

Introduction to S’mores Ice Cream Pie
There’s something magical about summer evenings, isn’t there? The sun sets, the air fills with laughter, and the sweet aroma of treats wafts through the backyard. That’s where S’mores Ice Cream Pie comes in—a delightful summer treat that captures the essence of those cozy campfire nights.
This recipe is perfect for anyone looking to impress friends or family without spending hours in the kitchen. With its creamy ice cream, crunchy graham cracker crust, and gooey marshmallows, it’s a quick solution for a busy day or a fun dessert for gatherings. Trust me, this pie will be the star of your summer celebrations!
Why You’ll Love This S’mores Ice Cream Pie
This S’mores Ice Cream Pie is a game-changer for summer desserts.
It’s incredibly easy to whip up, taking just a few simple steps.
The combination of creamy ice cream and crunchy graham cracker crust is pure bliss.
Plus, it’s a crowd-pleaser that brings smiles to faces young and old.
Whether you’re hosting a barbecue or just treating yourself, this pie is sure to impress without the fuss!
Ingredients for S’mores Ice Cream Pie
Creating the perfect S’mores Ice Cream Pie starts with gathering the right ingredients. Here’s what you’ll need:
- Graham cracker crumbs: These form the base of your pie, giving it that classic s’mores flavor. You can crush whole graham crackers if you prefer.
- Granulated sugar: A touch of sweetness to enhance the crust and balance the flavors.
- Unsalted butter: This adds richness and helps bind the crust together. Melt it for easy mixing.
- Vanilla ice cream: The star of the show! It provides a creamy texture and a sweet vanilla flavor. Feel free to swap it for chocolate ice cream for a richer taste.
- Mini marshmallows: These little puffs add that gooey s’mores experience. They’re fun and nostalgic!
- Chocolate chips: A must-have for that melty chocolate goodness. You can use dark, milk, or even white chocolate chips based on your preference.
- Hot fudge sauce: This decadent drizzle takes the pie to the next level. You can use store-bought or homemade for a personal touch.
- Whipped cream: A fluffy topping that adds lightness and a beautiful finish to each slice.
- Chocolate shavings or additional chocolate chips: These are optional but make for a lovely garnish that enhances the chocolatey flavor.
- Extra mini marshmallows: For topping, these add a fun and festive touch when serving.
For exact measurements, check the bottom of the article where you can find everything listed for easy printing. Enjoy the process of gathering these ingredients, as each one plays a vital role in creating this delightful summer treat!
How to Make S’mores Ice Cream Pie
Making S’mores Ice Cream Pie is a delightful journey that combines simple steps with delicious results. Let’s dive into the process!
Step 1: Preheat the Oven
Start by preheating your oven to 350°F.
This step is crucial because it ensures your crust bakes evenly.
A properly preheated oven helps achieve that perfect golden-brown crust, which is the foundation of your pie.
Step 2: Prepare the Crust
In a medium bowl, mix together the graham cracker crumbs, granulated sugar, and melted butter.
Stir until everything is well combined.
Now, here’s the key: press the mixture firmly into the bottom and up the sides of a 9-inch pie pan.
This creates a sturdy crust that holds all the delicious fillings.
Step 3: Bake the Crust
Place your crust in the preheated oven and bake for 8-10 minutes.
Keep an eye on it; you want it to be lightly golden.
This baking step enhances the flavor and texture, making it crispy and delightful.
Step 4: Mix the Ice Cream Filling
While the crust cools, grab a large bowl and mix the softened vanilla ice cream with mini marshmallows and chocolate chips.
Make sure everything is evenly distributed.
This combination is where the magic happens, blending creamy, gooey, and chocolatey goodness.
Step 5: Assemble the Pie
Pour the ice cream mixture into your cooled graham cracker crust.
Spread it evenly, then drizzle the hot fudge sauce over the top.
Use a knife or spatula to swirl it into the ice cream, creating a beautiful marbled effect.
Step 6: Freeze the Pie
Cover the pie with plastic wrap and place it in the freezer for at least 4 hours.
This step is essential for achieving that perfect texture.
You want it firm enough to slice but still creamy and delicious.
Step 7: Serve the Pie
When you’re ready to serve, remove the pie from the freezer and let it sit at room temperature for about 10 minutes.
This makes slicing easier.
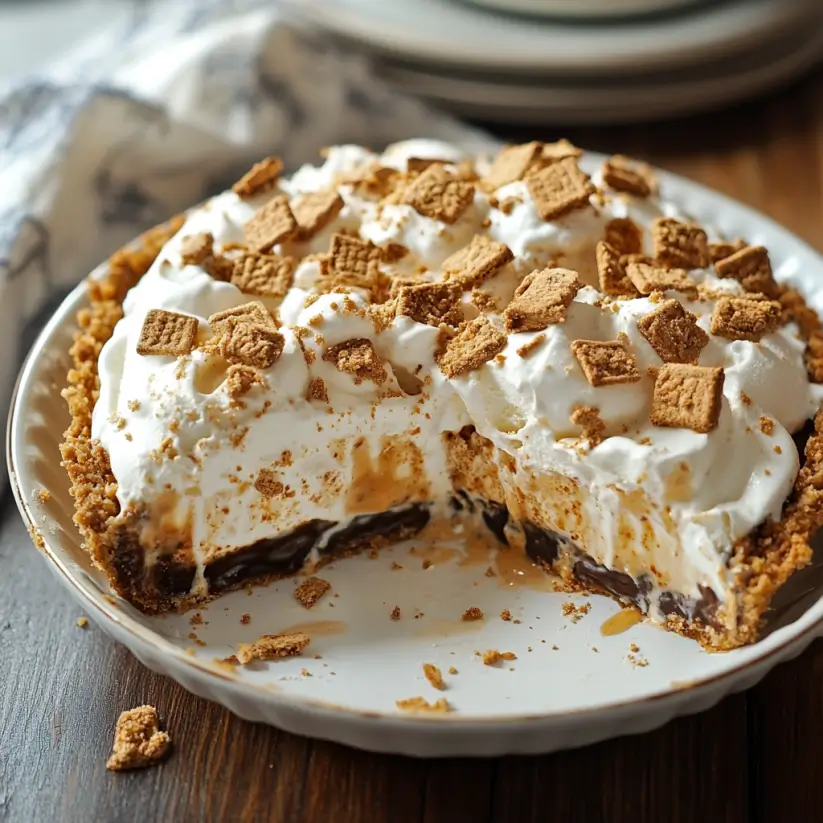
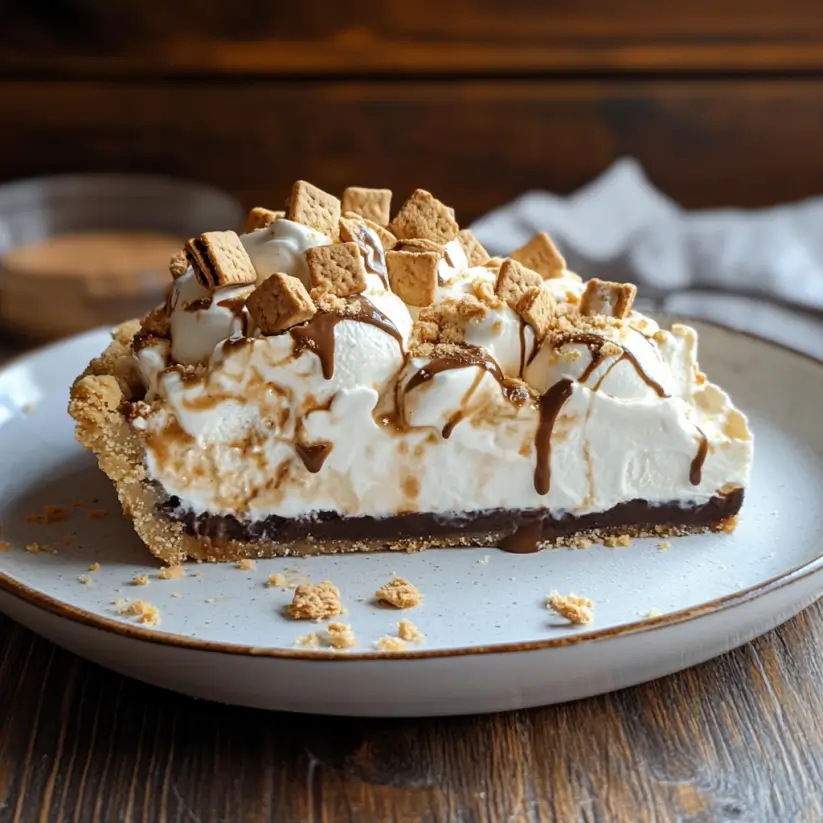
Top each slice with whipped cream, chocolate shavings, or extra mini marshmallows for that finishing touch.
Now, dig in and enjoy the smiles it brings!
Tips for Success
- Make sure your ice cream is softened for easy mixing; leave it out for about 10 minutes before starting.
- Press the crust firmly to avoid crumbling when slicing the pie.
- For a no-bake version, chill the crust in the fridge instead of baking.
- Experiment with different ice cream flavors for a unique twist.
- Use a hot knife to slice through the pie smoothly.
Equipment Needed
- 9-inch pie pan: A standard pie dish works best, but a springform pan can also be used for easy removal.
- Mixing bowls: Use medium and large bowls for mixing the crust and filling.
- Spatula: A rubber spatula is great for spreading the ice cream mixture evenly.
- Oven: Essential for baking the crust to perfection.
- Freezer: Necessary for setting the pie before serving.
Variations
- For a chocolate lover’s dream, swap the vanilla ice cream for chocolate ice cream and add chocolate fudge sauce.
- Try a peanut butter twist by mixing in creamy peanut butter with the ice cream filling for a nutty flavor.
- For a fruity touch, add crushed strawberries or raspberries to the ice cream mixture for a refreshing contrast.
- Make it gluten-free by using gluten-free graham cracker crumbs for the crust.
- For a vegan option, use dairy-free ice cream and coconut cream for the whipped topping.
Serving Suggestions
- Pair your S’mores Ice Cream Pie with a scoop of vanilla or chocolate ice cream for an extra treat.
- Serve alongside fresh berries for a refreshing contrast to the rich flavors.
- For drinks, consider iced coffee or a chilled glass of milk to complement the sweetness.
- Garnish with toasted marshmallows for a fun presentation that enhances the s’mores theme.
FAQs about S’mores Ice Cream Pie
Can I make S’mores Ice Cream Pie ahead of time?
Absolutely! This pie is perfect for making ahead. Just prepare it a day in advance and keep it in the freezer. It’ll be ready to serve when you are!
What if I don’t have graham cracker crumbs?
No worries! You can use crushed cookies like digestive biscuits or vanilla wafers as a substitute. They’ll still give you that delightful crust.
Can I use different flavors of ice cream?
Definitely! Feel free to experiment with flavors like chocolate, mint, or even cookie dough. Each variation will bring a unique twist to your S’mores Ice Cream Pie.
How do I store leftovers?
Store any leftover pie in the freezer, covered with plastic wrap or in an airtight container. It should stay fresh for up to a week, but trust me, it won’t last that long!
Is this recipe suitable for kids?
Yes! This S’mores Ice Cream Pie is a hit with kids and adults alike. Just be mindful of the mini marshmallows if you have younger children, as they can be a choking hazard.
Final Thoughts
Creating a S’mores Ice Cream Pie is more than just a recipe; it’s an experience that brings joy and nostalgia.
Each slice is a delightful reminder of summer nights spent around the campfire, sharing stories and laughter.
The combination of creamy ice cream, crunchy crust, and gooey marshmallows creates a symphony of flavors that dance on your taste buds.
Whether you’re serving it at a backyard barbecue or enjoying a quiet evening at home, this pie is sure to spark smiles and create lasting memories.
So grab your ingredients and let the fun begin!
S'mores Ice Cream Pie: A Delightful Summer Treat!
Ingredients
Method
- Preheat your oven to 350°F.
- In a medium bowl, combine graham cracker crumbs, granulated sugar, and melted butter. Mix until well combined.
- Press the mixture firmly into the bottom and up the sides of a 9-inch pie pan.
- Bake for 8-10 minutes until lightly golden. Remove from the oven and let cool completely.
- In a large bowl, mix the softened vanilla ice cream with mini marshmallows and chocolate chips until evenly distributed.
- Pour the mixture into the cooled graham cracker crust and spread it evenly.
- Drizzle the hot fudge sauce over the top and use a knife or spatula to swirl it into the ice cream.
- Cover the pie with plastic wrap and freeze for at least 4 hours, or until firm.
- Once frozen, remove the pie from the freezer and let it sit at room temperature for about 10 minutes before slicing.
- Top each slice with whipped cream, chocolate shavings or additional chocolate chips, and a sprinkle of mini marshmallows before serving.
Nutrition
Notes
- For a richer flavor, use chocolate ice cream instead of vanilla.
- You can also add crushed nuts or toffee bits for added texture.
- If you prefer a no-bake option, skip the baking step for the crust and chill it in the refrigerator until set.