

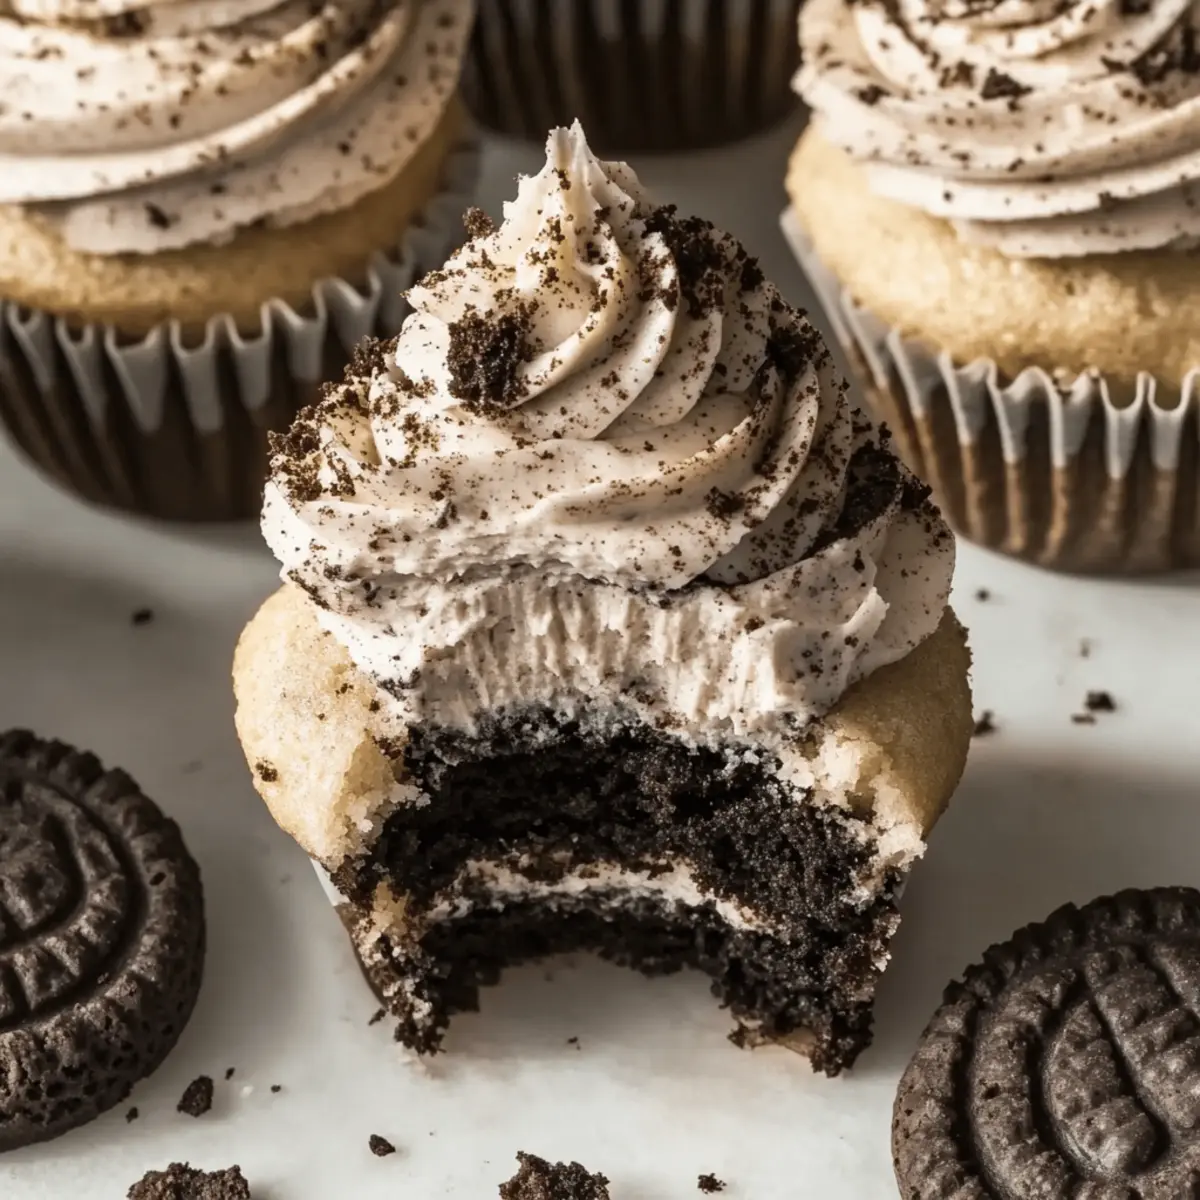
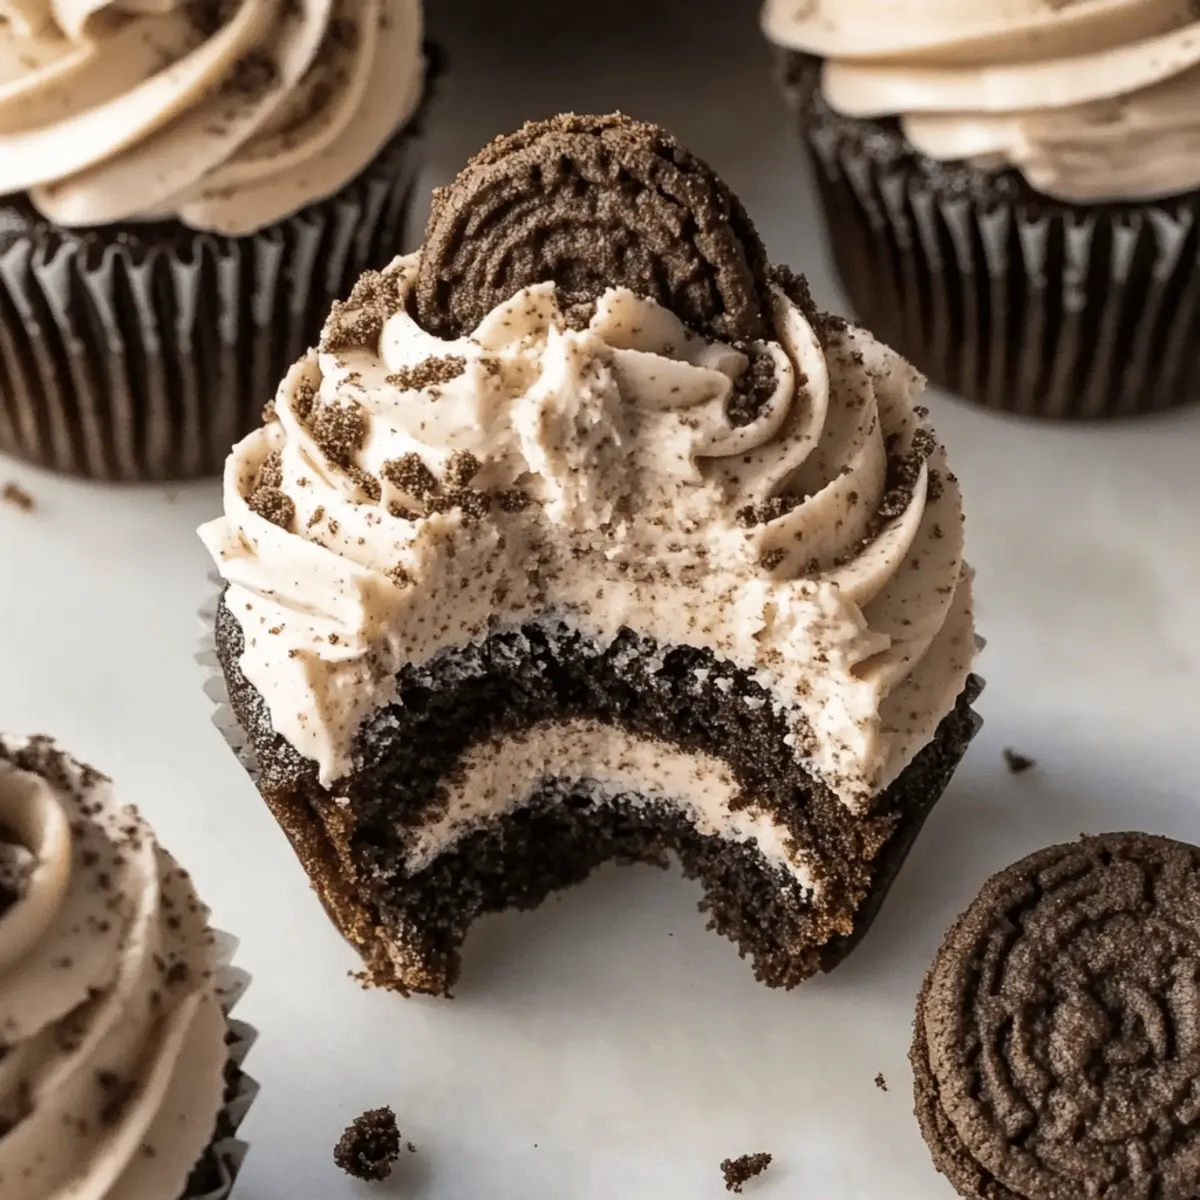
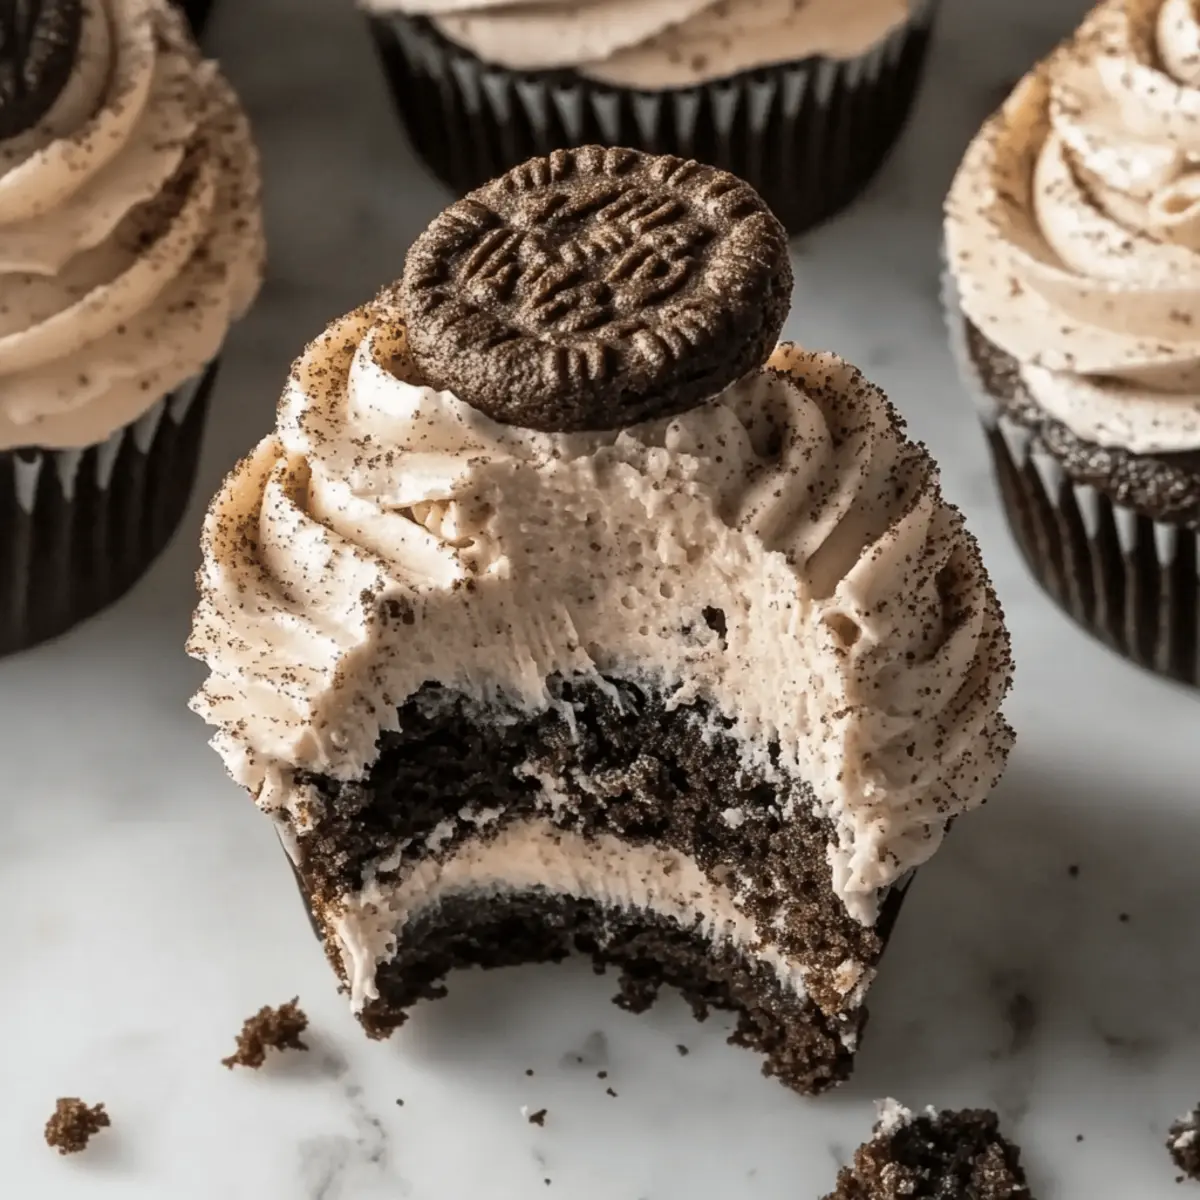
As I stood in my kitchen, surrounded by the comforting scent of baking cupcakes, I had a delightful revelation—Gluten-Free Cookies & Cream Cupcakes are a game changer for dessert lovers. These scrumptious little wonders feature a rich chocolate sandwich cookie nestled at the bottom, and are topped with a luscious cookies & cream buttercream frosting that dreams are made of. Not only are these treats gluten-free, but they’re also incredibly simple to prepare, perfect for anyone tired of fast food and looking to indulge in homemade goodness. Whether you’re hosting a gathering or treating yourself after a long day, these cupcakes will bring smiles to faces and joy to taste buds. Curious about how you can whip up these easy crowd-pleasers in your own kitchen? Let’s dive in!
Why make Gluten-Free Cookies & Cream Cupcakes?
Decadent Indulgence: Each bite of these cupcakes offers a harmonious blend of fluffy vanilla cake and rich chocolate cookie, making them utterly irresistible.
Quick and Easy: With simple ingredients and straightforward steps, anyone can create these delicious treats without spending hours in the kitchen.
Gluten-Free Delight: Perfect for those with gluten sensitivities, everyone can enjoy these delightful cupcakes without sacrificing flavor.
Customizable Options: Want to mix things up? Swap in different cookie flavors or add chocolate chips for a unique twist.
Party Perfect: Ideal for celebrations and gatherings, these cupcakes are sure to impress your guests and leave them asking for more.
For more delightful treats, check out my Chocolate Cranberry Cookies or even a refreshing Pumpkin Cream Cold Brew Coffee to accompany these sweet desserts!
Gluten-Free Cookies & Cream Cupcakes Ingredients
Here’s everything you need to bring these irresistible gluten-free treats to life!
For the Cupcakes
- Butter – Softened, adds richness and moisture to the cupcakes. Substitution: Use dairy-free butter for a vegan option.
- Oil – Coconut or vegetable, enhances the moisture and richness of the batter. No substitutions necessary, but can use applesauce for lower fat content.
- Granulated Sugar – Sweetens the batter, creating a balanced flavor. No substitutions; however, coconut sugar may be used for a lower glycemic index.
- Egg Whites – Acts as a binding agent, providing structure. Can substitute with aquafaba or flaxseed mixture for vegan options.
- Sour Cream – Contributes moisture and a tangy flavor. Substitution: Greek yogurt or dairy-free yogurt.
- Milk – Combined with sour cream, it adds creaminess. Use any plant-based milk as a substitute.
- Vanilla Extract – Enhances sweetness and flavor depth. No direct substitution recommended; however, almond extract may be used for variation.
- Gluten-Free Flour – Essential for structure; provides the body of the cupcakes. Substitution: A 1:1 gluten-free baking blend may be used.
- Baking Powder – Leavening agent for rise and fluffiness. Check expiration date; no substitutions.
- Salt – Balances flavors and enhances sweetness. No substitutions necessary.
- Crushed Gluten-Free Chocolate Sandwich Cookies – Adds flavor and texture to the batter. Use different gluten-free cookie varieties for flavor twists.
For the Frosting
- Butter – Softened, central for creamy frosting. Dairy-free options available.
- Cream Cheese – Adds smoothness and tang to the frosting. Substitution: Dairy-free cream cheese or coconut cream for vegan option.
- Powdered Sugar – Sweetens and thickens the frosting. No direct substitutions; however, powdered erythritol can be used for a low-sugar version.
- Vanilla Extract – Enhances overall flavor. Substitution: Almond extract for a different taste.
- Heavy Cream or Milk – Adjusts the consistency of frosting. Non-dairy alternatives can be used.
Step‑by‑Step Instructions for Gluten-Free Cookies & Cream Cupcakes
Step 1: Preheat the Oven
Begin your baking adventure by preheating your oven to 350°F (175°C). This ensures the perfect environment for your Gluten-Free Cookies & Cream Cupcakes to rise beautifully. While the oven heats up, gather your mixing bowls and measuring utensils, setting the stage for a delightful culinary experience.
Step 2: Cream Butter and Sugar
In a large mixing bowl, combine the softened butter, oil, and granulated sugar. Using an electric mixer, beat the ingredients together on medium speed until the mixture is creamy and fluffy, about 2–3 minutes. This step is crucial as it incorporates air, giving your cupcakes a light texture.
Step 3: Incorporate Wet Ingredients
Next, add the egg whites one at a time, mixing well after each addition until fully incorporated. Then, stir in the sour cream, milk, and vanilla extract until the mixture is smooth and well-blended. Feel free to scrape down the sides of the bowl to ensure everything is mixed evenly.
Step 4: Combine Dry Ingredients
In a separate bowl, sift together the gluten-free flour, baking powder, and salt. This process helps aerate the flour and combines the leavening agent evenly throughout. Gradually add the dry mixture into the wet ingredients while mixing on low speed until just combined and free of lumps.
Step 5: Fold in Cookies
Gently fold the crushed gluten-free chocolate sandwich cookies into the batter using a spatula. This will add a delightful crunch and rich flavor to your cupcakes. Make sure not to overmix; you want those cookie bits to remain intact for that Cookies & Cream experience.
Step 6: Prepare the Cupcake Pan
Line a cupcake pan with paper liners and place one whole chocolate sandwich cookie at the bottom of each liner. This hidden treat adds surprise and richness to each cupcake. Ensure the liners are secure, ready to be filled with the delicious batter.
Step 7: Fill with Batter
Using a spoon or a scoop, fill each cupcake liner with batter, filling them about three-quarters full. This volume allows room for the cupcakes to rise while baking. Take a moment to smooth the tops with a spatula for an even bake.
Step 8: Bake the Cupcakes
Carefully place the filled cupcake pan into the preheated oven. Bake for about 22 minutes or until a toothpick inserted in the center comes out clean. The tops should be slight golden brown and spring back when gently pressed.
Step 9: Cool the Cupcakes
Once baked, remove the pan from the oven and allow the cupcakes to cool in the pan for 8–10 minutes. This resting period helps them set properly. Afterward, transfer the cupcakes to a wire rack to cool completely before frosting.
Step 10: Make the Frosting
In a mixing bowl, beat together the softened butter and cream cheese until the mixture is creamy and smooth, about 2 minutes. Gradually mix in the powdered sugar, vanilla extract, and enough heavy cream to reach your desired frosting consistency.
Step 11: Fold in Cookies for Frosting
Once your frosting is ready, fold in the remaining crushed cookies. This will give your frosting that delightful cookies and cream flavor. You can either frost the cupcakes using a knife for a rustic look or use a piping bag for elegant decoration.
Step 12: Decorate and Serve
Once the cupcakes are completely cool and frosted, they are ready to serve! These Gluten-Free Cookies & Cream Cupcakes are perfect for sharing at parties, celebrations, or just as a sweet treat for yourself. Enjoy the delightful mix of flavors!
Gluten-Free Cookies & Cream Cupcakes Variations
Customize your Gluten-Free Cookies & Cream Cupcakes and take them to the next level with these fun and delicious variations!
- Dairy-Free: Substitute dairy butter and cream cheese with coconut or almond options for an entirely vegan and dairy-free treat.
- Flavor Twist: Swap crushed chocolate cookies for vanilla or peanut butter cookies to explore exciting new flavor profiles!
- Mini Choco Chips: Add mini chocolate chips to the batter before baking for an extra dimension of indulgence in every bite.
- Nutty Crunch: Incorporate finely chopped nuts, like pecans or walnuts, into the batter for a delightful crunchy texture.
- Fruity Fun: Add some fresh berries into the batter for a fruity surprise that adds a refreshing contrast to the sweet frosting.
- Herbal Note: A sprinkle of mint extract in the frosting can give your cupcakes a delightful minty refresh without overwhelming the original flavor.
- Spicy Kick: Sprinkle a bit of cinnamon or cayenne pepper into the batter for a warm, spicy twist that will surprise your palate.
- Decadent Drizzle: Top the cupcakes with a drizzle of chocolate ganache or caramel sauce for an elegant touch that enhances their appeal.
With any of these variations, your cupcakes will always be a hit—like pairing them with my light and creamy Chicken Fettuccine Alfredo for a complete meal experience!
What to Serve with Gluten-Free Cookies & Cream Cupcakes
Indulging in these delightful treats opens the door to a world of sweet pairings that will make your dessert experience unforgettable.
-
Classic Milk: The creamy richness of dairy or plant-based milk enhances the flavors while balancing the sweetness of the cupcakes.
-
Iced Coffee: A splash of cold coffee provides a delightful contrast to the sweetness, creating a perfect afternoon treat.
-
Fresh Berries: Vibrant strawberries or raspberries offer a refreshing tartness that cuts through the richness of the frosting.
-
Vanilla Ice Cream: A scoop of creamy vanilla ice cream melts seamlessly over the warm cupcake, creating a dreamy dessert experience.
-
Chocolate Sauce: Drizzling warm chocolate sauce adds an extra depth of flavor, transforming the cupcakes into an indulgent treat.
Imagine a cozy gathering where people savor each cupcake, and every bite is accompanied by laughter and joy. Pairing these cupcakes with your favorite beverages or fresh fruits can elevate the experience and create lasting memories.
-
Whipped Cream: Light and airy, whipped cream can be dolloped on top to add an extra layer of luxury.
-
Fruit Tart: For a party spread, a fruit tart introduces a colorful, refreshing option that complements the cupcakes’ rich chocolate flavor beautifully.
-
Sparkling Water: A bubbly drink can cleanse the palate between bites, allowing the rich flavors of the cupcakes to shine even more brightly.
-
Brownies or Bars: A plate of fudgy brownies or lemon bars creates a delightful variety and satisfies different taste preferences among your guests.
Expert Tips for Gluten-Free Cookies & Cream Cupcakes
-
Room Temperature Ingredients: Ensure butter and cream cheese are at room temperature for optimal mixing. This helps create a creamy, lump-free frosting.
-
Crushing Cookies: Use a food processor or place cookies in a ziplock bag and crush using a rolling pin. Aim for a fine crumb to incorporate smoothly into your batter.
-
Fresh Baking Powder: Double-check that your baking powder is fresh. Expired baking powder can lead to dense cupcakes that sink rather than rise beautifully.
-
Frosting Technique: For a polished finish, use a piping bag fitted with a Wilton 1M tip to frost your cupcakes. This simple tool gives your cupcakes a professional look.
-
Customize Flavor: Experiment with different crushed gluten-free cookie flavors or add mini chocolate chips to the cupcake batter for a delightful twist on these cookies & cream cupcakes.
Make Ahead Options
These Gluten-Free Cookies & Cream Cupcakes are fantastic for meal prep enthusiasts! You can prepare the cupcake batter up to 24 hours in advance by mixing all wet and dry ingredients and storing it in the refrigerator. Additionally, you can bake the cupcakes ahead and cool them completely, storing them in an airtight container for up to 3 days. For the frosting, whip it up and keep it in the fridge until you’re ready to use it; just allow it to soften for a few minutes before frosting your cupcakes. When it’s time to serve, simply frost and enjoy fresh, delightful cupcakes that are just as delicious as if made the same day!
How to Store and Freeze Gluten-Free Cookies & Cream Cupcakes
Fridge: Store leftovers in an airtight container in the fridge for up to 3-5 days, keeping them fresh and delicious.
Freezer: For longer storage, freeze cupcakes individually wrapped in plastic wrap and aluminum foil for up to 2 months.
Reheating: Thaw in the fridge overnight or microwave for 10-15 seconds for a quick treat, but avoid direct heat to maintain their moist texture.
Frosting Storage: Keep any leftover cookies & cream buttercream frosting in an airtight container in the fridge for up to 1 week; rewhip before using.

Gluten-Free Cookies & Cream Cupcakes Recipe FAQs
How do I select the right gluten-free flour?
When choosing gluten-free flour, look for blends that contain a mix of starches and whole grains for the best texture. A 1:1 gluten-free baking blend usually works great for this recipe. I often recommend checking labels for a blend that includes xanthan gum, which can help mimic the elasticity found in traditional flour.
How should I store my Gluten-Free Cookies & Cream Cupcakes?
To keep your cupcakes fresh, store them in an airtight container in the refrigerator for 3-5 days. If you would like them to last longer, you can freeze them. Just wrap each cupcake individually in plastic wrap, then place them in an airtight container or freezer bag. They can be stored in the freezer for up to 2 months!
Can I freeze the cupcakes after frosting?
Absolutely! To freeze, place the frosted cupcakes on a baking sheet to firm up for about an hour, then wrap each one individually in plastic wrap, followed by aluminum foil. This helps maintain their moisture and flavor. When you’re ready to enjoy, thaw them in the refrigerator overnight or microwave them for a quick microwave treat!
What should I do if my cupcakes sink in the middle?
If your cupcakes sink, it’s often due to overmixing the batter or using expired baking powder. Ensure you only mix until combined and check your baking powder’s expiration date before starting. Also, make sure not to open the oven door too soon during baking, as the temperature drop can cause sinking.
Is this recipe safe for nut allergies?
The Gluten-Free Cookies & Cream Cupcakes can be made nut-free by using specific substitutes. For instance, if you use a dairy-free butter and avoid almond extracts, you can cater to those with nut allergies. Always check labels for cross-contamination if you’re serving anyone with severe allergic reactions.
What can I substitute for sour cream in the cupcakes?
If you don’t have sour cream on hand, you can use Greek yogurt or a dairy-free yogurt as a substitute. Both options provide similar moisture and tang to the cupcakes. For a lower-fat option, try using applesauce or more plant-based milk, but this may slightly alter the richness of the flavor.
Irresistible Gluten-Free Cookies & Cream Cupcakes to Indulge!
Ingredients
Equipment
Method
- Preheat your oven to 350°F (175°C).
- In a large mixing bowl, combine the softened butter, oil, and granulated sugar. Beat until creamy and fluffy, about 2–3 minutes.
- Add the egg whites one at a time, mixing well after each. Stir in the sour cream, milk, and vanilla extract until smooth.
- Sift together the gluten-free flour, baking powder, and salt in a separate bowl. Gradually mix into the wet ingredients until just combined.
- Gently fold in the crushed gluten-free chocolate sandwich cookies.
- Line a cupcake pan with paper liners and place one whole chocolate sandwich cookie at the bottom of each liner.
- Fill each liner about three-quarters full with batter.
- Bake for about 22 minutes or until a toothpick inserted comes out clean.
- Allow the cupcakes to cool in the pan for 8–10 minutes, then transfer to a wire rack to cool completely.
- Beat together the softened butter and cream cheese until creamy. Gradually mix in the powdered sugar, vanilla extract, and heavy cream.
- Fold in the remaining crushed cookies into the frosting.
- Frost the cooled cupcakes and serve.