

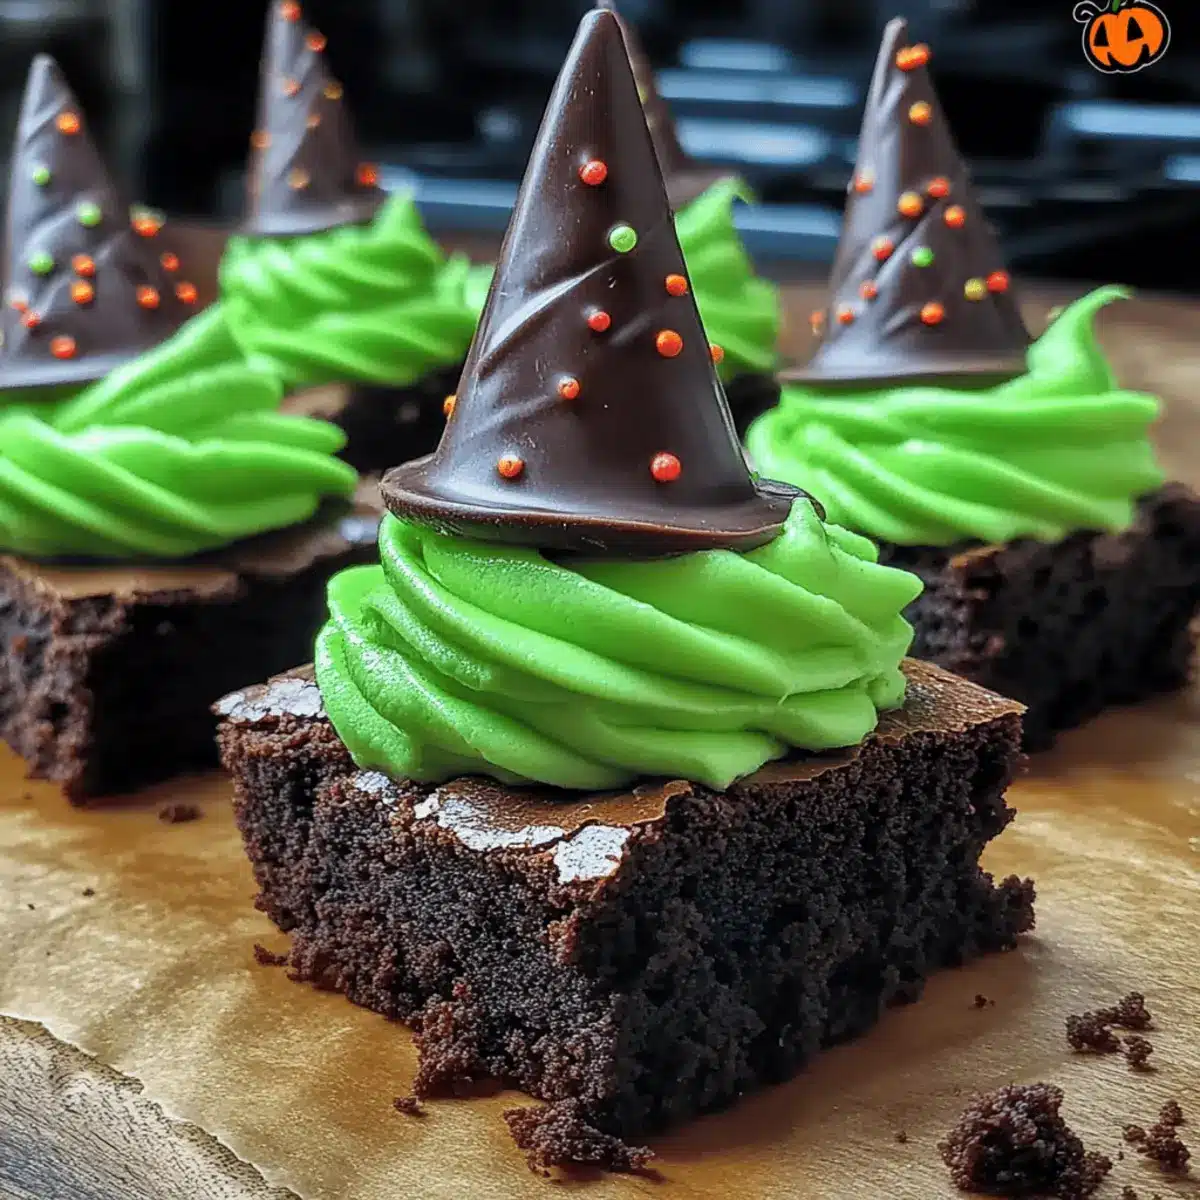
As I rummaged through my kitchen cabinets, an idea sparked that would ignite our Halloween festivities—Wicked Witch Hat Brownies! With their rich chocolatey goodness and whimsical presentation, these brownies turn an ordinary dessert into a playful treat that’s perfect for both kids and adults. Not only are they visually striking, topped with adorable chocolate ice cream cone hats, but they are also incredibly easy to whip up, making them the ideal choice for last-minute preparations. Whether you’re gearing up for a spooky party or a cozy family gathering, these fudgy brownies deliver a crowd-pleasing delight that will leave everyone reaching for seconds. Are you ready to enchant your guests with a dessert that’s both delicious and fun? Let’s dive into this enchanting recipe!

Why Are Wicked Witch Hat Brownies a Must-Try?
Fun and Festive: Transform any Halloween gathering with these playful brownies that are sure to become a hit! Decadent Flavor: Each bite offers a rich chocolate experience, perfectly complemented by a creamy frosting. Creative Presentation: The whimsical witch hats made from ice cream cones are not just adorable but also a conversation starter. Quick and Easy: Only a few steps stand between you and this delightful treat, making it perfect for last-minute baking. Crowd-Pleaser: Ideal for all ages, these brownies will impress kids and adults alike. For other festive inspirations, check out my Fudgy Brownies Indulge or try making these Patriotic Star Brownies as well!
Wicked Witch Hat Brownies Ingredients
For the Brownies
- Unsalted Butter – 1 cup (225g); adds moisture and richness; substitute with vegan butter for a dairy-free option.
- Granulated Sugar – 2 cups (400g); provides sweetness; brown sugar can be used for a deeper flavor.
- Eggs – 4 large; binder that adds structure; for a vegan substitute, use flaxseed meal or applesauce (1 egg = 1 Tbsp flaxseed meal + 3 Tbsp water).
- Vanilla Extract – 1 teaspoon; enhances flavor; can be replaced with almond extract for a different note.
- All-Purpose Flour – 1 cup (125g); provides structure; swap with gluten-free flour blend for gluten-free brownies.
- Unsweetened Cocoa Powder – 1 cup (90g); adds chocolate flavor; Dutch-processed cocoa can provide a milder taste.
- Salt – 1/2 teaspoon; balances sweetness; no substitute needed.
- Baking Powder – 1/2 teaspoon; leavens the brownies; ensure it’s fresh for effective rising.
For the Witch Hats
- Chocolate Ice Cream Cones – 12; forms the “witch hats”; any brand works, or mini cones for smaller treats.
- Halloween-themed Sprinkles – For decoration; adds festive flair; use any seasonal sprinkles for variety.
For the Frosting
- Powdered Sugar – 2 cups (300g); main component for frosting, adds sweetness; no significant substitutes.
- Milk – 1/4 cup (60ml); adds creaminess to frosting; substitute with almond milk for a dairy-free option.
- Green Food Coloring – To desired shade; for visual appeal; can leave out for a more natural look.
Step‑by‑Step Instructions for Wicked Witch Hat Brownies
Step 1: Prepare Brownie Batter
Begin by melting the unsalted butter in a saucepan over low heat until fully liquid, then allow it to cool slightly. In a large mixing bowl, combine the melted butter with the granulated sugar, stirring until smooth and creamy. Next, beat in the eggs one at a time, ensuring each is fully incorporated before adding the vanilla extract for that delightful flavor.
Step 2: Combine Dry Ingredients
In a separate bowl, whisk together the all-purpose flour, unsweetened cocoa powder, salt, and baking powder. Gradually mix this dry blend into the wet ingredients, stirring gently until just combined. Be cautious not to overmix; the goal is to maintain that fudgy texture characteristic of our Wicked Witch Hat Brownies.
Step 3: Bake
Pour the brownie batter into a greased 9×13 inch baking pan, spreading it evenly to ensure uniform baking. Preheat your oven to 350°F (175°C) and bake for 25-30 minutes. To check for doneness, insert a toothpick; it should come out with a few moist crumbs—this indicates the perfect fudginess. Allow the brownies to cool completely in the pan on a wire rack.
Step 4: Prepare Witch Hats
While the brownies are cooling, enhance your chocolate ice cream cones by dipping the tops in melted chocolate and then sprinkling with Halloween-themed sprinkles if desired. This step adds a festive touch and makes your witch hats pop with color and fun, ready to crown your delicious brownies.
Step 5: Frost Brownies
In a mixing bowl, combine the powdered sugar, milk, vanilla extract, and green food coloring to create a vibrant frosting. Mix until smooth and uniform. Once the brownies are completely cool, spread this delightful green frosting evenly over the top, allowing it to be thick and luscious—just like the Wicked Witch Hat Brownies deserve!
Step 6: Assemble
Finally, it’s time for the fun part! Place an upside-down ice cream cone onto each frosted brownie, creating the whimsical witch hats. Sprinkle some additional Halloween-themed sprinkles on top for that extra festive flair. Stand back and admire your creation; these delightful Wicked Witch Hat Brownies are sure to enchant everyone at your Halloween gathering!
Tips for the Best Wicked Witch Hat Brownies
- Check Freshness: Ensure your baking powder is fresh for proper rising; stale baking powder can lead to dense brownies.
- Room Temperature Eggs: Using eggs at room temperature helps them incorporate smoothly into the batter, ensuring that your Wicked Witch Hat Brownies have that desirable fudgy texture.
- Don’t Overmix: Gently combine wet and dry ingredients; overmixing can lead to tough brownies instead of the soft, rich consistency we aim for.
- Cool Completely: Let the brownies cool fully before frosting them. This prevents the frosting from melting and sliding off, ensuring a beautiful presentation.
- Customization: Don’t hesitate to get creative with toppings! Add nuts or use different-colored sprinkles to personalize your Wicked Witch Hat Brownies for your Halloween theme.
Storage Tips for Wicked Witch Hat Brownies
Room Temperature: Store brownies in an airtight container at room temperature for up to 4-5 days to maintain their fudgy texture.
Fridge: If you prefer a chilled treat, keep the brownies in the fridge for up to a week, but allow them to come to room temperature before serving for optimal taste.
Freezer: For long-term storage, freeze brownies in an airtight container for up to 3 months. Thaw at room temperature for a few hours before enjoying your Wicked Witch Hat Brownies again.
Reheating: If you want to warm them up, place the brownies in the microwave for about 10-15 seconds—just until slightly warm, being careful not to overheat.
Make Ahead Options
These Wicked Witch Hat Brownies are perfect for busy home cooks who want to save time during the Halloween rush! You can prepare the brownie batter up to 24 hours in advance by mixing it according to the instructions and refrigerating it in an airtight container. The baked brownies can also be made ahead of time; just cool them completely and store them at room temperature for up to 3 days. When you’re ready to serve, simply frost the cooled brownies and top them with the witch hats just before your guests arrive to keep everything fresh and delicious. This way, you can enjoy the festivities without the last-minute baking stress!
What to Serve with Wicked Witch Hat Brownies
Indulge in the playful spirit of Halloween with delightful sides and drinks that elevate your spooky dessert experience.
- Pumpkin Spice Lattes: This seasonal favorite’s warm spices beautifully enhance the rich chocolate of the brownies, creating a cozy pairing.
- Cold Milk: A classic choice; the creamy, coolness contrasts the fudgy brownies while balancing the sweetness for a perfect bite.
- Spooky Fruit Skewers: Add a fresh element with fruit cut into Halloween shapes; it lightens the meal and adds vibrant colors to the plate.
Try combining the fruit with a yogurt dip for an added layer of flavor and fun!
-
Ghostly Meringues: These light and airy meringue cookies create a delightful textural contrast to the dense brownies while adding to your Halloween theme.
-
Chocolate-Covered Pretzels: Salty meets sweet in this fun snack! Their crunchiness complements the softness of the brownies, keeping the texture varied and engaging.
-
Apple Cider: Whether hot or cold, this drink brings a delightful fall flavor to the table, enhancing the overall festive experience of your gathering.
-
Decorated Sugar Cookies: Adorned with Halloween themes, these cookies make for a festive accompaniment, offering another sweet treat with a different texture.
Embrace these delightful pairings for a Halloween spread that will enchant everyone!
Wicked Witch Hat Brownies Variations
Feel free to put your own spin on these delightful brownies with a few simple twists and substitutions!
-
Gluten-Free Version: Substitute all-purpose flour for a gluten-free blend containing xanthan gum for a delicious alternative.
-
Vegan Option: Replace eggs with flaxseed meal and butter with a vegan alternative while ensuring all other ingredients are plant-based.
-
Nutty Addition: Fold in 1 cup of chopped walnuts or pecans into the brownie batter for an added crunch and flavor boost.
-
Spicy Kick: Add a pinch of cayenne pepper or cinnamon to the brownie batter for a surprising warm spice that complements the chocolate perfectly.
-
Minty Twist: Incorporate 1 teaspoon of peppermint extract into the frosting for a refreshing mint flavor that pairs beautifully with chocolate.
-
Colorful Sprinkles: Switch up the Halloween-themed sprinkles with colorful or seasonal ones for a more festive look. You might even try adding edible glitter for an extra magical touch!
-
Fruity Infusion: Incorporate a handful of chocolate-covered cherries or raspberries on top of the frosting before placing the witch hats to add a burst of fruity flavor.
-
Peanut Butter Swirl: Swirl warmed peanut butter into the brownie batter before baking for a rich, creamy contrast that many adore.
Whichever variation you choose, it’ll surely put a smile on the faces of your guests! For more delicious brownie inspiration, don’t miss out on my Fudgy Brownies Indulge or consider trying these Patriotic Star Brownies. Your Halloween treats are about to get elevated in flavor and fun!
Wicked Witch Hat Brownies Recipe FAQs
How do I choose the best ingredients for my Wicked Witch Hat Brownies?
Absolutely! When selecting ingredients, opt for fresh, high-quality unsalted butter and granulated sugar to ensure a rich flavor. For the cocoa powder, choose unsweetened or Dutch-processed versions depending on your taste preference. Imported Dutch cocoa will offer a smoother taste, while regular unsweetened cocoa packs a punch of intense chocolate flavor. For eggs, look for large, fresh eggs, and consider using organic options for a more wholesome treat.
How should I store my Wicked Witch Hat Brownies?
To keep those brownies fresh, store them in an airtight container at room temperature for up to 4-5 days. If you want to extend their shelf life, you can refrigerate them for about a week—just remember to bring them back to room temperature before serving for that perfect fudgy experience. Alternatively, they can be frozen, where they’ll last for up to 3 months. Just place them in an airtight container and thaw at room temperature when you’re ready to enjoy.
Can I freeze Wicked Witch Hat Brownies?
Certainly! To freeze your Wicked Witch Hat Brownies, first, let them cool completely. Cut them into squares and wrap each piece tightly with plastic wrap or aluminum foil. Then, place them in an airtight freezer-safe container. This way, they’ll maintain their flavor and texture while frozen. When you’re ready to indulge, simply thaw them at room temperature for a couple of hours or microwave for 10-15 seconds for a warm treat.
What if my brownies turned out too dry?
If your brownies are too dry, don’t fret; this can happen for a few reasons, such as overbaking or using too much flour. To remedy this, always check for doneness at the 25-minute mark by inserting a toothpick—look for a few moist crumbs. If they seem dry post-baking, you can revive them by covering them with a damp paper towel and microwaving for a few seconds. For future batches, ensure you’re measuring your flour correctly; spooning it into the measuring cup instead of scooping can help maintain the right consistency.
Are Wicked Witch Hat Brownies suitable for those with dietary restrictions?
Very! This recipe is quite versatile. For vegan options, swap the eggs with flaxseed meal or applesauce, and use plant-based butter and milk. If you’re avoiding gluten, use a gluten-free flour blend to replace the all-purpose flour. Always check labels for any specific allergens, especially with your decorations like sprinkles and cones. It’s so wonderful to gather friends and family for Halloween treats while catering to everyone’s dietary needs!
Wicked Witch Hat Brownies: A Fun Halloween Delight!
Ingredients
Equipment
Method
- Begin by melting the unsalted butter in a saucepan over low heat until fully liquid, then allow it to cool slightly.
- In a large mixing bowl, combine the melted butter with the granulated sugar, stirring until smooth and creamy.
- Next, beat in the eggs one at a time, ensuring each is fully incorporated before adding the vanilla extract.
- In a separate bowl, whisk together the all-purpose flour, unsweetened cocoa powder, salt, and baking powder.
- Gradually mix this dry blend into the wet ingredients, stirring gently until just combined.
- Pour the brownie batter into a greased 9x13 inch baking pan, spreading it evenly.
- Preheat your oven to 350°F (175°C) and bake for 25-30 minutes, checking for doneness with a toothpick.
- Allow the brownies to cool completely in the pan on a wire rack.
- Enhance your chocolate ice cream cones by dipping the tops in melted chocolate and then sprinkling with Halloween-themed sprinkles if desired.
- In a mixing bowl, combine the powdered sugar, milk, vanilla extract, and green food coloring to create a vibrant frosting.
- Once the brownies are completely cool, spread the frosting evenly over the top.
- Place an upside-down ice cream cone onto each frosted brownie, creating the whimsical witch hats.
- Sprinkle additional Halloween-themed sprinkles on top for extra festive flair.