

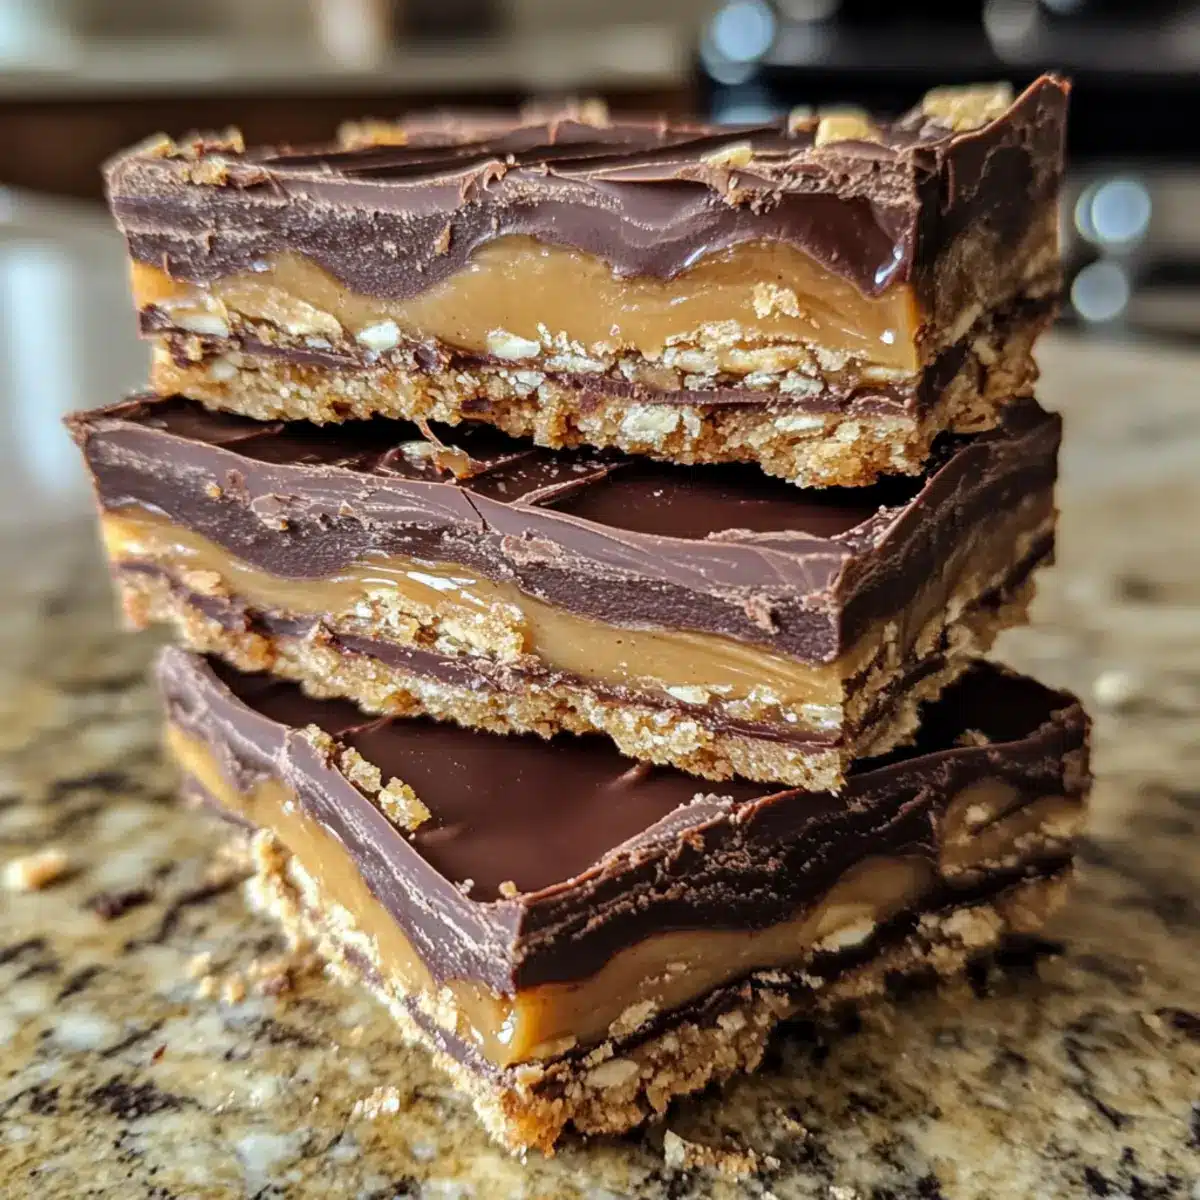
As I stood in my kitchen, measuring out coconut flour and almond butter, a wave of nostalgia hit me—the sweet, crunchy magic of Twix bars from childhood flooded back. But this time, I’m whipping up a guilt-free version: Healthy Twix Bars that embrace the joy of indulgence without any of the sugar-laden guilt. These delightful layers of crunchy shortbread, smooth caramel, and rich chocolate are not just tasty; they’re also gluten-free, dairy-free, and refined sugar-free, making them perfect for anyone looking to satisfy their sweet tooth in a healthier way. Imagine sharing these with friends at get-togethers or enjoying them as a post-workout treat! Curious how to bring this healthier twist to life? Let’s dive in!
Why Are Healthy Twix Bars So Irresistible?
Nostalgic Flavor: These bars capture the beloved taste of classic Twix while using wholesome ingredients to keep it guilt-free.
Endless Variations: With options to customize using different nut butters and sweeteners, you can make them your own!
No Guilt Indulgence: Satisfy your cravings knowing these treats are gluten-free, dairy-free, and refined sugar-free.
Effortless Preparation: Whipping up these bars is surprisingly simple—perfect for both novice and experienced bakers!
Perfect for Sharing: Whether at parties or as a post-workout snack, these bars are sure to impress family and friends alike.
If you love delicious yet healthy snacks, don’t forget to try Avocado Smoothie Healthy for a refreshing treat to complement your dessert!
Healthy Twix Bars Ingredients
• Whip up these delightful Healthy Twix Bars with wholesome ingredients!
For the Shortbread Base
- Coconut Flour – Provides a gluten-free base; consider using almond flour or oat flour for different textures.
- Almond Flour – Adds nutty flavor and structure; can be substituted with cashew flour if needed.
- Coconut Oil – Ensures moisture and binds ingredients; use vegan butter if you’re out of coconut oil.
- Honey (warmed) – Natural sweetener that helps bind the base; maple syrup is a great vegan alternative.
For the Caramel Layer
- Almond Butter – Creates a creamy caramel layer; peanut butter or sunflower seed butter work well too.
- Vanilla Extract – Enhances the overall flavor; omit if there are allergy concerns.
- Maple Syrup – Adds sweetness to the caramel; agave syrup can be used instead.
- Sea Salt – Balances the sweetness and enhances flavors; feel free to use coarse or flaky varieties.
For the Chocolate Coating
- Dark Chocolate Bar or Chips – Offers a luscious outer layer; opt for dairy-free chocolate for stricter dietary needs.
- Coconut Oil – Helps the chocolate melt smoothly for a glossy finish; essential for that perfect coating.
With these ingredients on hand, you’re just a few steps away from enjoying sumptuous Healthy Twix Bars that are sure to satisfy your sweet cravings without the guilt!
Step‑by‑Step Instructions for Healthy Twix Bars
Step 1: Preheat and Prepare
Begin by preheating your oven to 350°F (175°C). While the oven warms up, gather a large mixing bowl and combine coconut flour and almond flour. Melt coconut oil and warm honey; then pour them into the bowl, mixing until you achieve a cohesive dough. This mixture will form the base of your delicious Healthy Twix Bars.
Step 2: Form the Shortbread Layer
Line a 6×6 inch baking dish with parchment paper for easy removal. Once prepped, pour the shortbread mixture into the lined dish, pressing it uniformly across the bottom with a spatula. Aim for an even layer to ensure a consistent texture in every bite. Place the dish in the oven and bake for 10-12 minutes, until it turns golden brown and fragrant.
Step 3: Cool the Shortbread
Once golden, carefully remove the baking dish from the oven and allow the shortbread layer to cool completely at room temperature. This step is essential as it prevents the caramel layer from melting the shortbread. You’ll notice it will firm up significantly as it cools, making it perfect for the next steps of your Healthy Twix Bars.
Step 4: Make the Caramel Layer
In a saucepan over medium-low heat, combine almond butter, coconut oil, vanilla extract, maple syrup, and sea salt. Stir the mixture gently until all ingredients are melted and smoothly combined. This decadent caramel layer will add that chewy sweetness characteristic of traditional Twix bars. Remove from heat and let the mixture cool to room temperature.
Step 5: Assemble the Layers
Once the shortbread and caramel layers have cooled, it’s time to bring it all together. Pour the smooth caramel mixture over the cooled shortbread base, spreading it evenly with a spatula. The flavors of your Healthy Twix Bars start to meld at this stage. To set the layers, place the baking dish in the freezer for about 1 to 2 hours until the caramel is firm.
Step 6: Prepare the Chocolate Coating
While the caramel layer sets, melt your chocolate with coconut oil. You can use a microwave, heating in 30-second intervals and stirring in between, or melt it gently on the stove using a double boiler. Ensure it becomes completely liquid with a glossy finish. This rich chocolate will coat the caramel layer, bringing the Healthy Twix Bars to life.
Step 7: Final Assembly
Once the caramel is hardened, remove the baking dish from the freezer. Carefully pour the melted chocolate over the hardened caramel, ensuring it covers the entire surface. Sprinkle a pinch of flaky sea salt on top for added flavor and contrast. Now, refrigerate the assembled Healthy Twix Bars for an additional 5-10 minutes to allow the chocolate to firm up perfectly.
Step 8: Slice and Serve
Now that everything is set, carefully lift the bars out of the dish using the parchment paper. With a sharp knife, slice the chilled bars into even pieces. Enjoy your Healthy Twix Bars as a fantastic guilt-free indulgence, perfect for sharing or satisfying your sweet cravings.
Make Ahead Options
These Healthy Twix Bars are perfect for busy weeknights and meal prep enthusiasts! You can prepare the shortbread layer and the caramel filling up to 3 days ahead. Simply bake the shortbread, allow it to cool, and store it in an airtight container at room temperature. The caramel layer can be made and refrigerated until you’re ready to assemble. When you’re set to finish your Healthy Twix Bars, just pour the chilled caramel over the shortbread, freeze for 1-2 hours to harden, and then add the melted chocolate layer. With these make-ahead options, you’ll have a delicious treat ready in no time without sacrificing quality!
Expert Tips for Healthy Twix Bars
-
Chill Time: Allow the chocolate to chill for just 5-10 minutes; longer can make it hard to slice and may crack the layers.
-
Cutting Technique: Use a sharp knife when slicing the bars to maintain clean edges and prevent breaking the delicate layers of your Healthy Twix Bars.
-
Cool Layers Completely: Make sure the caramel layer is completely cool before adding the chocolate; this keeps the layers distinct and prevents melting.
-
Prevent Sticking: If the shortbread mixture feels sticky while packing it into the dish, coat your spatula with coconut oil to make spreading easier.
-
Experiment with Flavors: Don’t hesitate to swap out almond butter for other nut butters based on your taste preferences or dietary needs—this is where the fun begins!
Storage Tips for Healthy Twix Bars
Room Temperature: Keep the Healthy Twix Bars in an airtight container at room temperature for up to 3 days to maintain their delightful texture and flavor.
Fridge: Store the bars in the fridge in an airtight container for up to one week. This keeps them fresh and cool, enhancing their chewy caramel and crunchy base.
Freezer: For longer storage, freeze the Healthy Twix Bars for up to 3 months. Wrap each bar individually in parchment paper followed by plastic wrap to prevent freezer burn.
Reheating: If you prefer them softened, let the bars sit at room temperature for about 10-15 minutes before enjoying to restore their delightful texture.
Healthy Twix Bars Variations & Substitutions
Give your Healthy Twix Bars a personal touch—delight in experimenting with unique flavors and textures!
-
Nut Butter Swap: Use peanut butter or sunflower seed butter for different flavor profiles. Each nutty twist adds a unique touch!
-
Sweetener Adventure: Substitute honey with agave syrup or coconut nectar for added diversity in sweetness. The flavor spectrum is yours to explore!
-
Different Flours: Instead of coconut flour, opt for almond flour or oat flour for varying textures in your shortbread base. Each choice offers something fresh for your palate.
-
Chocolate Twist: Use dairy-free chocolate or even white chocolate for a sweeter treat that appeals to chocolate lovers. Experimenting with chocolate can open a whole new world of flavor!
-
Texture Boost: Mix in a sprinkle of crushed nuts or seeds into the caramel layer for added crunch. It’s a delightful surprise that creates contrast in every bite!
-
Flavor Zest: Add a hint of cinnamon or espresso powder to the chocolate for a warm, aromatic flavor that elevates the taste experience. This little touch can transform the entire dessert!
-
Fruity Addition: Incorporate a layer of dried fruits such as cherries or cranberries for a chewier texture and a burst of fruity flavor. It’s a delicious surprise in every bite!
For more delicious ways to enjoy healthy desserts, try making these delightful Strawberry Cheesecake Bars or whip up a refreshing Avocado Smoothie Healthy!
What to Serve with Healthy Twix Bars
Indulge in a stunning spread that pairs beautifully with these guilt-free delights, perfect for any occasion.
-
Creamy Coconut Yogurt: This luscious yogurt adds a cool, creamy element that contrasts wonderfully with the chewy texture of the bars, creating a harmonious flavor balance. Drizzle a hint of honey for an extra touch.
-
Fresh Berries Medley: Bright and juicy, a side of mixed berries—like strawberries, blueberries, and raspberries—adds a refreshing burst of flavor, offering a delightful acidity that enhances the sweetness of the Healthy Twix Bars.
-
Nutty Trail Mix: A handful of crunchy trail mix provides a satisfying crunch and a boost of protein, creating a deliciously wholesome pairing that feels indulgent yet healthy.
-
Decadent Dark Chocolate Coffee: Serve a rich cup of dark chocolate-infused coffee for a lovely caffeine kick. Its deep flavor complements the chocolate layers of the bars, elevating the dessert experience.
-
Crispy Apple Slices: The crispness of fresh apple slices contrasts beautifully with the bars’ textures while providing a natural sweetness. Try pairing them with almond butter for a delightful dip!
-
Silky Matcha Latte: This vibrant green tea brings a unique flavor profile that’s both earthy and slightly sweet, serving as a fantastic accompaniment to the rich and chocolatey Healthy Twix Bars.
-
Minty Iced Tea: Refreshing and aromatic, a glass of mint-infused iced tea cleanses the palate, making it a wonderful pairing after enjoying these sumptuous bars.
With these delightful accompaniments, you’ll create a memorable treat experience that celebrates healthy indulgence!
Healthy Twix Bars Recipe FAQs
What type of coconut flour should I use for Healthy Twix Bars?
Absolutely, use finely ground coconut flour for the best texture. Coconut flour is quite absorbent, so I recommend sticking to the brand you’re familiar with for consistent results. If you don’t have coconut flour, almond flour can serve as a suitable substitute, keeping in mind it will alter the flavor slightly.
How should I store Healthy Twix Bars?
You can store the Healthy Twix Bars in an airtight container at room temperature for up to 3 days. For extended freshness, keep them in the fridge for up to one week. If you want to prepare them ahead of time, freezing is a fantastic option: wrap each bar in parchment paper followed by plastic wrap and store in the freezer for up to 3 months.
Can I freeze my Healthy Twix Bars?
Yes, you can absolutely freeze these bars! To do this, wrap each bar individually in parchment paper and then in plastic wrap to protect them from freezer burn. Place the wrapped bars in a freezer-safe bag or container. When you’re ready to eat, allow them to thaw in the fridge or at room temperature for about 10-15 minutes for optimal texture.
What if my caramel layer is too runny?
If your caramel layer turns out too runny, you may need to simmer it a bit longer on the stove to thicken it up. Keep stirring over low heat until it reaches your desired consistency. Alternatively, if it’s already cooled and still runny, you can add a little extra almond butter to help thicken it and give it that chewy texture.
Can I substitute almond butter in this recipe?
Definitely! If you have allergies or simply prefer a different flavor, feel free to swap almond butter with peanut butter, sunflower seed butter, or even cashew butter. Each alternative will impart its unique flavor, but they all maintain that creamy texture we crave in the caramel layer of these Healthy Twix Bars.
Are there any common allergens in Healthy Twix Bars?
Yes, while these bars are gluten-free and dairy-free, they do contain nuts due to the use of almond flour and nut butter. If allergies are a concern, you can replace almond flour with oat flour and use a seed butter like sunflower seed butter instead of almond butter. This way, you can still enjoy a delicious and safe treat without compromising on flavor!
Healthy Twix Bars You'll Crave - Guilt-Free & Delicious
Ingredients
Equipment
Method
- Preheat your oven to 350°F (175°C). In a large mixing bowl, combine coconut flour and almond flour. Melt coconut oil and warm honey; then pour them into the bowl, mixing until you achieve a cohesive dough.
- Line a 6x6 inch baking dish with parchment paper. Pour the shortbread mixture into the lined dish, pressing it uniformly across the bottom. Bake for 10-12 minutes, until it turns golden brown and fragrant.
- Once baked, remove from the oven and allow the shortbread layer to cool completely at room temperature.
- In a saucepan over medium-low heat, combine almond butter, coconut oil, vanilla extract, maple syrup, and sea salt. Stir until all ingredients are melted and smoothly combined. Remove from heat and let the mixture cool.
- Pour the smooth caramel mixture over the cooled shortbread base, spreading it evenly with a spatula. Place the baking dish in the freezer for about 1 to 2 hours until the caramel is firm.
- Melt your chocolate with coconut oil, ensuring it becomes completely liquid with a glossy finish.
- Once the caramel is hardened, pour the melted chocolate over the caramel, ensuring it covers the entire surface. Sprinkle a pinch of flaky sea salt on top.
- Refrigerate the assembled Healthy Twix Bars for an additional 5-10 minutes to allow the chocolate to firm up.
- Lift the bars out of the dish using the parchment paper and slice into even pieces.