

The smell of something warm and comforting wafts through the kitchen, and I can’t help but get curious. What if I told you there’s a delightful twist on your typical breakfast that’s not only easy to whip up but also packs a protein punch? Welcome to my world of Baked Greek Yogurt, where health meets indulgence in a fluffy, custard-like treat. This recipe is a game changer—perfect for those busy mornings when you crave something satisfying yet guilt-free. Not only is it a low-carb, high-protein option that fits right into your clean-eating goals, but it’s also incredibly versatile, allowing you to customize it to your taste. Imagine savoring this creamy delight as a quick breakfast or a delicious post-workout reward. Are you ready to dive into a healthy yet delightful twist on breakfast? Let’s get started!
Why is Baked Greek Yogurt a Must-Try?
Health-Boosting Ingredients: With rich nonfat Greek yogurt and egg, you’ll enjoy a powerhouse of protein and nutrients.
Quick and Easy: This recipe is straightforward, perfect for busy individuals or meal prep enthusiasts looking to inject some flavor into their mornings.
Versatile Customization: Easily swap ingredients for dietary preferences, like coconut yogurt for a vegan version or different protein powders to suit your taste.
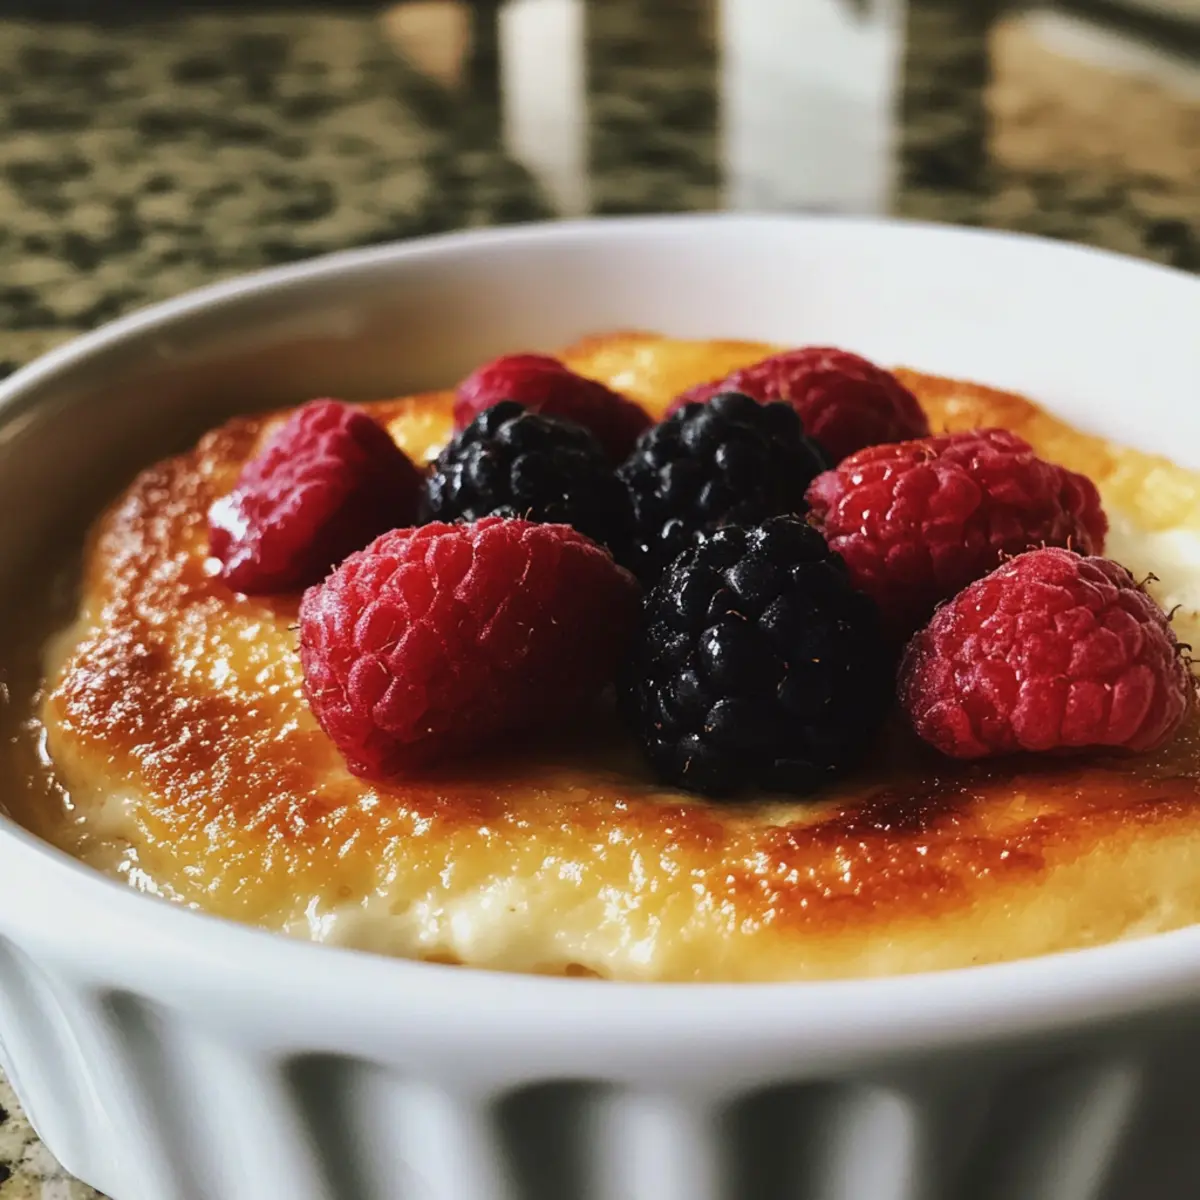
Crowd-Pleasing Delight: Serve chilled with fresh berries, and watch it disappear at family gatherings or brunch with friends, just like my Baked Vegetable Egg.
Irresistible Texture: Experience the heavenly, custard-like consistency that feels indulgent but remains light and healthy.
Sweet Satisfaction: Perfectly adaptable with additional flavors like honey or chocolate chips, you’ll find it fulfills that sweet craving without the guilt!
Baked Greek Yogurt Ingredients
For the Base
• Nonfat Plain Greek Yogurt – Provides creaminess and protein, essential for that custard-like texture.
• Egg – Acts as a binder, helping to elevate the fluffy structure; aquafaba can be used for a vegan option.
• Unsweetened Almond Milk – Adds moisture and smoothness; feel free to substitute with any plant-based milk you prefer.
For Flavor and Texture
• Vanilla Protein Powder (Whey-casein) – Boosts the protein content while adding a hint of sweetness; vegan protein powder can be used for a dairy-free choice.
• Cornstarch – Stabilizes the mixture, ensuring a smooth texture; while optional, it’s highly recommended for the best results.
Optional Add-Ins
• Chopped Berries – Enhance flavor and add natural sweetness; these can be mixed in or used as a topping.
• Chocolate Chips – For a decadent twist on your baked Greek yogurt, adding a few chips can satisfy your sweet tooth without guilt!
Step‑by‑Step Instructions for Baked Greek Yogurt
Step 1: Preheat the Oven
Begin by preheating your oven to 350°F (175°C). While the oven is warming up, take a large ramekin or two small ramekins and generously grease them with non-stick cooking spray. This step will ensure that your Baked Greek Yogurt releases easily after baking, helping you achieve that perfect custard-like texture.
Step 2: Mix the Base Ingredients
In a large mixing bowl, combine the nonfat plain Greek yogurt and one egg. Using a whisk, blend these ingredients together until the mixture is smooth and homogenous. The yogurt should appear creamy and well-combined with the egg, forming the essential base for your Baked Greek Yogurt.
Step 3: Add Protein and Stabilizer
Next, add in the vanilla protein powder and cornstarch. Gently mix them into the yogurt and egg mixture until fully integrated but be careful not to over-mix. If the mixture seems too thick, gradually incorporate the unsweetened almond milk to achieve a smoother consistency. You want a pourable but still thick batter.
Step 4: Sweeten and Customize
Taste the mixture to assess the sweetness and add sweetener as desired. If you choose to include optional ingredients like chopped berries or chocolate chips, fold them gently into the mixture for added texture and flavor. This is your chance to customize your Baked Greek Yogurt to your liking!
Step 5: Transfer to Ramekins
Pour the prepared batter evenly into your greased ramekin(s), ensuring the tops are smooth. This step is important as it helps the yogurt bake evenly, leading to that light, airy texture you aspire to achieve.
Step 6: Bake to Perfection
Place the ramekin(s) in the preheated oven and bake for 30 minutes. If you’re using smaller ramekins, check for doneness at around 20 minutes. The center should be slightly jiggly, indicating that your Baked Greek Yogurt is light and custardy, yet set enough to hold its shape when cooled.
Step 7: Cool and Chill
Once baked, remove the ramekin(s) from the oven and allow them to cool for about 30 minutes at room temperature. After cooling, refrigerate for at least an hour to enhance flavors and create that desired creamy custard-like consistency. Chilling also allows the texture to deepen, making your Baked Greek Yogurt even more delightful to enjoy.

Baked Greek Yogurt Variations & Substitutions
Feel free to explore these delicious twists on the classic, making it uniquely yours with every delightful bite!
-
Vegan Option: Replace Greek yogurt with coconut yogurt and use aquafaba instead of eggs for a creamy, vegan take.
-
Almond-Free: Substitute almond milk with oat milk or soy milk if you have nut allergies, ensuring a delightful flavor still shines through.
-
Chocolate Indulgence: Mix in a couple of tablespoons of cocoa powder to create a rich chocolate version that feels like dessert.
-
Fruit Burst: Add a sprinkle of fresh or frozen berries into the mixture before baking for a fruity explosion that adds natural sweetness.
-
Protein Punch: Experiment with flavored protein powders (like chocolate or strawberry) to change the taste profile, tailoring it to your flavor cravings.
-
Crunchy Topping: For added texture, consider topping with a handful of granola or crushed nuts right before serving, creating a delightful contrast to the creamy yogurt.
-
Low-Carb Sweetness: Drizzle some sugar-free syrup on top after baking for a guilt-free sweet touch that still fits your low-carb lifestyle.
-
Nutty Flavor: Stir in a spoonful of almond or peanut butter for a nutty flavor that enhances the richness of your baked yogurt.
Each variation adds its own charm to this delicious recipe, making it even easier to enjoy this healthy breakfast or snack option. Whether you’re going for something fruity, chocolaty, or nutty, you can’t go wrong with these twists. And if you’re keen on more healthy breakfast ideas, check out my Air Fryer Baked potatoes, or serve it with a side of Roadhouse Style Baked salmon for a delightful brunch!
Make Ahead Options
These Baked Greek Yogurt treats are a fantastic option for meal prep enthusiasts! You can mix the base ingredients (Greek yogurt, egg, protein powder, and cornstarch) up to 24 hours in advance, storing it in the refrigerator to optimize freshness. Additionally, any optional ingredients like chopped berries can be added right before serving to maintain their vibrant flavor and texture. When you’re ready to bake, simply pour the mixture into the greased ramekins and follow the baking instructions as noted. The result will be just as delicious—perfect for busy weeknights or quick breakfasts on the go!
Expert Tips for Baked Greek Yogurt
-
Cool Before Chilling: Allow the baked yogurt to cool for at least 30 minutes at room temperature to develop the ideal custard-like texture.
-
Don’t Cover While Baking: Avoid covering the ramekin with foil; it can cause the yogurt to rise too high and stick to the cover.
-
Taste Test First: Always taste the mixture before baking to adjust the sweetness, especially if you incorporate different protein powders or add-ins.
-
Choose the Right Yogurt: For the best results, use nonfat plain Greek yogurt as your base, or choose coconut yogurt for a creamy vegan alternative.
-
Optional Ingredients Matter: Add-ins like berries or chocolate chips can enhance flavor; fold them gently into the mixture without over-mixing for an even bake.
-
Perfect Portioning: Utilize smaller ramekins for individual servings; they bake faster (20 minutes) and create delightful, personal-sized treats.
How to Store and Freeze Baked Greek Yogurt
Fridge: Store in an airtight container for up to 3 days; this keeps the delightful flavors intact while maintaining that creamy texture.
Freezer: Baked Greek Yogurt can be frozen for up to 2 months. Wrap individual portions tightly in plastic wrap and then place them in a freezer-safe bag.
Thawing: To enjoy, simply transfer to the fridge for several hours or overnight to thaw. Reheat gently in the microwave for a few seconds if desired, but enjoy it cold for the best texture!
Serving: Always garnish with toppings like fresh berries or a drizzle of honey just before serving for that fresh touch!
What to Serve with Baked Greek Yogurt
Elevate your healthy meal with delicious sides that will complement the creamy goodness of this delightful dish.
-
Fresh Berries: Bright, juicy berries enhance the yogurt’s creamy texture and add a burst of natural sweetness, making for a refreshing contrast. Strawberries, blueberries, or raspberries are perfect choices that not only look beautiful but also provide vitamins and antioxidants.
-
Granola: A sprinkle of crunchy granola adds a satisfying texture, offering a delightful crunch that balances the smoothness of the baked yogurt. Choose a low-sugar variety to keep it healthy, and enjoy a satisfying bite with every spoonful.
-
Chopped Nuts: Almonds or walnuts provide a wonderful crunch and a dose of healthy fats, enriching each bite of the yogurt. Their nutty flavor beautifully complements the creamy baked yogurt, turning this delightful dish into a well-rounded meal.
-
Honey Drizzle: A light drizzle of honey or maple syrup brings a naturally sweet note that elevates the overall flavor while keeping it wholesome. This touch of sweetness enhances the dish, making it an irresistible choice for breakfast or dessert.
-
Coconut Flakes: Sprinkle unsweetened coconut flakes over the top for a tropical twist that adds chewiness and enhances the visual appeal. The subtle sweetness of the coconut contrasts beautifully with the tangy yogurt.
-
Iced Green Tea: Pair your baked Greek yogurt with a refreshing glass of iced green tea for a light and invigorating complement. The grassy notes from the tea perfectly balance the richness of the yogurt, making it a well-rounded meal.
-
Avocado Toast: For a more substantial breakfast, serve alongside a slice of avocado toast topped with a sprinkle of sea salt and pepper. The creaminess of the avocado works harmoniously with the yogurt, creating a satisfying, nutrient-packed meal.
-
Dark Chocolate Chips: For an indulgent yet guilt-free twist, fold in a few dark chocolate chips. Their rich, bittersweet flavor contrasts charmingly with the yogurt’s creaminess, making it a tasty delight.
-
Cottage Cheese: A small side of cottage cheese adds another layer of protein and creaminess while providing a unique texture that pairs beautifully with the baked yogurt’s custard-like profile.
-
Seasonal Fruit Salad: A colorful fruit salad featuring seasonal fresh fruits can bring vibrancy to your plate, offering an array of flavors and textures that lift the simple yogurt into a celebratory dish.

Baked Greek Yogurt Recipe FAQs
How do I select the best Greek yogurt for this recipe?
Absolutely! When choosing your nonfat plain Greek yogurt, look for one that has a smooth texture and minimal additives. I often recommend selecting a brand that is high in protein and low in sugar, allowing the natural flavor to shine through. If you’re going for a vegan twist, opt for a thick coconut yogurt, which provides creaminess while keeping it dairy-free.
How should I store leftovers of Baked Greek Yogurt?
Very! After baking, let your Baked Greek Yogurt cool completely. Store it in an airtight container in the fridge for up to 3 days. If you’re like me and love meal prep, this recipe is perfect because it retains its delicious flavor and texture even after a couple of days in the refrigerator!
Can I freeze Baked Greek Yogurt? How should I do it?
Absolutely! Baked Greek Yogurt can be frozen for up to 2 months. To do this, wrap individual portions tightly in plastic wrap, ensuring no air gets in, and then place them in a freezer-safe bag. When you’re ready to enjoy it, simply transfer it to the fridge to thaw overnight. If you prefer it warm, a quick reheat in the microwave will do the trick, although I find it delightful cold, just as it is!
What if my Baked Greek Yogurt isn’t set after baking?
Don’t worry—it happens! If your yogurt is still too jiggly after the suggested baking time, it’s likely due to oven variances. Simply give it an additional 5 to 10 minutes in the oven, checking every few minutes to ensure it doesn’t over-bake. The center should be soft but not liquidy. Rest assured, once it cools, it will firm up beautifully!
Is Baked Greek Yogurt suitable for my gluten-free diet?
Absolutely! This Baked Greek Yogurt recipe is naturally gluten-free, making it a fantastic choice for those following a gluten-free lifestyle. Just ensure that any add-ins like protein powder or toppings are also certified gluten-free to keep it safe for your dietary needs.
Can I customize the flavors in Baked Greek Yogurt?
Very much so! This recipe is incredibly versatile! You can add various flavors to the base mix—think cacao powder for a chocolatey twist or different protein powder flavors for a unique taste experience. Incorporating fruits like berries or a drizzle of honey just before serving can elevate the dish even further, making it custom to your preferences!

Baked Greek Yogurt: A Dreamy, Protein-Packed Delight
Ingredients
Equipment
Method
- Preheat your oven to 350°F (175°C) and grease large ramekin(s) with non-stick cooking spray.
- In a large mixing bowl, combine the Greek yogurt and the egg, whisking until smooth.
- Add the vanilla protein powder and cornstarch, mixing gently. If too thick, incorporate almond milk.
- Taste the mixture for sweetness and fold in any optional ingredients like berries or chocolate chips.
- Pour the batter into greased ramekin(s) and smooth the tops.
- Bake for 30 minutes, or 20 for smaller ramekins, until slightly jiggly in the center.
- Allow to cool for 30 minutes at room temperature, then refrigerate for at least an hour.