

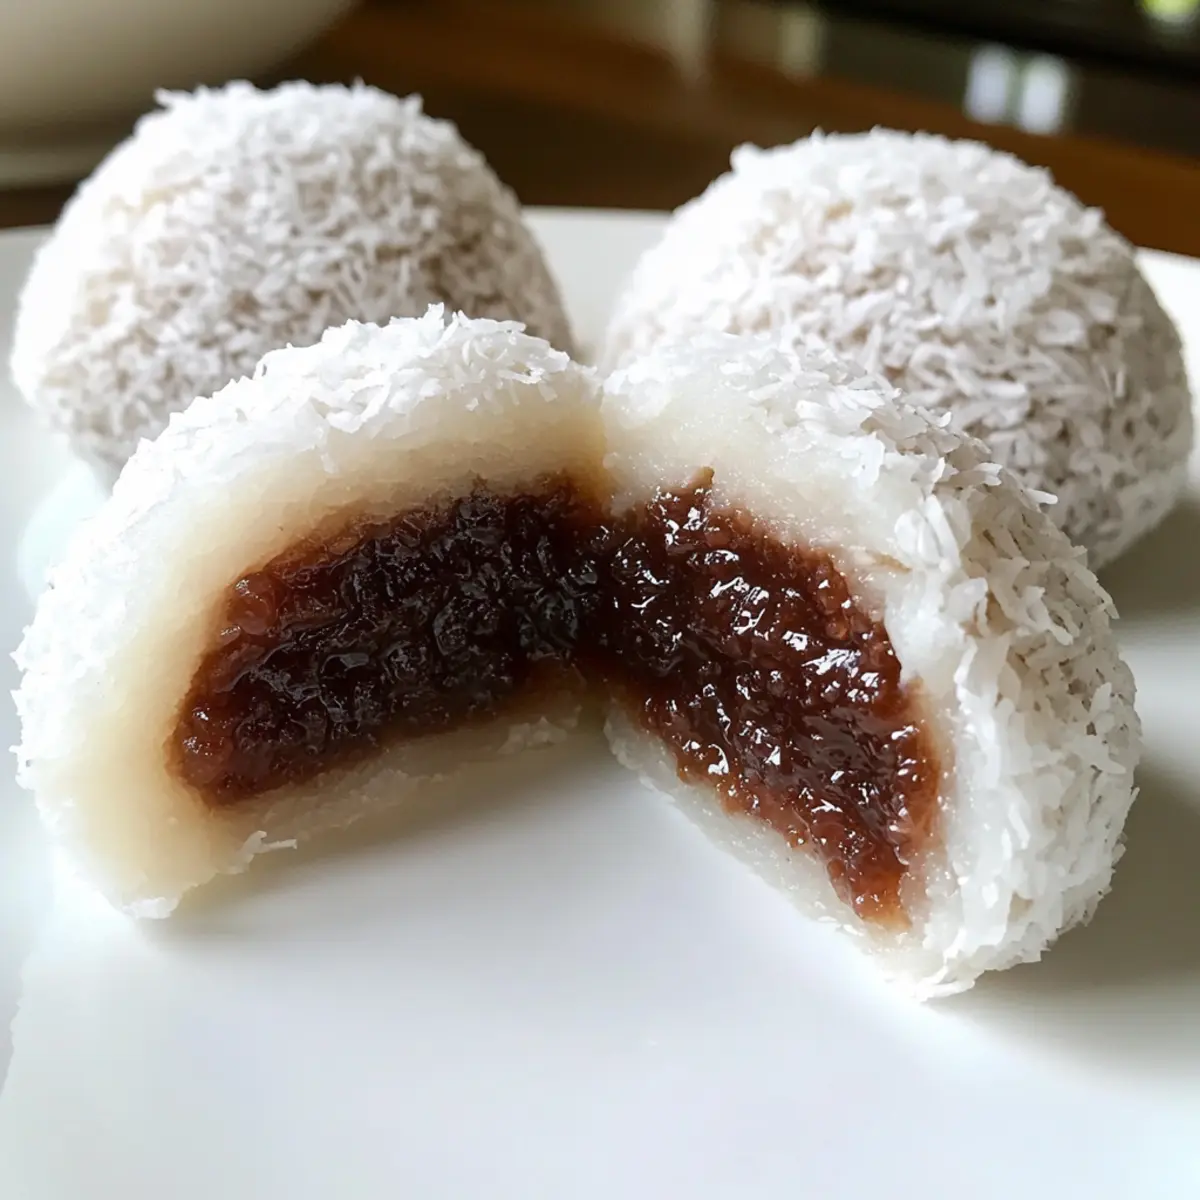
As the afternoon sun filters through my kitchen window, I can almost taste the sweet, tropical breeze that comes with a delightful batch of Coconut Mochi filled with red bean paste. This unique dessert is a crowd-pleaser, combining chewy bliss with a creamy center that’s sure to impress family and friends. With its simple, gluten-free ingredients, making coconut mochi becomes an easy culinary adventure that allows you to stray from the typical fast food rut. The joy of crafting these little bundles of joy not only brings a subtle holiday spirit but also opens up a world of flavorful variations—think luscious mango or nut-infused surprises! Who else is ready to dive into this soft and delightful treat?
Why is Coconut Mochi a Must-Make?
Irresistible Flavor: The combination of coconut milk and sweet red bean paste creates an unforgettable taste that’s both rich and satisfying.
Easy to Make: With just a few straightforward steps, you can create these chewy delights—even beginners will feel like pros!
Versatile Fillings: Don’t stop at red bean—try filling your mochi with mango or sweet nuts for a different twist.
A Fun Activity: Making coconut mochi can be a delightful way to involve friends or kids in the kitchen!
Experience the joy of homemade desserts that break free from the fast food cycle. For more delightful recipes, check out this refreshing Pineapple Coconut Mojito or treat yourself to a luscious Mango Coconut Pudding.
Coconut Mochi Ingredients
-
For the Mochi Dough
• Glutinous Rice Flour – Essential for that signature sticky texture; find it at Asian grocery stores or online.
• Cornstarch – Prevents sticking and enhances texture; no substitutes required here.
• White Sugar – Sweetens the dough beautifully; feel free to use alternative sweeteners if needed.
• Coconut Milk – Adds a creamy coconut flavor; can be swapped with any plant-based milk for a dairy-free version.
• Coconut Oil (or Butter) – Provides richness and aids in dough consistency; use a neutral oil as a substitute if you like. -
For the Filling
• Red Bean Paste – The star filling that delivers sweetness; opt for homemade or store-bought for ease. -
For the Coating
• Shredded Coconut – This adds a delightful tropical touch; choose between sweetened or unsweetened, based on your preference.
With these Coconut Mochi ingredients on hand, you’re all set to create a dessert that’s as exciting to make as it is to eat!
Step‑by‑Step Instructions for Coconut Mochi
Step 1: Prepare the Batter
In a mixing bowl, whisk together the glutinous rice flour, cornstarch, and white sugar until well combined. Gradually pour in the coconut milk while continuously stirring to create a smooth batter. Once blended, strain the mixture through a fine sieve to remove any lumps, ensuring a velvety texture for your Coconut Mochi.
Step 2: Steam Mixture
Set up a steamer by bringing water to a boil in a pot. Pour the smooth batter into a heatproof dish lined with parchment paper, then place the dish in the steamer basket. Cover and steam the batter for 25 minutes until it’s firm and cooked through—test doneness by inserting a chopstick; it should come out clean.
Step 3: Cool Dough
After steaming, carefully remove the dish from the steamer and let the dough cool for about 10 minutes. Once slightly cooled, add the coconut oil and mix thoroughly until fully incorporated. Allow the dough to cool even more by wrapping it in plastic wrap, which helps maintain moisture while you prepare for shaping the mochi.
Step 4: Shape Mochi
Once the dough is cool enough to handle, divide it into 10 equal pieces. Roll each piece into a ball, then flatten it into a circle on a lightly dusted surface. Place a small ball of red bean paste in the center of each circle, carefully fold over the edges to seal, and gently roll the filled mochi in shredded coconut to finish.
Step 5: Finish
To serve your freshly made Coconut Mochi, place each piece in a cupcake liner for a charming presentation. Allow them to come to room temperature, which enhances the soft, chewy texture of the mochi. Enjoy these delightful treats with family and friends!
Expert Tips for Coconut Mochi
-
Use Gloves: Handling mochi dough can get sticky! Wearing gloves will prevent the dough from clinging to your hands during shaping.
-
Check Consistency: If your mochi dough is too dry, mix in a bit more coconut milk. Conversely, if it’s too wet, add a little more cornstarch for that perfect texture.
-
Seal Well: Ensure the edges of your mochi are tightly sealed after adding the red bean paste to avoid spills while rolling in shredded coconut.
-
Chill Before Serving: For the best texture, chill your coconut mochi in the fridge for about 30 minutes before serving. This will enhance the chewy experience!
-
Experiment with Fillings: Don’t be afraid to try different fillings! Coconut Mochi can be delicious with mango puree or nut mixes for exciting flavor variations.
How to Store and Freeze Coconut Mochi
Fridge: Store your coconut mochi in an airtight container in the fridge for up to 3–4 days. This keeps them fresh while maintaining their chewy texture.
Freezer: For long-term storage, freeze the mochi by wrapping each piece in plastic wrap and placing them in a freezer-safe bag. They can last for up to 3 months this way.
Reheating: To enjoy your frozen coconut mochi, thaw them in the fridge overnight, then microwave for about 10-15 seconds to restore their soft, chewy goodness.
Wrapping: For best results, ensure the mochi is wrapped well before freezing to prevent freezer burn and preserve flavor.
What to Serve with Coconut Mochi Filled with Red Bean Paste
Indulge your senses by creating a full meal that pairs perfectly with the tender sweetness of this delightful treat.
- Green Tea: The subtle bitterness of green tea balances the sweetness beautifully, making it a timeless accompaniment to your mochi.
- Mango Sticky Rice: This dessert shares similar textural delights and tropical flavors, enhancing the experience of both treats.
- Sweetened Coconut Chia Pudding: Creamy and rich, this pudding adds a nourishing touch to your dessert table, complementing the coconut flavor of the mochi.
- Fruity Sorbet: A refreshing scoop of mango or passionfruit sorbet provides a fruity contrast that enlivens your palate between bites of mochi.
- Steamed Dumplings: Serve a savory option alongside your coconut mochi; the contrasting flavor profiles create a harmonious tasting experience.
- Fruit Salad: Use fresh, vibrant fruits like strawberries or kiwi to introduce brightness and a hint of acidity, refreshing your palate after the sweet mochi.
- Iced Matcha Latte: The creamy, earthy tones of matcha pair smoothly with the sweet, chewy delight of coconut mochi, making for a delightful combination.
Make Ahead Options
Preparing the delightful Coconut Mochi ahead of time is a savvy way to save those precious minutes during busy weeks! You can make the mochi dough up to 24 hours in advance by following the first three steps of the recipe, then wrapping the cooled dough tightly in plastic wrap and refrigerating it. This helps maintain its delightful texture. When you’re ready to shape the mochi, simply take the dough out, divide, and proceed to fill with red bean paste as instructed. For ultimate freshness, enjoy the mochi within 3 days after making, or freeze them for up to 3 months—just remember to wrap them well to prevent freezer burn. Reheat any refrigerated mochi in the microwave for a soft, chewy treat that tastes just as delicious as the day you made it!
Coconut Mochi: Creative Variations
Feel free to get adventurous in the kitchen! Customizing your coconut mochi allows you to explore delightful new flavors and textures.
- Mango Bliss: Substitute red bean paste with luscious mango puree for a tropical twist that’s bursting with sweetness.
- Nutty Delight: Incorporate finely chopped nuts like almonds or cashews into the filling for a delightful crunch and increased texture.
- Dairy-Free: Replace coconut milk with almond milk for a nuttier flavor profile that still celebrates coconut’s charm.
- Choco-Lover: Add cocoa powder to the dough for a chocolatey variation, filling it with chocolate ganache for a heavenly treat.
- Spicy Kick: Mix in a pinch of ground cinnamon or cayenne pepper into the filling for a warm, bold flavor that surprises the palate.
- Coconut Magic: Enhance the coconut flavor by using toasted shredded coconut in the dough for extra depth and texture.
- Fruit Fusion: Experiment with other fruit purees such as passion fruit or berry blends for vibrant, colorful fillings!
- Matcha Twist: Blend matcha powder into the dough for a unique green tea flavor, pairing beautifully with red bean or a sweet white chocolate filling.
For a refreshing drink to serve alongside your coconut mochi, try whipping up a Pineapple Coconut Mojito. And for an indulgent dessert option, don’t miss the creamy goodness of our Mango Coconut Pudding.
Coconut Mochi Recipe FAQs
What type of glutinous rice flour should I use?
Absolutely! Look for sweet rice flour or glutinous rice flour specifically labeled for mochi, available at Asian grocery stores or online. This is crucial for achieving that signature chewy texture in your Coconut Mochi.
How should I store leftover mochi?
Very! To keep your coconut mochi fresh, store them in an airtight container in the fridge for up to 3-4 days. This method retains their delightful chewiness, making them just as enjoyable when you’re ready to indulge again!
Can I freeze Coconut Mochi? What’s the best way?
Absolutely! To freeze, wrap each mochi piece tightly in plastic wrap and then place them in a freezer-safe bag. This will keep them fresh for up to 3 months. When you’re ready to enjoy them, thaw in the fridge overnight, then pop them in the microwave for 10-15 seconds to restore their delectable texture.
What if my mochi dough is too sticky?
If you find yourself in this sticky situation, don’t worry! You can sprinkle a bit more cornstarch into the mix, kneading it gently until you achieve the desired consistency. If it’s too dry, mixing in a small amount of coconut milk will help. Remember, keep your hands and work surface lightly dusted with cornstarch while shaping to prevent sticking!
Are there any dietary considerations for pets or allergies?
Definitely! While coconut mochi is vegetarian and gluten-free, always be cautious about ingredients if serving to others. The red bean paste should be checked for added sugars or preservatives that might not be pet-friendly. Furthermore, if anyone has allergies to coconut or nuts, try alternative fillings with caution—perhaps use fruit purees instead!
How do I know when the three mixtures are properly combined?
A great question! Start by mixing glutinous rice flour, cornstarch, and sugar in a bowl. Once you gradually add the coconut milk, you’ll know they’re well combined when the batter is smooth and free of lumps. Straining it through a fine sieve is a good practice for an impeccable texture, ensuring each bite of your Coconut Mochi is a delight!
Delicious Coconut Mochi: A Chewy Delight You Can Make at Home
Ingredients
Equipment
Method
- In a mixing bowl, whisk together the glutinous rice flour, cornstarch, and white sugar until well combined. Gradually pour in the coconut milk while continuously stirring to create a smooth batter. Once blended, strain the mixture through a fine sieve to remove any lumps.
- Set up a steamer by bringing water to a boil. Pour the batter into a heatproof dish lined with parchment paper, then place the dish in the steamer basket. Cover and steam for 25 minutes until it's firm and cooked through.
- After steaming, remove the dish and let the dough cool for about 10 minutes. Add the coconut oil and mix thoroughly. Wrap in plastic wrap to maintain moisture.
- Divide the dough into 10 equal pieces. Roll each piece into a ball, flatten it, and place a small ball of red bean paste in the center. Fold edges to seal and roll in shredded coconut.
- Place each piece in a cupcake liner for presentation and allow to come to room temperature before serving.