

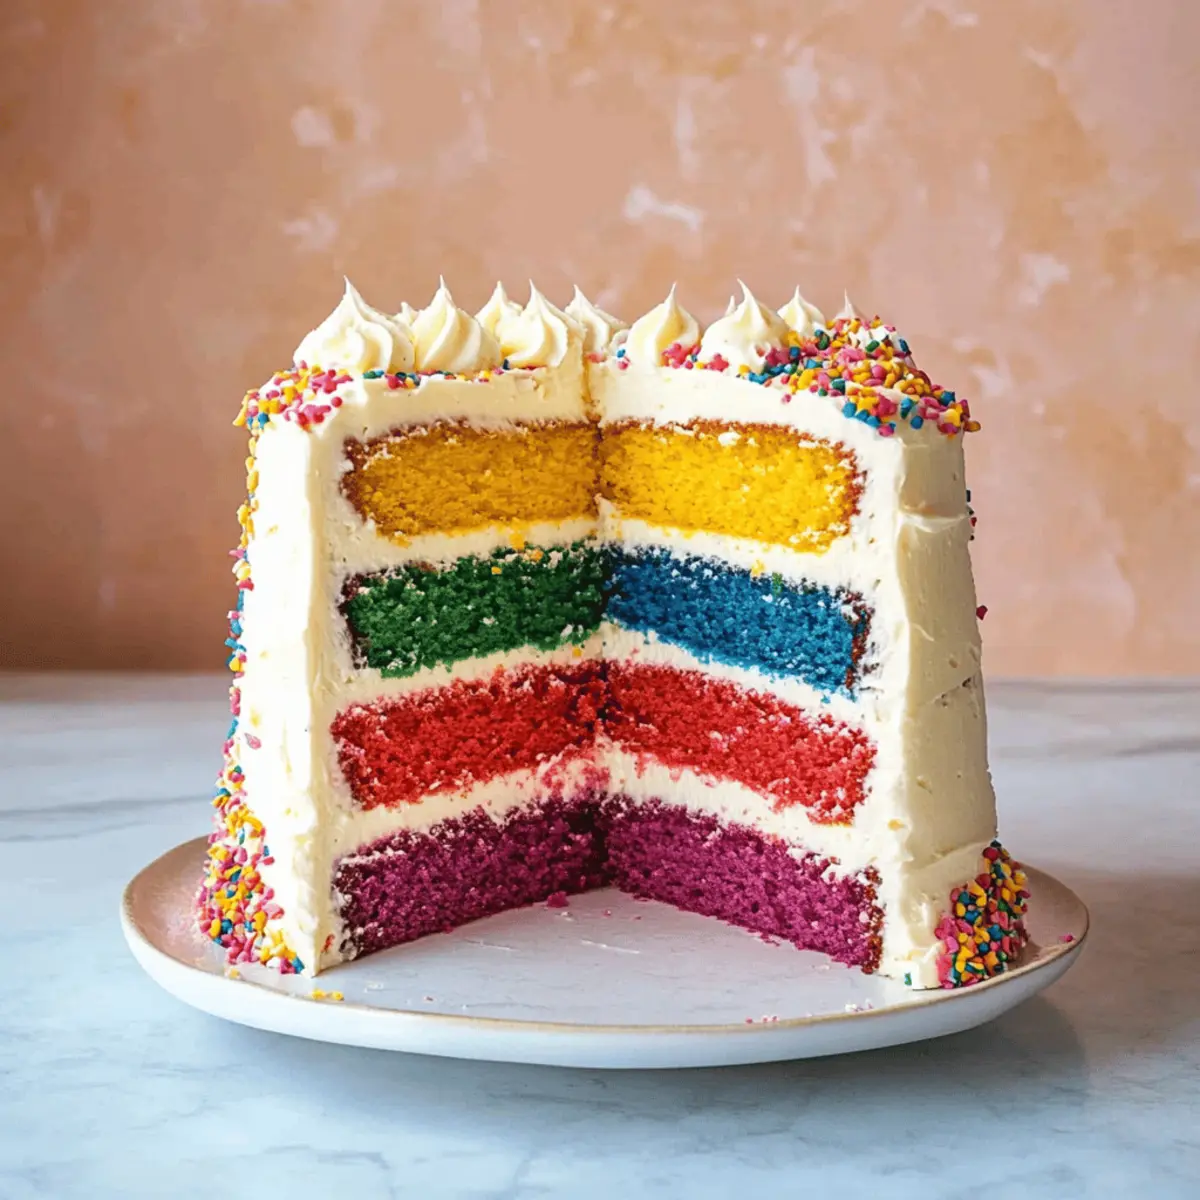
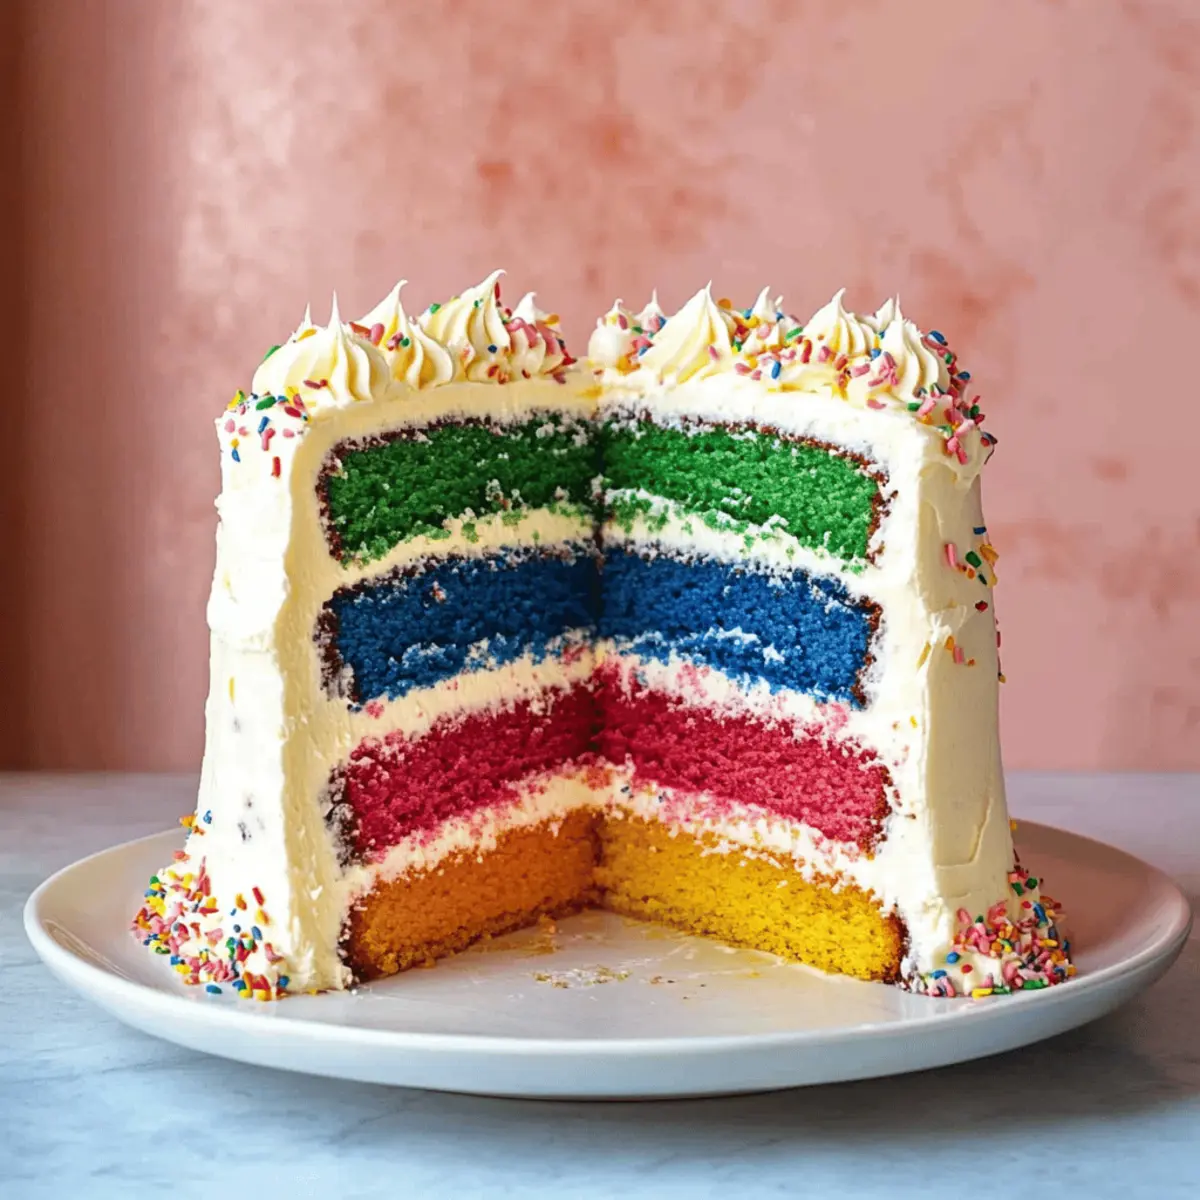
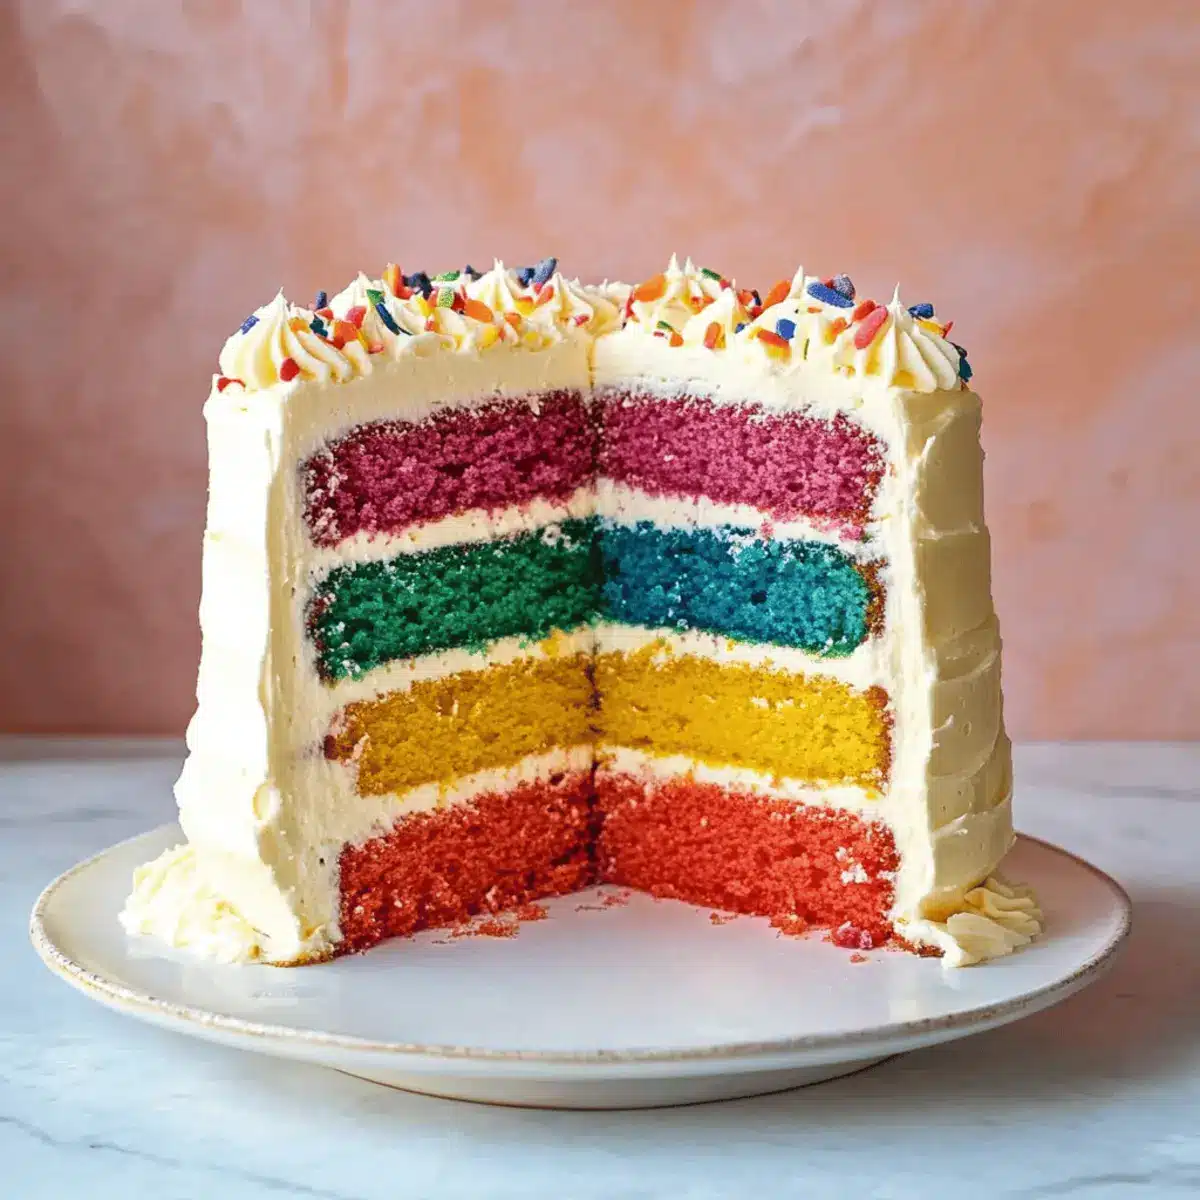
As I stood in my kitchen, the vibrant colors of food dyes beckoned me to create something truly special. Enter the Easy Six-Layer Rainbow Cake, a delightful masterpiece that not only dazzles the eyes but is also incredibly simple to whip up! With its soft, fluffy vanilla layers and rich frosting, this cake is perfect for celebrating life’s little joys or even turning an ordinary day into something festive. Not only is it a crowd-pleaser that can easily become the centerpiece of any gathering, but it also offers vegan-friendly options that make it accessible for everyone. So, whether you’re a baking novice or a seasoned pro, aren’t you curious how this colorful creation can brighten your table?

Why Choose This Rainbow Cake?
Eye-Catching Presentation: This cake creates a stunning centerpiece that will mesmerize your guests, making it ideal for birthday parties or celebrations.
Easy to Make: With simple ingredients and straightforward steps, even beginners can confidently bake this beautiful cake.
Customizable Colors: Change the food coloring for different themed events or holidays, ensuring your cake is always fresh and exciting.
Vegan-Friendly Options: Easily adjust the ingredients to accommodate dietary preferences, allowing everyone to enjoy a slice of happiness.
Deliciously Fluffy: Each layer is soft and moist, complemented perfectly by the rich vanilla frosting, making every bite a delightful experience.
This Easy Six-Layer Rainbow Cake truly stands out and is perfect for any celebration! If you’re also looking for other vibrant desserts, you might enjoy our delicious Strawberry Cheesecake Bars or fun Cookies & Cream Cheesecake.
Rainbow Cake Ingredients
For the Cake
- All-purpose flour – Provides the cake’s structure; substitute with gluten-free flour for a gluten-free variant.
- Sugar – Sweetens the cake while keeping it moist; opt for coconut sugar for a lower-calorie option.
- Baking soda – Acts as a leavening agent, helping the cake rise; no substitutions needed.
- White vinegar – Works in tandem with baking soda for leavening; apple cider vinegar can be an alternative.
- Neutral-flavored oil – Adds moisture and richness; can be swapped with applesauce for a lighter version.
- Vanilla extract – Infuses the cake with flavor; consider using vanilla bean paste for a more intense taste.
- Water – Hydrates the batter; use milk instead for a creamier consistency.
- Food coloring – Provides the vibrant hues for each layer; gel food coloring will yield bolder colors than liquid.
For the Frosting
- Vanilla frosting – Essential for layering and decorating; feel free to make from scratch or use store-bought for convenience.
This Rainbow Cake is not just a treat for the tummy, but also a feast for the eyes!
Step‑by‑Step Instructions for Easy Six-Layer Rainbow Cake
Step 1: Prepare Baking Pans
Preheat the oven to 350°F (180°C) and grease six 8-inch round cake pans to ensure easy removal later. This step is crucial for the success of your rainbow cake, so take the time to get the pans ready. Once greased, place them aside while you mix the batter.
Step 2: Make the Batter
In a large mixing bowl, whisk together the all-purpose flour, sugar, baking soda, and a pinch of salt until well combined. Next, add in the white vinegar, neutral oil, vanilla extract, and water. Mix everything together using a hand mixer or whisk for about 2-3 minutes, until you achieve a smooth, lump-free batter that’s light and airy.
Step 3: Divide and Color the Batter
Carefully divide the batter into six separate bowls, ensuring portions are even. Add a different color of gel food coloring to each bowl; start with several drops and mix until the colors are vibrant and well-blended. This step is when the magic happens—your rainbow cake will come to life with each hue swirling beautifully in the batter.
Step 4: Bake the Layers
Pour each colored batter into the prepared cake pans, distributing evenly. Bake in your preheated oven for 18-20 minutes, or until a toothpick inserted into the center comes out clean. As the layers bake, your kitchen will fill with delightful aromas. Allow them to cool in the pans for 10 minutes before gently transferring them to wire racks to cool completely.
Step 5: Assemble the Cake
Once the cake layers are completely cooled, it’s time to assemble your artistic creation. Stack each layer on a serving plate, spreading a generous thin layer of vanilla frosting between each one. Make sure to evenly distribute the frosting to prevent any slippage. Once stacked, spread the frosting thickly around the entire outer layer of the rainbow cake for a beautiful finish.
Step 6: Decorate and Set
After frosting, get creative with additional decorations like sprinkles, edible glitter, or fresh fruits to enhance the visual appeal of your rainbow cake. Allow the frosted cake to sit for about 30 minutes, letting the frosting set slightly for easier slicing. Now your Easy Six-Layer Rainbow Cake is ready to be sliced into vibrant pieces, welcoming everyone to enjoy it!
Make Ahead Options
These Easy Six-Layer Rainbow Cakes are perfect for meal prep enthusiasts! You can bake the cake layers up to 2 days in advance and store them in the refrigerator wrapped in plastic wrap to maintain freshness. Additionally, the vanilla frosting can be prepared up to 3 days ahead and kept in an airtight container in the refrigerator. When you’re ready to assemble, simply remove the layers from the fridge and frost them while they’re still cool; this helps to avoid melting. By prepping the Rainbow Cake components ahead of time, you’ll save precious hours on party day and ensure that each slice is just as delicious and festive as fresh out of the oven!
Expert Tips for Rainbow Cake
- Cool Layers Completely: Make sure each cake layer cools entirely before frosting; this prevents the frosting from melting and sliding off.
- Use Gel Food Coloring: Opt for gel food coloring over liquid for richer, more vibrant hues in your rainbow cake. A little goes a long way!
- Level the Cakes: After baking, trim the tops of the cooling layers if they have domed. This ensures even stacking and a stable finished cake.
- Offset Spatula Magic: Use an offset spatula to spread frosting evenly between layers. This technique helps you achieve a professional finish for your rainbow cake.
- Storage Tips: Store any leftover cake in an airtight container in the fridge for up to 2 weeks. For longer storage, freeze slices wrapped tightly in plastic.
Rainbow Cake Variations & Substitutions
Feel free to let your creativity shine as you customize this delicious cake to suit your taste and dietary needs!
-
Vegan Friendly: Replace eggs with flaxseed meal (1 tbsp mixed with 2.5 tbsp water) for a fully plant-based delight.
Try this twist for a cake that’s just as fluffy and satisfying, while catering to vegan preferences. -
Gluten-Free: Use a 1:1 gluten-free flour blend to maintain the cake’s structure without its gluten counterpart.
This ensures everyone at your gathering can savor a piece without fussing over dietary restrictions. -
Lower Sugar: Substitute half of the sugar with mashed bananas or applesauce for a naturally sweet alternative.
This option brings additional moisture to the cake while reducing refined sugars, perfect for a healthier treat! -
Fruit Punch: Infuse some extra flavor by blending in a touch of fruit puree, like strawberry or mango, into the batter.
This not only adds a kick of fruity goodness but also an extra layer of vibrancy to your rainbow layers. -
Chocolaty Twist: Add cocoa powder to one or two of the batter portions for a fun chocolate layer!
Imagine slicing through the cake and discovering both rainbow colors and rich chocolate; a delightful surprise for all. -
Natural Coloring: For a more wholesome approach, use natural food colorings by creating your own with beet juice or spirulina.
These healthy swaps allow you to enjoy vibrant colors without chemical additives, plus, they’re a striking visual experience! -
Cream Cheese Frosting: Switch the vanilla frosting with cream cheese frosting for a tangy and rich alternative that complements the cake perfectly.
This twist harmonizes beautifully with the sweetness of the cake, creating a more complex flavor profile that’s simply irresistible. -
Add Texture: Incorporate nuts or seeds into the batter for added crunch and nutrition.
A sprinkle of crushed almonds or chia seeds not only boosts texture but also adds nutty flavor to each delightful bite.
With these variations, this Rainbow Cake becomes a canvas for your culinary imagination! For further sweet inspirations, don’t miss our delightful Pistachio Carrot Cake or check out some fluffy Buttermilk Pancakes that will surely brighten your mornings.
How to Store and Freeze Rainbow Cake
- Room Temperature: Store leftover cake at room temperature in a cake carrier for up to 3 days. Keep it covered to maintain moisture while preventing unwanted drying.
- Fridge: For longer freshness, refrigerate the Rainbow Cake in an airtight container for up to 2 weeks. Make sure it’s wrapped securely to prevent it from absorbing any odors.
- Freezer: Wrap individual slices tightly in plastic wrap and place them in a freezer-safe bag for up to 6 months. This allows you to enjoy a piece of rainbow happiness anytime!
- Reheating: Thaw frozen slices in the fridge overnight, then allow them to come to room temperature before serving. If desired, pop them in the microwave for a few seconds for a warm treat!
What to Serve with Easy Six-Layer Rainbow Cake
Elevate your dessert experience by pairing this vibrant cake with complementary flavors that will leave everyone craving more.
-
Creamy Vanilla Ice Cream: The smooth creaminess of vanilla ice cream contrasts beautifully with the fluffy layers of the cake, adding a delightful richness to each bite.
-
Fresh Berries: A medley of strawberries, blueberries, and raspberries introduces a burst of tartness that cuts through the sweetness, making each slice feel refreshing.
-
Chocolate Ganache: Drizzling warm chocolate ganache on top of the cake brings an indulgent twist, perfectly balancing the sweet vanilla frosting.
-
Citrus Salad: A light citrus salad with oranges and grapefruits adds brightness and a zingy counterpoint to the soft cake layers. It’s a wonderful palate cleanser.
-
Sparkling Lemonade: Serve with bubbly lemonade for a refreshing drink that complements the cake’s festive colors and sweetness while providing a fizzy pop.
-
Funfetti Cookies: Keep the party going with cookies that echo the colorful theme. Their soft texture and sprinkle-filled bites create a delightful treat alongside the rainbow cake.
-
Coconut Whipped Cream: This light, fluffy topping adds a tropical flair and a lovely contrast to the cake, enhancing the overall sweetness without overpowering it.
-
Fruit-Infused Tea: A chilled fruit-infused tea will quench your thirst and harmonize beautifully with the cake, rounding out the meal with a subtly sweet finish.
-
Mint Chocolate Chip Muffins: For an adventurous touch, pair with mint chocolate chip muffins for a flavor surprise that will delight your guests.
Each of these suggestions not only complements the rainbow cake’s bold flavors but also brings additional textures to your dessert spread, inviting your guests to indulge in a true celebration of taste!
Rainbow Cake Recipe FAQs
What type of food coloring should I use for the Rainbow Cake?
I highly recommend using gel food coloring! It provides vibrant hues that are much richer than liquid food coloring. Just a few drops will create bold colors, making your layers pop beautifully!
How long can I store my Rainbow Cake?
You can store any leftover Rainbow Cake at room temperature in a cake carrier for up to 3 days. If you want it to last longer, refrigerate it in an airtight container for up to 2 weeks. This way, you can enjoy a slice of happiness whenever you crave it!
Can I freeze my Rainbow Cake?
Absolutely! To freeze your Rainbow Cake, wrap individual slices tightly in plastic wrap, then place them in a freezer-safe bag. It will keep well for up to 6 months. When you’re ready to enjoy a slice, just thaw it in the fridge overnight and let it come to room temperature.
What if my cake layers dome during baking?
If your layers do dome while baking, no worries! Once they cool, just level the tops with a serrated knife before assembling. This ensures even stacking and helps your cake have that professional look you want.
Are there any allergy considerations I should be aware of?
Yes! The Rainbow Cake can be made vegan by substituting the eggs with a chia or flaxseed mixture, and using plant-based milk instead of water. However, be cautious with cross-contamination from cake decorations or store-bought frostings that may contain allergens.
How can I make my Rainbow Cake gluten-free?
To make your Rainbow Cake gluten-free, simply swap the all-purpose flour with a gluten-free flour blend. Most blends work as a 1:1 substitute, allowing you to enjoy the same delicious taste and texture while catering to gluten sensitivities!
Rainbow Cake that Will Light Up Your Next Celebration
Ingredients
Equipment
Method
- Preheat the oven to 350°F (180°C) and grease six 8-inch round cake pans.
- In a large mixing bowl, whisk together the all-purpose flour, sugar, baking soda, and a pinch of salt until well combined. Add white vinegar, neutral oil, vanilla extract, and water. Mix for about 2-3 minutes until smooth.
- Divide the batter into six bowls, adding a different color of gel food coloring to each bowl and mix until vibrant.
- Pour each colored batter into the prepared pans and bake for 18-20 minutes until a toothpick comes out clean. Cool in pans for 10 minutes before transferring to wire racks.
- Once cooled, stack each layer on a serving plate with a thin layer of frosting between each one. Spread frosting around the outer layer for finishing.
- Decorate with sprinkles, edible glitter, or fruits. Let sit for 30 minutes to allow frosting to set.