

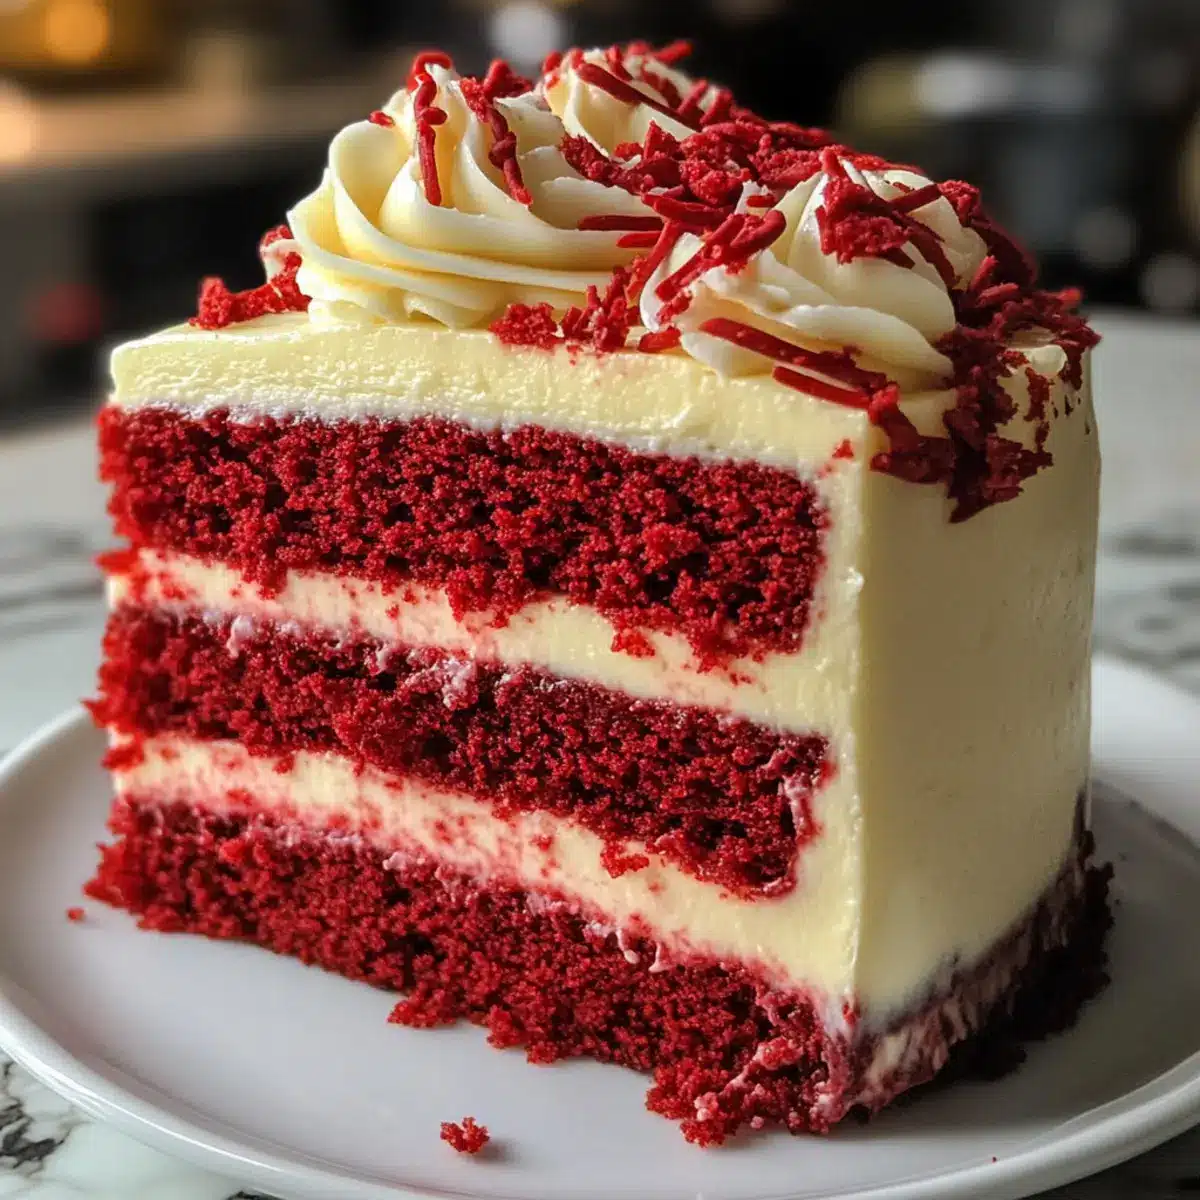
The moment I pulled my Christmas Red Velvet Cheesecake from the oven, the festive spirit enveloped my kitchen like a warm hug. Each layer of velvety, rich red cake intertwined with luscious cheesecake promises to sweep your loved ones off their feet. This luxurious dessert isn’t just a treat for the taste buds—its stunning visual appeal makes it a show-stopping centerpiece for your holiday gatherings. Not to mention, it’s surprisingly simple to make, ensuring you can spend less time stressing and more time yule-tiding with your family. With its delightful blend of sweet and tangy flavors, I guarantee this cheesecake will become a cherished holiday tradition in your home. What unique touch will you add to make this festive delight your own?
Why is this cheesecake a holiday must?
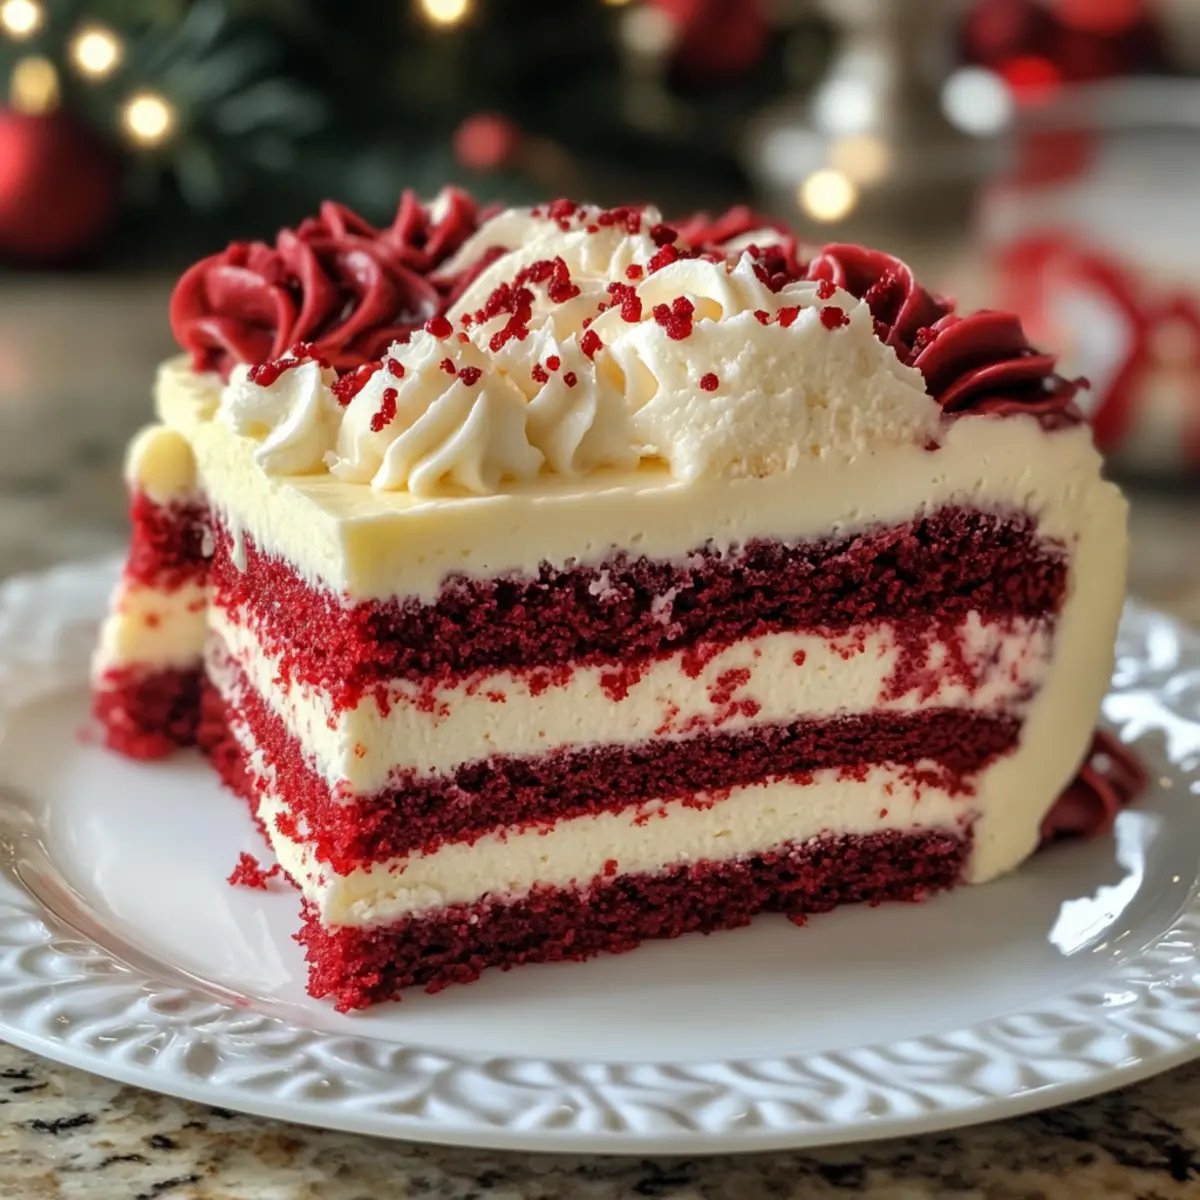
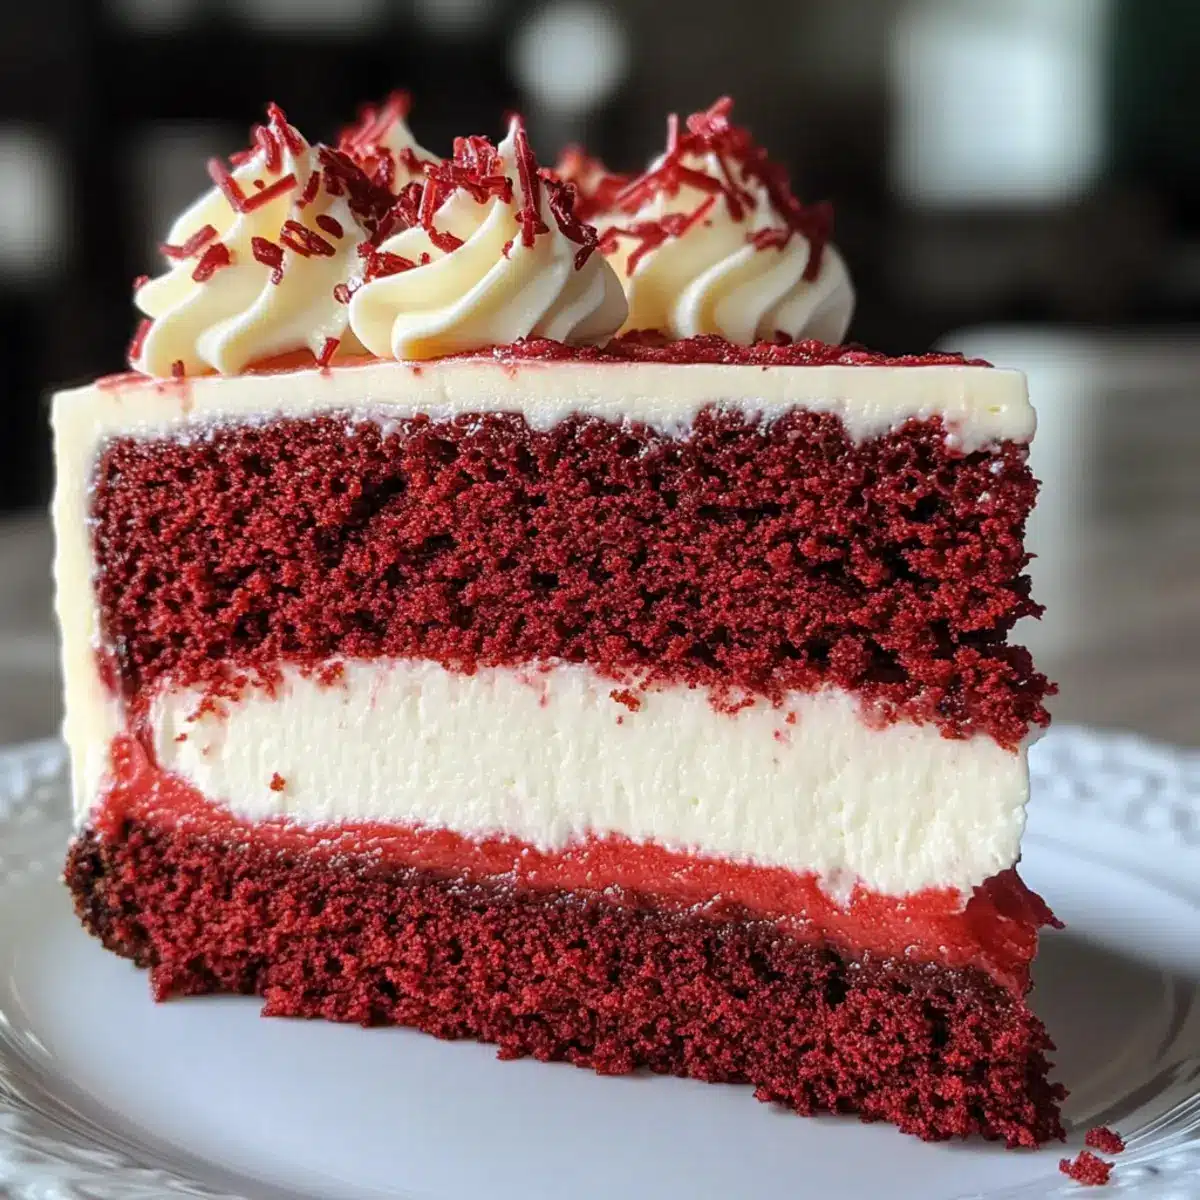
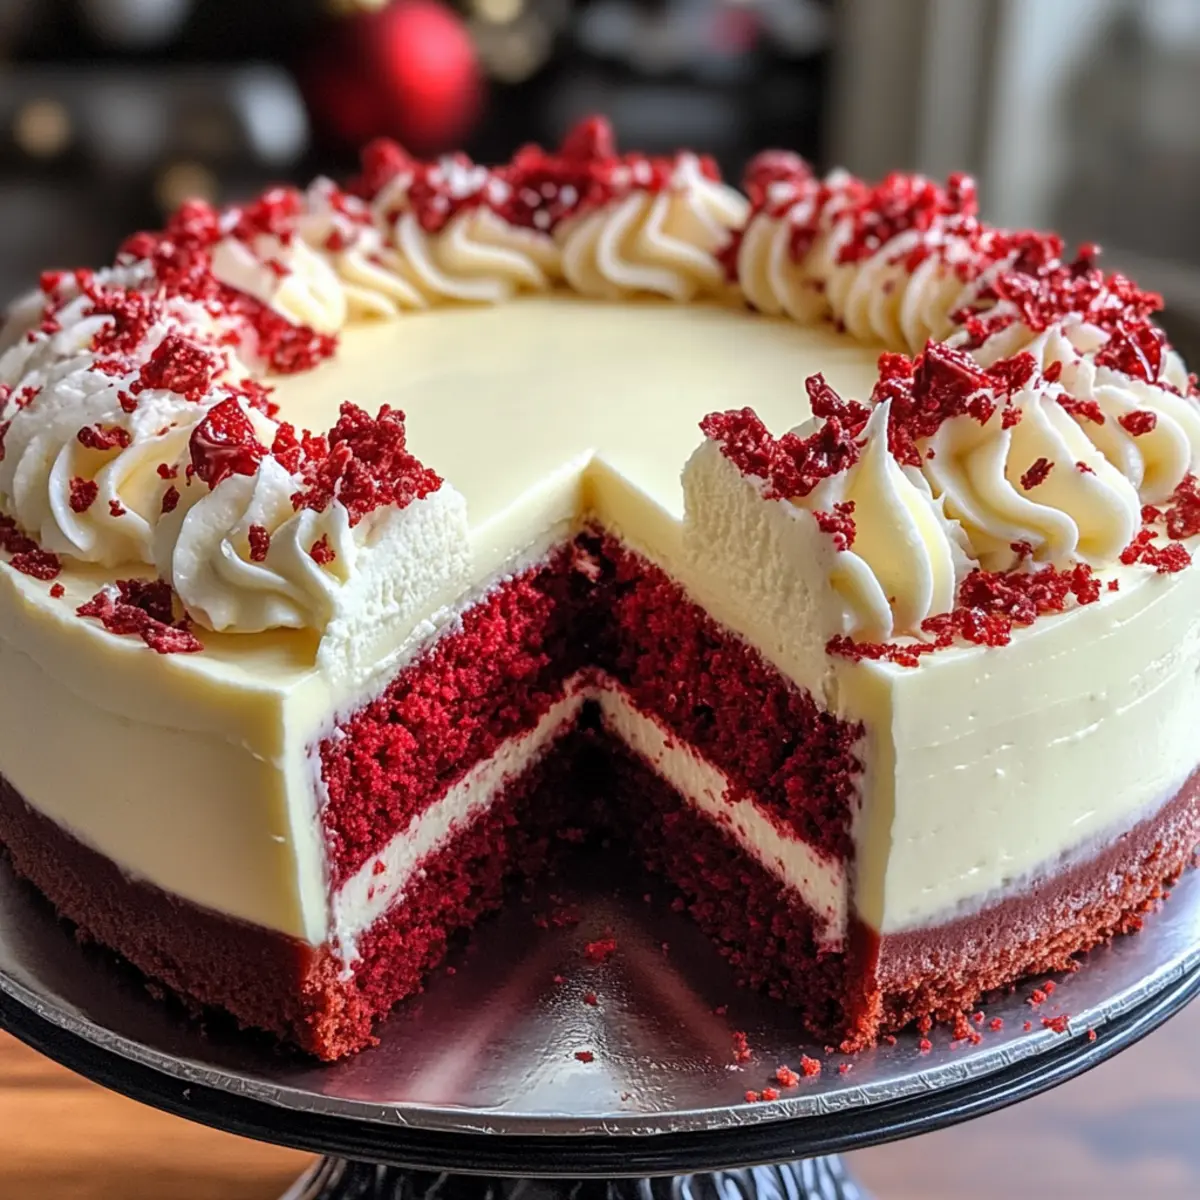
Indulgent Layers: This Christmas Red Velvet Cheesecake features stunning layers that combine rich red velvet cake with a creamy cheesecake center, making it not only delicious but also visually captivating.
Festive Flavor Profile: The blend of sweet and tangy flavors will remind your guests of beloved holiday treats, ensuring it becomes a cherished favorite.
Simple Preparation: Despite its luxurious appearance, this recipe is easy to follow, allowing you to whip up a show-stopper without the stress—perfect alongside my Strawberry Cheesecake Bars!
Versatile Options: Feel free to customize this cheesecake with chocolate chips or a touch of peppermint for an extra festive twist.
Make-Ahead Convenience: Prepare a day in advance to save time on the big day—so you can focus on celebrating with loved ones instead of last-minute baking!
Centerpiece Appeal: Its vibrant red and white contrast makes it the perfect centerpiece for your holiday table, ready to be admired and savored.
Christmas Red Velvet Cheesecake Ingredients
For the Cake Layers
- All-Purpose Flour – Provides structure to the cake layers; try using gluten-free flour if needed.
- Unsweetened Cocoa Powder – Adds a subtle chocolate flavor; ensure it’s high-quality for best results.
- Baking Powder – Acts as a leavening agent; make sure it’s fresh for optimal rise.
- Baking Soda – Helps neutralize acidity from cocoa and buttermilk.
- Salt – Enhances all flavors.
- Granulated Sugar – Sweetens the batter and contributes to moisture.
- Vegetable Oil – Provides moisture; substitute with melted coconut oil for a richer taste.
- Buttermilk – Adds tanginess and keeps the cake moist; milk mixed with vinegar works as a substitute.
- Eggs – Binds the ingredients and provides structure; use eggs at room temperature for best results.
- Red Food Coloring – Gives the cake its iconic hue; gel food coloring offers better intensity.
- Vanilla Extract – Enhances the flavor profile.
- White Vinegar – Activates the baking soda and adds a touch of tanginess.
For the Cheesecake Layer
- Cream Cheese – The main ingredient for the cheesecake layer; use full-fat for the creamiest texture.
- Granulated Sugar (for cheesecake) – Sweetens the cheesecake layer effectively.
- Sour Cream – Adds creaminess with a slight tang to balance flavors.
For the Frosting
- Unsalted Butter – Used in the frosting, contributing to its creaminess and flavor; ensure it’s softened.
- Powdered Sugar – Sweetens and thickens the frosting for a perfect finish.
This festive creation, the Christmas Red Velvet Cheesecake, will leave your guests enchanted!
Step‑by‑Step Instructions for Christmas Red Velvet Cheesecake
Step 1: Preheat and Prep
Begin by preheating your oven to 350°F (175°C). Grease and flour two 9-inch round cake pans, ensuring they are well-prepared to release the cake layers effortlessly. Place parchment paper at the bottoms for added security. This step ensures that your beautiful Christmas Red Velvet Cheesecake layers come out perfectly shaped and ready for indulgence.
Step 2: Sift the Dry Ingredients
In a large bowl, sift together 2 cups of all-purpose flour, ¼ cup of unsweetened cocoa powder, 2 teaspoons of baking powder, 1 teaspoon of baking soda, and ½ teaspoon of salt. Sifting helps to aerate the mixture and avoid lumps, resulting in a light and fluffy cake. Set this bowl aside, allowing the dry ingredients to blend while you prepare the wet mix.
Step 3: Whisk the Wet Ingredients
In a separate large mixing bowl, whisk together 1 ½ cups of granulated sugar and 1 cup of vegetable oil until well combined. Next, incorporate 1 cup of buttermilk, 2 large eggs (ensure they are at room temperature), 1 tablespoon of red food coloring, 1 teaspoon of vanilla extract, and 1 teaspoon of white vinegar. Mix until the mixture is smooth and vibrant—it should have a lovely, rich red hue!
Step 4: Combine Wet and Dry Mixtures
Gently fold the dry ingredients into the wet ingredients using a spatula. Mix until just combined—don’t overmix, as this can lead to a dense cake. The batter for your Christmas Red Velvet Cheesecake should be thick and luscious, with no visible dry spots remaining. This careful blending is crucial for achieving the perfect cake texture.
Step 5: Bake the Cake Layers
Divide the red velvet batter evenly between the prepared cake pans. Bake in your preheated oven for 25-30 minutes or until a toothpick inserted in the center comes out clean. As they bake, your kitchen will fill with a delightful aroma that signifies the holiday spirit. Once done, remove the pans and let them cool on a wire rack.
Step 6: Cool and Prepare the Cheesecake Layer
After allowing the cake layers to cool in the pans for about 10 minutes, gently turn them out onto the wire racks to cool completely. Meanwhile, prepare your cheesecake layer by preheating the oven to 325°F (160°C). Using a mixer, beat 16 oz of cream cheese until smooth, then add 1 cup of granulated sugar, 1 cup of sour cream, and 2 large eggs, mixing until silky and lump-free.
Step 7: Bake the Cheesecake
Pour the creamy cheesecake mixture into a greased 9-inch springform pan. Bake in the preheated oven for 50-60 minutes, until the edges are set but the center is slightly jiggly. This gentle baking helps create a smooth, velvety texture for your Christmas Red Velvet Cheesecake. Once done, turn off the oven and crack the door open for an hour to cool gradually.
Step 8: Frost the Cake Layers
Once the red velvet cake layers and cheesecake have cooled completely, it’s time to assemble. Use a serrated knife to level the tops of the cakes if necessary. Spread a layer of cream cheese frosting on top of the first red velvet layer, followed by the cheesecake layer. Place the second red velvet layer on top, securing the layers in place with creamy frosting.
Step 9: Decorate and Chill
Frost the entire cake with cream cheese frosting, decorating as desired with festive touches like crushed candy canes or seasonal sprinkles. Once frosted, chill the entire Christmas Red Velvet Cheesecake in the refrigerator for at least 4 hours, or overnight if possible, to allow the layers to meld beautifully.
Step 10: Serve and Enjoy
Before serving, slice into your stunning Christmas Red Velvet Cheesecake, revealing its festive layers. This beautiful dessert is sure to be the highlight of your holiday gatherings. Pair each slice with a coffee or dessert wine for a delightful experience. Share the love of homemade flavors and create sweet memories with your friends and family!
Expert Tips for Christmas Red Velvet Cheesecake
-
Cool Completely: Make sure the cake layers are completely cool before frosting to avoid melting your cream cheese frosting and ruining its beautiful presentation.
-
Level Layers: Use a serrated knife to level the tops of the cake layers if they’re domed. This ensures a more stable and easier-to-cut Christmas Red Velvet Cheesecake.
-
Room Temperature Ingredients: Allow your cream cheese and eggs to reach room temperature. This helps create a smoother cheesecake layer, eliminating lumps for a perfect texture.
-
Gel Food Coloring: Opt for gel food coloring instead of liquid for a more vibrant red color that holds better in the cake. Adjust the amount depending on the desired intensity.
-
Crease Prevention: To prevent the cheesecake from cracking, follow the baking time closely and allow it to cool gradually in the oven with the door slightly ajar.
-
Make-Ahead Delight: Prepare your cheesecake a day in advance to improve the flavors and save time on the day of your celebration, allowing you to enjoy the festivities!
What to Serve with Christmas Red Velvet Cheesecake
The perfect holiday feast deserves equally delightful companions to elevate your festive experience.
-
Creamy Mashed Potatoes: Their buttery richness contrasts beautifully with the cheesecake’s sweet tang, rounding out your holiday meal.
-
Roasted Brussels Sprouts: Crispy on the outside and tender inside, these add a satisfying crunch that refreshes the palate between bites of cheesecake.
-
Spiced Apple Cider: Warm and fragrant, this seasonal drink brings out the flavors of your red velvet dessert while wrapping you in cozy comfort.
-
Homemade Hot Chocolate: Topped with whipped cream, this sweet treat echoes the dessert’s richness, making every sip a delightful continuation of indulgence.
-
Chocolate-Dipped Fruit: Fresh strawberries or bananas dipped in chocolate provide a fresh, contrasting touch to the rich cheesecake, perfect for a light touch.
-
Gingerbread Cookies: With their spiced flavor, these holiday favorites add a classic touch to your celebration, complementing the festive essence of your cheesecake.
-
Pecan Pie: Its gooey sweetness combines beautifully with the cheesecake’s cheesiness, creating a heavenly and comforting dessert experience.
-
Nutty Cheese Platter: A selection of nuts and creamy cheeses creates a sophisticated appetizer that balances well with the dessert’s sweet notes.
-
Caramel Sauce: Drizzling this over each slice adds an extra layer of decadence, enhancing the joy of every bite of your Christmas Red Velvet Cheesecake.
How to Store and Freeze Christmas Red Velvet Cheesecake
Fridge: Store your cheesecake in the refrigerator, wrapped tightly in plastic wrap or placed in an airtight container. It will stay fresh for up to 3-4 days.
Freezer: If you want to keep the Christmas Red Velvet Cheesecake for a longer period, freeze it. Wrap slices in plastic wrap and aluminum foil, or place the whole cake in an airtight container for up to 1 month.
Reheating: To enjoy frozen slices, simply transfer to the fridge to thaw overnight before serving. Avoid reheating in the microwave, as it may alter the texture.
Make Ahead Options
These Christmas Red Velvet Cheesecake layers make for an incredible make-ahead dessert that saves you time on busy holiday days! You can prepare the red velvet cake layers up to 24 hours in advance; just cool them completely, wrap them tightly in plastic wrap, and refrigerate to maintain their moisture and prevent drying out. Additionally, the cheesecake layer can be made up to 3 days ahead—simply bake it, let it cool, and store it in an airtight container in the fridge. When it’s time to serve, assemble the cake by frosting and chilling it for at least 4 hours (or overnight if you can wait). This ensures all flavors meld perfectly, delivering a stunning dessert that’s just as delicious as if made fresh that day!
Christmas Red Velvet Cheesecake Variations
Feel free to add your personal touch to this decadent dessert masterpiece! Each variation offers a delightful twist that will please your senses and creativity.
-
Gluten-Free: Substitute all-purpose flour with a gluten-free blend for a safe and equally delicious option for gluten-sensitive friends and family.
-
Classic Vanilla Layers: Swap the red velvet layers for a classic vanilla cake to create a more neutral base that lets the cheesecake shine.
-
Minty Freshness: Mix in crushed peppermint candies into the cheesecake layer for a refreshing holiday flavor. The candy adds a delightful crunch and festive flair!
-
Chocolate Chip Surprise: Fold in chocolate chips into the red velvet batter to create pockets of melty chocolate in every slice. It’s a sweet surprise that chocolate lovers will adore!
-
Festive Toppings: Top the cheesecake with festive decorations like crushed candy canes, seasonal sprinkles, or even a drizzle of white chocolate for added sweetness and visual appeal.
-
Cream Cheese Swirl: Before baking, dollop cheesecake batter over the red velvet batter in the cake pans and use a knife to create beautiful swirls. This results in a stunning marbled effect for your holiday dessert!
-
Spice Up the Flavor: Add a pinch of cinnamon or nutmeg to both the cake and cheesecake batter for a warm hint of spice that evokes cozy holiday memories.
-
Mini Cheesecakes: For a fun twist, turn the cheesecake into mini versions by using a muffin tin. Just adjust the baking time, and you’ll have bite-sized delights perfect for sharing.
If you enjoy this indulgent recipe, you might also find joy in making my festive Red White Blue Rice Krispie Treats or celebrating with my luxurious Cookies Cream Cheesecake. Let your imagination run wild!
Christmas Red Velvet Cheesecake Recipe FAQs
Which ingredients should I pay attention to for ripeness and quality?
Absolutely! For the best flavor and texture in your Christmas Red Velvet Cheesecake, ensure you use high-quality ingredients. Fresh eggs are vital as they bind the mixture effectively, so check the sell-by date. Use full-fat cream cheese for a rich flavor in the cheesecake layer, and opt for fresh buttermilk or homemade alternatives (milk mixed with vinegar) for that perfect tanginess. When it comes to cocoa powder, a good, unsweetened variety will elevate the chocolate notes beautifully!
How should I store the cheesecake, and how long will it last?
Very! Store your Christmas Red Velvet Cheesecake by wrapping it tightly in plastic wrap or placing it in an airtight container. It will stay fresh in the refrigerator for about 3 to 4 days. If you plan to keep it longer, the freezer is a great option—just make sure to wrap it properly to prevent freezer burn!
Can I freeze my Christmas Red Velvet Cheesecake? If so, how?
Certainly! Freezing your cheesecake is simple! After it has completely cooled, wrap each slice tightly in plastic wrap, followed by a layer of aluminum foil for added protection. Alternatively, you can place the whole cake in an airtight container. It can be frozen for up to 1 month. When you’re ready to enjoy it, transfer the slices to the refrigerator to thaw overnight.
What if my cheesecake layer cracks during baking?
Don’t worry; it happens to the best of us! To avoid cracks in your cheesecake layer, make sure you don’t overbake it—look for the edges to be set, while the center remains slightly jiggly. Gradually cooling it in the oven with the door slightly ajar for about an hour after baking can also help. If cracks do occur, you can cover them with frosting or festive decorations like crushed candy canes!
Do any dietary considerations need to be kept in mind?
Definitely! If you’re serving guests with dietary restrictions, it’s good to know that this cheesecake contains gluten (from all-purpose flour) and dairy (from cream cheese and butter). You could use gluten-free flour to make it gluten-free and plant-based cream cheese or coconut cream for a dairy-free version. Always check ingredient labels for potential allergens like soy or nut oils if you’re uncertain about specific allergies.
How can I make this cheesecake more festive or personalized?
The more the merrier! Feel free to add a personal touch—incorporating chocolate chips, crushed peppermint candies, or even a hint of espresso powder can elevate the festive appeal. You might also try different food coloring for seasonal themes—pastel colors for spring or rich greens for St. Patrick’s Day! Don’t be shy to experiment; customization is part of the fun!
Decadent Christmas Red Velvet Cheesecake for Festive Cheer
Ingredients
Equipment
Method
- Preheat your oven to 350°F (175°C). Grease and flour two 9-inch round cake pans.
- In a large bowl, sift together 2 cups of all-purpose flour, ¼ cup of unsweetened cocoa powder, 2 teaspoons of baking powder, 1 teaspoon of baking soda, and ½ teaspoon of salt.
- In a separate large mixing bowl, whisk together 1 ½ cups of granulated sugar and 1 cup of vegetable oil until well combined. Incorporate 1 cup of buttermilk, 2 large eggs, 1 tablespoon of red food coloring, 1 teaspoon of vanilla extract, and 1 teaspoon of white vinegar. Mix until smooth.
- Gently fold the dry ingredients into the wet ingredients using a spatula until just combined.
- Divide the batter evenly between the prepared cake pans and bake for 25-30 minutes or until a toothpick comes out clean.
- Cool the cake layers for 10 minutes in the pans, then turn them onto wire racks to cool completely.
- Preheat the oven to 325°F (160°C) and prepare the cheesecake layer by beating 16 oz of cream cheese until smooth. Add 1 cup of granulated sugar, 1 cup of sour cream, and 2 large eggs, mixing until silky and lump-free.
- Pour the cheesecake mixture into a greased 9-inch springform pan and bake for 50-60 minutes, until the edges are set but the center is slightly jiggly.
- Cool the cheesecake gradually by cracking the oven door open after baking for an hour.
- Level the tops of the cooled cake layers with a serrated knife if necessary. Assemble by frosting the top of the first layer with cream cheese frosting, adding the cheesecake layer, then the second cake layer.
- Frost the entire cake and chill in the refrigerator for at least 4 hours, or overnight if possible.
- Slice and serve your stunning Christmas Red Velvet Cheesecake paired with coffee or dessert wine.