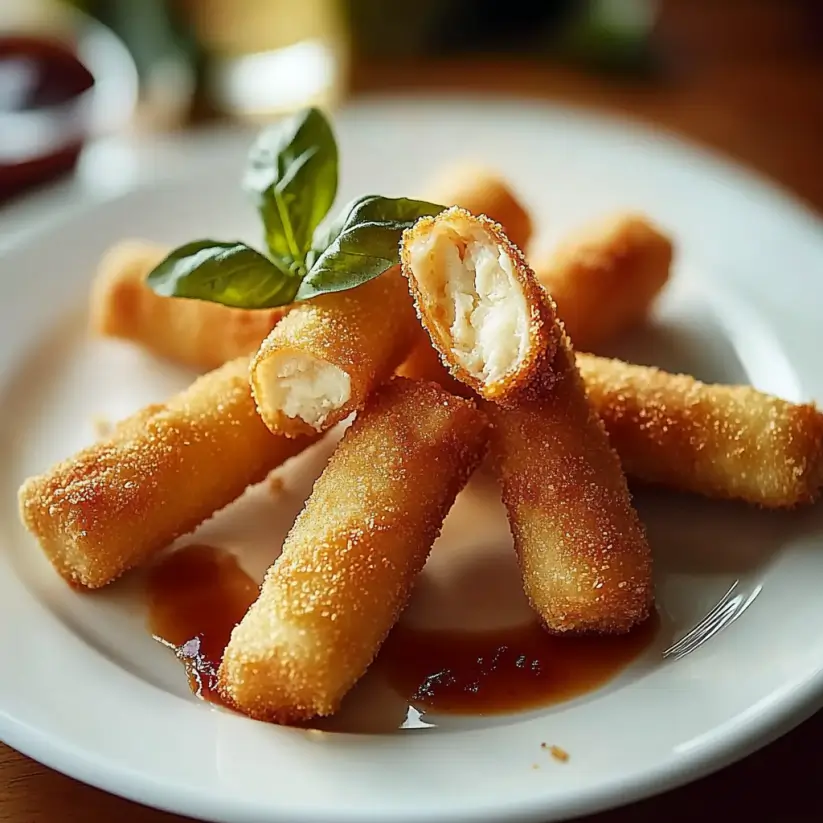
Crispy Rice Paper Crab Rangoons: Discover the Recipe!

Introduction to Crispy Rice Paper Crab Rangoons

There’s something magical about the crunch of a perfectly fried appetizer, isn’t there? Crispy Rice Paper Crab Rangoons bring that delightful texture to your table, making them an irresistible treat. Whether you’re hosting friends for game night or just looking for a quick solution to satisfy your cravings, these rangoons are a fantastic choice. With a creamy crab filling wrapped in delicate rice paper, they’re not just delicious; they’re also a fun way to impress your loved ones. Let’s dive into this easy recipe that’s sure to become a favorite in your kitchen!

Why You’ll Love This Crispy Rice Paper Crab Rangoons

These Crispy Rice Paper Crab Rangoons are a game-changer for any home cook. They come together in just 35 minutes, making them perfect for busy weeknights or last-minute gatherings. The combination of creamy crab and crispy rice paper creates a flavor explosion that’s hard to resist. Plus, they’re gluten-free, so everyone can enjoy them. Trust me, once you try these, they’ll become your go-to appetizer!

Ingredients for Crispy Rice Paper Crab Rangoons

Gathering the right ingredients is the first step to creating these delightful Crispy Rice Paper Crab Rangoons. Here’s what you’ll need:

  • Cream cheese: This creamy base adds richness and helps bind the filling together.
  • Crab meat: Fresh or canned, this is the star of the show, providing that sweet, oceanic flavor.
  • Green onions: These add a fresh, mild onion flavor that brightens up the filling.
  • Garlic powder: A dash of this brings a savory depth to the mixture.
  • Worcestershire sauce: This adds a tangy umami kick that enhances the overall taste.
  • Soy sauce: A splash of this salty sauce rounds out the flavors beautifully.
  • Rice paper wrappers: These delicate wrappers are what make the rangoons crispy and light.
  • Vegetable oil: Essential for frying, it gives the rangoons that golden, crispy exterior.

For those looking to spice things up, consider adding a teaspoon of sriracha or chili paste to the crab mixture. If you want to switch things up, you can substitute the crab meat with cooked shrimp or even mashed avocado for a vegetarian twist. All ingredient quantities are listed at the bottom of the article for easy reference and printing!

How to Make Crispy Rice Paper Crab Rangoons

Now that you have all your ingredients ready, it’s time to bring these Crispy Rice Paper Crab Rangoons to life! Follow these simple steps, and you’ll be on your way to creating a delicious appetizer that will wow your friends and family.

Step 1: Prepare the Filling

Start by grabbing a mixing bowl. Combine the softened cream cheese, shredded crab meat, finely chopped green onions, garlic powder, Worcestershire sauce, and soy sauce. Mix everything together until it’s creamy and well-blended. This filling is the heart of your rangoons, so make sure it’s smooth and flavorful!

Step 2: Soften the Rice Paper

Next, fill a shallow dish with warm water. Dip one rice paper wrapper into the water for about 10-15 seconds. You want it to become pliable but not too soggy. Once it’s ready, gently lay it on a clean surface. This step is crucial for achieving that perfect crispy texture when frying!

Step 3: Assemble the Rangoons

Now comes the fun part! Place about 1 tablespoon of the crab mixture in the center of the softened rice paper wrapper. Fold the sides over the filling, then roll it up tightly from the bottom to the top, sealing the edges as you go. Repeat this process with the remaining wrappers and filling. Each one should look like a little package of joy!

Step 4: Fry the Rangoons

In a large skillet, heat about 1 inch of vegetable oil over medium heat. Once the oil is hot, carefully add the rangoons in batches. Fry them until they turn golden brown and crispy, which should take about 3-4 minutes per side. Keep an eye on them; you want that perfect crunch without burning!

Step 5: Drain and Serve

Once they’re beautifully golden, remove the rangoons from the oil and place them on a paper towel-lined plate to drain any excess oil. Serve them warm with your favorite dipping sauce, like sweet and sour sauce or soy sauce. Trust me, these crispy delights will disappear in no time!
Tips for Success

  • Make sure your cream cheese is softened for easy mixing.
  • Don’t over-soak the rice paper; it should be pliable, not mushy.
  • Fry in small batches to maintain oil temperature and achieve even crispiness.
  • Use a thermometer to check oil temperature; it should be around 350°F.
  • Experiment with different dipping sauces to find your favorite flavor combination!

Equipment Needed

  • Mixing bowl: A standard bowl works, but a large one makes mixing easier.
  • Shallow dish: Use a pie plate or any wide dish for soaking rice paper.
  • Skillet: A deep skillet or wok is ideal for frying.
  • Slotted spoon: This helps remove the rangoons from hot oil safely.
  • Paper towels: Essential for draining excess oil after frying.

Variations

  • Spicy Crab Rangoons: Add a teaspoon of sriracha or chili paste to the filling for a fiery kick.
  • Shrimp Rangoons: Substitute crab meat with cooked shrimp for a different seafood flavor.
  • Vegetarian Option: Use mashed avocado or a mix of sautéed vegetables for a creamy, plant-based filling.
  • Cheesy Rangoons: Mix in shredded cheese like mozzarella or cheddar for an extra cheesy twist.
  • Herbed Rangoons: Add fresh herbs like cilantro or dill to the filling for a burst of freshness.

Serving Suggestions

  • Pair your Crispy Rice Paper Crab Rangoons with a refreshing cucumber salad for a light side.
  • Serve with sweet and sour sauce or a zesty soy dipping sauce for added flavor.
  • For drinks, consider a chilled beer or a crisp white wine to complement the dish.
  • Garnish with fresh herbs like cilantro or parsley for a pop of color.

FAQs about Crispy Rice Paper Crab Rangoons

Can I make Crispy Rice Paper Crab Rangoons ahead of time?

Absolutely! You can prepare the filling and assemble the rangoons in advance. Just store them in the fridge, covered, until you’re ready to fry. This makes for a quick appetizer when guests arrive!

What dipping sauces pair well with these rangoons?

These crispy delights are fantastic with a variety of dipping sauces. Sweet and sour sauce, soy sauce, or even a spicy mayo can elevate the flavor. Feel free to experiment!

Can I bake the rangoons instead of frying them?

While frying gives the best crispy texture, you can bake them for a healthier option. Brush the assembled rangoons with oil and bake at 400°F for about 15-20 minutes, flipping halfway through.

What can I substitute for crab meat?

If crab isn’t your thing, you can use cooked shrimp or even mashed avocado for a vegetarian version. Both options will still deliver a delicious flavor!

How do I store leftover rangoons?

Store any leftover Crispy Rice Paper Crab Rangoons in an airtight container in the fridge for up to 2 days. Reheat them in the oven to regain some crispiness before serving again.

Final Thoughts

Creating Crispy Rice Paper Crab Rangoons is more than just cooking; it’s about sharing joy and deliciousness with those you love. The satisfying crunch, the creamy filling, and the delightful dipping sauces come together to create a memorable experience. Whether you’re serving them at a party or enjoying them on a quiet evening, these rangoons are sure to bring smiles. Plus, the versatility of this recipe means you can adapt it to suit any taste. So roll up your sleeves, gather your ingredients, and let the magic happen in your kitchen!

Ranis

Crispy Rice Paper Crab Rangoons: Discover the Recipe!

Crispy Rice Paper Crab Rangoons are a delicious appetizer featuring a creamy crab filling wrapped in crispy rice paper, perfect for dipping.
Prep Time 20 minutes
Cook Time 15 minutes
Total Time 35 minutes
Course: Appetizer
Cuisine: Asian
Calories: 250

Ingredients
  

  • 8 ounces cream cheese softened
  • 1 cup crab meat shredded
  • 1/4 cup green onions finely chopped
  • 1 teaspoon garlic powder
  • 1 teaspoon Worcestershire sauce
  • 1/2 teaspoon soy sauce
  • 1 package 8 ounces rice paper wrappers
  • Vegetable oil for frying

Method
 

  1. In a mixing bowl, combine the softened cream cheese, crab meat, green onions, garlic powder, Worcestershire sauce, and soy sauce. Mix until well combined and creamy.
  2. Fill a shallow dish with warm water. Dip one rice paper wrapper into the water for about 10-15 seconds until it becomes pliable.
  3. Lay the softened rice paper wrapper on a clean surface. Place about 1 tablespoon of the crab mixture in the center of the wrapper.
  4. Fold the sides of the wrapper over the filling, then roll it up tightly from the bottom to the top, sealing the edges. Repeat with the remaining wrappers and filling.
  5. In a large skillet, heat about 1 inch of vegetable oil over medium heat. Once the oil is hot, carefully add the rangoons in batches, frying until golden brown and crispy, about 3-4 minutes per side.
  6. Remove the rangoons from the oil and place them on a paper towel-lined plate to drain excess oil.
  7. Serve warm with your favorite dipping sauce, such as sweet and sour sauce or soy sauce.

Nutrition

Serving: 1servingCalories: 250kcalCarbohydrates: 10gProtein: 8gFat: 20gSaturated Fat: 10gPolyunsaturated Fat: 5gCholesterol: 50mgSodium: 300mgFiber: 1gSugar: 1g

Notes

  • For a spicy kick, add a teaspoon of sriracha or chili paste to the crab mixture.
  • Substitute the crab meat with cooked shrimp or a vegetarian option like mashed avocado for a different flavor profile.
Tried this recipe?

Let us know how it was!

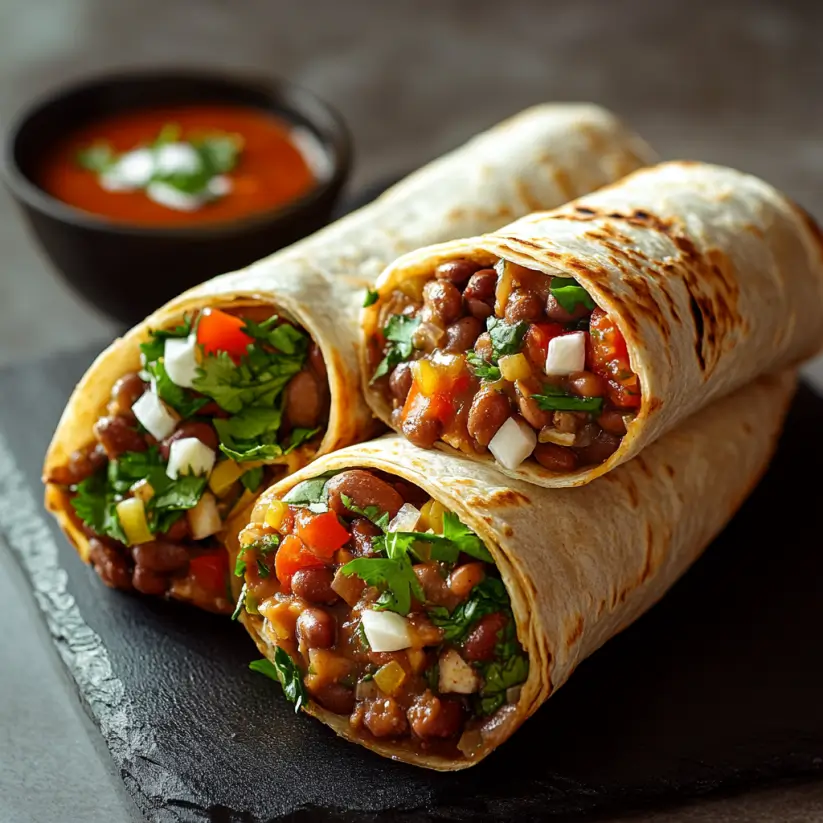
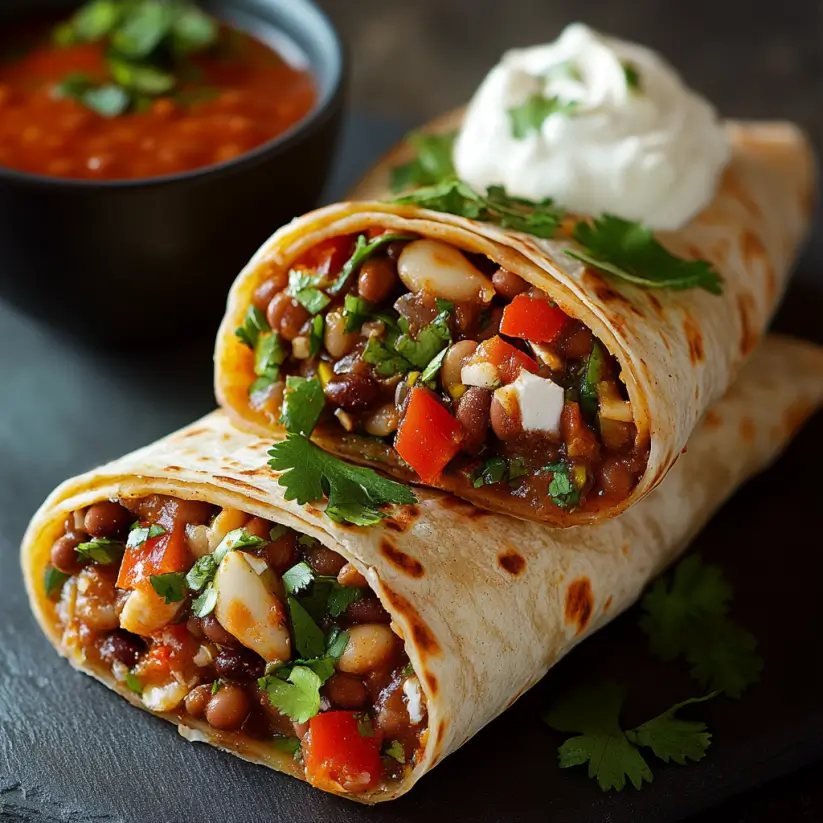
Fiesta Bean Wraps: Discover a Flavorful Recipe Today!

Introduction to Fiesta Bean Wraps

Life can get hectic, and sometimes, you just need a quick solution that doesn’t skimp on flavor. That’s where my Fiesta Bean Wraps come in! These wraps are not only a breeze to whip up, but they also pack a punch of taste and nutrition. Whether you’re looking for a satisfying lunch or a light dinner, this recipe is perfect for busy days or when you want to impress your loved ones with minimal effort. Trust me, once you try these wraps, they’ll become a staple in your kitchen!

Why You’ll Love This Fiesta Bean Wraps

Fiesta Bean Wraps are the ultimate answer to your mealtime dilemmas. They’re quick to prepare, taking just 25 minutes from start to finish. The vibrant flavors will dance on your taste buds, making every bite a delight. Plus, they’re packed with protein and fiber, keeping you full and satisfied. Whether you’re cooking for yourself or a crowd, these wraps are sure to impress without the stress!

Ingredients for Fiesta Bean Wraps

Gathering the right ingredients is the first step to creating these delicious Fiesta Bean Wraps. Here’s what you’ll need:

  • Black beans: These hearty beans add a rich flavor and are packed with protein.
  • Pinto beans: Creamy and slightly sweet, they complement the black beans perfectly.
  • Corn kernels: Fresh, frozen, or canned, corn brings a sweet crunch to the mix.
  • Red bell pepper: This vibrant veggie adds color and a hint of sweetness.
  • Red onion: A touch of sharpness that balances the other flavors beautifully.
  • Garlic: Minced garlic infuses the dish with a warm, aromatic essence.
  • Ground cumin: This spice adds a warm, earthy flavor that’s essential in Mexican cuisine.
  • Chili powder: A dash of heat that elevates the flavor profile of the wraps.
  • Olive oil: Used for sautéing, it adds richness and helps the veggies soften.
  • Salt and pepper: Essential seasonings to enhance all the flavors.
  • Whole wheat tortillas: A healthier option that holds all the delicious fillings together.
  • Shredded lettuce: Adds a refreshing crunch and a pop of color.
  • Diced tomatoes: Juicy and vibrant, they bring freshness to each bite.
  • Avocado: Creamy slices that add richness and healthy fats.
  • Salsa: A zesty topping that ties all the flavors together.
  • Shredded cheese (optional): For those who love a cheesy finish, this is a great addition.

For exact measurements, check the bottom of the article where you can find everything listed for easy printing. Feel free to get creative with substitutions; lentils or chickpeas can be great alternatives to the beans if you’re looking for a different texture or taste!

How to Make Fiesta Bean Wraps

Creating these Fiesta Bean Wraps is as easy as pie, or should I say, as easy as a wrap! Follow these simple steps, and you’ll have a delicious meal ready in no time. Let’s dive in!

Step 1: Sauté the Vegetables

Start by heating a tablespoon of olive oil in a large skillet over medium heat. Once the oil is shimmering, toss in the diced red onion and bell pepper. Sauté them for about 5 minutes, stirring occasionally, until they soften and become fragrant. This step is crucial; it sets the stage for the flavor explosion to come!

Step 2: Add Spices and Garlic

Next, it’s time to amp up the flavor! Add the minced garlic, ground cumin, chili powder, salt, and pepper to the skillet. Cook everything together for another minute, stirring constantly. The aroma will be heavenly, and you’ll know you’re on the right track!

Step 3: Mix in the Beans and Corn

Now, stir in the black beans, pinto beans, and corn. Mix everything well and let it cook for about 5-7 minutes, stirring occasionally. You want the beans to be heated through and the flavors to meld together beautifully. This is where the magic happens!

Step 4: Prepare the Tortillas

While the bean mixture is cooking, warm the whole wheat tortillas. You can do this in a separate pan or pop them in the microwave for a few seconds until they’re pliable. This makes rolling them up a breeze and prevents tearing!

Step 5: Assemble the Wraps

It’s assembly time! Take a warm tortilla and place a generous scoop of the bean mixture in the center. Top it off with shredded lettuce, diced tomatoes, avocado slices, and a dollop of salsa. If you’re feeling cheesy, sprinkle some shredded cheese on top. Now, fold in the sides of the tortilla and roll it up tightly from the bottom. Voila, your wrap is ready!

Step 6: Serve or Store

Enjoy your Fiesta Bean Wraps immediately for the best flavor and texture. If you’re not eating them right away, wrap them in foil to keep them fresh for later. These wraps are perfect for meal prep or a quick snack on the go!

Tips for Success

  • Don’t skip the sautéing step; it enhances the flavors of the veggies.
  • Experiment with spices! A pinch of smoked paprika can add a nice twist.
  • For extra freshness, add a squeeze of lime juice before serving.
  • Wraps can be made ahead of time; just store them in the fridge.
  • Feel free to customize toppings based on your preferences!

Equipment Needed

  • Large skillet: A non-stick skillet works wonders for easy cooking and cleanup.
  • Spatula: Use a sturdy spatula to stir and serve your delicious wraps.
  • Microwave or pan: For warming tortillas, either method gets the job done.
  • Cutting board and knife: Essential for chopping veggies with ease.

Variations

  • Spicy Kick: Add jalapeños or a splash of hot sauce to the bean mixture for an extra kick.
  • Protein Boost: Incorporate grilled chicken or turkey for a heartier wrap.
  • Vegan Delight: Skip the cheese and use a dairy-free alternative to keep it plant-based.
  • Grain Swap: Try quinoa or brown rice instead of beans for a different texture and flavor.
  • Herb Infusion: Mix in fresh cilantro or parsley for a burst of freshness.

Serving Suggestions

  • Side Salad: Pair your wraps with a light mixed greens salad drizzled with vinaigrette.
  • Chips and Salsa: Serve with tortilla chips and your favorite salsa for a crunchy side.
  • Refreshing Drink: Enjoy with a cold glass of iced tea or a zesty limeade.
  • Presentation: Cut wraps in half and arrange on a colorful platter for a festive look.

FAQs about Fiesta Bean Wraps

Got questions about these delicious Fiesta Bean Wraps? You’re not alone! Here are some common queries that might pop up as you whip up this tasty dish.

Can I make Fiesta Bean Wraps ahead of time?

Absolutely! You can prepare the bean mixture in advance and store it in the fridge. Just warm it up when you’re ready to assemble your wraps. This makes for a quick meal on busy days!

What can I substitute for the beans?

If you’re looking for a change, lentils or chickpeas work wonderfully in place of black and pinto beans. They’ll add a different texture while still keeping the wraps hearty and satisfying.

Are Fiesta Bean Wraps suitable for meal prep?

Yes! These wraps are perfect for meal prep. Just wrap them in foil or store them in airtight containers. They’ll stay fresh in the fridge for a few days, making them a convenient grab-and-go option.

Can I make these wraps gluten-free?

Definitely! Simply swap out the whole wheat tortillas for gluten-free ones. This way, everyone can enjoy the fiesta, regardless of dietary restrictions!

How can I make these wraps spicier?

If you like a little heat, add jalapeños or a splash of your favorite hot sauce to the bean mixture. You can also sprinkle some crushed red pepper flakes for an extra kick!

Final Thoughts

Fiesta Bean Wraps are more than just a meal; they’re a celebration of flavors and a testament to how simple ingredients can create something extraordinary. Each bite is a delightful mix of textures and tastes, making it hard to believe they’re so easy to prepare. Whether you’re enjoying them on a busy weeknight or serving them at a gathering, these wraps bring joy and satisfaction to the table. Plus, they’re versatile enough to adapt to your cravings. So, roll up your sleeves, gather your ingredients, and let the fiesta begin in your kitchen!

Ranis

Fiesta Bean Wraps: Discover a Flavorful Recipe Today!

A delicious and nutritious recipe for Fiesta Bean Wraps, perfect for a quick meal or snack.
Prep Time 10 minutes
Cook Time 15 minutes
Total Time 25 minutes
Servings: 4 servings
Course: Main Dish
Cuisine: Mexican
Calories: 380

Ingredients
  

  • 1 can 15 oz black beans, drained and rinsed
  • 1 can 15 oz pinto beans, drained and rinsed
  • 1 cup corn kernels fresh, frozen, or canned
  • 1 red bell pepper diced
  • 1 small red onion diced
  • 2 cloves garlic minced
  • 1 teaspoon ground cumin
  • 1 teaspoon chili powder
  • 1 tablespoon olive oil
  • Salt and pepper to taste
  • 4 large whole wheat tortillas
  • 1 cup shredded lettuce
  • 1 cup diced tomatoes
  • 1 avocado sliced
  • 1/2 cup salsa
  • 1/2 cup shredded cheese optional

Method
 

  1. In a large skillet, heat the olive oil over medium heat. Add the diced red onion and bell pepper, and sauté for about 5 minutes until softened.
  2. Add the minced garlic, cumin, chili powder, salt, and pepper. Cook for another minute until fragrant.
  3. Stir in the black beans, pinto beans, and corn. Cook for about 5-7 minutes, stirring occasionally, until heated through.
  4. Warm the tortillas in a separate pan or microwave until pliable.
  5. To assemble, place a generous scoop of the bean mixture in the center of each tortilla. Top with shredded lettuce, diced tomatoes, avocado slices, and salsa. Add cheese if desired.
  6. Fold in the sides of the tortilla and roll it up tightly from the bottom.
  7. Serve immediately or wrap in foil for later.

Nutrition

Serving: 1wrapCalories: 380kcalCarbohydrates: 45gProtein: 15gFat: 12gSaturated Fat: 2gPolyunsaturated Fat: 10gSodium: 400mgFiber: 12gSugar: 2g

Notes

  • For added flavor, consider adding a squeeze of lime juice or fresh cilantro to the filling.
  • Substitute the beans with lentils or chickpeas for a different texture and taste.

Tried this recipe?

Let us know how it was!

Dill Pickle Parmesan Chicken: A Unique Flavor Explosion!

Introduction to Dill Pickle Parmesan Chicken

There’s something magical about the combination of flavors that can transform a simple chicken dinner into a culinary adventure. Dill Pickle Parmesan Chicken is just that—a delightful twist that brings together the tangy zest of dill pickles and the rich, savory notes of Parmesan cheese. This dish is perfect for those busy weeknights when you want to impress your family without spending hours in the kitchen. With just a few ingredients and minimal prep, you can create a meal that’s not only delicious but also a conversation starter at the dinner table.

Why You’ll Love This Dill Pickle Parmesan Chicken

This Dill Pickle Parmesan Chicken is a game-changer for your dinner routine. It’s incredibly easy to whip up, making it perfect for those hectic evenings when time is tight. The unique flavor profile will tantalize your taste buds, leaving everyone at the table asking for seconds. Plus, it’s baked, not fried, so you can enjoy a crispy, guilt-free meal that doesn’t skimp on taste. What’s not to love?

Ingredients for Dill Pickle Parmesan Chicken

Gathering the right ingredients is the first step to culinary success. For this Dill Pickle Parmesan Chicken, you’ll need:

  • Chicken breasts: The star of the show! Choose large, boneless chicken breasts for even cooking and juicy results.
  • Dill pickle juice: This tangy liquid not only marinates the chicken but also infuses it with a delightful flavor that’s hard to resist.
  • Breadcrumbs: Panko breadcrumbs are ideal for that extra crunch, but regular breadcrumbs work too. They create a crispy coating that’s simply irresistible.
  • Parmesan cheese: Grated Parmesan adds a savory depth to the dish. It melts beautifully and enhances the overall flavor.
  • Garlic powder: A must-have for that aromatic kick. It complements the chicken and adds a layer of flavor.
  • Onion powder: This ingredient brings a subtle sweetness and depth, balancing the tanginess of the pickles.
  • Black pepper and salt: Essential seasonings that elevate the dish. Adjust to your taste preference.
  • Egg: This acts as a binder, helping the breadcrumbs stick to the chicken for a perfect crust.
  • Dijon mustard: A touch of Dijon adds a hint of sharpness, enhancing the overall flavor profile.
  • Cooking spray or olive oil: A light spray or drizzle ensures a crispy finish without the extra calories.

For those looking to spice things up, consider adding cayenne pepper to the breadcrumb mixture for a kick. You can find the exact quantities for each ingredient at the bottom of the article, ready for printing!

How to Make Dill Pickle Parmesan Chicken

Creating Dill Pickle Parmesan Chicken is a straightforward process that yields delicious results. Follow these simple steps, and you’ll have a crispy, flavorful dish that will impress everyone at the table.

Step 1: Marinate the Chicken

Start by placing the chicken breasts in a large bowl. Pour in the dill pickle juice, ensuring the chicken is fully submerged. Cover the bowl and let it marinate in the refrigerator for at least an hour. If you have time, letting it sit overnight will deepen the flavor.

Step 2: Preheat the Oven

While the chicken is marinating, preheat your oven to 400°F (200°C). This step is crucial for achieving that perfect golden-brown crust. Line a baking sheet with parchment paper or lightly grease it with cooking spray to prevent sticking.

Step 3: Prepare the Coating

In a shallow dish, combine the breadcrumbs, grated Parmesan cheese, garlic powder, onion powder, black pepper, and salt. Mix well to ensure an even distribution of flavors. This coating will give your chicken that irresistible crunch.

Step 4: Mix the Egg and Mustard

In another bowl, whisk together the egg and Dijon mustard until smooth. This mixture acts as a glue, helping the breadcrumb coating stick to the chicken. It’s a simple yet effective step that makes all the difference.

Step 5: Coat the Chicken

Remove the chicken from the pickle juice and pat it dry with paper towels. Dip each chicken breast into the egg mixture, allowing any excess to drip off. Then, coat it thoroughly in the breadcrumb mixture, pressing gently to ensure it adheres well.

Step 6: Bake the Chicken

Place the coated chicken breasts on the prepared baking sheet. For an extra crispy finish, lightly spray the tops with cooking spray or drizzle with olive oil. Bake in the preheated oven for 25-30 minutes. The chicken is done when it’s golden brown and reaches an internal temperature of 165°F (75°C).

Step 7: Rest and Serve

Once baked, let the chicken rest for about 5 minutes before slicing. This allows the juices to redistribute, ensuring each bite is juicy and flavorful. Serve it up with your favorite sides, and enjoy the delightful explosion of flavors!

Tips for Success

  • Marinate the chicken overnight for maximum flavor absorption.
  • Use a meat thermometer to check for doneness; it should read 165°F (75°C).
  • For extra crunch, consider double-coating the chicken by repeating the egg and breadcrumb steps.
  • Experiment with different seasonings in the breadcrumb mixture to customize the flavor.
  • Let the chicken rest after baking to keep it juicy and tender.

Equipment Needed

  • Baking sheet: A standard baking sheet works well, but a wire rack can elevate the chicken for even crispiness.
  • Parchment paper: This helps prevent sticking; aluminum foil is a good alternative.
  • Mixing bowls: Use two bowls for marinating and coating.
  • Whisk: A simple whisk is perfect for mixing the egg and mustard.
  • Meat thermometer: Essential for checking the chicken’s doneness; a simple knife can also help check if juices run clear.

Variations

  • Spicy Dill Pickle Parmesan Chicken: Add a teaspoon of cayenne pepper or red pepper flakes to the breadcrumb mixture for a fiery kick.
  • Herb-Infused Coating: Mix in dried herbs like oregano, thyme, or Italian seasoning to the breadcrumb mixture for an aromatic twist.
  • Gluten-Free Option: Substitute regular breadcrumbs with gluten-free panko or crushed gluten-free crackers to accommodate dietary needs.
  • Cheesy Delight: Incorporate shredded mozzarella or cheddar cheese into the breadcrumb mixture for an extra cheesy crust.
  • Air Fryer Version: Cook the coated chicken in an air fryer at 375°F (190°C) for about 15-20 minutes for a quicker, healthier option.

Serving Suggestions

  • Coleslaw: A refreshing side that complements the tangy chicken perfectly.
  • Garden Salad: Crisp greens with a light vinaigrette add a fresh contrast.
  • Mashed Potatoes: Creamy potatoes provide a comforting base for the dish.
  • Pair with Beer: A light lager or pale ale enhances the flavors.
  • Presentation: Serve on a rustic wooden board for a homey touch.

FAQs about Dill Pickle Parmesan Chicken

Can I use chicken thighs instead of breasts?

Absolutely! Chicken thighs will add a richer flavor and remain juicy. Just adjust the cooking time slightly, as thighs may take a bit longer to cook through.

How do I store leftovers?

Store any leftover Dill Pickle Parmesan Chicken in an airtight container in the refrigerator for up to three days. Reheat in the oven for the best texture.

Can I make this dish ahead of time?

Yes! You can marinate the chicken the night before and coat it just before baking. This makes for a quick dinner solution on busy nights.

What can I serve with Dill Pickle Parmesan Chicken?

This dish pairs wonderfully with coleslaw, a fresh garden salad, or even creamy mashed potatoes. The tangy flavors complement a variety of sides!

Is this recipe gluten-free?

To make Dill Pickle Parmesan Chicken gluten-free, simply substitute regular breadcrumbs with gluten-free panko or crushed gluten-free crackers. Enjoy without worry!

Final Thoughts

Cooking Dill Pickle Parmesan Chicken is more than just preparing a meal; it’s about creating a memorable experience. The delightful crunch of the coating, paired with the tangy flavor of dill pickles, brings a unique twist to your dinner table. Each bite is a celebration of flavors that can spark joy and conversation among family and friends. Whether you’re a seasoned chef or a kitchen novice, this recipe is a fantastic way to impress without the fuss. So, roll up your sleeves, embrace the culinary adventure, and enjoy the delicious rewards of your efforts!

Ranis

Dill Pickle Parmesan Chicken: A Unique Flavor Explosion!

Dill Pickle Parmesan Chicken is a unique and flavorful dish that combines the tanginess of dill pickles with the savory taste of Parmesan cheese, creating a deliciously crispy chicken meal.
Prep Time 1 hour
Cook Time 30 minutes
Total Time 1 hour 30 minutes
Servings: 4 servings
Course: Main Course
Cuisine: American
Calories: 320

Ingredients
  

  • 2 large chicken breasts about 1 pound
  • 1 cup dill pickle juice
  • 1 cup breadcrumbs preferably panko
  • ½ cup grated Parmesan cheese
  • 1 teaspoon garlic powder
  • 1 teaspoon onion powder
  • ½ teaspoon black pepper
  • ½ teaspoon salt
  • 1 large egg
  • 1 tablespoon Dijon mustard
  • Cooking spray or olive oil for baking

Method
 

  1. In a large bowl, combine the chicken breasts and dill pickle juice. Cover and marinate in the refrigerator for at least 1 hour, or up to overnight for more flavor.
  2. Preheat your oven to 400°F (200°C). Line a baking sheet with parchment paper or lightly grease it with cooking spray.
  3. In a shallow dish, mix together the breadcrumbs, Parmesan cheese, garlic powder, onion powder, black pepper, and salt.
  4. In another bowl, whisk together the egg and Dijon mustard until well combined.
  5. Remove the chicken from the pickle juice and pat dry with paper towels. Dip each chicken breast into the egg mixture, allowing excess to drip off, then coat thoroughly in the breadcrumb mixture.
  6. Place the coated chicken breasts on the prepared baking sheet. Lightly spray the tops with cooking spray or drizzle with olive oil for extra crispiness.
  7. Bake in the preheated oven for 25-30 minutes, or until the chicken is cooked through and the coating is golden brown. The internal temperature should reach 165°F (75°C).
  8. Let the chicken rest for 5 minutes before slicing and serving.

Nutrition

Serving: 1pieceCalories: 320kcalCarbohydrates: 10gProtein: 30gFat: 18gSaturated Fat: 4gPolyunsaturated Fat: 14gCholesterol: 150mgSodium: 600mgFiber: 1g

Notes

  • For a spicier kick, add a teaspoon of cayenne pepper to the breadcrumb mixture.
  • Serve with a side of coleslaw or a fresh garden salad for a complete meal.

Tried this recipe?

Let us know how it was!

Dark Chocolate Blackberry Cupcakes: Indulge in Heaven!

Introduction to Dark Chocolate Blackberry Cupcakes

There’s something magical about the combination of dark chocolate and fresh blackberries.

These Dark Chocolate Blackberry Cupcakes are not just a treat; they’re a celebration of flavors that dance on your palate.

Whether you’re looking to impress friends at a gathering or simply want to indulge after a long day, this recipe is your go-to solution.

With rich, moist cupcakes topped with creamy chocolate frosting, they’re perfect for any occasion.

Trust me, once you take a bite, you’ll understand why these cupcakes are a must-bake in your kitchen!

Why You’ll Love This Dark Chocolate Blackberry Cupcakes

These Dark Chocolate Blackberry Cupcakes are a dream come true for any home cook.

They’re quick to whip up, taking just 40 minutes from start to finish.

The rich chocolate flavor pairs perfectly with the tartness of blackberries, creating a delightful balance.

Plus, they’re versatile enough for any occasion, whether it’s a casual family dinner or a fancy celebration.

You’ll love how easy they are to make and how impressive they look on the table!

Ingredients for Dark Chocolate Blackberry Cupcakes

When it comes to baking, having the right ingredients is key.

For these Dark Chocolate Blackberry Cupcakes, you’ll need a mix of pantry staples and fresh produce.

Here’s what you’ll gather:

  • All-purpose flour: The foundation of your cupcakes, providing structure and texture.
  • Unsweetened cocoa powder: This adds that rich chocolate flavor we all crave.
  • Granulated sugar: Sweetens the batter and helps create a moist cupcake.
  • Baking powder: A leavening agent that gives your cupcakes that perfect rise.
  • Baking soda: Works with the acidic buttermilk to help the cupcakes rise even more.
  • Salt: Enhances the flavors and balances the sweetness.
  • Unsalted butter: Adds richness and moisture; make sure it’s softened for easy mixing.
  • Large eggs: They bind the ingredients together and add moisture.
  • Vanilla extract: A must-have for that warm, comforting flavor.
  • Buttermilk: This adds tanginess and keeps the cupcakes tender.
  • Fresh blackberries: The star of the show! Their tartness complements the chocolate beautifully.
  • For the frosting:
  • Unsalted butter: Again, for creaminess in your frosting.
  • Powdered sugar: Sweetens and thickens the frosting to a perfect consistency.
  • Unsweetened cocoa powder: To keep that chocolate theme going in the frosting.
  • Heavy cream: Adds richness and helps achieve a smooth texture.
  • Vanilla extract: Just a touch to enhance the frosting flavor.

Feel free to get creative!

You can swap blackberries for raspberries or strawberries if you prefer.

For a deeper flavor, consider adding a teaspoon of espresso powder to the batter.

Exact quantities for each ingredient are listed at the bottom of the article for your convenience.

How to Make Dark Chocolate Blackberry Cupcakes

Baking these Dark Chocolate Blackberry Cupcakes is a delightful journey.

With each step, you’ll find the process simple and rewarding.

Let’s dive into the steps that will lead you to cupcake heaven!

Step 1: Preheat and Prepare

Start by preheating your oven to 350°F (175°C).

While it warms up, line a muffin tin with cupcake liners.

This will keep your cupcakes from sticking and make cleanup a breeze.

Step 2: Mix Dry Ingredients

In a large mixing bowl, whisk together the all-purpose flour, cocoa powder, granulated sugar, baking powder, baking soda, and salt.

Make sure everything is well combined.

This step is crucial for an even texture in your cupcakes.

Step 3: Combine Wet Ingredients

Now, add the softened butter, large eggs, vanilla extract, and buttermilk to the dry mix.

Beat everything together with an electric mixer on medium speed for about 2 minutes.

You want a smooth and creamy batter that’s full of flavor.

Step 4: Fold in Blackberries

Gently fold in the fresh blackberries.

Be careful not to overmix; you want those juicy berries to stay intact.

Their tartness will shine through in every bite!

Step 5: Fill and Bake

Divide the batter evenly among the prepared cupcake liners, filling each about two-thirds full.

This allows room for them to rise without overflowing.

Bake in the preheated oven for 18-20 minutes.

Check for doneness by inserting a toothpick into the center; it should come out clean.

Step 6: Cool the Cupcakes

Once baked, remove the cupcakes from the oven.

Let them cool in the pan for about 5 minutes.

Then, transfer them to a wire rack to cool completely.

This step is essential before frosting!

Step 7: Make the Frosting

While the cupcakes cool, prepare the chocolate frosting.

In a mixing bowl, beat the softened butter until creamy.

Gradually add the powdered sugar and cocoa powder, mixing until combined.

Then, add the heavy cream and vanilla extract.

Beat on high speed for about 2 minutes until the frosting is light and fluffy.

Step 8: Frost and Serve

Once the cupcakes are completely cool, it’s time to frost them.

Use a piping bag or a spatula to spread the chocolate frosting generously on top.

For an extra touch, top with additional blackberries if desired.

Now, you’re ready to indulge in these delicious Dark Chocolate Blackberry Cupcakes!

Tips for Success

  • Always use room temperature ingredients for a smoother batter.
  • Don’t overmix the batter; gentle folding keeps the cupcakes light and fluffy.
  • Check for doneness a minute or two early to avoid overbaking.
  • Let the cupcakes cool completely before frosting for the best results.
  • Experiment with different berries for a fun twist on flavor!

Equipment Needed

  • Muffin tin: Essential for baking your cupcakes; a silicone mold works too!
  • Mixing bowls: Use a large bowl for dry ingredients and a medium one for wet.
  • Electric mixer: A hand mixer speeds up the process; a whisk will do in a pinch.
  • Measuring cups and spoons: Accurate measurements are key for baking success.
  • Piping bag or spatula: For frosting; a zip-top bag with a corner cut works as well!

Variations

  • Gluten-Free: Substitute all-purpose flour with a gluten-free blend for a delicious gluten-free option.
  • Vegan: Use flax eggs (1 tablespoon ground flaxseed mixed with 2.5 tablespoons water) instead of eggs, and replace buttermilk with almond milk mixed with a splash of vinegar.
  • Nutty Twist: Add chopped walnuts or pecans to the batter for a delightful crunch.
  • Spicy Kick: Incorporate a pinch of cayenne pepper or cinnamon for a surprising flavor boost.
  • Fruity Variations: Swap blackberries for other berries like raspberries, strawberries, or even diced peaches for a seasonal twist.

Serving Suggestions

  • Pair with Coffee: A rich cup of coffee complements the chocolate perfectly.
  • Serve with Ice Cream: A scoop of vanilla or berry ice cream adds a creamy contrast.
  • Garnish with Mint: Fresh mint leaves elevate the presentation and add a pop of color.
  • Display on a Cake Stand: Present your cupcakes on a decorative cake stand for an impressive look.

FAQs about Dark Chocolate Blackberry Cupcakes

Can I use frozen blackberries instead of fresh?

Absolutely! Frozen blackberries work well, but make sure to thaw and drain them first. This prevents excess moisture in your batter.

How do I store leftover cupcakes?

Store your Dark Chocolate Blackberry Cupcakes in an airtight container at room temperature for up to three days. If you want to keep them longer, refrigerate them for up to a week.

Can I make the batter ahead of time?

While it’s best to bake the cupcakes fresh, you can prepare the batter and refrigerate it for a few hours. Just give it a gentle stir before filling the liners.

What can I substitute for buttermilk?

If you don’t have buttermilk, mix one cup of milk with a tablespoon of vinegar or lemon juice. Let it sit for about 5 minutes, and you’ll have a perfect substitute!

Can I make these cupcakes gluten-free?

Yes! Simply swap the all-purpose flour with a gluten-free flour blend. The texture will still be delightful, and you won’t miss the gluten!

Final Thoughts

Baking these Dark Chocolate Blackberry Cupcakes is more than just a culinary task; it’s an experience filled with joy and satisfaction.

The rich aroma of chocolate mingling with the tartness of blackberries creates a sensory delight that fills your kitchen.

Each bite is a reminder of the simple pleasures in life, perfect for sharing with loved ones or savoring alone.

Whether it’s a special occasion or a casual afternoon treat, these cupcakes bring a touch of indulgence to any moment.

So, roll up your sleeves and dive into this delightful recipe—you won’t regret it!

Ranis

Dark Chocolate Blackberry Cupcakes: Indulge in Heaven!

Indulge in these rich and moist dark chocolate blackberry cupcakes topped with a creamy chocolate frosting.
Prep Time 20 minutes
Cook Time 20 minutes
Total Time 40 minutes
Servings: 12 cupcakes
Course: Dessert
Cuisine: American
Calories: 250

Ingredients
  

  • 1 cup all-purpose flour
  • 1/2 cup unsweetened cocoa powder
  • 1 cup granulated sugar
  • 1 teaspoon baking powder
  • 1/2 teaspoon baking soda
  • 1/4 teaspoon salt
  • 1/2 cup unsalted butter softened
  • 2 large eggs
  • 1 teaspoon vanilla extract
  • 1/2 cup buttermilk
  • 1 cup fresh blackberries
For the frosting:
  • 1/2 cup unsalted butter softened
  • 2 cups powdered sugar
  • 1/4 cup unsweetened cocoa powder
  • 2 tablespoons heavy cream
  • 1 teaspoon vanilla extract

Method
 

  1. Preheat your oven to 350°F (175°C) and line a muffin tin with cupcake liners.
  2. In a large mixing bowl, whisk together the flour, cocoa powder, sugar, baking powder, baking soda, and salt until well combined.
  3. Add the softened butter, eggs, vanilla extract, and buttermilk to the dry ingredients. Beat with an electric mixer on medium speed for about 2 minutes until smooth and creamy.
  4. Gently fold in the fresh blackberries until evenly distributed throughout the batter.
  5. Divide the batter evenly among the prepared cupcake liners, filling each about 2/3 full.
  6. Bake in the preheated oven for 18-20 minutes, or until a toothpick inserted into the center comes out clean.
  7. Remove from the oven and let the cupcakes cool in the pan for 5 minutes before transferring them to a wire rack to cool completely.
  8. While the cupcakes are cooling, prepare the frosting. In a mixing bowl, beat the softened butter until creamy.
  9. Gradually add the powdered sugar and cocoa powder, mixing until combined.
  10. Add the heavy cream and vanilla extract, then beat on high speed for about 2 minutes until the frosting is light and fluffy.
  11. Once the cupcakes are completely cool, frost them with the chocolate frosting using a piping bag or a spatula. Top with additional blackberries if desired.

Nutrition

Serving: 1cupcakeCalories: 250kcalCarbohydrates: 30gProtein: 3gFat: 12gSaturated Fat: 7gPolyunsaturated Fat: 3gCholesterol: 40mgSodium: 150mgFiber: 2gSugar: 20g

Notes

  • For a richer flavor, consider adding a teaspoon of espresso powder to the batter.
  • You can substitute the blackberries with raspberries or chopped strawberries for a different fruity twist.

Tried this recipe?

Let us know how it was!

Mint Chocolate Chip Protein Balls: A Healthy Snack to Love!

Introduction to Mint Chocolate Chip Protein Balls

Life can get hectic, and finding a healthy snack that satisfies your cravings is often a challenge. That’s where these Mint Chocolate Chip Protein Balls come in! They’re not just a treat; they’re a quick solution for those busy days when you need a little energy boost. Packed with protein and bursting with flavor, these little bites are perfect for a post-workout snack or a midday pick-me-up. Plus, they’re easy to whip up, making them a go-to recipe for anyone looking to indulge without the guilt. Trust me, your taste buds will thank you!

Why You’ll Love This Mint Chocolate Chip Protein Balls

These Mint Chocolate Chip Protein Balls are a game changer for anyone juggling a busy lifestyle. They come together in just 10 minutes, making them a breeze to prepare. The delightful combination of mint and chocolate satisfies your sweet tooth while providing a healthy dose of protein. Plus, they’re no-bake, so you can skip the oven and enjoy a delicious snack without the hassle. What’s not to love?

Ingredients for Mint Chocolate Chip Protein Balls

Gathering the right ingredients is the first step to creating these delightful Mint Chocolate Chip Protein Balls. Here’s what you’ll need:

  • Rolled oats: These provide a hearty base, adding fiber and texture.
  • Chocolate protein powder: A key player for that protein boost, it also brings a rich chocolate flavor.
  • Almond butter: This creamy nut butter adds healthy fats and a delicious nutty taste. For a nut-free option, sunflower seed butter works wonders!
  • Honey: A natural sweetener that binds everything together while adding a touch of sweetness.
  • Mini chocolate chips: Because who doesn’t love a little extra chocolate? They add a delightful crunch.
  • Fresh mint leaves: These bring a refreshing burst of flavor. If fresh isn’t available, peppermint extract is a great substitute.
  • Salt: Just a pinch enhances all the flavors, making them pop.
  • Water: Sometimes needed to adjust the mixture’s consistency, ensuring it’s sticky enough to roll into balls.

For those looking to mix things up, consider adding shredded coconut for extra texture and flavor. The exact quantities for each ingredient can be found at the bottom of the article, ready for printing!

How to Make Mint Chocolate Chip Protein Balls

Creating these Mint Chocolate Chip Protein Balls is as easy as pie—well, easier! Follow these simple steps, and you’ll have a delicious, healthy snack ready in no time.

Step 1: Combine the Dry Ingredients

Start by grabbing a large mixing bowl. Toss in the rolled oats and chocolate protein powder. These two ingredients form the foundation of your protein balls. Give them a good stir to ensure they’re evenly mixed. This step is crucial; it sets the stage for the flavors to come!

Step 2: Mix in the Wet Ingredients

Next, add the almond butter and honey to the dry mixture. The almond butter brings creaminess, while honey adds sweetness. Stir everything together until it’s well combined. You want a thick, sticky mixture that holds together. If you’re using peppermint extract instead of fresh mint, now’s the time to add it!

Step 3: Adjust Consistency

Sometimes, the mixture can be a bit dry. If that’s the case, don’t worry! Just add water one tablespoon at a time. Mix well after each addition until you reach a sticky consistency. This is key for rolling the balls later. You want them to hold their shape without crumbling apart.

Step 4: Roll into Balls

Now comes the fun part! Use your hands to scoop out small portions of the mixture and roll them into balls about one inch in diameter. It’s okay if they’re not perfect; a little rustic charm adds character! Place each ball on a baking sheet lined with parchment paper. This will prevent them from sticking.

Step 5: Chill and Store

Once all the balls are rolled, pop the baking sheet in the refrigerator. Let them chill for at least 30 minutes. This helps them firm up and makes them easier to handle. After chilling, transfer the protein balls to an airtight container. They’ll stay fresh in the fridge for up to a week—if they last that long!

Tips for Success

  • Use a cookie scoop for evenly sized protein balls—no more guesswork!
  • Chill the mixture for 10 minutes before rolling for easier handling.
  • Experiment with different nut butters for unique flavors.
  • Store in the freezer for a longer shelf life—just thaw before enjoying.
  • Double the recipe to have a stash ready for busy days!

Equipment Needed

  • Mixing bowl: A large bowl for combining ingredients. A sturdy pot can work in a pinch.
  • Spoon or spatula: For mixing. A fork can also do the trick!
  • Baking sheet: To chill the protein balls. A plate lined with parchment paper is a great alternative.
  • Measuring cups: For precise ingredient amounts. You can eyeball it if you’re feeling adventurous!

Variations

  • Nut-Free Option: Swap almond butter for sunflower seed butter to keep it nut-free while still delicious.
  • Chocolate Lovers: Add an extra 1/4 cup of mini chocolate chips for a richer chocolate flavor.
  • Minty Fresh: Use peppermint extract instead of fresh mint for a more intense mint flavor.
  • Protein Boost: Incorporate a scoop of your favorite protein powder for an extra protein kick.
  • Fruit Fusion: Mix in dried fruits like cranberries or raisins for added sweetness and texture.
  • Coconut Delight: Add 1/4 cup of shredded coconut for a tropical twist and extra chewiness.

Serving Suggestions

  • Pair these protein balls with a glass of almond milk for a refreshing treat.
  • Serve alongside fresh fruit like strawberries or bananas for a balanced snack.
  • For a fun presentation, arrange them on a platter and garnish with mint leaves.
  • Enjoy them as a pre- or post-workout snack to fuel your day.

FAQs about Mint Chocolate Chip Protein Balls

Can I make these Mint Chocolate Chip Protein Balls vegan?

Absolutely! To make them vegan, simply substitute honey with maple syrup or agave nectar. The rest of the ingredients are already plant-based, so you’re good to go!

How long do these protein balls last in the fridge?

These Mint Chocolate Chip Protein Balls can be stored in an airtight container in the refrigerator for up to one week. If you want to keep them longer, consider freezing them!

Can I use a different type of protein powder?

Yes! Feel free to use any protein powder you prefer, whether it’s whey, plant-based, or even collagen. Just keep in mind that the flavor may vary slightly based on your choice.

What’s the best way to enjoy these protein balls?

These protein balls are perfect as a quick snack on the go, a post-workout treat, or even a sweet addition to your lunchbox. Pair them with a smoothie for a balanced meal!

Can I add more mint flavor?

If you’re a mint lover, you can definitely amp up the mint flavor! Just add a bit more fresh mint or peppermint extract to suit your taste. Just be careful not to overdo it, as it can become overpowering!

Final Thoughts

Creating these Mint Chocolate Chip Protein Balls is more than just whipping up a snack; it’s about embracing a healthier lifestyle without sacrificing flavor. Each bite is a delightful blend of minty freshness and rich chocolate, making them a joy to eat. Whether you’re fueling up for a workout or simply satisfying a sweet craving, these protein balls deliver on all fronts. Plus, they’re incredibly easy to make, allowing you to enjoy a guilt-free treat anytime. So, roll up your sleeves, gather your ingredients, and let the deliciousness unfold. Your taste buds—and your body—will thank you!

Ranis

Mint Chocolate Chip Protein Balls: A Healthy Snack to Love!

Mint Chocolate Chip Protein Balls are a delicious and healthy snack packed with protein and flavor, perfect for a quick energy boost.
Prep Time 10 minutes
Total Time 40 minutes
Servings: 12 servings
Course: Snack
Cuisine: American
Calories: 120

Ingredients
  

  • 1 cup rolled oats
  • 1/2 cup chocolate protein powder
  • 1/4 cup almond butter
  • 1/4 cup honey
  • 1/4 cup mini chocolate chips
  • 1/4 cup chopped fresh mint leaves or 1 teaspoon peppermint extract
  • 1/4 teaspoon salt
  • 2 tablespoons water if needed

Method
 

  1. In a large mixing bowl, combine rolled oats, chocolate protein powder, almond butter, honey, mini chocolate chips, chopped mint leaves (or peppermint extract), and salt.
  2. Mix all ingredients together until well combined. If the mixture is too dry, add water one tablespoon at a time until it reaches a sticky consistency.
  3. Once the mixture is well combined, use your hands to roll it into small balls, about 1 inch in diameter.
  4. Place the protein balls on a baking sheet lined with parchment paper.
  5. Refrigerate for at least 30 minutes to firm up.
  6. Store the protein balls in an airtight container in the refrigerator for up to one week.

Nutrition

Serving: 1ballCalories: 120kcalCarbohydrates: 10gProtein: 6gFat: 5gSaturated Fat: 1gPolyunsaturated Fat: 4gSodium: 50mgFiber: 2gSugar: 8g

Notes

  • For a nut-free version, substitute almond butter with sunflower seed butter.
  • Add 1/4 cup of shredded coconut for extra texture and flavor.

Tried this recipe?

Let us know how it was!

Apple Shaped Cupcakes: Discover the Perfect Recipe!

Introduction to Apple Shaped Cupcakes

There’s something magical about baking that takes me back to my childhood. The aroma of sweet treats wafting through the house always felt like a warm hug. Today, I want to share a delightful recipe for apple shaped cupcakes that not only look adorable but taste incredible too.

These cupcakes are perfect for any occasion, whether you’re hosting a party or just want to impress your loved ones. With a moist cake and vibrant frosting, they’re a quick solution for a busy day or a fun project to enjoy with the kids. Let’s dive into this delicious adventure together!

Why You’ll Love This Apple Shaped Cupcakes

These apple shaped cupcakes are a game changer in the kitchen.

They’re not just easy to make; they’re a feast for the eyes and the taste buds.

In about 40 minutes, you can whip up a dozen of these delightful treats.

The moist cake paired with vibrant frosting makes them irresistible.

Plus, they’re a fantastic way to bring a smile to anyone’s face, young or old!

Ingredients for Apple Shaped Cupcakes

Creating these apple shaped cupcakes is a breeze with the right ingredients. Here’s what you’ll need to bring this delightful recipe to life:

  • All-purpose flour: The backbone of your cupcakes, providing structure and a soft crumb.
  • Baking powder: This leavening agent helps your cupcakes rise, giving them that fluffy texture.
  • Baking soda: Works alongside baking powder to ensure your cupcakes are light and airy.
  • Salt: A pinch enhances the sweetness and balances the flavors.
  • Unsalted butter: Adds richness and moisture; make sure it’s softened for easy mixing.
  • Granulated sugar: Sweetens the batter and contributes to the cupcakes’ tender texture.
  • Eggs: They bind the ingredients together and add moisture, creating a lovely cake-like consistency.
  • Vanilla extract: A must for flavor; it brings warmth and depth to your cupcakes.
  • Buttermilk: This adds moisture and a slight tang, making your cupcakes incredibly tender.
  • Red food coloring (optional): For that classic apple hue; a few drops can make a big difference.
  • Green fondant or green gummy candy: These are for the leaves, adding a fun and decorative touch.
  • Cupcake liners: Essential for easy removal and a neat presentation.
  • For the frosting: You’ll need more unsalted butter, powdered sugar, vanilla extract, and milk to achieve the perfect creamy consistency. Red food coloring can also be added here for a vibrant finish.

You can find the exact measurements for each ingredient at the bottom of the article, ready for printing. Happy baking!

How to Make Apple Shaped Cupcakes

Baking these apple shaped cupcakes is a delightful journey.

Follow these simple steps, and you’ll have a dozen charming treats in no time!

Step 1: Preheat and Prepare

Start by preheating your oven to 350°F (175°C).

While it warms up, line your cupcake pan with cupcake liners.

This makes for easy cleanup and adds a pop of color!

Step 2: Mix Dry Ingredients

In a medium bowl, whisk together the all-purpose flour, baking powder, baking soda, and salt.

This step is crucial for ensuring your cupcakes rise perfectly.

Set this mixture aside for now; it’ll be ready to join the party soon!

Step 3: Cream Butter and Sugar

In a large mixing bowl, cream together the softened butter and granulated sugar.

Beat them until the mixture is light and fluffy, about 3-4 minutes.

This is where the magic begins, creating a rich base for your cupcakes.

Step 4: Add Eggs and Vanilla

Now, add the eggs one at a time, mixing well after each addition.

Stir in the vanilla extract, letting its warm aroma fill your kitchen.

This step adds moisture and flavor, making your cupcakes irresistible.

Step 5: Combine Wet and Dry Ingredients

Gradually add the dry mixture to the wet ingredients, alternating with the buttermilk.

Mix until just combined; overmixing can lead to dense cupcakes.

If you want a hint of color, add a few drops of red food coloring here!

Step 6: Bake the Cupcakes

Fill each cupcake liner about two-thirds full with batter.

Bake in the preheated oven for 18-20 minutes.

Check for doneness by inserting a toothpick; it should come out clean.

Step 7: Make the Frosting

While the cupcakes cool, let’s whip up the frosting.

In a large bowl, beat the softened butter until creamy.

Gradually add the powdered sugar, mixing on low until combined.

Add the vanilla extract and enough milk to reach your desired consistency.

If you want a vibrant finish, don’t forget to add red food coloring!

Step 8: Frost and Decorate

Once the cupcakes are completely cool, it’s time to frost them generously.

Use a spatula or piping bag for a fun design.

Top each cupcake with green fondant or gummy candy leaves to resemble apples.

Your apple shaped cupcakes are now ready to impress!

Tips for Success

  • Make sure your butter is at room temperature for easy creaming.
  • Don’t overmix the batter; mix until just combined for fluffy cupcakes.
  • Use a toothpick to check for doneness; it should come out clean.
  • Let the cupcakes cool completely before frosting to prevent melting.
  • Experiment with flavors by adding spices like cinnamon for a twist!

Equipment Needed

  • Cupcake pan: Essential for baking; a muffin tin works too.
  • Cupcake liners: Use paper or silicone liners for easy removal.
  • Mixing bowls: A set of various sizes is handy.
  • Whisk: A hand whisk or electric mixer will do the job.
  • Spatula: Perfect for frosting and scraping the bowl clean.

Variations

  • Spiced Apple Cupcakes: Add a teaspoon of cinnamon or nutmeg to the batter for a warm, spiced flavor.
  • Chocolate Version: Substitute half of the all-purpose flour with cocoa powder for a rich chocolate twist.
  • Gluten-Free Option: Use a gluten-free all-purpose flour blend to make these cupcakes suitable for gluten-sensitive friends.
  • Vegan Adaptation: Replace eggs with flaxseed meal and use plant-based butter and milk for a vegan-friendly treat.
  • Fruit-Filled Surprise: Add a spoonful of apple pie filling or chopped apples into the batter for a fruity surprise.

Serving Suggestions

  • Pair these apple shaped cupcakes with a scoop of vanilla ice cream for a delightful dessert combo.
  • Serve alongside a warm cup of spiced chai or apple cider to enhance the flavors.
  • For a festive touch, arrange them on a decorative platter with fresh apple slices.

FAQs about Apple Shaped Cupcakes

Can I make these apple shaped cupcakes ahead of time?

Absolutely! You can bake the cupcakes a day in advance. Just store them in an airtight container at room temperature. Frost them on the day you plan to serve for the best results.

What can I use instead of buttermilk?

If you don’t have buttermilk on hand, you can make a quick substitute. Just mix one cup of milk with a tablespoon of vinegar or lemon juice. Let it sit for about 5 minutes, and you’re good to go!

How do I store leftover cupcakes?

Store any leftover apple shaped cupcakes in an airtight container. They’ll stay fresh for up to three days at room temperature or up to a week in the fridge. Just remember to bring them back to room temperature before serving!

Can I freeze these cupcakes?

Yes, you can freeze the cupcakes! Just make sure they are completely cooled. Wrap them tightly in plastic wrap and place them in a freezer-safe bag. They can be frozen for up to three months. Frost them after thawing for the best presentation.

What other decorations can I use for these cupcakes?

Get creative! You can use chocolate chips, sprinkles, or even edible glitter for a fun twist. For a more natural look, consider using fresh mint leaves or small edible flowers to enhance the apple theme.

Final Thoughts

Baking these apple shaped cupcakes is more than just a recipe; it’s an experience filled with joy and creativity.

The vibrant colors and delightful flavors bring smiles to faces, making them perfect for any gathering.

Whether you’re celebrating a special occasion or simply indulging in a sweet treat, these cupcakes are sure to impress.

I love how they spark conversations and create memories around the table.

So, roll up your sleeves, gather your loved ones, and enjoy the sweet satisfaction of creating something truly special together!

Ranis

Apple Shaped Cupcakes: Discover the Perfect Recipe!

Delicious apple-shaped cupcakes that are perfect for any occasion, featuring a moist cake and vibrant frosting.
Prep Time 20 minutes
Cook Time 20 minutes
Total Time 40 minutes
Servings: 12 cupcakes
Course: Dessert
Cuisine: American
Calories: 350

Ingredients
  

  • 2 cups all-purpose flour
  • 1 ½ teaspoons baking powder
  • ½ teaspoon baking soda
  • ½ teaspoon salt
  • 1 cup unsalted butter softened
  • 2 cups granulated sugar
  • 4 large eggs
  • 1 teaspoon vanilla extract
  • 1 cup buttermilk
  • Red food coloring optional
  • Green fondant or green gummy candy for leaves
  • Cupcake liners
  • For the frosting: 1 cup unsalted butter softened
  • 4 cups powdered sugar
  • 2 teaspoons vanilla extract
  • 2-4 tablespoons milk
  • Red food coloring optional

Method
 

  1. Preheat your oven to 350°F (175°C). Line a cupcake pan with cupcake liners.
  2. In a medium bowl, whisk together the flour, baking powder, baking soda, and salt. Set aside.
  3. In a large mixing bowl, cream together the softened butter and granulated sugar until light and fluffy, about 3-4 minutes.
  4. Add the eggs one at a time, mixing well after each addition. Stir in the vanilla extract.
  5. Gradually add the dry ingredients to the wet mixture, alternating with the buttermilk. Mix until just combined. If desired, add a few drops of red food coloring to achieve a light pink hue.
  6. Fill each cupcake liner about two-thirds full with batter. Bake for 18-20 minutes or until a toothpick inserted in the center comes out clean. Let the cupcakes cool in the pan for 5 minutes before transferring them to a wire rack to cool completely.
  7. For the frosting, beat the softened butter in a large bowl until creamy. Gradually add the powdered sugar, mixing on low until combined. Add the vanilla extract and enough milk to reach your desired consistency. If desired, add red food coloring to tint the frosting.
  8. Once the cupcakes are completely cool, frost them generously with the red frosting. Use the green fondant or gummy candy to create leaves on top of each cupcake to resemble apples.

Nutrition

Serving: 1cupcakeCalories: 350kcalCarbohydrates: 45gProtein: 2gFat: 18gSaturated Fat: 10gPolyunsaturated Fat: 8gCholesterol: 70mgSodium: 200mgFiber: 1gSugar: 30g

Notes

  • For a fun twist, try adding a teaspoon of cinnamon to the batter for a spiced flavor.
  • You can also use chocolate frosting instead of red for a different look.

Tried this recipe?

Let us know how it was!

Peach Mango Pie: Discover the Ultimate Recipe Delight!

Introduction to Peach Mango Pie

There’s something magical about the combination of peaches and mangoes, isn’t there? The moment I take a bite of a Peach Mango Pie, I’m transported back to summer days spent at my grandmother’s house, where the air was filled with the sweet scent of ripe fruit. This recipe is not just a dessert; it’s a quick solution for a busy day or a delightful way to impress your loved ones. With its flaky crust and juicy filling, this pie is sure to become a favorite in your home. Let’s dive into this delicious adventure together!

Why You’ll Love This Peach Mango Pie

This Peach Mango Pie is a game-changer in the dessert world. It’s incredibly easy to whip up, making it perfect for those busy weeknights or last-minute gatherings. The vibrant flavors of fresh peaches and mangoes create a taste explosion that will leave your taste buds dancing. Plus, the flaky crust adds that perfect crunch. Trust me, once you try it, you’ll be hooked and craving more!

Ingredients for Peach Mango Pie

Gathering the right ingredients is the first step to creating a mouthwatering Peach Mango Pie. Here’s what you’ll need:

  • Fresh peaches: These juicy gems are the star of the show, bringing sweetness and a hint of tartness.
  • Fresh mango: Adds a tropical flair and a vibrant color that complements the peaches beautifully.
  • Granulated sugar: This sweetener enhances the natural flavors of the fruit, making every bite delightful.
  • Cornstarch: A thickening agent that helps create a luscious filling, preventing it from being too runny.
  • Ground cinnamon: Just a pinch adds warmth and depth, elevating the overall flavor profile.
  • Lemon juice: A splash of acidity brightens the fruit and balances the sweetness perfectly.
  • Butter: Small pieces of butter dot the filling, adding richness and a lovely buttery flavor.
  • Refrigerated pie crusts: For convenience, these ready-made crusts save time without sacrificing taste.
  • Egg (for egg wash): A beaten egg brushed on top gives the crust a beautiful golden finish.

For those looking to experiment, consider adding a teaspoon of vanilla extract to the fruit mixture for an extra layer of flavor. You can find all the exact measurements at the bottom of the article, ready for printing!

How to Make Peach Mango Pie

Creating a Peach Mango Pie is a delightful journey that’s easier than you might think. Follow these simple steps, and you’ll have a stunning dessert that will impress everyone at the table.

Step 1: Preheat the Oven

Start by preheating your oven to 425°F (220°C). This step is crucial because a hot oven ensures that the crust bakes evenly and becomes beautifully golden. Trust me, you want that flaky texture!

Step 2: Prepare the Fruit Filling

In a large mixing bowl, combine your sliced peaches and diced mango. Sprinkle in the granulated sugar, cornstarch, ground cinnamon, and lemon juice. Gently stir until the fruit is well coated. Let this mixture sit for about 10 minutes. This allows the juices to develop, creating a luscious filling that’s bursting with flavor.

Step 3: Prepare the Pie Crust

Roll out one of the refrigerated pie crusts on a lightly floured surface. Carefully fit it into a 9-inch pie pan, trimming any excess crust hanging over the edges. This crust will cradle your delicious filling, so make sure it’s snug and ready to hold all that fruity goodness!

Step 4: Assemble the Pie

Pour the prepared fruit mixture into the pie crust, spreading it evenly. Dot the top with small pieces of butter. This little touch adds richness and enhances the flavor, making every bite a delight.

Step 5: Top the Pie

Roll out the second pie crust and place it over the fruit filling. Trim and crimp the edges to seal the pie tightly. Don’t forget to cut a few slits in the top crust! These slits allow steam to escape, preventing a soggy pie.

Step 6: Bake the Pie

Place your pie in the preheated oven and bake for 20 minutes. After that, reduce the temperature to 350°F (175°C) and continue baking for an additional 25-30 minutes. You’re looking for a golden brown crust and a bubbly filling. The aroma will be irresistible!

Step 7: Cool and Serve

Once baked, remove the pie from the oven and let it cool for at least 2 hours before slicing. This cooling time is essential for the filling to set properly. Trust me, waiting will be worth it when you slice into that perfectly textured pie!

Tips for Success

  • Use ripe peaches and mangoes for the best flavor and sweetness.
  • Don’t skip the resting time for the fruit mixture; it enhances the filling.
  • For a flaky crust, avoid overworking the dough when rolling it out.
  • Brush the crust with egg wash for a beautiful golden finish.
  • Serve with a scoop of vanilla ice cream for an extra treat!

Equipment Needed

  • 9-inch pie pan: A standard pie dish works best, but a glass or ceramic one can also do the trick.
  • Mixing bowl: Any large bowl will suffice for combining your fruit filling.
  • Rolling pin: If you don’t have one, a wine bottle can work in a pinch!
  • Sharp knife: Essential for slicing fruit and cutting slits in the crust.
  • Pastry brush: Use it to apply the egg wash; a clean paintbrush can be a handy substitute.

Variations

  • Berry Bliss: Add a cup of fresh blueberries or raspberries to the fruit mixture for a burst of color and flavor.
  • Spiced Up: Incorporate a pinch of nutmeg or ginger for a warm, spiced twist that complements the fruit beautifully.
  • Gluten-Free Option: Use a gluten-free pie crust to make this dessert suitable for those with gluten sensitivities.
  • Vegan Delight: Substitute the butter with coconut oil and use a plant-based egg wash for a vegan-friendly version.
  • Nutty Crunch: Sprinkle some chopped pecans or almonds on top of the filling before adding the second crust for added texture.

Serving Suggestions

  • Pair your Peach Mango Pie with a scoop of vanilla ice cream for a classic dessert experience.
  • Serve with a dollop of whipped cream to add a light, airy touch.
  • For a refreshing drink, consider iced tea or lemonade to complement the fruity flavors.
  • Garnish with fresh mint leaves for a pop of color and added freshness.

FAQs about Peach Mango Pie

As you embark on your Peach Mango Pie journey, you might have a few questions. Here are some common queries that can help you along the way:

Can I use frozen fruit for this pie?

Absolutely! Frozen peaches and mangoes work well, but make sure to thaw and drain them first to avoid excess moisture in your filling.

How do I know when the pie is done baking?

Look for a golden brown crust and bubbling filling. If the crust starts to brown too quickly, cover the edges with foil to prevent burning.

Can I make the pie ahead of time?

Yes! You can prepare the pie a day in advance. Just store it in the refrigerator after it cools, and reheat it in the oven before serving for that fresh-baked taste.

What can I do with leftover pie?

Leftover Peach Mango Pie can be stored in the fridge for up to three days. Enjoy it cold, or warm it up for a cozy dessert experience!

Is this pie suitable for a vegan diet?

To make this Peach Mango Pie vegan, simply substitute the butter with coconut oil and use a plant-based egg wash. It’s a delicious twist that everyone can enjoy!

Final Thoughts

Creating a Peach Mango Pie is more than just baking; it’s about crafting memories and sharing joy with those you love. The vibrant colors and delightful aromas fill your kitchen, inviting everyone to gather around. Each slice reveals a perfect blend of sweet peaches and tropical mangoes, wrapped in a flaky crust that’s simply irresistible. Whether it’s a family gathering or a quiet evening at home, this pie brings a touch of sunshine to any occasion. So, roll up your sleeves, embrace the process, and enjoy the delicious rewards of your culinary adventure!

Ranis

Peach Mango Pie: Discover the Ultimate Recipe Delight!

A delightful Peach Mango Pie that combines the sweetness of fresh peaches and mangoes in a flaky crust.
Prep Time 20 minutes
Cook Time 55 minutes
Total Time 1 hour 15 minutes
Servings: 8 servings
Course: Dessert
Cuisine: American
Calories: 250

Ingredients
  

  • 2 cups fresh peaches peeled and sliced
  • 1 cup fresh mango peeled and diced
  • 1 cup granulated sugar
  • 2 tablespoons cornstarch
  • 1 teaspoon ground cinnamon
  • 1 tablespoon lemon juice
  • 1 tablespoon butter cut into small pieces
  • 1 package 14.1 ounces refrigerated pie crusts (2 crusts)
  • 1 egg beaten (for egg wash)

Method
 

  1. Preheat the oven to 425°F (220°C).
  2. In a large mixing bowl, combine the sliced peaches, diced mango, sugar, cornstarch, cinnamon, and lemon juice. Stir gently until the fruit is well coated. Let the mixture sit for about 10 minutes to allow the juices to develop.
  3. Roll out one pie crust and fit it into a 9-inch pie pan. Trim any excess crust hanging over the edges.
  4. Pour the fruit mixture into the pie crust, spreading it evenly. Dot the top with small pieces of butter.
  5. Roll out the second pie crust and place it over the fruit filling. Trim and crimp the edges to seal the pie. Cut a few slits in the top crust to allow steam to escape.
  6. Brush the top crust with the beaten egg to give it a golden color when baked.
  7. Bake in the preheated oven for 20 minutes. Reduce the temperature to 350°F (175°C) and continue baking for an additional 25-30 minutes, or until the crust is golden brown and the filling is bubbly.
  8. Remove from the oven and let the pie cool for at least 2 hours before slicing to allow the filling to set.

Nutrition

Serving: 1sliceCalories: 250kcalCarbohydrates: 34gProtein: 2gFat: 10gSaturated Fat: 4gPolyunsaturated Fat: 6gCholesterol: 30mgSodium: 150mgFiber: 1gSugar: 20g

Notes

  • For a twist, add a teaspoon of vanilla extract to the fruit mixture for added flavor.
  • Serve warm with a scoop of vanilla ice cream or whipped cream for a delicious dessert.

Tried this recipe?

Let us know how it was!

Creamy Crockpot White Chicken Chili is a must-try recipe!

Introduction to Creamy Crockpot White Chicken Chili

There’s something magical about a warm bowl of chili on a chilly evening.

Creamy Crockpot White Chicken Chili is not just a meal; it’s a hug in a bowl.

After a long day, the last thing you want is to spend hours in the kitchen.

This recipe is a quick solution for busy days, allowing you to toss everything in the crockpot and let it work its magic.

With tender chicken, creamy broth, and hearty beans, it’s a dish that will impress your loved ones and keep you cozy.

Let’s dive into this comforting delight!

Why You’ll Love This Creamy Crockpot White Chicken Chili

This Creamy Crockpot White Chicken Chili is a game-changer for any home cook.

It’s incredibly easy to prepare, making it perfect for those hectic weeknights.

Just toss the ingredients in, set the timer, and let the crockpot do the work.

The rich, creamy flavor will have your taste buds dancing, while the wholesome ingredients ensure you’re feeding your family something nutritious.

It’s comfort food at its finest!

Ingredients for Creamy Crockpot White Chicken Chili

Gathering the right ingredients is the first step to creating this delicious dish.

Here’s what you’ll need for your Creamy Crockpot White Chicken Chili:

  • Boneless, skinless chicken breasts: The star of the show! They become tender and flavorful as they cook.
  • Onion: Diced onion adds a savory base, enhancing the overall flavor profile.
  • Garlic: Minced garlic brings a fragrant aroma and depth to the chili.
  • White beans: These provide creaminess and a hearty texture, making the dish filling.
  • Corn: Sweet corn adds a pop of color and a hint of sweetness.
  • Diced green chilies: They introduce a mild heat and a touch of zest.
  • Low-sodium chicken broth: This forms the base of your chili, ensuring it’s rich without being overly salty.
  • Ground cumin: A warm spice that adds an earthy flavor, making the chili more aromatic.
  • Chili powder: This brings a bit of heat and a robust flavor to the mix.
  • Paprika: Adds a subtle smokiness and vibrant color.
  • Salt and black pepper: Essential for seasoning, enhancing all the flavors in the dish.
  • Sour cream: This is what makes the chili creamy and adds a tangy finish.
  • Shredded Monterey Jack cheese: Melts beautifully, adding richness and flavor.
  • Fresh cilantro: Optional, but it adds a fresh, herbal note when garnished.
  • Lime wedges: A squeeze of lime brightens the dish and balances the creaminess.

For exact measurements, check the bottom of the article where you can find everything available for printing.

Feel free to get creative! You can substitute Greek yogurt for sour cream for a healthier twist or add a diced jalapeño for an extra kick.

How to Make Creamy Crockpot White Chicken Chili

Making this Creamy Crockpot White Chicken Chili is as easy as pie.

Follow these simple steps, and you’ll have a delicious meal ready to enjoy.

Let’s get started!

Step 1: Prepare the Chicken

Begin by placing the boneless, skinless chicken breasts at the bottom of your crockpot.

This is crucial because the chicken will soak up all the flavors from the other ingredients as it cooks.

Make sure they’re spread out evenly for even cooking.

Step 2: Add the Vegetables and Beans

Next, layer the diced onion, minced garlic, white beans, corn, and diced green chilies on top of the chicken.

This layering technique enhances the flavor, allowing the juices from the chicken to mingle with the veggies and beans.

It’s like a flavor party in your crockpot!

Step 3: Pour in the Broth and Seasonings

Now, it’s time to pour in the low-sodium chicken broth.

This forms the base of your chili, creating a rich and hearty texture.

Sprinkle the ground cumin, chili powder, paprika, salt, and black pepper over the top.

These spices are the secret to a robust flavor that will have everyone asking for seconds.

Step 4: Cook the Chili

Cover the crockpot and set it to cook on low for 6-8 hours or on high for 3-4 hours.

The longer, the better!

Check for doneness by ensuring the chicken is cooked through and tender.

You’ll know it’s ready when it easily shreds with a fork.

Step 5: Shred the Chicken

Once the chicken is cooked, remove it from the crockpot and shred it using two forks.

This step is essential for achieving that perfect texture.

Return the shredded chicken to the pot, mixing it back into the chili for a cohesive dish.

Step 6: Stir in Cream and Cheese

Now, stir in the sour cream and shredded Monterey Jack cheese.

This is where the magic happens!

The creaminess from the sour cream and the melty cheese elevate the chili to a whole new level of deliciousness.

Let it cook on low for an additional 15-20 minutes to heat through.

Step 7: Serve and Garnish

Finally, serve your Creamy Crockpot White Chicken Chili hot.

Garnish with fresh cilantro and lime wedges for a burst of flavor.

The cilantro adds a fresh touch, while a squeeze of lime brightens the dish beautifully.

Enjoy every comforting bite!

Tips for Success

  • Prep your ingredients the night before to save time in the morning.
  • For extra flavor, sear the chicken in a skillet before adding it to the crockpot.
  • Adjust the spices to your taste; don’t be afraid to experiment!
  • Let the chili cool completely before storing leftovers in an airtight container.
  • Reheat gently on the stove or in the microwave for best results.

Equipment Needed

  • Crockpot: The star of the show! Any slow cooker will do.
  • Cutting board: Essential for chopping veggies and prepping ingredients.
  • Knife: A sharp one makes quick work of dicing and mincing.
  • Measuring cups: Handy for portioning out ingredients accurately.
  • Forks: Perfect for shredding the chicken once it’s cooked.

Variations

  • Spicy Kick: Add diced jalapeños or a splash of hot sauce for an extra kick of heat.
  • Vegetarian Option: Substitute chicken with cubed tofu or additional beans for a hearty vegetarian chili.
  • Low-Carb Version: Replace white beans with cauliflower florets for a low-carb alternative.
  • Herb Infusion: Experiment with fresh herbs like thyme or oregano for a different flavor profile.

  • Cheesy Delight: Mix in different cheeses like pepper jack or cheddar for a unique twist.

Serving Suggestions

  • Crusty Bread: Serve with warm, crusty bread or cornbread for dipping.
  • Salad: Pair with a fresh green salad for a light, balanced meal.
  • Drinks: Enjoy with a cold beer or a refreshing iced tea.
  • Presentation: Serve in colorful bowls and garnish generously for a vibrant look.

FAQs about Creamy Crockpot White Chicken Chili

Can I use frozen chicken in this recipe?

Absolutely! You can use frozen chicken breasts. Just increase the cooking time by an hour or so. The crockpot will work its magic, ensuring the chicken is tender and flavorful.

How can I make this chili spicier?

If you’re looking for a spicy kick, consider adding diced jalapeños or increasing the chili powder. You can also stir in some hot sauce just before serving for an extra punch!

Can I make this chili ahead of time?

Yes! This Creamy Crockpot White Chicken Chili is perfect for meal prep. You can prepare it the night before and store it in the fridge. Just pop it in the crockpot in the morning, and you’ll have a delicious meal waiting for you!

What can I serve with this chili?

This chili pairs wonderfully with crusty bread, cornbread, or a fresh salad. A squeeze of lime and a sprinkle of cilantro on top adds a refreshing touch!

Is this recipe gluten-free?

Yes! This Creamy Crockpot White Chicken Chili is naturally gluten-free, making it a great option for those with dietary restrictions. Enjoy without worry!

Final Thoughts

Cooking should be a joyful experience, and this Creamy Crockpot White Chicken Chili embodies that spirit.

With minimal effort, you can create a dish that warms the heart and satisfies the soul.

Each bite is a reminder of cozy evenings spent with family and friends, sharing stories and laughter.

Whether it’s a busy weeknight or a weekend gathering, this chili is your go-to recipe for comfort and flavor.

So grab your crockpot, gather your ingredients, and let the magic unfold.

You’ll find that this dish not only fills your belly but also creates lasting memories.

Ranis

Creamy Crockpot White Chicken Chili is a must-try recipe!

Creamy Crockpot White Chicken Chili is a delicious and easy-to-make dish that combines tender chicken, white beans, and a creamy broth, perfect for a comforting meal.
Prep Time 15 minutes
Servings: 6 servings
Course: Main Dish
Cuisine: American
Calories: 350

Ingredients
  

  • 2 pounds boneless skinless chicken breasts
  • 1 medium onion diced
  • 3 cloves garlic minced
  • 2 cans 15 ounces each white beans, drained and rinsed
  • 1 can 15 ounces corn, drained
  • 1 can 4 ounces diced green chilies
  • 4 cups low-sodium chicken broth
  • 1 teaspoon ground cumin
  • 1 teaspoon chili powder
  • 1/2 teaspoon paprika
  • 1/2 teaspoon salt
  • 1/4 teaspoon black pepper
  • 1 cup sour cream
  • 1 cup shredded Monterey Jack cheese
  • Fresh cilantro for garnish (optional)
  • Lime wedges for serving (optional)

Method
 

  1. Place the chicken breasts in the bottom of the crockpot.
  2. Add the diced onion, minced garlic, white beans, corn, and diced green chilies on top of the chicken.
  3. Pour in the chicken broth and sprinkle the cumin, chili powder, paprika, salt, and black pepper over the mixture.
  4. Cover and cook on low for 6-8 hours or on high for 3-4 hours, until the chicken is cooked through and tender.
  5. Remove the chicken from the crockpot and shred it using two forks. Return the shredded chicken to the pot.
  6. Stir in the sour cream and shredded cheese until well combined. Let it cook for an additional 15-20 minutes on low to heat through.
  7. Serve hot, garnished with fresh cilantro and lime wedges if desired.

Nutrition

Serving: 1bowlCalories: 350kcalCarbohydrates: 30gProtein: 30gFat: 12gSaturated Fat: 6gPolyunsaturated Fat: 4gCholesterol: 80mgSodium: 800mgFiber: 8gSugar: 2g

Notes

  • For a spicier chili, add a diced jalapeño or increase the amount of chili powder.
  • You can substitute the sour cream with Greek yogurt for a healthier option.

Tried this recipe?

Let us know how it was!

Creamy Spinach Artichoke Dip: A Crowd-Pleasing Recipe!

Introduction to Creamy Spinach Artichoke Dip

There’s something magical about gathering around a warm bowl of Creamy Spinach Artichoke Dip.

It takes me back to those lively game nights with friends, where laughter and good food filled the air.

This dip is not just a recipe; it’s a quick solution for busy days or a dish that impresses your loved ones.

With its rich, creamy texture and savory flavors, it’s bound to be a hit at any gathering.

Whether you’re hosting a party or just craving a cozy night in, this dip is your go-to for comfort and joy.

Why You’ll Love This Creamy Spinach Artichoke Dip

This Creamy Spinach Artichoke Dip is a game-changer for any occasion.

It’s incredibly easy to whip up, taking just 15 minutes of prep time.

The slow cooker does the rest, allowing you to focus on your guests.

With its rich, cheesy goodness and a hint of garlic, it’s a flavor explosion that everyone will adore.

Perfect for parties, movie nights, or just a cozy evening at home, this dip never disappoints!

Ingredients for Creamy Spinach Artichoke Dip

Creating the perfect Creamy Spinach Artichoke Dip starts with gathering the right ingredients.

Here’s what you’ll need:

  • Cream Cheese: This is the base of our dip, providing that luscious creaminess.
  • Sour Cream: Adds a tangy flavor and smooth texture, balancing the richness of the cream cheese.
  • Mayonnaise: For extra creaminess and a hint of zest, mayonnaise is a must.
  • Parmesan Cheese: This grated cheese brings a nutty flavor that elevates the dip.
  • Shredded Mozzarella Cheese: Melts beautifully, adding gooeyness and stretch to each bite.
  • Artichoke Hearts: These tender morsels add a unique taste and texture, making the dip special.
  • Frozen Spinach: A convenient way to add greens; just make sure to thaw and drain it well.
  • Garlic: Freshly minced garlic infuses the dip with aromatic flavor.
  • Onion Powder: A sprinkle of this enhances the overall taste without overpowering it.
  • Salt and Black Pepper: Essential for seasoning, bringing all the flavors together.
  • Crushed Red Pepper Flakes (optional): For those who like a little heat, these add a spicy kick.

Feel free to get creative!

For a lighter version, swap Greek yogurt for sour cream and use low-fat cream cheese.

If you want to amp up the flavor, consider mixing in some cooked, crumbled bacon or diced jalapeños.

All ingredient quantities are listed at the bottom of the article for easy printing.

How to Make Creamy Spinach Artichoke Dip

Making this Creamy Spinach Artichoke Dip is as easy as pie.

With just a few simple steps, you’ll have a delicious appetizer that will wow your guests.

Let’s dive into the process!

Step 1: Prepare the Base

Start by grabbing a large mixing bowl.

Add the softened cream cheese, sour cream, and mayonnaise.

Using a hand mixer or a sturdy spatula, blend these ingredients until they’re smooth and creamy.

This base is the heart of your dip, so take your time to get it just right.

Step 2: Mix in the Cheeses and Vegetables

Next, it’s time to add the fun stuff!

Stir in the grated Parmesan and shredded mozzarella cheese.

Then, toss in the chopped artichoke hearts and thawed spinach.

Mix everything together until it’s well combined.

The colors and textures will start to come together beautifully.

Step 3: Season the Mixture

Now, let’s add some flavor!

Sprinkle in the minced garlic, onion powder, salt, and black pepper.

If you’re feeling adventurous, add the crushed red pepper flakes for a little heat.

Give it a good stir to ensure all the seasonings are evenly distributed.

This step is crucial for that mouthwatering taste.

Step 4: Cook in the Slow Cooker

Transfer your creamy mixture into a slow cooker.

Spread it out evenly for even cooking.

Cover and set it on low for 2 to 3 hours.

You’ll know it’s ready when the dip is hot and bubbly.

The slow cooker does all the work, so you can relax and enjoy the company.

Step 5: Serve and Enjoy

Once your dip is ready, give it a quick stir.

Taste it and adjust the seasoning if needed.

Serve it warm with tortilla chips, bread, or fresh vegetable sticks.

Watch as your guests dive in, savoring every creamy bite.

This dip is sure to be the star of the show!

Tips for Success

  • Make sure your cream cheese is softened for easy mixing.
  • Thaw and drain the spinach thoroughly to avoid a watery dip.
  • For a creamier texture, consider using full-fat ingredients.
  • Adjust the seasoning to your taste; don’t be afraid to experiment!
  • Keep an eye on the slow cooker; every model cooks differently.

Equipment Needed

  • Large Mixing Bowl: A sturdy bowl for combining ingredients; a glass or ceramic bowl works well.
  • Hand Mixer or Spatula: Use a hand mixer for smoothness, or a spatula for a more rustic texture.
  • Slow Cooker: Essential for cooking the dip; a stovetop pot can be used for a quick version.
  • Measuring Cups and Spoons: For accurate ingredient portions; a simple kitchen scale can also help.

Variations

  • Spicy Spinach Artichoke Dip: Add diced jalapeños or a splash of hot sauce for an extra kick.
  • Cheesy Bacon Dip: Mix in cooked, crumbled bacon for a smoky flavor that elevates the dip.
  • Vegan Version: Substitute cream cheese and sour cream with cashew cream and nutritional yeast for a plant-based delight.
  • Herbed Spinach Dip: Incorporate fresh herbs like basil or dill for a burst of freshness.
  • Artichoke and Sun-Dried Tomato Dip: Add chopped sun-dried tomatoes for a tangy twist that complements the artichokes.

Serving Suggestions

  • Pair the dip with crispy tortilla chips for a classic combo.
  • Serve alongside sliced baguette or pita bread for a delightful crunch.
  • Fresh vegetable sticks like carrots, celery, and bell peppers add a healthy touch.
  • For drinks, consider a chilled white wine or a light beer.
  • Garnish with fresh parsley or a sprinkle of paprika for a pop of color.

FAQs about Creamy Spinach Artichoke Dip

Can I make Creamy Spinach Artichoke Dip ahead of time?

Absolutely! You can prepare the dip a day in advance. Just mix all the ingredients and store them in the fridge. When you’re ready to serve, pop it in the slow cooker to heat it up. This makes it a perfect party appetizer!

What can I serve with Creamy Spinach Artichoke Dip?

This dip pairs wonderfully with crispy tortilla chips, sliced baguette, or fresh vegetable sticks. You can also serve it with crackers for a delightful crunch. The options are endless!

Can I freeze Creamy Spinach Artichoke Dip?

Yes, you can freeze it! Just make sure to store it in an airtight container. When you’re ready to enjoy it, thaw it in the fridge overnight and reheat it in the slow cooker or oven until hot and bubbly.

How can I make this dip healthier?

For a lighter version, substitute Greek yogurt for sour cream and use low-fat cream cheese. You can also add more spinach to increase the nutritional value without sacrificing flavor.

What’s the best way to reheat leftover dip?

The best way to reheat leftover Creamy Spinach Artichoke Dip is in the oven or microwave. If using the oven, cover it with foil and heat at 350°F until warm. Stir occasionally to ensure even heating.

Final Thoughts

Creating this Creamy Spinach Artichoke Dip is more than just following a recipe; it’s about bringing people together.

The joy of watching friends and family gather around a warm bowl, sharing stories and laughter, is truly special.

Each creamy bite is a reminder of the simple pleasures in life.

Whether it’s game night or a casual get-together, this dip never fails to impress.

So, roll up your sleeves, gather your ingredients, and let the magic happen in your kitchen.

You’ll not only serve a delicious appetizer but also create lasting memories.

Ranis

Creamy Spinach Artichoke Dip: A Crowd-Pleasing Recipe!

A creamy and delicious spinach artichoke dip that is perfect for parties and gatherings.
Prep Time 15 minutes
Total Time 2 hours 15 minutes
Course: Appetizer
Cuisine: American
Calories: 290

Ingredients
  

  • 8 ounces cream cheese softened
  • 1 cup sour cream
  • 1 cup mayonnaise
  • 1 cup grated Parmesan cheese
  • 1 cup shredded mozzarella cheese
  • 1 can 14 ounces artichoke hearts, drained and chopped
  • 1 cup frozen spinach thawed and drained
  • 2 cloves garlic minced
  • 1 teaspoon onion powder
  • 1 teaspoon salt
  • 1/2 teaspoon black pepper
  • 1/2 teaspoon crushed red pepper flakes optional

Method
 

  1. In a large mixing bowl, combine the softened cream cheese, sour cream, and mayonnaise. Mix until smooth and well blended.
  2. Stir in the grated Parmesan cheese, shredded mozzarella cheese, chopped artichoke hearts, and thawed spinach.
  3. Add the minced garlic, onion powder, salt, black pepper, and crushed red pepper flakes (if using). Mix until all ingredients are evenly combined.
  4. Transfer the mixture to a slow cooker and spread it evenly. Cover and cook on low for 2 to 3 hours, or until the dip is hot and bubbly.
  5. Stir the dip before serving and adjust seasoning if necessary. Serve warm with tortilla chips, bread, or vegetable sticks.

Nutrition

Serving: 1/8 of the dipCalories: 290kcalCarbohydrates: 5gProtein: 6gFat: 28gSaturated Fat: 12gPolyunsaturated Fat: 16gCholesterol: 70mgSodium: 600mgFiber: 1gSugar: 2g

Notes

  • For a lighter version, substitute Greek yogurt for sour cream and use low-fat cream cheese.
  • For added flavor, mix in some cooked, crumbled bacon or diced jalapeños for a spicy kick.

Tried this recipe?

Let us know how it was!

Mexican Chicken Adobo Street Tacos: Tasty & Easy Recipe!

Introduction to Mexican Chicken Adobo Street Tacos

There’s something magical about street tacos, isn’t there? The way they bring people together, the vibrant flavors, and the ease of preparation make them a go-to for any occasion. My favorite? Mexican Chicken Adobo Street Tacos. This dish is not just a meal; it’s a quick solution for those busy weeknights or a delightful way to impress friends at your next gathering. With tender chicken marinated in a rich adobo sauce, these tacos are bursting with flavor. Trust me, once you try this recipe, you’ll want to make it a regular in your kitchen rotation!

Why You’ll Love This Mexican Chicken Adobo Street Tacos

These Mexican Chicken Adobo Street Tacos are a game-changer for anyone looking for a quick, delicious meal. They come together in just 40 minutes, making them perfect for busy weeknights. The combination of spices creates a mouthwatering flavor that will have your taste buds dancing. Plus, they’re versatile! You can easily customize them with your favorite toppings, ensuring everyone at the table leaves satisfied. What’s not to love?

Ingredients for Mexican Chicken Adobo Street Tacos

Gathering the right ingredients is the first step to creating these mouthwatering Mexican Chicken Adobo Street Tacos. Here’s what you’ll need:

  • Boneless, skinless chicken thighs: These are juicy and tender, perfect for absorbing all the delicious flavors.
  • Olive oil: A staple in many kitchens, it’s used for sautéing the onions and adds a rich flavor.
  • Onion: Finely chopped, it provides a sweet and savory base for the dish.
  • Garlic: Minced garlic adds an aromatic punch that elevates the overall taste.
  • Chili powder: This spice brings warmth and depth, giving the chicken that classic adobo flavor.
  • Ground cumin: Earthy and slightly nutty, cumin enhances the taco’s flavor profile.
  • Smoked paprika: It adds a subtle smokiness that complements the spices beautifully.
  • Dried oregano: A must-have herb in Mexican cuisine, it adds a hint of earthiness.
  • Salt and black pepper: Essential for seasoning, they help to balance the flavors.
  • Apple cider vinegar: This tangy ingredient brightens the dish and helps tenderize the chicken.
  • Chicken broth: It adds moisture and richness to the sauce.
  • Brown sugar: A touch of sweetness to balance the spices and acidity.
  • Corn tortillas: The perfect vessel for your taco filling, they’re soft and flavorful.
  • Fresh cilantro: Chopped cilantro adds a burst of freshness and color.
  • Lime: Cut into wedges, lime juice adds a zesty kick when squeezed over the tacos.
  • Sliced radishes and avocado (optional): These make great garnishes, adding crunch and creaminess.

For exact measurements, check the bottom of the article where you can find everything available for printing. Happy cooking!

How to Make Mexican Chicken Adobo Street Tacos

Now that you have all your ingredients ready, let’s dive into the fun part—making these delicious Mexican Chicken Adobo Street Tacos! Follow these simple steps, and you’ll have a mouthwatering meal in no time.

Step 1: Sauté the Onions

Start by heating the olive oil in a large skillet over medium heat. Once the oil is shimmering, toss in the finely chopped onion. Sauté it for about 5 minutes, stirring occasionally, until the onions become translucent. This step builds a flavorful base for your tacos, so don’t rush it!

Step 2: Add Garlic

Next, it’s time to add the minced garlic. Stir it into the skillet and cook for an additional minute. You’ll know it’s ready when the kitchen fills with that irresistible aroma. Garlic is a key player in this dish, enhancing the overall flavor profile and making your taste buds tingle with anticipation.

Step 3: Season the Chicken

Now, add the boneless, skinless chicken thighs to the skillet. Sprinkle the chili powder, ground cumin, smoked paprika, dried oregano, salt, and black pepper over the chicken. Stir everything together, ensuring the chicken is evenly coated with those vibrant spices. This is where the magic begins, as the chicken absorbs all those delicious flavors!

Step 4: Simmer the Mixture

Pour in the apple cider vinegar and chicken broth, then add the brown sugar. Bring the mixture to a gentle simmer. Cover the skillet and reduce the heat to low. Let it cook for 25-30 minutes, or until the chicken is tender and cooked through. This slow simmer allows the flavors to meld beautifully, creating a rich sauce that you’ll love.

Step 5: Shred the Chicken

Once the chicken is cooked, remove it from the skillet and place it on a cutting board. Using two forks, shred the chicken into bite-sized pieces. Return the shredded chicken to the skillet and stir it back into the sauce. This step ensures every piece of chicken is coated in that delicious adobo sauce, making each taco a flavor explosion!

Step 6: Warm the Tortillas

While the chicken is soaking up all that flavor, it’s time to warm the corn tortillas. Heat a dry skillet over medium heat. Place each tortilla in the skillet for about 30 seconds on each side, just until they’re warm and pliable. This little step makes a big difference, giving your tacos that perfect texture.

Step 7: Assemble the Tacos

Now comes the fun part—assembling your tacos! Take a warm tortilla and place a generous amount of the chicken mixture in the center. Top it off with chopped fresh cilantro and any optional garnishes like sliced radishes or avocado. Serve with lime wedges on the side for that zesty kick. Enjoy every bite of your homemade Mexican Chicken Adobo Street Tacos!

Tips for Success

  • Prep your ingredients ahead of time to streamline the cooking process.
  • Don’t skip the simmering step; it’s crucial for flavor development.
  • Feel free to adjust the spice levels to suit your taste.
  • Use fresh tortillas for the best texture and flavor.
  • Experiment with toppings like pickled onions or crumbled queso for added flair.

Equipment Needed

  • Large skillet: A non-stick skillet works great, but any heavy-bottomed pan will do.
  • Cutting board: Essential for shredding the chicken; a plastic or wooden board is fine.
  • Two forks: Perfect for shredding the chicken; you can also use your hands if you prefer.
  • Measuring cups: Handy for measuring liquids like vinegar and broth.

Variations

  • Spicy Adobo: Add diced jalapeños or a splash of your favorite hot sauce to the chicken mixture for an extra kick.
  • Vegetarian Option: Substitute chicken with grilled portobello mushrooms or jackfruit for a plant-based twist.
  • Gluten-Free Tacos: Ensure your corn tortillas are certified gluten-free for a safe option.
  • Different Proteins: Try using shredded beef or pork for a different flavor profile while keeping the adobo sauce.
  • Herb Variations: Experiment with fresh herbs like mint or parsley in place of cilantro for a unique taste.

Serving Suggestions

  • Pair your tacos with a side of Mexican street corn for a delightful crunch.
  • Serve with a refreshing cucumber salad to balance the flavors.
  • For drinks, try a cold cerveza or a zesty margarita.
  • Garnish with lime wedges and extra cilantro for a vibrant presentation.

FAQs about Mexican Chicken Adobo Street Tacos

Can I use chicken breasts instead of thighs for this recipe?

Absolutely! While I love the tenderness of chicken thighs, boneless, skinless chicken breasts work just as well. Just keep an eye on the cooking time, as they may cook a bit faster.

How spicy are these Mexican Chicken Adobo Street Tacos?

The spice level is adjustable! The chili powder gives a nice warmth, but if you prefer more heat, feel free to add diced jalapeños or a splash of hot sauce to the chicken mixture.

Can I make the chicken adobo ahead of time?

Yes! You can prepare the chicken adobo a day in advance. Just store it in the fridge and reheat it when you’re ready to assemble your tacos. This can actually enhance the flavors!

What toppings do you recommend for these tacos?

Fresh cilantro is a must, but you can also add sliced radishes, avocado, or even crumbled queso. Lime wedges are perfect for that zesty finish!

Are these tacos gluten-free?

Yes! As long as you use certified gluten-free corn tortillas, these Mexican Chicken Adobo Street Tacos are a delicious gluten-free option. Enjoy without worry!

Final Thoughts

Cooking these Mexican Chicken Adobo Street Tacos is more than just preparing a meal; it’s about creating memories. The aroma of spices wafting through your kitchen, the laughter shared around the table, and the satisfaction of a delicious bite all come together in this simple yet flavorful dish. Whether you’re feeding a hungry family or impressing friends at a gathering, these tacos are sure to be a hit. So roll up your sleeves, gather your ingredients, and dive into this culinary adventure. Trust me, once you taste these tacos, you’ll be hooked for life!

Ranis

Mexican Chicken Adobo Street Tacos: Tasty & Easy Recipe!

Delicious and easy-to-make Mexican Chicken Adobo Street Tacos, perfect for a quick meal.
Prep Time 10 minutes
Cook Time 30 minutes
Total Time 40 minutes
Servings: 4 servings
Course: Main Dish
Cuisine: Mexican
Calories: 320

Ingredients
  

  • 2 pounds boneless skinless chicken thighs
  • 1 tablespoon olive oil
  • 1 medium onion finely chopped
  • 4 cloves garlic minced
  • 1 tablespoon chili powder
  • 1 teaspoon ground cumin
  • 1 teaspoon smoked paprika
  • 1 teaspoon dried oregano
  • 1/2 teaspoon salt
  • 1/4 teaspoon black pepper
  • 1/4 cup apple cider vinegar
  • 1/4 cup chicken broth
  • 1 tablespoon brown sugar
  • 8 small corn tortillas
  • 1 cup chopped fresh cilantro
  • 1 lime cut into wedges
  • Sliced radishes and avocado for garnish optional

Method
 

  1. In a large skillet, heat the olive oil over medium heat. Add the chopped onion and sauté until translucent, about 5 minutes.
  2. Stir in the minced garlic and cook for an additional minute until fragrant.
  3. Add the chicken thighs to the skillet and sprinkle with chili powder, cumin, smoked paprika, oregano, salt, and pepper. Stir to coat the chicken evenly with the spices.
  4. Pour in the apple cider vinegar and chicken broth, then add the brown sugar. Bring the mixture to a simmer.
  5. Cover the skillet and reduce the heat to low. Cook for 25-30 minutes, or until the chicken is cooked through and tender.
  6. Remove the chicken from the skillet and shred it using two forks. Return the shredded chicken to the skillet and stir to combine with the sauce.
  7. Warm the corn tortillas in a dry skillet over medium heat for about 30 seconds on each side.
  8. Assemble the tacos by placing a generous amount of the chicken mixture on each tortilla. Top with chopped cilantro and any additional garnishes like radishes and avocado.
  9. Serve with lime wedges on the side for squeezing over the tacos.

Nutrition

Serving: 1tacoCalories: 320kcalCarbohydrates: 20gProtein: 25gFat: 15gSaturated Fat: 3gPolyunsaturated Fat: 12gCholesterol: 80mgSodium: 500mgFiber: 2gSugar: 5g

Notes

  • For a spicier kick, add diced jalapeños or a splash of hot sauce to the chicken mixture.
  • Substitute the chicken thighs with boneless, skinless chicken breasts for a leaner option.

Tried this recipe?

Let us know how it was!