Honey Glazed Corn Casserole That Everyone Will Love

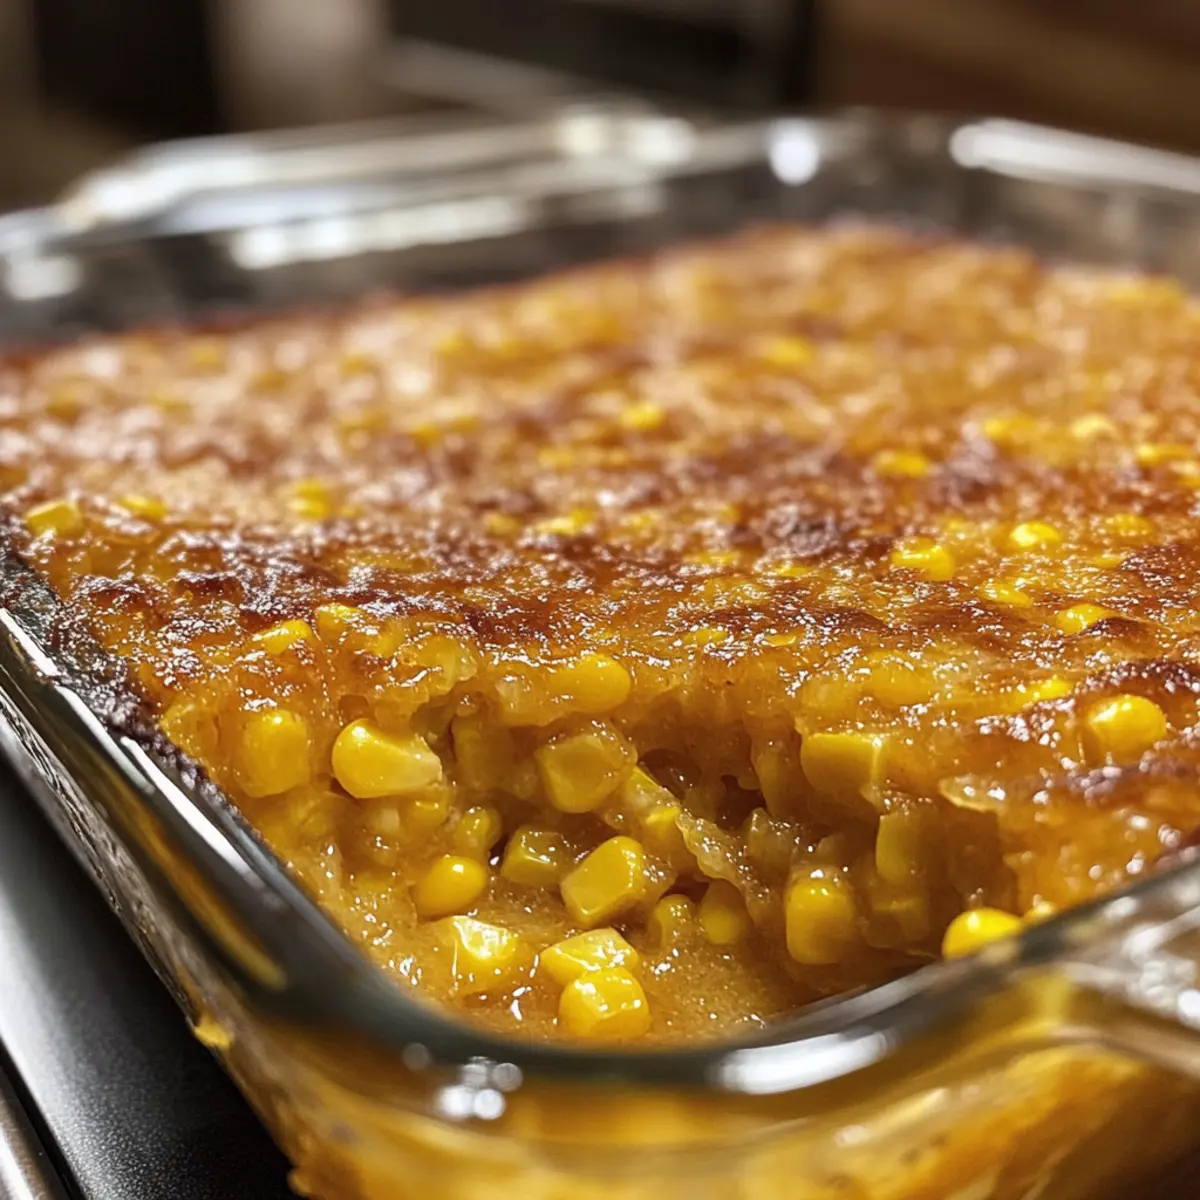
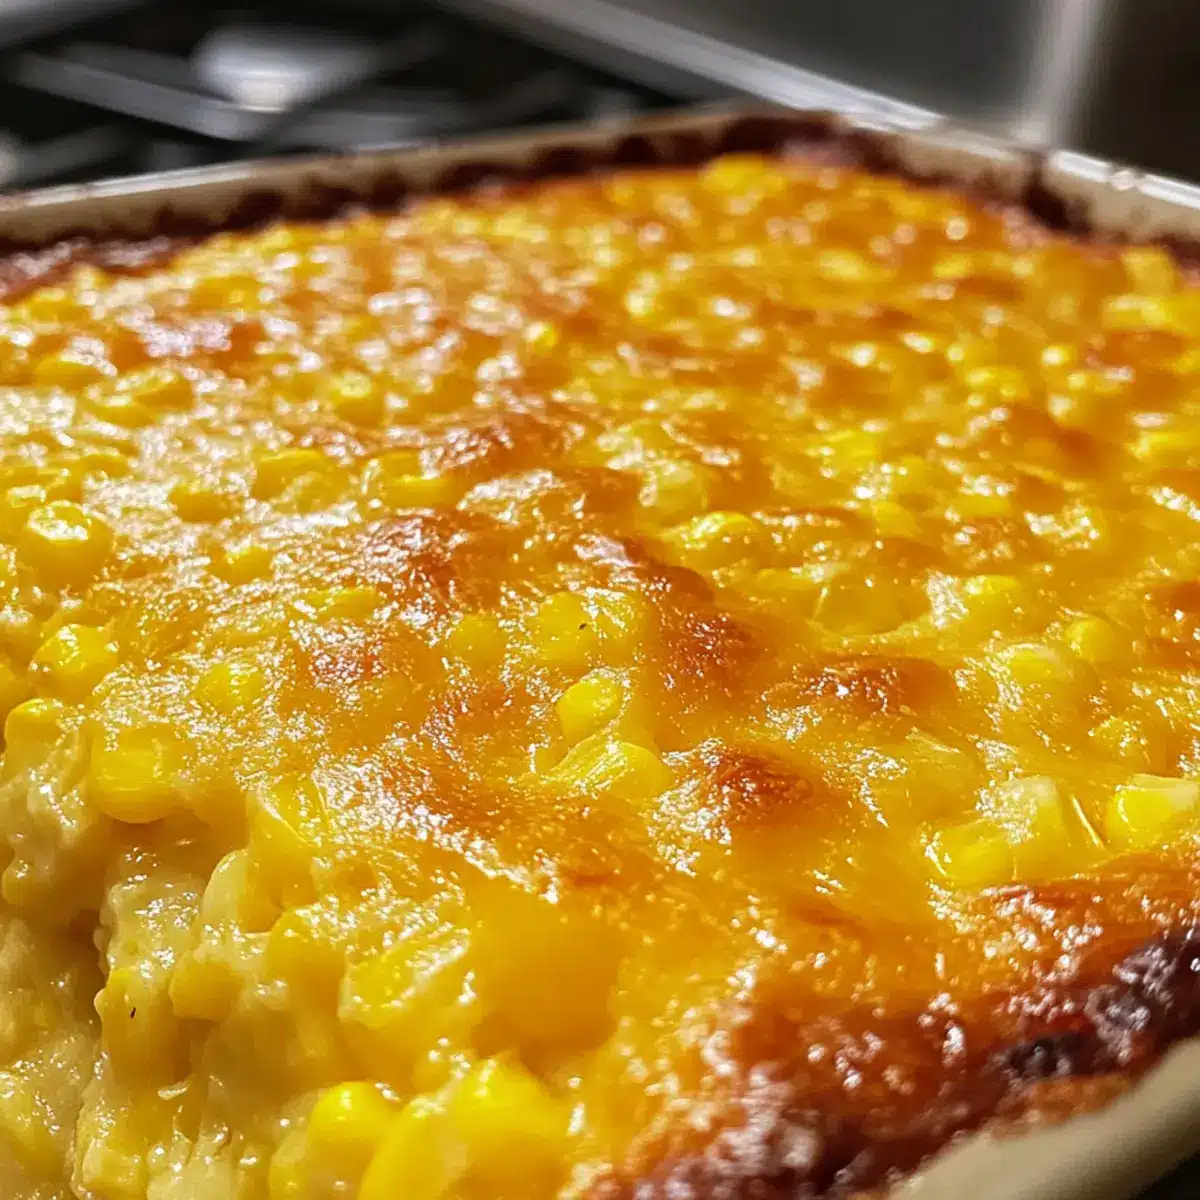
As I sunk my spoon into the warm, golden-brown Honey Glazed Corn Casserole, a wave of nostalgia washed over me, reminiscent of family gatherings and cherished celebrations. This dish seamlessly marries sweet and savory flavors, transforming a classic side into a comforting culinary masterpiece. Its creamy texture and delightful honey glaze make it not only a crowd-pleaser but also an effortless addition to any meal, whether you’re hosting a holiday feast or enjoying a cozy weeknight dinner. Plus, with its simple prep time, you can whip it up in no time, leaving more space for laughter around the table. Are you ready to surprise your taste buds with this irresistible twist on comfort food?

What makes this casserole irresistible?

Simplicity at its finest: With minimal prep work, this Honey Glazed Corn Casserole is a breeze to whip up, leaving you free to enjoy your company.

Versatile variations: Customize it with cheese, bacon, or jalapeños to suit your taste or to impress your guests.

Crowd-pleaser appeal: Perfect for potlucks or family dinners, this dish will have everyone asking for seconds, making it a staple on your table.

Comfort food classic: The sweet and savory combination offers a comforting taste of home, reminiscent of festive gatherings.

Make-ahead option: Prepare it in advance and refrigerate, allowing flavors to deepen, which adds to its convenience.

Honey Glazed Corn Casserole Ingredients

  • For the Casserole
  • Creamed Corn – Provides moisture and sweetness; substitute with homemade if desired.
  • Whole Kernel Corn – Adds texture and slight crunch; fresh corn can be used for added freshness.
  • Corn Muffin Mix – Serves as the base; Jiffy is recommended, but any similar brand will suffice.
  • Sour Cream – Adds creaminess and a delightful tang; Greek yogurt works well as a lighter alternative.
  • Butter – Incorporates richness and flavor; unsalted butter is preferable for better control over seasoning.
  • Honey – Delivers sweetness and a unique glaze; feel free to swap with maple syrup for a different flavor profile.
  • Large Egg – Binds the casserole together; for a vegan twist, consider using a flax or chia egg.
  • Salt & Black Pepper – Enhances overall flavor; adjust to your taste, and try smoked salt for an extra kick.

This Honey Glazed Corn Casserole is not just easy to make but also a dish that evolves with your creativity!

Step‑by‑Step Instructions for Honey Glazed Corn Casserole

Step 1: Preheat Oven and Prepare Dish
Begin by preheating your oven to 350°F (175°C) to ensure it’s at the perfect temperature for baking. While the oven warms up, take an 8×8 inch baking dish and apply a generous coating of grease or line it with parchment paper to prevent your Honey Glazed Corn Casserole from sticking.

Step 2: Combine Corn Varieties
In a large mixing bowl, combine the creamed corn and drained whole kernel corn. Stir them together until they are thoroughly blended, creating a sweet and creamy base. This step is essential as it allows for an even distribution of flavors in your casserole.

Step 3: Incorporate Corn Muffin Mix
Next, add the corn muffin mix into the corn mixture. Use a spatula or wooden spoon to gently stir, just until the ingredients are combined. Be careful not to overmix, as this could lead to a dense texture in your Honey Glazed Corn Casserole.

Step 4: Mix in Wet Ingredients
Now, it’s time to enhance the flavors! Add sour cream, melted butter, honey, and the beaten egg to the bowl. Combine everything until just blended, adding a pinch of salt and black pepper to taste. The mixture should have a smooth consistency that’s creamy and inviting.

Step 5: Bake the Casserole
Pour the combined mixture into your prepared baking dish, spreading it out evenly. Place it in the preheated oven and bake for 45-50 minutes. The Honey Glazed Corn Casserole is ready when the top turns a lovely golden brown and a toothpick inserted in the center comes out clean, indicating it’s fully set.

Step 6: Cool and Serve
Once baked to perfection, remove the casserole from the oven and let it cool for about 10-15 minutes. This cooling period allows the flavors to settle and makes slicing easier. Serve your warm Honey Glazed Corn Casserole as a delightful side dish, and watch as everyone gathers to enjoy its deliciousness!

What to Serve with Honey Glazed Corn Casserole

Whether you’re hosting a cozy family dinner or a festive gathering, this delightful casserole pairs beautifully with an array of dishes that elevate your culinary experience.

  • Roasted Chicken: The juicy, savory flavors of roasted chicken create a wonderful contrast to the sweetness of the casserole, making for a harmonious plate.

  • Grilled Steak: With its charred exterior and rich flavor, grilled steak complements the creamy texture of the corn casserole, bringing out the best in both dishes.

  • Baked Ham: The slight sweetness of the baked ham elevates the honey glaze, enhancing the overall comfort food experience perfect for any celebration.

  • Fresh Green Salad: A crisp salad with a tangy vinaigrette adds a refreshing crunch, balancing the richness of the casserole and bringing freshness to your meal.

  • Garlic Bread: The warm, buttery garlic bread creates the perfect accompaniment for soaking up any leftover honey glaze, adding a delightful crunch to the meal.

  • Sparkling Cider: Pairing your casserole with a sweet sparkling cider provides a refreshing lift, adding just the right touch of celebration to your dinner.

  • Apple Crisp: For dessert, an apple crisp offers a warm, sweet finish to your meal, echoing the comforting flavors of the honey glazed corn casserole while introducing a deliciously fruity element.

Expert Tips for Honey Glazed Corn Casserole

  • Mixing Technique: Avoid overmixing: Stir until just combined to maintain a light, fluffy texture in your Honey Glazed Corn Casserole.

  • Browning Control: Tent with foil: If the top browns too quickly during baking, cover it with foil to prevent burning while ensuring a lovely golden finish.

  • Cooling Time: Let it rest: Allow the casserole to cool for 10-15 minutes after baking to set properly, enhancing both flavor and texture.

  • Greasing the Dish: Prevent sticking: Always grease or parchment-line your baking dish to ensure smooth serving and easy cleanup.

  • Egg Substitution: Vegan option: For a plant-based version, replace the large egg with a flax or chia egg, ensuring the binder remains effective.

Honey Glazed Corn Casserole Variations

Feel free to make this Honey Glazed Corn Casserole your own and delight your taste buds with exciting twists!

  • Cheesy Delight: Mix in shredded cheese like cheddar for a gooey, cheesy version. Imagine the melty goodness enhancing each bite!
  • Spicy Twist: Add chopped jalapeños to the mix for a spicy kick. This adds a delightful heat that balances the sweetness perfectly!
  • Savory Crunch: Stir in cooked bacon, or crumble it on top for added texture and a smoky flavor. This will tantalize your senses in the best way!
  • Different Corn Varieties: Experiment with using different types of corn, like sweet corn, for a burst of fresh flavor. Fresh corn from the cob truly elevates the dish!
  • Greek Yogurt Substitute: Replace sour cream with Greek yogurt for a lighter, tangy alternative. It’s a subtle change that keeps the creaminess intact!
  • Maple Syrup Substitute: Swap honey for maple syrup for a unique flavor profile that adds a touch of warmth. It will introduce a lovely, robust sweetness.
  • Dairy-Free Option: Use non-dairy milk and vegan butter for a plant-based twist. This way, everyone can enjoy a slice of comfort!
  • Herb Infusion: Incorporate fresh herbs such as chives or parsley into the mixture for an aromatic lift. This elevates the casserole from humble to sophisticated!

With these variations, your Honey Glazed Corn Casserole can adapt to any occasion, just like my Grilled Honey Glazed carrots or Honey Sriracha Glazed meatballs that always impress!

Make Ahead Options

These Honey Glazed Corn Casserole options are perfect for busy home cooks looking to save time! You can prepare the entire mixture and refrigerate it for up to 24 hours before baking, allowing the flavors to deepen. Just combine the creamed corn, whole kernel corn, corn muffin mix, sour cream, melted butter, honey, and beaten egg, season with salt and pepper, and pour the mixture into your greased dish. Cover it tightly with plastic wrap to maintain freshness and prevent drying out. When you’re ready to serve, simply uncover and bake as directed—enjoy a delicious, stress-free side that tastes just as delightful as if made fresh!

How to Store and Freeze Honey Glazed Corn Casserole

Refrigerator: Store any leftovers in an airtight container for up to 3-4 days, ensuring the casserole retains its delightful flavors.

Freezer: For longer storage, freeze the casserole for up to 2 months. Wrap it tightly in plastic wrap, then cover with foil for added protection against freezer burn.

Reheating: When ready to enjoy, thaw in the refrigerator overnight. Reheat in a 350°F (175°C) oven covered with foil until heated through, approximately 20-30 minutes.

Make-Ahead: You can prepare the Honey Glazed Corn Casserole up to 24 hours in advance. Just refrigerate it uncooked until you’re ready to bake, allowing the flavors to meld beautifully.

Honey Glazed Corn Casserole Recipe FAQs

What is the best way to select sweet corn for the casserole?
Absolutely! When choosing fresh sweet corn, look for ears that are firm and feel heavy for their size. The kernels should be plump, tightly packed, and have a bright green husk. If you notice any dark spots or signs of drying on the husk, it’s best to pass. Fresh corn adds a delightful crunch and sweetness that elevates your Honey Glazed Corn Casserole.

How should I store leftovers of the casserole?
Very! To store leftovers, place them in an airtight container in the refrigerator. Properly stored, your Honey Glazed Corn Casserole will stay fresh for about 3-4 days. It’s a comforting dish, perfect for rewarming on busy nights!

Can I freeze Honey Glazed Corn Casserole?
Of course! To freeze, wrap the cooled casserole tightly in plastic wrap, then cover it with foil for extra protection. It can be frozen for up to 2 months. When you’re ready to enjoy it, thaw in the refrigerator overnight before reheating, ensuring it tastes as delicious as it did fresh.

What should I do if my casserole is too dense?
If your Honey Glazed Corn Casserole turns out dense, it’s likely due to overmixing the batter. For a lighter texture, mix the ingredients just until combined, and consider reducing the baking time slightly next time. If you find it unappetizing this time, try serving it with a dollop of sour cream or a sprinkle of cheese on top for added moisture and flavor.

Is this casserole suitable for people with gluten allergies?
Absolutely! To make the Honey Glazed Corn Casserole gluten-free, substitute the corn muffin mix with a gluten-free alternative. There are many brands available, or you could make your own blend using cornmeal and gluten-free flour. Always double-check that your other ingredients, like the creamed corn, are gluten-free as well.

Can I prepare the casserole in advance?
Yes, you can! To make ahead, simply assemble the casserole up to 24 hours before baking. Cover it tightly with plastic wrap and refrigerate it. When you’re ready to bake, remove the wrap and pop it into the oven as directed. The extra time allows the flavors to meld beautifully, making your Honey Glazed Corn Casserole even more delicious!

Honey Glazed Corn Casserole

Honey Glazed Corn Casserole That Everyone Will Love

This Honey Glazed Corn Casserole is a delightful blend of sweet and savory flavors, perfect for family gatherings.
Prep Time 15 minutes
Cook Time 50 minutes
Cooling Time 15 minutes
Total Time 1 hour 20 minutes
Servings: 8 servings
Course: Dinner
Cuisine: American
Calories: 250

Ingredients
  

For the Casserole
  • 1 can Creamed Corn Substitute with homemade if desired
  • 1 can Whole Kernel Corn Fresh corn can be used for added freshness
  • 1 package Corn Muffin Mix Jiffy is recommended
  • 1 cup Sour Cream Greek yogurt works well as a lighter alternative
  • 1/2 cup Butter Unsalted butter is preferable
  • 1/4 cup Honey Feel free to swap with maple syrup
  • 1 large Egg Consider using a flax or chia egg for a vegan twist
  • to taste Salt Adjust to your taste
  • to taste Black Pepper Try smoked salt for an extra kick

Equipment

  • 8x8-inch Baking Dish

Method
 

Step-by-Step Instructions
  1. Preheat your oven to 350°F (175°C) and prepare an 8x8 inch baking dish by greasing or lining with parchment paper.
  2. In a large mixing bowl, combine the creamed corn and drained whole kernel corn.
  3. Add the corn muffin mix into the corn mixture and gently stir until combined.
  4. Mix in sour cream, melted butter, honey, and the beaten egg until just blended.
  5. Pour the mixture into the prepared baking dish and spread it out evenly. Bake for 45-50 minutes.
  6. Let the casserole cool for about 10-15 minutes before serving.

Nutrition

Serving: 1servingCalories: 250kcalCarbohydrates: 30gProtein: 5gFat: 12gSaturated Fat: 7gPolyunsaturated Fat: 1gMonounsaturated Fat: 4gCholesterol: 40mgSodium: 300mgPotassium: 200mgFiber: 2gSugar: 6gVitamin A: 300IUVitamin C: 2mgCalcium: 100mgIron: 1mg

Notes

Allow flavors to deepen by preparing in advance and refrigerating. Can substitute large egg with a flax or chia egg for a vegan option.

Tried this recipe?

Let us know how it was!

Savory One Pot Shawarma Chicken and Rice for Easy Dinners

The warm, inviting aroma of spices wafts through my kitchen, transporting me to a bustling bazaar where street vendors expertly dish out shawarma to eager food lovers. That’s the magic I sought to capture with my One Pot Shawarma Chicken and Rice. This delightful recipe brings together tender chicken marinated in a symphony of Middle Eastern flavors, all atop fluffy rice that absorbs each spice’s essence. Not only is it an effortless one-pan dish, making cleanup a breeze, but it also packs a satisfying punch of high protein while keeping calories in check—just 430 per serving! Perfect for busy weeknights, it’s a meal the whole family can gather around. Curious how to recreate this comforting dish at home? Let’s dive in!

Why is This Shawarma Chicken Special?

Simplicity at Its Best: Prepare a delicious meal in just one pot, making cleanup quick and easy.

Rich Middle Eastern Flavors: Each bite is infused with aromatic spices like cumin, coriander, and cardamom, transporting you straight to a bustling bazaar.

Nutrient-Packed: At only 430 calories per serving, this dish ensures you enjoy a wholesome meal that is still high in protein—33g to be exact!

Versatile Serving Options: Pair it with refreshing salads or fluffy pita bread for a complete, family-friendly feast.

Perfect for Busy Nights: Cook this One Pot Shawarma Chicken and Rice on a weeknight, and spend less time cooking and more time with loved ones—a satisfying and quick solution to your dinner dilemmas!

For more easy dinner ideas, check out my delicious Grilled Chicken Sandwich or the flavorful Corn Chicken Rice.

One Pot Shawarma Chicken and Rice Ingredients

For the Chicken Marinade

  • Chicken Thighs (600g, boneless, skinless) – Tender and juicy, perfect for absorbing spices; substitute with chicken breast if desired.
  • Ground Cumin (2 tsp) – This spice adds warm, earthy notes; no direct replacement but coriander can enhance its flavor.
  • Ground Coriander (2 tsp) – Offers a refreshing citrusy tone; curry powder can work in a pinch if you’re out of this.
  • Paprika (2 tsp) & Smoked Paprika (1 tsp) – Provides excellent color and sweetness; using only regular paprika will lose the smoky depth.
  • Salt (¾ tsp) – Essential for flavor enhancement; feel free to adjust according to your liking.
  • Black Pepper (½ tsp) – Adds warmth and a bit of heat; freshly ground is best for maximum flavor.
  • Turmeric (½ tsp) – Infuses a beautiful golden hue and earthy taste; saffron could substitute for an upscale touch.
  • Ground Cardamom (½ tsp) – Delivers a warm and aromatic profile; garam masala can be an easy swap.
  • Chili Flakes (¼ tsp) – Regulate the spice level to your preference; adjust the amount if you’re sensitive to heat.
  • Lemon Juice (1.5 tbsp) – Brightens and balances the dish; substitute with apple cider vinegar if necessary.
  • Olive Oil (1 tbsp) – Used for searing the chicken; any neutral oil can replace it if preferred.

For the Rice and Broth

  • Long Grain Rice (180g) – Acts as the heart of this dish, soaking up the spices; Jasmine or Basmati rice makes a fragrant alternative.
  • Chicken Stock (480ml, hot) – Adds richness and depth; vegetable stock is perfect for a vegetarian version.

For the Aromatics

  • Onion (1 medium, halved & sliced) – Introduces sweetness and texture; shallots can be used for a milder flavor.
  • Garlic (3 cloves, crushed) – Deepens the flavor profile; a pinch of garlic powder can substitute if fresh isn’t available.

For Garnish

  • Fresh Parsley (2 tbsp, chopped) & Dried Dill (½ tsp) – Bright, fresh garnishes that add depth; fresh dill is preferred, but you can skip it if not on hand.

This One Pot Shawarma Chicken and Rice will not only please your palate but also make dinner a breeze, keeping your family happy and satisfied!

Step‑by‑Step Instructions for One Pot Shawarma Chicken and Rice

Step 1: Prepare the Chicken
In a mixing bowl, slice the chicken thighs in half and combine them with ground cumin, ground coriander, paprika, smoked paprika, salt, black pepper, turmeric, ground cardamom, chili flakes, and lemon juice. Make sure the chicken is evenly coated and let it marinate for at least 15 minutes, allowing the flavors to meld while you prep the other ingredients.

Step 2: Sear the Chicken
Heat 1 tablespoon of olive oil in a large, deep frying pan over medium-high heat. Once the oil shimmers, add the marinated chicken and sear for 3-4 minutes on each side until it’s beautifully golden and cooked through. Midway through cooking, toss in the sliced onion and crushed garlic; sauté until aromatic and the onion is slightly translucent.

Step 3: Cook the Rice
Add the long grain rice to the pan, stirring it into the mixture and sautéing for about 1 minute until slightly translucent. This will allow the rice to absorb the spices. Then, pour in 480ml of hot chicken stock, giving it a gentle stir to incorporate all ingredients evenly, and bring the mixture to a low simmer.

Step 4: Simmer and Steam
Once simmering, do not stir further; allow the mixture to simmer uncovered until the stock absorbs completely, around 10-12 minutes. This step is crucial for achieving fluffy rice. Afterward, turn off the heat and cover the pan with a lid. Let it steam undisturbed for an additional 12 minutes to ensure everything is perfectly cooked.

Step 5: Season and Garnish
After steaming, carefully uncover the pan and check the seasoning; you may want to add a pinch of salt or pepper. Stir in the chopped fresh parsley and dried dill, mixing gently to distribute the herbs throughout the One Pot Shawarma Chicken and Rice, adding fresh flavor to the dish.

Step 6: Serve
Spoon the delicious One Pot Shawarma Chicken and Rice onto plates, showcasing the tender chicken and fluffy rice. Consider serving with sides of refreshing salads or warm pita bread to complement the rich flavors of the dish, enticing your family for a satisfying meal.

Make Ahead Options

This One Pot Shawarma Chicken and Rice is an excellent choice for those looking to save time during busy weekdays! You can marinate the chicken with spices and lemon juice up to 24 hours in advance, storing it in the refrigerator to enhance the flavors. The rice can be pre-measured and kept in an airtight container for up to 3 days, ensuring quick assembly. When you’re ready to cook, simply sear the marinated chicken and follow the recipe as directed. The dish will be just as delicious, with tender chicken and fluffy rice that boasts all the rich flavors!

One Pot Shawarma Chicken and Rice Variations

Feel free to personalize this dish with creative swaps and tweaks that will excite your taste buds!

  • Chicken Breasts: Swap chicken thighs for chicken breasts for a leaner option; just ensure to reduce cooking time for tenderness.
  • Flavored Rice: Use Jasmine or Basmati rice instead of long-grain for an aromatic twist that complements the spices beautifully.
  • Vegetarian Delight: Swap chicken for chickpeas and vegetable stock for a hearty, vegetarian-friendly meal without compromising flavor.
  • Herb Boost: Instead of parsley and dill, try cilantro and mint for a fresh, vibrant kick atop your dish.
  • Heat Level: If you prefer a more pronounced heat, increase the chili flakes, or even add some diced jalapeños during cooking!

For a different flavor palate, consider serving alongside roasted vegetables or a cooling tzatziki dip for extra satisfaction. You might also enjoy the delightful Grilled Chicken Sandwich or simple yet elegant Corn Chicken Rice for more meal inspiration!

  • Citrus Zing: A splash of orange juice can lighten the flavor profile beautifully; try adding it right before serving for a refreshing touch.
  • Nutty Texture: Toss in toasted pine nuts or slivered almonds before serving for a delightful crunch that elevates the dish’s texture!

What to Serve with One Pot Shawarma Chicken and Rice

Elevate your One Pot Shawarma Chicken and Rice with these delightful accompaniments that will truly complete your meal experience.

  • Crisp Tabbouleh Salad: This fresh, herby salad adds a bright contrast, balancing the warm spices of the chicken dish perfectly. The crunch of cucumber and parsley makes every bite refreshing.

  • Roasted Vegetable Medley: A colorful assortment of seasonal veggies roasted to perfection offers a sweet and smoky flavor that complements the Shawarma beautifully. Each bite delivers a satisfying texture alongside the fluffy rice.

  • Garlic Yogurt Sauce: Creamy and tangy, this sauce not only cools the palate but enhances the dish’s flavors with its rich consistency. Serve it on the side for a delightful dipping experience!

  • Pita Bread: Soft, warm pita is perfect for scooping up savory chicken and rice. This versatile bread adds an inviting touch, allowing everyone to enjoy the meal in a hands-on way.

  • Minted Yogurt Drink (Ayran): This refreshing, slightly tangy beverage offers a cooling counterpoint to the spices, enhancing the joyous sharing experience of your meal.

  • Date and Nut Platter: For a sweet finish, serve a small platter of dates and mixed nuts. Their natural sweetness contrasts wonderfully with the savory dish, rounding out the flavors delightfully.

  • Grilled Eggplant: Smoky grilled eggplant drizzled with tahini completes the meal, adding depth and richness that harmonizes nicely with the existing flavors of the chicken and rice.

  • Lemon Wedges: A squeeze of fresh lemon over the dish brightens all the flavors, bringing an extra zing that ties everything together magnificently.

Expert Tips for One Pot Shawarma Chicken and Rice

  • Marinate Well: Ensure the chicken thighs are marinated for at least 15 minutes for maximum flavor absorption. The spices need time to infuse into the meat.
  • Use the Right Pan: A large, deep frying pan is ideal for this recipe. It allows even cooking and ample space for the chicken and rice.
  • Don’t Stir While Simmering: Once you add the chicken stock, avoid stirring! This helps the rice achieve that fluffy texture, soaking up all the flavors.
  • Adjust for Spice: Feeling adventurous? Modify the amount of chili flakes to suit your spice preference, but be cautious—too much can overpower the dish!
  • Garnish for Freshness: Don’t skip the parsley and dill; they enhance the dish’s aroma and provide a fresh pop of color, making your One Pot Shawarma Chicken and Rice more appealing.

How to Store and Freeze One Pot Shawarma Chicken and Rice

Fridge: Store your One Pot Shawarma Chicken and Rice in an airtight container in the fridge for up to 3 days. Just reheat thoroughly before serving to enjoy its flavors again.

Freezer: If you’d like to keep it longer, freeze it in portions for up to 2 months. Use freezer-safe containers or bags to prevent freezer burn.

Reheating: To reheat, thaw overnight in the fridge if frozen. Warm it up in a skillet over low heat, adding a splash of broth if needed to restore moisture, or microwave until heated through.

Serving Tips: When serving from the fridge, a quick stir and garnish with fresh parsley or dill can liven up your One Pot Shawarma Chicken and Rice for a delightful meal again!

One Pot Shawarma Chicken and Rice Recipe FAQs

What’s the best way to select ripe chicken thighs for this recipe?
Absolutely! When selecting chicken thighs, look for ones that are bright in color and have a firm texture without any dark spots or off smells. Fresh chicken should feel slightly moist but not sticky. If you’re opting for frozen, ensure they’re well-packaged without freezer burn.

How should I store leftover One Pot Shawarma Chicken and Rice?
You can keep your One Pot Shawarma Chicken and Rice in an airtight container in the refrigerator for up to 3 days. Make sure to allow it to cool to room temperature before sealing it to prevent condensation, which could make your dish soggy.

Can I freeze One Pot Shawarma Chicken and Rice? If so, how?
Yes, freezing is an excellent option! To freeze, let the dish cool completely, then divide it into portions and place each in a freezer-safe container or bag. It will last for up to 2 months. For easy reheating, label each container with the date and contents.

What should I do if my rice is undercooked?
Very! If you find that your rice is undercooked after the steaming time, simply add a splash of additional hot chicken stock or water, cover again, and let it steam for another 5 to 10 minutes. Check occasionally to prevent it from burning while it absorbs the liquid.

Are there any dietary considerations for this One Pot Shawarma Chicken and Rice?
Absolutely! If you have gluten sensitivities, feel free to substitute the chicken stock with gluten-free stock. For those with allergies, ensure all spices are free from contaminants. While it’s safe for people, always check with your veterinarian before sharing any seasoned dishes with pets.

Can I use other types of rice for this recipe?
Very! While long grain rice is recommended for its fluffy texture, you can experiment with Jasmine or Basmati rice for a fragrant twist. Just remember to adjust the cooking time and liquid amounts, as different rice types may absorb moisture differently.

One Pot Shawarma Chicken and Rice

Savory One Pot Shawarma Chicken and Rice

This One Pot Shawarma Chicken and Rice brings high protein, flavorful spices, and ease of preparation for a delicious dinner.
Prep Time 15 minutes
Cook Time 25 minutes
Total Time 40 minutes
Servings: 4 servings
Course: Dinner
Cuisine: Middle Eastern
Calories: 430

Ingredients
  

For the Chicken Marinade
  • 600 g Chicken Thighs, boneless, skinless Tender and juicy, can substitute with chicken breast
  • 2 tsp Ground Cumin Adds warm, earthy notes
  • 2 tsp Ground Coriander Offers a refreshing citrusy tone
  • 2 tsp Paprika Provides color and sweetness
  • 1 tsp Smoked Paprika Adds smoky depth
  • ¾ tsp Salt Essential for flavor enhancement
  • ½ tsp Black Pepper Adds warmth and heat
  • ½ tsp Turmeric Infuses a golden hue
  • ½ tsp Ground Cardamom Delivers aromatic profile
  • ¼ tsp Chili Flakes Regulate the spice level
  • 1.5 tbsp Lemon Juice Brightens and balances the dish
  • 1 tbsp Olive Oil Used for searing chicken
For the Rice and Broth
  • 180 g Long Grain Rice Soaks up the spices
  • 480 ml Chicken Stock, hot Adds richness and depth
For the Aromatics
  • 1 medium Onion, halved & sliced Introduces sweetness and texture
  • 3 cloves Garlic, crushed Deepens the flavor profile
For Garnish
  • 2 tbsp Fresh Parsley, chopped Bright, fresh garnish
  • ½ tsp Dried Dill Adds depth; fresh dill preferred

Equipment

  • large deep frying pan

Method
 

Instructions
  1. Slice chicken thighs in half and combine with marinade ingredients, marinate for at least 15 minutes.
  2. Heat olive oil in frying pan over medium-high heat, sear chicken for 3-4 minutes per side.
  3. Add sliced onion and crushed garlic, sauté until aromatic.
  4. Stir in long grain rice, sauté for about 1 minute, then add hot chicken stock and simmer.
  5. Simmer uncovered until stock absorbs, about 10-12 minutes, then cover and steam for additional 12 minutes.
  6. Uncover, check seasoning, stir in parsley and dill, and serve.

Nutrition

Serving: 1servingCalories: 430kcalCarbohydrates: 56gProtein: 33gFat: 12gSaturated Fat: 2gPolyunsaturated Fat: 2gMonounsaturated Fat: 8gCholesterol: 70mgSodium: 700mgPotassium: 600mgFiber: 3gSugar: 2gVitamin A: 2IUVitamin C: 10mgCalcium: 30mgIron: 3mg

Notes

Can serve with refreshing salads or warm pita bread for a complete meal.

Tried this recipe?

Let us know how it was!

Sweet and Tangy Raspberry Cheesecake Sourdough Focaccia Magic

As I whisked the ingredients together, a sweet aroma filled my kitchen, instantly transporting me to a cozy café on a sunny spring afternoon. This Sweet and Tangy Raspberry Cheesecake Sourdough Focaccia is a delightful way to brighten up any day, especially with Valentine’s Day around the corner. Combining the soft, chewy texture of traditional sourdough with the vibrant flavors of raspberries and a luscious cream cheese glaze, this unique treat is both a crowd-pleaser and a slightly healthier indulgence. Perfect for breakfast or as an afternoon snack, it allows you to enjoy something special without the guilt of overly sweet desserts. Curious how to create this mouthwatering masterpiece in your own kitchen? Let’s dive into the recipe!

Why will you adore this focaccia?

Unforgettable Flavors: The tangy raspberry and creamy cheesecake glaze create a dreamy balance that tantalizes your taste buds.

Easy to Make: With minimal shaping involved, this focaccia is great for both beginners and seasoned bakers alike.

Perfect for Celebrations: Whether it’s Valentine’s Day or an afternoon tea, this treat is sure to impress friends and family.

Versatile Toppings: Not a fan of raspberries? Try swapping them for strawberries or blueberries, or even make a savory version with herbs!

Healthier Indulgence: Enjoy the sweetness of this recipe knowing it uses fresh fruit and less sugar than traditional desserts.

Elevate your baking game and pair this delightful focaccia with a cup of coffee or tea, just like with our Sweet Hawaiian Crockpot Chicken or Zucchini Sweet Potato Beef Skillet!

Sweet and Tangy Raspberry Cheesecake Sourdough Focaccia Ingredients

For the Dough

Flour – Use unbleached all-purpose or bread flour for a perfect texture.
Water – Always opt for room temperature, unfiltered water to hydrate your dough.
Sourdough Starter – Ensure it’s active for a great rise and that delightful sour flavor.
Salt – Enhances flavor and strengthens the gluten structure for a fluffy finish.
Oil – Add moisture and tenderness; olive oil or melted butter work beautifully.

For the Toppings

Raspberries – Fresh or frozen, these provide the tangy kick; frozen is often more accessible.
Sugar – Use any sugar you have on hand to sweeten the raspberry sauce.

For the Glaze

Cream Cheese – This is key for that luscious cheesecake flavor in the icing.
Powdered Sugar – Essential for the glaze; sift it if clumpy to ensure a smooth finish.

Curious about the magic of making this Sweet and Tangy Raspberry Cheesecake Sourdough Focaccia? Let’s move on to the instructions!

Step‑by‑Step Instructions for Sweet and Tangy Raspberry Cheesecake Sourdough Focaccia

Step 1: Prepare the Dough
In a large mixing bowl, combine room temperature water and active sourdough starter. Stir in olive oil, followed by unbleached all-purpose flour and salt until a shaggy dough forms. Make sure all ingredients are well incorporated, then cover the bowl with a damp cloth and let it rest for 30 minutes to allow the flour to hydrate.

Step 2: Coil Folds
After the initial 30 minutes of rest, perform a series of coil folds on the dough over the next 2 hours. For each fold, gently stretch the dough from one side and fold it over itself; repeat this every 30 minutes. This technique strengthens the dough structure, ensuring a tasty Sweet and Tangy Raspberry Cheesecake Sourdough Focaccia.

Step 3: Bulk Fermentation
Cover the bowl with plastic wrap and allow the dough to rise for about 6 hours, or until it has doubled in size. You’ll know it’s ready when the dough appears puffy and has a few bubbles on the surface. For optimal flavor, you can refrigerate it overnight for 8-10 hours, allowing the dough to develop more complex flavors.

Step 4: Shape the Focaccia
On the baking day, gently flip the risen dough onto a floured surface and divide it into two equal pieces. Lightly stretch each piece into a rectangle and place them on oiled baking sheets, ensuring they have enough space to rise. Cover with a kitchen towel and let them rest for an additional 2 hours until slightly puffed.

Step 5: Preheat the Oven
While the dough rests, preheat your oven to 425°F (220°C). This ensures that the Sweet and Tangy Raspberry Cheesecake Sourdough Focaccia bakes evenly, giving it a golden-brown crust. Prepare your baking space by lining the sheets with parchment paper, which helps prevent sticking and makes cleanup a breeze.

Step 6: Make Raspberry Sauce
In a small saucepan over medium heat, combine fresh or frozen raspberries with sugar. Cook, stirring frequently, until the raspberries break down into a sauce, which should take about 5-7 minutes. Once the sauce thickens, remove it from the heat and let it cool slightly before adding it to your focaccia.

Step 7: Add Toppings
After the dough has rested, create dimples across the surface using your fingers. Drizzle a bit of olive oil over the top, then generously spoon the cooled raspberry sauce onto each focaccia. Spread the sauce for even coverage while maintaining those lovely dimples, allowing the swirls to peek through.

Step 8: Bake the Focaccia
Place the baking sheets in the preheated oven and bake for 20–25 minutes, or until the focaccia is golden brown and sounds hollow when tapped. Keep an eye on it as ovens vary; you’re looking for that perfect balance of chewy texture and a crisp crust.

Step 9: Prepare the Icing
While the focaccia bakes, prepare the cream cheese icing. In a mixing bowl, beat softened cream cheese with powdered sugar and a splash of milk until you achieve a smooth, pourable consistency. Make sure there are no lumps for a creamy finish that complements the focaccia beautifully.

Step 10: Drizzle and Serve
Once the focaccia has cooled slightly, drizzle the cream cheese icing over the top, letting it cascade into the dimples and raspberry sauce. Slice the Sweet and Tangy Raspberry Cheesecake Sourdough Focaccia into squares, and serve warm for a delightful treat that’s perfect for sharing—enjoy!

Expert Tips for Sweet and Tangy Raspberry Cheesecake Sourdough Focaccia

  • Active Starter: Ensure your sourdough starter is bubbly and active; this is crucial for proper fermentation and flavor development.

  • Rest Periods: Don’t rush the resting and rising times; allowing the dough to rest helps to develop better texture and flavor.

  • Dimpling Technique: When dimpling, be gentle; overpressing can deflate the dough, affecting the overall structure of your Sweet and Tangy Raspberry Cheesecake Sourdough Focaccia.

  • Baking Watch: Since ovens vary, adjust the baking time as necessary; aim for a golden-brown crust and a hollow sound when tapped.

  • Parchment Paper: Use parchment paper on your baking sheets to prevent sticking and facilitate easy removal of your delicious focaccia!

Sweet and Tangy Raspberry Cheesecake Sourdough Focaccia Variations

Feel free to unleash your creativity and make this delightful focaccia your own, enticing your senses along the way!

  • Berry Swap: Replace raspberries with strawberries, blueberries, or blackberries to mix up the flavor profile based on your favorites or what’s in season.
  • Savory Twist: Skip the icing and blend herbs such as rosemary or thyme into the dough for a delightful savory focaccia that pairs wonderfully with soups and salads. Imagine a comforting meal enhanced by this savory take!
  • Gluten-Free: Substitute all-purpose flour with a gluten-free blend, ensuring to add xanthan gum to mimic traditional bread texture.
  • Sweetener Switch: Use honey or maple syrup instead of sugar to create a naturally sweetened raspberry sauce; it adds a lovely depth of flavor to your dessert.
  • Citrus Zing: Add a splash of lemon or orange zest into the dough to give your focaccia a refreshing citrus kick that complements the berries beautifully.
  • Nuts for Crunch: Incorporate almonds or walnuts on top before baking for a delightful crunch that contrasts with the soft focaccia and creamy glaze.
  • Chocolate Drizzle: For an extra indulgence, drizzle melted chocolate over the cream cheese icing, turning your focaccia into a decadent dessert.
  • Spicy Kick: Add a pinch of red pepper flakes to the raspberry sauce for a surprising spicy twist, tantalizing the taste buds in an unexpected way!

The versatility of this Sweet and Tangy Raspberry Cheesecake Sourdough Focaccia opens the door to endless culinary adventures, just like with our delightful Strawberry Cheesecake Bars or the comforting Smoky Cheddar Mac and Cheese for different occasions!

What to Serve with Sweet and Tangy Raspberry Cheesecake Sourdough Focaccia

From luscious glazes to comforting sides, enhance your meal experience with these perfect pairings.

  • Creamy Yogurt Parfait: A dollop of Greek yogurt topped with fresh berries adds a refreshing tang, pairing deliciously with the sweet focaccia.
  • Coffee or Tea: A warm cup of your favorite brew complements the sweetness beautifully, enhancing the comforting vibes of your afternoon tea time.
  • Mixed Green Salad: A light salad with citrus vinaigrette introduces a zesty contrast, balancing the richness of the cream cheese glaze.
  • Chocolate-Dipped Strawberries: The indulgent sweetness of chocolate-covered berries offers a romantic touch, perfect for Valentine’s Day.
  • Chilled Sparkling Water with Mint: Refreshing and light, this drink cleanses the palate while keeping the sweetness of dessert at the forefront.
  • Cheese Platter: Soft cheeses like ricotta or brie provide a creamy counterpoint that harmonizes well with the tart raspberry flavors.
  • Vanilla Ice Cream: A scoop of creamy vanilla ice cream melting over the warm focaccia adds extra indulgence and delightful temperature contrast.
  • Fruit Salad: A vibrant mix of seasonal fruits enhances freshness, offering juicy bites that complement the focaccia’s texture and flavor.

How to Store and Freeze Sweet and Tangy Raspberry Cheesecake Sourdough Focaccia

Room Temperature: Keep your focaccia at room temperature in an airtight container for up to 3 days to maintain its softness.

Fridge: If you want to extend freshness, store it in the fridge for up to 5 days. Just make sure to wrap it well to prevent drying out.

Freezer: For longer storage, freeze slices of focaccia individually in airtight freezer bags for up to 2 months. To enjoy, just reheat in the oven at 350°F for 10-15 minutes.

Reheating: For the best texture, reheat in the oven rather than the microwave, ensuring the sweet and tangy flavors of the Raspberry Cheesecake Sourdough Focaccia shine through!

Make Ahead Options

These Sweet and Tangy Raspberry Cheesecake Sourdough Focaccia are perfect for meal prep enthusiasts! You can prepare the dough up to 24 hours in advance by following the mixing and coil folding steps, then refrigerate it overnight for optimal flavor development. The raspberry sauce can also be made up to 3 days ahead; simply store it in an airtight container in the fridge to preserve its freshness. When you’re ready to bake, just shape the focaccia, allow it to rest for 2 hours, and follow the baking instructions. With these make-ahead steps, you’ll enjoy restaurant-quality results with minimal effort, making your busy weeknights a breeze!

Sweet and Tangy Raspberry Cheesecake Sourdough Focaccia Recipe FAQs

What type of sourdough starter should I use?
Absolutely! Ensure that your sourdough starter is active, bubbly, and has been fed within the last 12 hours. This helps achieve a good rise and enhances the flavor of your Sweet and Tangy Raspberry Cheesecake Sourdough Focaccia. If you’re not sure, a simple test is to drop a spoonful of your starter into a glass of water; if it floats, it’s ready to use!

How should I store leftover focaccia?
For sure! Keep your focaccia at room temperature in an airtight container for up to 3 days for the best texture. If you want it to last longer, you can refrigerate it for up to 5 days, but remember to wrap it well to prevent it from drying out.

Can I freeze the focaccia?
Yes, definitely! To freeze your Sweet and Tangy Raspberry Cheesecake Sourdough Focaccia, wrap it tightly in plastic wrap and then place it in an airtight freezer bag. This method helps prevent freezer burn and keeps it fresh for up to 2 months. When you’re ready to enjoy, simply reheat it in a preheated oven at 350°F for 10-15 minutes until warmed through and delicious!

What should I do if my focaccia is too dense?
Very good question! If your Sweet and Tangy Raspberry Cheesecake Sourdough Focaccia turns out too dense, it may be due to insufficient fermentation. Ensure your starter is active and let the dough rise until it’s doubled in size during the bulk fermentation phase, which typically takes about 6 hours. If you find your dough is still dense after baking, it could benefit from a longer resting time during the coil fold stage next time.

Can I use different fruits instead of raspberries?
The more the merrier! Absolutely, feel free to swap raspberries for strawberries, blueberries, or even blackberries! This recipe is quite flexible; just keep in mind that different fruits may alter the sweetness or tartness of the focaccia, so adjust the sugar in the raspberry sauce accordingly. For a savory twist, consider omitting the icing and adding herbs or cheese to the dough.

Is this recipe safe for pets or those with food allergies?
Always important to check! Because this Sweet and Tangy Raspberry Cheesecake Sourdough Focaccia contains common allergens like gluten, dairy (from cream cheese), and sugar, it may not be suitable for individuals with specific dietary restrictions or those with gluten intolerance. As for pets, it’s best to avoid sharing any baked goods containing sugar or dairy, as these ingredients can upset their stomachs.

Sweet and Tangy Raspberry Cheesecake Sourdough Focaccia

Sweet and Tangy Raspberry Cheesecake Sourdough Focaccia Magic

A delightful Sweet and Tangy Raspberry Cheesecake Sourdough Focaccia that combines soft texture with vibrant flavors, perfect for breakfast or an afternoon snack.
Prep Time 1 hour
Cook Time 25 minutes
Resting Time 2 hours
Total Time 3 hours 25 minutes
Servings: 12 slices
Course: Dessert
Cuisine: American
Calories: 250

Ingredients
  

For the Dough
  • 4 cups Flour unbleached all-purpose or bread flour
  • 1.5 cups Water room temperature, unfiltered
  • 1 cup Sourdough Starter active
  • 1 teaspoon Salt
  • 2 tablespoons Oil olive oil or melted butter
For the Toppings
  • 2 cups Raspberries fresh or frozen
  • 1/4 cup Sugar
For the Glaze
  • 8 ounces Cream Cheese softened
  • 2 cups Powdered Sugar sifted if clumpy

Equipment

  • Mixing Bowl
  • Baking Sheets
  • Parchment paper
  • Saucepan
  • Whisk

Method
 

Step-by-Step Instructions
  1. In a large mixing bowl, combine room temperature water and active sourdough starter. Stir in olive oil, followed by unbleached all-purpose flour and salt until a shaggy dough forms.
  2. After the initial 30 minutes of rest, perform a series of coil folds on the dough over the next 2 hours.
  3. Cover the bowl with plastic wrap and allow the dough to rise for about 6 hours, or until it has doubled in size.
  4. On the baking day, gently flip the risen dough onto a floured surface and divide it into two equal pieces.
  5. While the dough rests, preheat your oven to 425°F (220°C).
  6. In a small saucepan over medium heat, combine fresh or frozen raspberries with sugar. Cook, stirring frequently, until the raspberries break down into a sauce.
  7. After the dough has rested, create dimples across the surface using your fingers. Drizzle a bit of olive oil over the top, then generously spoon the cooled raspberry sauce onto each focaccia.
  8. Place the baking sheets in the preheated oven and bake for 20–25 minutes until golden brown.
  9. While the focaccia bakes, prepare the cream cheese icing by beating softened cream cheese with powdered sugar and a splash of milk.
  10. Once the focaccia has cooled slightly, drizzle the cream cheese icing over the top, then slice and serve warm.

Nutrition

Serving: 1sliceCalories: 250kcalCarbohydrates: 35gProtein: 4gFat: 10gSaturated Fat: 5gPolyunsaturated Fat: 2gMonounsaturated Fat: 3gCholesterol: 15mgSodium: 150mgPotassium: 150mgFiber: 2gSugar: 12gVitamin A: 200IUVitamin C: 5mgCalcium: 50mgIron: 1mg

Notes

Ensure your sourdough starter is bubbly and active for best results. Use parchment paper on baking sheets to prevent sticking.

Tried this recipe?

Let us know how it was!

Fragrant Butter Chicken Biryani You’ll Love for Dinner Tonight

The aroma wafting through the kitchen is nothing short of enchanting, a promise of an unforgettable meal to come. This is the magic of my Fragrant Butter Chicken Biryani, where tender chicken meets spiced rice in a harmonious dance of flavors. This one-pot wonder not only makes a beautiful centerpiece for family dinners, but it also allows you to savor the richness of homemade Indian cuisine without the fuss of takeout. With its creamy tomato sauce and just the right amount of spices, this dish strikes the perfect balance between comfort food and culinary adventure. Whether you’re a seasoned chef or just looking to add a crowd-pleaser to your weeknight routine, this recipe is bound to engage your culinary creativity and delight your loved ones with every flavorful bite. Ready to transform your dinner table into an aromatic feast? Let’s dive into the recipe!

Why is This Biryani So Irresistible?

Aromatic Perfection: The Fragrant Butter Chicken Biryani takes your taste buds on an exotic journey with its blend of spices—each ingredient uniquely crafted to create a mouthwatering experience.

One-Pot Convenience: Enjoy the simplicity of this one-pot meal, making it a breeze to prepare and perfect for busy evenings, reducing dishwashing time while maximizing flavor.

Comfort Food Elevated: This dish transforms basic ingredients into an extraordinary family feast, making it a go-to for comfort food lovers—just like my Jerk Chicken Burritos or Thai Chicken Meatball.

Crowd-Pleasing Delight: It’s hard to resist a plate of Butter Chicken Biryani, making it an excellent choice for gatherings or family dinners—everyone will be asking for seconds!

Flavor Harmony: Each bite combines tender chicken, fluffy rice, and creamy sauce, resulting in a memorable taste experience that lingers long after the meal is over.

Versatile Options: You can easily swap out ingredients or add your favorites, like veggies or nuts, to personalize your dish, creating a unique masterpiece every time.

Fragrant Butter Chicken Biryani Ingredients

For the Chicken Marinade

  • Boneless Chicken Breast/Thighs – This is the primary protein; opt for thighs for juiciness and flavor.
  • Ginger Garlic Paste – Essential for aroma and depth; use fresh for the best results.
  • Turmeric Powder – Adds beautiful color and earthy notes.
  • Coriander Powder – Enhances the spicy profile of the dish.
  • Red Chili Powder – Provides heat and distinct flavor; adjust based on your heat preference.
  • Salt – Crucial for seasoning; modify to taste.
  • Yogurt – Tenderizes the chicken and adds creaminess; coconut yogurt can substitute for a dairy-free option.

For the Biryani Base

  • Basmati Rice – Main carbohydrate in this fragrant Butter Chicken Biryani; soak beforehand for optimal texture.
  • Whole Spices (Cloves, Cinnamon Stick, Cardamom Pods, Bay Leaf) – Infuse your biryani with aromatic flavors.
  • Onion & Tomatoes – Form the basis of your masala; blend for a smoother consistency.
  • Cashews – Add richness and texture to the gravy.
  • Unsalted Butter – Enhances flavor; for an authentic taste, use ghee as a substitute.
  • Kasuri Methi – Dried fenugreek leaves contributing a unique aroma to the dish.

For Garnishing

  • Crispy Fried Onions – A delicious garnish that adds crunch and extra flavor.
  • Mint Leaves – Freshness on top; can swap with cilantro if you prefer.

For Cooking

  • Water – The cooking medium for the rice to ensure proper boiling; adjust based on rice quantity.
  • Garam Masala – A blend of spices for a final flavor boost; adjust to your taste.

Get ready to enjoy the deliciousness of this Fragrant Butter Chicken Biryani!

Step‑by‑Step Instructions for Fragrant Butter Chicken Biryani

Step 1: Marinate the Chicken
Begin by combining boneless chicken with ginger garlic paste, turmeric, coriander powder, red chili powder, salt, and yogurt in a large bowl. Ensure the chicken is thoroughly coated. Cover the bowl and let it marinate in the refrigerator for 30–60 minutes, allowing the flavors to meld and penetrate the meat for a truly delicious Fragrant Butter Chicken Biryani.

Step 2: Soak and Parboil the Rice
While the chicken marinates, soak the basmati rice in cold water for 30 minutes. After soaking, drain the rice and bring a pot of water to a rolling boil, adding the soaked rice along with a pinch of salt and whole spices. Cook for 8–10 minutes, until the rice is 70-80% done. The grains should be firm yet slightly undercooked; drain and set aside.

Step 3: Prepare the Chicken
Preheat your air fryer to 375°F (190°C) while the rice is parboiling. Once the chicken has marinated, arrange it in the air fryer basket. Cook for 9 minutes, ensuring the chicken is just slightly undercooked. This will keep it juicy during the final cooking stages. Set the air-fried chicken aside to rest while you prepare the masala.

Step 4: Make the Masala Base
In a food processor, blend together onions, tomatoes, ginger garlic paste, and cashews to form a smooth paste. In a large, heavy-bottomed pot, melt butter over medium heat. Once melted, add whole spices and allow them to sizzle for a few seconds. Then, add the blended masala and cook until the mixture darkens and the oil begins to separate, about 5–7 minutes, filling your kitchen with enticing aromas.

Step 5: Combine Chicken and Gravy
Add the slightly cooked chicken pieces to the masala in the pot and mix well. Stir in the remaining yogurt for creaminess along with any residual marinade. Reduce the heat and let it simmer for an additional 2 minutes, ensuring all the flavors meld perfectly. The chicken should be coated in the rich, creamy sauce while retaining its moisture, forming the heart of your Fragrant Butter Chicken Biryani.

Step 6: Layer the Biryani
Carefully spread the parboiled rice over the chicken mixture in the pot. Sprinkle garam masala evenly on top, and garnish with crispy fried onions and fresh mint leaves for added flavor and texture. Gently press the rice down to ensure an even layer while avoiding mashing the grains, creating a beautifully layered dish.

Step 7: Cook on Dum
Cover the pot tightly with a lid, sealing in all the steam. Cook on high heat for 5 minutes, allowing the flavors to intensify, then reduce to low heat for an additional 10 minutes. Be sure not to lift the lid during this process to maintain the steaming environment, which is essential for a moist, aromatic biryani. Once cooked, allow it to rest covered for 5 minutes before serving.

Fragrant Butter Chicken Biryani Variations

Feel free to sprinkle your own flair into this delicious dish and make it your own!

  • Vegetarian Delight: Swap chicken for paneer or your favorite seasonal vegetables, creating a fulfilling and colorful alternative.

  • Quinoa Twist: For a healthier option, use quinoa instead of basmati rice, providing a nutty flavor and additional protein.

  • Nutty Addition: Toss in some toasted almonds or cashews along with the chicken for an added crunch and richness.

  • Egg Upgrade: For a protein boost, add boiled eggs on top of the layered rice before sealing the pot for a delightful surprise!

  • Heat Adjustment: If you love a fiery kick, consider adding chopped green chilies or more red chili powder to amp up the heat level.

  • Creamy Coconut: For a tropical twist, replace the yogurt with coconut yogurt; it adds a creamy consistency with a lovely coconut flavor.

  • Extra Veggies: Incorporate greens like spinach or peas either during the layering or blend them into the masala for added nutrition and color.

No matter which variation you choose, there’s a version of this Fragrant Butter Chicken Biryani just waiting to become your family’s new favorite dish! If you love comforting one-pot meals like this, you might also enjoy my Grilled Chicken Sandwich or Chicken Cashew Broccoli Stir Fry.

Storage Tips for Fragrant Butter Chicken Biryani

  • Fridge: Store the Fragrant Butter Chicken Biryani in an airtight container for up to 3 days. The flavors deepen and improve overnight, making it even more delightful.
  • Freezer: For longer storage, freeze the biryani in a well-sealed container for up to 2 months. Allow it to cool completely before placing it in the freezer.
  • Thawing: To reheat, simply thaw the biryani in the refrigerator overnight, then reheat it on the stove over low heat, adding a splash of water if needed to restore moisture.
  • Reheating: Make sure to reheat until steaming hot, which keeps the spices vibrant and chicken tender, ensuring that every bite is just as delicious as when it was first made.

Make Ahead Options

These Fragrant Butter Chicken Biryani are perfect for busy weeknights! You can marinate the chicken up to 24 hours in advance, allowing those rich flavors to penetrate the meat for a tender, juicy result. The basmati rice can also be soaked ahead and kept in the fridge for a day. When you’re ready to serve, simply cook the marinated chicken and make the masala base as directed, then layer with the pre-soaked rice. For the best flavor, avoid parboiling the rice until you’re ready to finish the dish. This way, your biryani will turn out just as delicious, with all the comforting aromas to delight your family.

Expert Tips for Fragrant Butter Chicken Biryani

  • Marination Matters: Ensure to marinate the chicken long enough, at least 30–60 minutes, to infuse flavor and tenderness for the best Fragrant Butter Chicken Biryani.

  • Rice Soaking: Don’t skip soaking the basmati rice. It helps achieve the perfect fluffy texture that complements the chicken without making it soggy.

  • Avoid Overcooking: Keep an eye on your parboiling time. Undercook the rice slightly; it will finish cooking while on dum, allowing it to absorb all those delicious flavors.

  • Gentle Layering: When layering the rice on top of the chicken mixture, do it gently. This ensures the grains don’t break, maintaining a beautiful presentation and fluffy texture.

  • Lid Lifting: Resist the temptation to lift the lid while cooking on dum. This maintains steam, locking in moisture and flavor for that perfect biryani experience.

  • Resting Time: After cooking, let the biryani rest for about 5 minutes before serving. This allows the flavors to meld beautifully, enhancing your dining experience.

What to Serve with Butter Chicken Biryani

Transform your Butter Chicken Biryani into a delightful feast with these complementary dishes that enhance its rich flavors.

  • Cooling Raita: A smooth yogurt-based side with cucumber and cumin, it cools the palate and contrasts beautifully with the spices of the biryani.

  • Fresh Side Salad: Crisp onions, juicy tomatoes, and a squeeze of lemon create a refreshing balance, brightening the earthy tones of the biryani.

  • Crispy Papadums: These thin, crunchy lentil wafers offer a delightful textural contrast and a crispy element that pairs beautifully with the creamy biryani.

  • Mango Chutney: Sweet and tangy, this chutney adds a burst of flavor, enhancing the savory notes of the Butter Chicken Biryani and elevating the entire meal.

  • Sweet Coconut Ladoo: For dessert, these traditional Indian sweets provide a delightful end to the meal. Their rich sweetness perfectly offsets the savory flavors of the biryani.

  • Chai Tea: A warm cup of spiced chai is the perfect drink to round off your meal, its aromatic spices echoing the boldness of the biryani.

  • Sliced Avocado: For an unexpected twist, creamy avocado slices add a rich texture and can balance the spices while contributing healthy fats to your plate.

  • Fruit Chaat: A tangy fruit salad with a hint of spice offers a refreshing contrast and a light finish to the meal—perfect for cleansing the palate.

Fragrant Butter Chicken Biryani Recipe FAQs

Which chicken parts are best for this recipe?
Using boneless chicken thighs is ideal because they remain juicy and flavorful during cooking. However, boneless chicken breasts work well too; just ensure you don’t overcook them, as they can dry out more easily.

How do I store leftover biryani?
Store the Fragrant Butter Chicken Biryani in an airtight container in the fridge for up to 3 days. The flavors actually deepen overnight, making the leftovers extra delicious! Just ensure it’s cooled to room temperature before sealing to avoid condensation.

Can I freeze Butter Chicken Biryani?
Absolutely! You can freeze this dish in a well-sealed container for up to 2 months. Once it’s cool, portion it out to make reheating easier. When you’re ready to enjoy it again, thaw it in the refrigerator overnight before reheating.

What should I do if my rice turns mushy?
If your rice becomes mushy, it may be due to overcooking during the parboiling step. To avoid this, aim to cook the rice to just 70-80% doneness. If you do find yourself with mushy rice, gently fluff it with a fork after cooking, and serve it with a side dish that has a contrasting texture to balance it out.

Can I make this dish vegetarian?
Yes, you can customize the dish by substituting the chicken with paneer or your favorite vegetables. Just ensure they are pre-cooked or sautéed beforehand for the best results. If you choose to use vegetables, I recommend adding hearty options like potatoes, carrots, and peas.

Is this recipe suitable for those with dairy allergies?
Yes, you can easily make this curry dairy-free! Substitute yogurt with coconut yogurt in the marination and cooking steps for that creamy texture, and use coconut oil or ghee made from non-dairy sources instead of butter.

Feel free to dive into cooking, and enjoy every delightful bite of your Fragrant Butter Chicken Biryani!

Fragrant Butter Chicken Biryani

Fragrant Butter Chicken Biryani You'll Love for Dinner Tonight

Discover the enchanting aroma of Fragrant Butter Chicken Biryani, a perfect harmony of tender chicken and spiced rice for a delightful dinner.
Prep Time 1 hour
Cook Time 30 minutes
Resting Time 5 minutes
Total Time 1 hour 35 minutes
Servings: 4 servings
Course: Dinner
Cuisine: Indian
Calories: 550

Ingredients
  

For the Chicken Marinade
  • 1 kg Boneless Chicken Breast/Thighs Opt for thighs for juiciness and flavor
  • 2 tbsp Ginger Garlic Paste Use fresh for the best results
  • 1 tsp Turmeric Powder Adds beautiful color and earthy notes
  • 1 tsp Coriander Powder Enhances the spicy profile of the dish
  • 1 tsp Red Chili Powder Adjust based on your heat preference
  • 1 tsp Salt Modify to taste
  • 1 cup Yogurt Coconut yogurt can substitute for a dairy-free option
For the Biryani Base
  • 2 cups Basmati Rice Soak beforehand for optimal texture
  • 5 pieces Whole Spices (Cloves, Cinnamon Stick, Cardamom Pods, Bay Leaf) Infuse your biryani with aromatic flavors
  • 1 large Onion Blend for a smoother consistency
  • 2 medium Tomatoes Form the basis of your masala
  • 1/2 cup Cashews Adds richness and texture to the gravy
  • 100 g Unsalted Butter For an authentic taste, use ghee as a substitute
  • 1 tbsp Kasuri Methi Dried fenugreek leaves contributing a unique aroma
For Garnishing
  • 1 cup Crispy Fried Onions Adds crunch and extra flavor
  • 1/4 cup Mint Leaves Can swap with cilantro if you prefer
For Cooking
  • 4 cups Water Adjust based on rice quantity
  • 1 tbsp Garam Masala Adjust to taste

Equipment

  • Air fryer
  • Food processor
  • Heavy-bottomed pot

Method
 

Cooking Instructions
  1. Combine boneless chicken with ginger garlic paste, turmeric, coriander powder, red chili powder, salt, and yogurt in a large bowl. Cover and let marinate in the refrigerator for 30–60 minutes.
  2. Soak the basmati rice in cold water for 30 minutes. After soaking, drain and bring a pot of water to a rolling boil, adding soaked rice, a pinch of salt, and whole spices. Cook for 8–10 minutes, then drain and set aside.
  3. Preheat your air fryer to 375°F (190°C). Arrange marinated chicken in the air fryer basket and cook for 9 minutes. Set aside to rest.
  4. In a food processor, blend together onions, tomatoes, ginger garlic paste, and cashews to form a smooth paste. Melt butter in a heavy-bottomed pot, add whole spices, and let sizzle. Add the blended masala and cook until darkens and oil begins to separate, about 5–7 minutes.
  5. Add the cooked chicken pieces to the masala in the pot. Stir in remaining yogurt and any residual marinade. Reduce heat and let simmer for 2 minutes.
  6. Spread the parboiled rice over the chicken mixture in the pot. Sprinkle garam masala on top, garnish with crispy fried onions and fresh mint leaves. Gently press down to ensure an even layer.
  7. Cover the pot tightly with a lid. Cook on high heat for 5 minutes, then reduce to low heat for 10 minutes without lifting the lid. Allow to rest covered for 5 minutes before serving.

Nutrition

Serving: 1bowlCalories: 550kcalCarbohydrates: 62gProtein: 35gFat: 22gSaturated Fat: 10gPolyunsaturated Fat: 3gMonounsaturated Fat: 6gCholesterol: 75mgSodium: 600mgPotassium: 600mgFiber: 4gSugar: 5gVitamin A: 500IUVitamin C: 10mgCalcium: 150mgIron: 2.5mg

Notes

For the best results, marinate the chicken long enough and soak the rice. Avoid lifting the lid while cooking on dum for perfect moisture and flavor.

Tried this recipe?

Let us know how it was!

Savory Chicken Peach Ricotta Pizza with Arugula Bliss

As I pulled out a warm, golden pizza from the oven, the aroma of grilled chicken mingled with the sweetness of fresh peaches, instantly transporting me to sunlit summer picnics. This Chicken Peach Ricotta Pizza with Arugula and Balsamic Glaze has become my go-to dish when I want to impress friends without spending hours in the kitchen. With a quick prep time and all the vibrant summer flavors packed into every slice, it’s the perfect marriage of savory and sweet that’s sure to delight your taste buds. Plus, it’s adaptable for those following gluten-free diets with the right dough! Curious to learn how to whip up this culinary delight in no time? Let’s dive into the recipe!

Why is this pizza a must-try?

Vibrant Flavors: The mix of savory grilled chicken, sweet peaches, and creamy ricotta creates a flavor explosion that’s perfect for summer gatherings.

Quick and Easy: With a simple prep time, this dish can be on your table faster than you can say “takeout,” making it ideal for busy weeknights.

Versatile Ingredient Options: Whether you stick with peaches or swap in figs, the possibilities for customization are endless, allowing you to get creative.

Healthy Yet Indulgent: Each slice is around 301 calories, offering a satisfying yet balanced meal that doesn’t compromise on taste.

Perfect for Sharing: Ideal for entertaining, this pizza serves beautifully as part of a charcuterie spread, alongside other favorites like a Grilled Chicken Sandwich or Jerk Chicken Burritos.

Embrace the summer flavors with this delightful recipe that your guests will rave about!

Chicken Peach Ricotta Pizza Ingredients

For the Dough
Whole Wheat Pizza Dough – This sturdy base is perfect for holding all the delightful toppings. Use store-bought gluten-free pizza dough for a gluten-free option.

For the Cheese Layer
Part Skim Ricotta Cheese – Adds creamy richness that enhances the overall flavor; opt for whole milk ricotta for an indulgent twist.
Part Skim Mozzarella Cheese – Melts beautifully to create a savory layer; fresh mozzarella will elevate the taste even more.

For the Toppings
Cooked Chicken Breast – Provides the necessary protein to make this pizza hearty; consider using leftover grilled chicken to save time.
Peaches – Brings a burst of sweetness and fresh flavor; always choose ripe peaches for the best results.
Arugula – Delivers a peppery bite that contrasts beautifully with the sweet peaches; baby spinach makes a great substitute.

For the Finishing Touches
Pesto – Infuses the pizza with fragrant herby notes; a homemade mix of basil, garlic, and olive oil can be a delightful alternative.
Fresh Ground Black Pepper – Just a sprinkle enhances the flavor; adjust to your preference for added spiciness.
Torn Basil Leaves – Brightens the pizza with fresh herbal notes; add them just before serving for maximum flavor.
Balsamic Glaze – A drizzle adds the perfect tangy finish; aged balsamic vinegar can substitute if needed.

Embrace your inner chef and indulge in this Chicken Peach Ricotta Pizza with Arugula and Balsamic Glaze that’s sure to impress!

Step‑by‑Step Instructions for Chicken Peach Ricotta Pizza with Arugula and Balsamic Glaze

Step 1: Preheat the Oven
Begin by preheating your oven to 475°F (245°C). While the oven warms up, prepare a baking sheet by lightly coating it with cooking spray or a drizzle of olive oil to prevent sticking. This will ensure your Chicken Peach Ricotta Pizza bakes evenly and develops a lovely golden crust.

Step 2: Roll Out the Dough
Take your whole wheat pizza dough and place it on a lightly floured surface. Use a rolling pin to stretch and roll the dough into a 10-12 inch circle, ensuring it’s about ¼ inch thick. Gently transfer the rolled dough to the prepared baking sheet, taking care to maintain its shape for a perfect presentation.

Step 3: Prepare the Ricotta Mixture
In a medium mixing bowl, combine ½ cup of part-skim ricotta cheese with a generous spoonful of pesto. Mix until smooth and well-blended, creating a flavorful base for your Chicken Peach Ricotta Pizza. Spread this mixture evenly over the dough, leaving a 1-inch border around the edge for the crust to rise.

Step 4: Add the Cheesy Toppings
Sprinkle a generous layer of part-skim mozzarella cheese over the ricotta spread, ensuring an even coverage for that gooey, melty goodness. Next, evenly distribute the cooked shredded chicken and sliced ripe peaches on top of the cheese, then dollop the remaining ricotta in small spoonfuls for added creaminess.

Step 5: Bake the Pizza
Slide the baking sheet into your preheated oven and bake the pizza for 10-15 minutes. Keep a close eye on it; the pizza is done when the crust is beautifully golden and the cheese is bubbly and melted. This process will create a delightful aroma that fills your kitchen with anticipation.

Step 6: Add Final Toppings
Once baked to perfection, remove the Chicken Peach Ricotta Pizza from the oven. Immediately sprinkle freshly ground black pepper over the top, followed by a handful of peppery arugula and torn basil leaves for a burst of freshness. Finish with a drizzle of balsamic glaze, adding a sweet tang to enhance the overall flavor profile. Serve immediately for the best taste experience.

How to Store and Freeze Chicken Peach Ricotta Pizza

Room Temperature: Enjoy your Chicken Peach Ricotta Pizza fresh, but if there are leftovers, let it cool and store at room temperature for no more than 2 hours.

Fridge: Place any leftover pizza in an airtight container in the refrigerator. It will stay fresh for up to 3 days; reheat in the oven for the best results.

Freezer: To freeze, wrap individual slices tightly in plastic wrap and then in aluminum foil or place in a labeled freezer bag. It can be stored for up to 2 months; just thaw overnight in the fridge before reheating.

Reheating: For optimal crispiness, reheat slices in a preheated oven at 350°F (175°C) for about 10-12 minutes, ensuring the cheese is melted and the crust is nice and crispy.

Expert Tips for Chicken Peach Ricotta Pizza

Use Ripe Peaches: Choosing the best peaches enhances sweetness and flavor; check for a slight give when gently pressed.

Watch the Baking Time: Keep an eye on the pizza to avoid burning the crust while ensuring the cheese melts perfectly; around 10-15 minutes should suffice.

Roll Dough Evenly: Ensure the pizza dough is rolled to an even thickness for consistent cooking; thicker spots can lead to undercooked areas.

Preheat Your Oven: A properly preheated oven helps create that golden crust that we all love; don’t skip this step!

Customize Ingredients: Feel free to swap peaches for figs or nectarines; adapting the Chicken Peach Ricotta Pizza gives you endless flavor combinations.

Use Fresh Herbs: Adding torn basil leaves just before serving elevates the dish’s fresh taste; it’s a small step that makes a big difference!

Chicken Peach Ricotta Pizza Variations

Don’t hesitate to personalize this delicious pizza with your own unique twists and flavors!

  • Dairy-Free: Swap the ricotta and mozzarella for cashew cheese or your favorite dairy-free cheese for a creamy alternative. Rich and satisfying, it can surprise even non-dairy eaters!

  • Gluten-Free: Use a gluten-free pizza dough instead of whole wheat, ensuring everyone can enjoy this delectable dish without worry. It may become a family favorite for those who avoid gluten!

  • Nuts for Crunch: Toss in some toasted pine nuts or walnuts to add a delightful crunch that contrasts with the softness of the cheese and fruit. It’s an unexpected yet wonderful addition!

  • Sweet Heat: Adding sliced jalapeños or crushed red pepper flakes gives a spicy kick that balances the sweetness of the peaches beautifully. Perfect for those who love a little heat in their meals!

  • Herb Infusion: Replace the pesto with freshly chopped herbs like thyme or rosemary for a fragrant twist, enhancing the overall flavor. A little herb magic goes a long way in elevating your pizza!

  • Seasonal Swap: Use seasonal fruits like figs or nectarines in place of peaches, providing a new flavor profile each time you make this delightful pizza. Each fruit brings its own uniqueness!

  • Alternate Greens: If you’re not a fan of arugula, baby kale or even microgreens can add an exciting flavor twist while also being a healthy alternative. It’s an easy way to adapt to your preferences!

Ready to enjoy your delicious creation? This Chicken Peach Ricotta Pizza with Arugula and Balsamic Glaze is filled with possibilities and so much potential for delightful variations. Don’t forget to try it alongside a refreshing side salad or a warm Grilled Citrus Chicken for a complete meal!

What to Serve with Chicken Peach Ricotta Pizza with Arugula and Balsamic Glaze

As you savor each slice of this vibrant pizza, consider rounding out your meal with these delightful pairings that will enhance its flavors.

  • Garden Salad: A crisp, fresh salad with mixed greens and cherry tomatoes provides a refreshing contrast to the warm pizza. Drizzle with a light vinaigrette to complement the balsamic glaze.

  • Grilled Vegetables: Smoky grilled zucchini and bell peppers add a savory, earthy touch that pairs beautifully with the sweetness of the peaches. The charred flavors will elevate your dining experience.

  • Herbed Quinoa: This fluffy and nutty side dish brings a healthy, protein-packed option that adds texture to your meal. Toss with fresh herbs to echo the flavors of the pizza.

  • Fruit Skewers: Bright and juicy summer fruits like strawberries, pineapple, and even more peaches can be drizzled with honey for a sweet finish. These delicious bites will keep the summery spirit alive.

  • Sparkling Lemonade: A refreshing, citrusy drink that cleanses the palate perfectly. The bubbles enhance the meal’s lightness, making it truly feel like a festive summer gathering.

  • Chocolate Mint Brownies: End on a sweet note with fudgy brownies topped with fresh mint. Their richness and hint of mint beautifully round out the vibrant savory and sweet notes from the pizza.

These thoughtful additions will transform your dinner into a memorable meal, filled with contrasting textures and flavors.

Make Ahead Options

Preparing the Chicken Peach Ricotta Pizza with Arugula and Balsamic Glaze ahead of time is a fantastic way to save time during busy weeknights! You can prep the pizza dough, ricotta mixture, and toppings up to 24 hours in advance. Simply roll out the dough and store it covered in the refrigerator. The ricotta and pesto mixture can be prepared and refrigerated as well, keeping it fresh and flavorful. When you’re ready to enjoy, layer the cheese and toppings on the prepared dough, and bake immediately. This ensures you have a delicious, homemade pizza that tastes just as wonderful, allowing you to focus on what matters most—sharing great food with loved ones!

Chicken Peach Ricotta Pizza with Arugula and Balsamic Glaze Recipe FAQs

What type of peaches should I use for the pizza?
Absolutely! For the best flavor and sweetness, opt for ripe, fresh peaches. They should have a slight give when gently pressed and vibrant color. Avoid peaches that have dark spots all over, as this indicates overripeness.

How should I store leftover Chicken Peach Ricotta Pizza?
Very! To keep your pizza fresh, place any leftovers in an airtight container and store it in the refrigerator. It should stay tasty for about 3 days. When you’re ready to enjoy it again, reheat in the oven at 350°F (175°C) for that crispy crust!

Can I freeze Chicken Peach Ricotta Pizza?
Absolutely! If you want to save some pizza for later, wrap individual slices tightly in plastic wrap and then in aluminum foil, or place them in a labeled freezer bag. It can be stored for up to 2 months. When you’re ready to eat, just thaw overnight in the fridge before reheating.

What can I do if my pizza crust is too soggy?
If your pizza crust turns out soggy, it may be due to excess moisture from the toppings. To prevent this, try patting the peach slices dry with a paper towel before adding them to the pizza. Also, consider increasing your oven temperature to 500°F (260°C) for the last couple of minutes of baking to help crisp it up.

Is this recipe suitable for gluten-free diets?
Absolutely! This Chicken Peach Ricotta Pizza can be made gluten-free by using the right gluten-free pizza dough. Check your local grocery store for options, or try making your own! Just ensure any other toppings, like pesto, are gluten-free as well.

Can pets eat any leftovers from this pizza?
While it’s tempting to share, it’s best to keep your feline or canine friends away from this pizza. Ingredients like cheese and balsamic glaze can upset their stomachs. Always stick to strictly pet-friendly treats just for them!

Chicken Peach Ricotta Pizza with Arugula and Balsamic Glaze

Savory Chicken Peach Ricotta Pizza with Arugula Bliss

This Chicken Peach Ricotta Pizza with Arugula and Balsamic Glaze is a delightful dish featuring savory and sweet flavors, perfect for summer gatherings.
Prep Time 15 minutes
Cook Time 15 minutes
Total Time 30 minutes
Servings: 4 slices
Course: Dinner
Cuisine: Italian
Calories: 301

Ingredients
  

For the Dough
  • 1 batch Whole Wheat Pizza Dough Use store-bought gluten-free pizza dough for gluten-free option.
For the Cheese Layer
  • ½ cup Part Skim Ricotta Cheese Opt for whole milk ricotta for an indulgent twist.
  • 1 cup Part Skim Mozzarella Cheese Fresh mozzarella will elevate the taste even more.
For the Toppings
  • 1 cup Cooked Chicken Breast Consider using leftover grilled chicken to save time.
  • 2 medium Peaches Always choose ripe peaches for the best results.
  • 2 cups Arugula Baby spinach makes a great substitute.
For the Finishing Touches
  • 2 tablespoons Pesto A homemade mix of basil, garlic, and olive oil can be a delightful alternative.
  • to taste Fresh Ground Black Pepper Adjust to your preference for added spiciness.
  • 1 cup Torn Basil Leaves Add them just before serving for maximum flavor.
  • to taste Balsamic Glaze Aged balsamic vinegar can substitute if needed.

Equipment

  • Oven
  • Baking Sheet
  • Rolling Pin
  • Mixing Bowl

Method
 

Step-by-Step Instructions
  1. Preheat your oven to 475°F (245°C). Prepare a baking sheet with cooking spray or olive oil.
  2. On a floured surface, roll the whole wheat pizza dough into a 10-12 inch circle, about ¼ inch thick. Transfer to the baking sheet.
  3. In a bowl, mix ½ cup of ricotta cheese with pesto until smooth. Spread this mixture over the dough, leaving a 1-inch border.
  4. Sprinkle mozzarella cheese over the ricotta, then add shredded chicken and sliced peaches. Dollop remaining ricotta on top.
  5. Bake for 10-15 minutes until the crust is golden and the cheese is bubbly. Watch closely to prevent burning.
  6. Remove the pizza from the oven, sprinkle with black pepper, arugula, and torn basil. Drizzle with balsamic glaze and serve immediately.

Nutrition

Serving: 1sliceCalories: 301kcalCarbohydrates: 34gProtein: 20gFat: 12gSaturated Fat: 6gPolyunsaturated Fat: 1gMonounsaturated Fat: 4gCholesterol: 50mgSodium: 400mgPotassium: 300mgFiber: 2gSugar: 5gVitamin A: 10IUVitamin C: 15mgCalcium: 20mgIron: 10mg

Notes

Choosing ripe peaches enhances sweetness and flavor. Customize ingredients to your liking.

Tried this recipe?

Let us know how it was!

Poblano Pizza with Cilantro: A Flavorful Twist on Tradition

Stepping into my kitchen on a summer afternoon, I was met with an unexpected burst of inspiration: a vibrant Poblano Pesto Pizza with Cilantro-Lime Crema! With roasted poblano peppers adding a mild, smoky heat and fresh zucchini lending a sweet crunch, this dish effortlessly embodies everything I love about summer cooking. Not only is it a quick and satisfying vegetarian option, but the creamy feta and zesty crema elevate the whole experience, making it a showstopper for any gathering. Plus, it’s a delightful way to revamp your pizza nights with a gourmet twist. Are you ready to bring some sunshine to your table? Let’s dive into this mouthwatering creation!

Why is Poblano Pizza a Must-Try?

Bold Flavor: The roasted poblano peppers introduce a mild, smoky essence, balancing beautifully with creamy feta and crunchy zucchini, making each bite a delightful experience.

Quick and Easy: Perfect for busy weeknights, this recipe is straightforward and requires minimal prep, allowing you to whip up a gourmet-style pizza in no time.

Versatile Choice: Not only is it a fantastic vegetarian option, but you can easily customize it. Swap in your favorite toppings or add a spicy kick with jalapeños, ensuring every palate is satisfied.

Crowd-Pleasing Appeal: Serve this at your next gathering, and watch it disappear! It’s an impressive addition to any summer menu, effortlessly summing up the season’s bright flavors.

Perfect Pairing: Enhance your meal by serving this delicious pizza alongside a light summer salad or a chilled wine, creating an unforgettable dining experience.

Poblano Pizza with Cilantro Ingredients

For the Cilantro-Lime Crema
Sour Cream – Adds creaminess and tang to the crema; substitute with Greek yogurt for a lighter option.
Mayonnaise – Enhances the richness of the crema; can be omitted for a healthier version.
Fresh Cilantro – Provides aromatic freshness; substitute with parsley if cilantro is undesirable.
Lime Zest & Juice – Adds brightness and acidity; use fresh for the best flavor.
Fine Sea Salt – Enhances overall flavor; adjust to taste based on preference.
Dried Red Chile Flakes – Brings mild heat to the crema; swap with cayenne for more spice.

For the Poblano Pesto
Poblano Chiles – The star ingredient that adds a mild, smoky flavor; substitute with green bell peppers for less heat.
Olive Oil – Used for the pesto, adding richness; avocado oil can serve as a substitute.
Scallions – Provides a mild onion flavor; can be replaced with diced onions or shallots.
Feta Cheese – Adds a creamy, tangy element; use crumbled tofu for a dairy-free option.
Garlic – Adds depth of flavor; fresh cloves are preferred for a robust taste.

For the Pizza
Pizza Dough – The base for the pizza; use store-bought or homemade; gluten-free options available.
Zucchini – Contributes freshness and visual appeal; yellow squash can also be used.

For the Topping
Raw Unsalted Pepitas – Adds crunch and protein; sunflower seeds can be used for a similar texture.
Chili Powder – Seasoning for the pepitas, enhancing flavor; smoked paprika can be used for a different twist.

Create this delightful Poblano Pizza with Cilantro for a gourmet pizza night that your family and friends will love!

Step‑by‑Step Instructions for Poblano Pizza with Cilantro

Step 1: Preheat the Oven
Begin by preheating your oven to 500°F (or as high as it can go, especially if using a baking stone). This high temperature is essential for achieving a perfectly crispy crust on your Poblano Pizza with Cilantro. Allow the oven to heat thoroughly while you prepare the other ingredients, ensuring a deliciously golden base.

Step 2: Prepare the Cilantro-Lime Crema
In a medium bowl, mix together sour cream, mayonnaise, finely chopped cilantro, lime zest, lime juice, sea salt, and dried red chile flakes. Stir well until all ingredients are combined. Cover the bowl and refrigerate the crema while you work on the pizza, allowing the flavors to meld beautifully in this zesty topping.

Step 3: Char the Vegetables
On a hot skillet, char the poblano peppers, scallions, and garlic for about 6-8 minutes, or until their skins are golden and blistered. Make sure to turn them occasionally for even cooking. Once done, remove from heat, allow to cool for a few minutes, then peel the skins off the peppers and finely chop all vegetables to incorporate into your pesto.

Step 4: Make the Poblano Pesto
In a food processor, combine the charred poblano peppers, scallions, garlic, fresh cilantro, feta cheese, a pinch of salt, and pepper. With the processor running, drizzle in olive oil until the mixture is smooth but still has a bit of texture. This vibrant poblano pesto will form the base of your pizza and add tremendous flavor.

Step 5: Prepare the Pizza Dough
Flour your countertop or a baking sheet and stretch the pizza dough to your desired size, about 12 to 14 inches in diameter. If using a pizza peel, sprinkle it with flour beforehand to ensure easy transfer to the oven. The dough should have a soft, slightly sticky texture, which makes it easy to shape for your Poblano Pizza with Cilantro.

Step 6: Assemble the Pizza
Spread a generous layer of the poblano pesto evenly over the stretched pizza dough, reaching the edges. Layer thinly sliced zucchini on top, distributing it evenly. Crumble additional feta cheese over the zucchini for a burst of flavor, making sure every slice will have that creamy goodness when baked.

Step 7: Bake the Pizza
Carefully transfer the assembled pizza to your preheated oven. Bake for about 8-10 minutes if using a baking sheet, or 6-8 minutes on a hot baking stone. Keep an eye on it; the pizza is done when the crust is golden brown and the cheese is bubbly.

Step 8: Toast the Pepitas
While the pizza is baking, toast raw unsalted pepitas in a dry skillet over medium heat for 3-5 minutes. Stir frequently until they are fragrant and lightly golden. Once toasted, remove them from heat and toss with chili powder and a pinch of salt for a flavorful, crunchy topping.

Step 9: Final Touches and Serve
Once the Poblano Pizza is out of the oven, drizzle the chilled cilantro-lime crema generously across the top. Sprinkle the toasted pepitas and additional cilantro for a fresh finish. Slice the pizza into wedges and serve immediately, relishing each flavorful bite that embodies summer!

How to Store and Freeze Poblano Pizza with Cilantro

Fridge: Store leftover Poblano Pizza in an airtight container for up to 3 days. This keeps it fresh while maintaining its delightful textures.

Freezer: For longer storage, wrap individual slices in plastic wrap and then in aluminum foil before placing them in a freezer bag. Frozen pizza can be stored for up to 2 months.

Reheating: When ready to enjoy, reheat your pizza in the oven at 375°F for 10-15 minutes, or until heated through. This method preserves the crispy crust you love.

Labeling: Don’t forget to label your container or bag with the date! This way, you’ll know exactly how long your delicious Poblano Pizza with Cilantro has been in storage.

Make Ahead Options

These Zesty Poblano Pesto Pizzas with Cilantro-Lime Crema are fantastic for meal prep, helping you save time on busy weeknights! You can prepare the cilantro-lime crema and poblano pesto up to 24 hours in advance. Simply mix the crema ingredients and refrigerate it, as the chilling time enhances the flavor. For the poblano pesto, char the peppers, scallions, and garlic, then blend with the remaining ingredients and store in an airtight container in the fridge. When you’re ready to serve, stretch and bake the pizza dough with the prepared pesto and toppings. This way, you’ll enjoy a fresh and delicious meal with minimal effort!

Expert Tips for Poblano Pizza

Preheat Fully: Ensure your oven is completely preheated to 500°F for a crispy crust. Don’t rush this step!

Char with Care: Monitor the charring of your vegetables; too much can overpower the sweet, smoky flavor of the poblanos.

Blend Texture: When making your pesto, blend just enough to maintain some texture. A smooth paste can lose the vibrant character of the dish.

Flavor Swap: Experiment with different cheeses such as goat cheese for a unique twist, expanding the flavor profile of your Poblano Pizza with Cilantro.

Garnish Generously: Don’t skimp on the toppings! A lush drizzle of cilantro-lime crema and a sprinkle of toasted pepitas elevate the flavors beautifully.

Storage Success: If you have leftovers, store them in the fridge for up to 3 days, but reheat in the oven for the best taste and texture.

Variations & Substitutions for Poblano Pizza with Cilantro

Feel free to customize this vibrant dish to suit your taste buds and dietary needs!

  • Dairy-Free: Swap feta with crumbled tofu or omit cheese entirely for a lighter pizza.
  • Spicy Kick: Leave the seeds in the roasted poblano or add jalapeños for an extra heat boost.
  • Herb Swap: If cilantro isn’t your favorite, replace it with fresh parsley or basil for a different flavor.
  • Different Cheeses: Experiment with goat cheese or mozzarella for varied flavor profiles—and a creamy texture that delights!
  • Zucchini Alternatives: Try swapping zucchini with sliced bell peppers or even grilled eggplant for a unique touch.
  • Pesto Variations: Add walnuts or pine nuts to the poblano pesto for a richer flavor and delightful crunch.
  • Gluten-Free Option: Use gluten-free pizza dough to cater to your dietary requirements and still enjoy a homemade pizza night!
  • Texture Twist: Top with fresh arugula or microgreens right after baking for an added crispy bite and gorgeous presentation.

With these variations, your pizza can consistently evolve, making every gathering an opportunity to explore new flavors. If you’re looking for more creative toppings, consider adding fresh basil or incorporating elements from a delightful Chicken Naan Pizza! Or if you’re in the mood for something fun, how about trying my Pizza Burgers for a completely different culinary adventure? Happy cooking!

What to Serve with Poblano Pizza with Cilantro

Pair your vibrant pizza with these delightful sides and beverages to create a memorable summer meal that sings with flavor.

  • Crunchy Summer Salad: A refreshing mix of greens and seasonal vegetables will complement the pizza’s vibrant flavors, adding extra crunch and color.

  • Grilled Corn on the Cob: Sweet, charred corn brushed with lime and cilantro offers a delightful combination that echoes the pizza’s zesty notes.

  • Roasted Vegetable Medley: Carrots, bell peppers, and asparagus lightly seasoned and roasted create a warm, aromatic side that balances out the pizza’s richness.

  • Spicy Garlic Bread: Warm, toasted bread with garlic and spices provides a satisfying contrast in texture while inviting you to dip into that zesty crema.

  • Chilled White Wine: A chilled glass of Sauvignon Blanc will enhance your dining experience, with crisp acidity that pairs beautifully with the creamy feta and smoky poblano.

  • Fresh Tropical Fruit Salad: Juicy watermelon, pineapple, and mango create a sweet contrast to the savory pizza, refreshing your palate between bites.

  • Homemade Lemonade: Quench your thirst with a tangy lemonade infused with mint, making it the perfect light drink to accompany every slice.

These thoughtful pairings amplify the enjoyment of your Poblano Pizza with Cilantro, crafting a memorable meal that celebrates the essence of summer.

Poblano Pizza with Cilantro Recipe FAQs

How do I select ripe poblano peppers?
When selecting poblano peppers, look for smooth, firm skin without any dark spots or blemishes. A vibrant green color signals freshness, while slight wrinkling indicates ripeness. If you want more flavor depth, choose ones that are slightly soft but still firm, as they will roast beautifully.

How should I store leftover Poblano Pizza?
To store your leftover Poblano Pizza, place it in an airtight container in the refrigerator. It will stay fresh for up to 3 days. Make sure to avoid stacking slices on top of each other to maintain their crispiness!

Can I freeze Poblano Pizza with Cilantro?
Absolutely! For freezing, wrap individual slices in plastic wrap followed by aluminum foil to prevent freezer burn. Place them in a labeled freezer bag. Your pizza can be frozen for up to 2 months. When ready to eat, simply reheat in the oven at 375°F for about 10-15 minutes to bring back that crunchy crust.

What should I do if my pizza crust is soggy?
If you encounter a soggy crust, it could be due to too much moisture from the toppings. Make sure to pat dry any wet ingredients, like zucchini, before adding them. Additionally, consider par-baking the crust for 2-3 minutes before adding your toppings; this helps to firm it up.

Are there any allergy considerations for this recipe?
Yes, individuals with dairy allergies should take caution with the feta cheese and sour cream in the recipe. You can substitute the feta with crumbled tofu or a dairy-free cheese alternative. For the crema, using a non-dairy yogurt can keep the cilantro-lime crema delicious and allergy-friendly.

What is the best way to reheat my pizza?
To reheat your leftover Poblano Pizza and retain that desirable crispy texture, preheat your oven to 375°F. Place the pizza slices on a baking sheet and bake for about 10-15 minutes, or until heated through. This method will help re-crisp the crust instead of making it chewy, which can happen if you microwave it.

Poblano Pizza with Cilantro

Poblano Pizza with Cilantro: A Flavorful Twist on Tradition

Enjoy a gourmet vegetarian pizza featuring roasted poblanos and creamy feta, perfect for summer gatherings.
Prep Time 20 minutes
Cook Time 15 minutes
Total Time 35 minutes
Servings: 4 slices
Course: Dinner
Cuisine: Mexican
Calories: 350

Ingredients
  

For the Cilantro-Lime Crema
  • 1 cup Sour Cream Substitute with Greek yogurt for a lighter option.
  • 1/2 cup Mayonnaise Can be omitted for a healthier version.
  • 1/4 cup Fresh Cilantro Substitute with parsley if cilantro is undesirable.
  • 1 tbsp Lime Zest Use fresh for the best flavor.
  • 2 tbsp Lime Juice Use fresh for the best flavor.
  • 1 tsp Fine Sea Salt Adjust to taste based on preference.
  • 1/2 tsp Dried Red Chile Flakes Swap with cayenne for more spice.
For the Poblano Pesto
  • 2 whole Poblano Chiles Substitute with green bell peppers for less heat.
  • 1/2 cup Olive Oil Avocado oil can serve as a substitute.
  • 3 whole Scallions Can be replaced with diced onions or shallots.
  • 1/2 cup Feta Cheese Use crumbled tofu for a dairy-free option.
  • 2 cloves Garlic Fresh cloves are preferred for robust taste.
For the Pizza
  • 1 lb Pizza Dough Use store-bought or homemade; gluten-free options available.
  • 1 cup Zucchini Yellow squash can also be used.
For the Topping
  • 1/4 cup Raw Unsalted Pepitas Sunflower seeds can be used for a similar texture.
  • 1 tbsp Chili Powder Smoked paprika can be used for a different twist.

Equipment

  • Oven
  • Baking stone or baking sheet
  • Food processor
  • Skillet
  • Mixing Bowl

Method
 

Step‑by‑Step Instructions for Poblano Pizza with Cilantro
  1. Preheat your oven to 500°F (or as high as it can go, especially if using a baking stone).
  2. In a medium bowl, mix together sour cream, mayonnaise, finely chopped cilantro, lime zest, lime juice, sea salt, and dried red chile flakes. Stir well until all ingredients are combined.
  3. On a hot skillet, char the poblano peppers, scallions, and garlic for about 6-8 minutes, or until their skins are golden and blistered.
  4. In a food processor, combine the charred poblano peppers, scallions, garlic, fresh cilantro, feta cheese, a pinch of salt, and pepper. Drizzle in olive oil until smooth.
  5. Flour your countertop or a baking sheet and stretch the pizza dough to your desired size, about 12 to 14 inches in diameter.
  6. Spread a generous layer of the poblano pesto evenly over the stretched pizza dough, and layer thinly sliced zucchini on top.
  7. Carefully transfer the assembled pizza to your preheated oven. Bake for about 8-10 minutes.
  8. Toast raw unsalted pepitas in a dry skillet over medium heat for 3-5 minutes, then toss with chili powder and a pinch of salt.
  9. Once the Poblano Pizza is out of the oven, drizzle the chilled cilantro-lime crema across the top, sprinkle with toasted pepitas and additional cilantro.

Nutrition

Serving: 1sliceCalories: 350kcalCarbohydrates: 30gProtein: 12gFat: 20gSaturated Fat: 8gPolyunsaturated Fat: 3gMonounsaturated Fat: 7gCholesterol: 30mgSodium: 800mgPotassium: 300mgFiber: 2gSugar: 4gVitamin A: 600IUVitamin C: 15mgCalcium: 150mgIron: 2mg

Notes

Store leftovers in an airtight container for up to 3 days, or freeze individual slices for up to 2 months.

Tried this recipe?

Let us know how it was!

Mouthwatering Spicy Dill Pickle Burger Sauce You’ll Love

As I stood in my kitchen, the tantalizing aroma of burgers sizzling on the grill filled the air, reminding me of sunny backyard barbecues and laughter with loved ones. That’s when it hit me: the perfect Spicy Dill Pickle Burger Sauce was missing! This creamy, tangy condiment takes less than 10 minutes to whip up and will elevate any burger experience with its delightful zing. Not only is it a crowd-pleaser, but it’s also versatile—feel free to adjust the spice level and explore fun variations with sweet or dill pickles. Creamy and bursting with flavor, this sauce is sure to become a family favorite, making your meals feel a bit more special. So, are you ready to add a zesty twist to your home-cooked burgers? Let’s dive into this delicious recipe!

Why is this sauce a game changer?

Creamy, Tangy Bliss: The Spicy Dill Pickle Burger Sauce is a harmonious blend of flavors that adds a delicious zing to your burgers, making each bite a taste sensation.

Quick and Easy: With no cooking skills required, this sauce can be whipped up in under 10 minutes, perfect for busy weeknights or spontaneous barbecues.

Customizable Heat: Adjust the spice level by adding more or less hot sauce. Want something milder? Feel free to swap in some sweet pickles for a gentler flavor profile!

Crowd-Pleasing Appeal: This sauce is kid-friendly and pairs beautifully with burgers, sandwiches, and even as a dipping sauce for fries or onion rings!

Versatile Uses: Beyond burgers, you can drizzle it on grilled chicken or use it as a sauce for a fun twist on your favorite dishes. It’s a great way to keep meals exciting!

Elevate your meals and bring some joy to the table with this delicious sauce, similar to the flavors found in Pizza Burgers Flavor or Cheeseburger Pockets Snack.

Spicy Dill Pickle Burger Sauce Ingredients

Unleash flavor with these essentials!

For the Base
Mayonnaise – Provides creaminess and serves as a rich foundation for the sauce; full-fat mayo offers the best taste.
Ketchup – Contributes a touch of sweetness that balances the tangy elements; consider low-sugar ketchup for a healthier alternative.
Yellow Mustard – Adds a burst of acidity and brightness; feel free to swap in Dijon mustard for a unique twist.

For the Flavor
Dill Pickles – Delivers crunch and sharp tanginess; opt for sweet pickles for a milder flair.
Pickle Juice – Intensifies the tangy flavor of the sauce; it’s essential for creating the perfect flavor profile.
Hot Sauce – Brings a delightful kick that you can adjust based on your spice preference.
Garlic Powder – Imparts depth and richness; fresh minced garlic can be used for a bolder taste.
Onion Powder – Adds subtle sweetness and earthy complexity; fresh onion provides a different texture if preferred.
Smoked Paprika – Introduces a smoky dimension to the sauce; regular paprika can be a substitute if smokiness isn’t your preference.
Salt – Enhances overall flavor; taste and adjust as necessary to suit your palate.

Step‑by‑Step Instructions for Spicy Dill Pickle Burger Sauce

Step 1: Combine Base
In a clean, medium mixing bowl, place 1 cup of mayonnaise as the base for your Spicy Dill Pickle Burger Sauce. Ensure the bowl is dry for the best texture. Using a spatula, stir until the mayonnaise is smooth and lump-free, creating a creamy foundation for your sauce.

Step 2: Incorporate Pickles
Finely chop about ¼ cup of dill pickles and add them to the mayonnaise. Gently fold the pickles into the mixture, ensuring even distribution while maintaining some crunch. This step adds a delightful tanginess and texture to your burger sauce, making it irresistibly flavorful.

Step 3: Add Liquid Ingredients
Pour in 2 tablespoons of pickle juice, followed by 2 tablespoons of ketchup and 1 tablespoon of yellow mustard. For an extra kick, add 1 teaspoon of hot sauce. Stir the mixture thoroughly until everything is well combined, creating a smooth and creamy sauce that is both tangy and sweet.

Step 4: Season
Next, sprinkle in ½ teaspoon of garlic powder, ½ teaspoon of onion powder, and ½ teaspoon of smoked paprika. Add salt to taste, keeping in mind the flavors of the pickles and mayonnaise. Mix well to incorporate all the seasonings into the sauce, enhancing the flavors of your Spicy Dill Pickle Burger Sauce.

Step 5: Taste and Adjust
With a clean spoon, taste your sauce to gauge its flavor and spiciness. If desired, add more hot sauce for a stronger kick. Stir again to combine any additional ingredients thoroughly. The sauce should be a delightful balance of creamy, tangy, and spicy, perfect for enhancing your burgers.

Step 6: Chill Sauce
After mixing, cover the bowl with plastic wrap or a lid and place it in the refrigerator. Allow the Spicy Dill Pickle Burger Sauce to chill for at least 15 minutes. Chilling helps the flavors meld together beautifully, resulting in a sauce that’s irresistibly vibrant and zesty when served.

Spicy Dill Pickle Burger Sauce Variations

Feel free to get creative and tailor this sauce to your taste buds!

  • Milder Option: Reduce or skip the hot sauce for a smooth, kid-friendly flavor. This way, the creamy and tangy elements shine without overwhelming heat.

  • Sweet Pickles: Swap dill pickles for sweet pickles to create a sweeter sauce that adds a different, delightful twist. The contrast of flavors can be a surprising hit!

  • Honey Drizzle: Add a tablespoon of honey for a touch of sweetness. This will balance the tanginess perfectly, offering a charming sweetness that complements your burgers.

  • Greek Yogurt Swap: Substitute half of the mayonnaise with Greek yogurt for a lighter, tangy alternative. This not only reduces calories, but also adds a creamy richness that’s oh-so-delicious!

  • Garlic Lovers’ Twist: Use fresh minced garlic instead of garlic powder for a bolder garlic punch. The freshness will bring an intense depth of flavor to the sauce.

  • Herbal Flair: Stir in some finely chopped fresh dill or parsley for a herbaceous note. This addition brightens up the sauce and adds a beautiful green hue!

  • Kick it Up: If you love heat, try adding a bit of cayenne pepper or red pepper flakes. It’ll give an extra kick that spice aficionados will adore!

  • BBQ Mash-Up: Incorporate a tablespoon of your favorite barbecue sauce for a sweet, smoky flavor addition. This creatively combines two beloved condiments into one fabulous sauce!

Elevate your burger game and let your tastebuds dance with these variations! And if you’re looking for more delicious flavor inspirations, you might enjoy the boldness of Spicy Korean Gochujang or the savory vibes of Parmesan Crusted Sauce.

How to Store and Freeze Spicy Dill Pickle Burger Sauce

Fridge: Keep the Spicy Dill Pickle Burger Sauce in an airtight container, where it will stay fresh for up to 5 days. Stir before each use to refresh its consistency.

Freezer: It’s not recommended to freeze this sauce, as freezing can alter the creamy texture and flavor. Enjoy it fresh for the best taste!

Refrigerate Leftovers: After serving, promptly refrigerate any leftovers to maintain flavor and safety.

Serving Temperature: This sauce is best enjoyed chilled. If using from the fridge, give it a good stir before serving to invigorate its creamy texture.

Make Ahead Options

This Spicy Dill Pickle Burger Sauce is a fantastic choice for meal prep enthusiasts! You can prepare the sauce up to 3 days in advance. Simply follow the recipe, but instead of serving immediately, cover the bowl tightly and refrigerate it. This allows the flavors to meld beautifully, enhancing the taste. When you’re ready to serve, give the sauce a good stir to refresh its texture. To maintain its creamy consistency, ensure it’s stored in an airtight container, and always taste before serving to adjust seasoning if necessary. With this make-ahead option, you’ll have a delicious, homemade condiment ready for your burgers and sandwiches with minimal effort!

What to Serve with Spicy Dill Pickle Burger Sauce

Brighten up your mealtime with complementary dishes that enhance this vibrant, zesty condiment.

  • Grilled Burgers: Juicy beef or chicken burgers are a natural pairing, allowing the sauce’s tangy flavors to shine brightly and balance the richness of the meat.

  • Crispy French Fries: The crunch and warmth of these golden delights make an irresistible companion. Dip them generously into the sauce for a delightful flavor boost.

  • Garden Salad: Light and fresh, a garden salad adds a crisp contrast to the creamy sauce, making for a satisfying meal that feels wholesome and refreshing.

  • Roasted Vegetables: Seasoned, roasted veggies bring a hearty and savory element to your plate, enhancing the delicious bite of the burger sauce with every taste.

  • Sweet Potato Fries: Their natural sweetness complements the tanginess of the sauce beautifully, creating a fantastic harmony of flavors and textures.

  • Classic Coleslaw: Creamy coleslaw offers a refreshing crunch and creamy texture that pairs delightfully, adding an extra layer of enjoyment to your meal.

  • Sparkling Lemonade: A zesty, refreshing drink like sparkling lemonade cleanses the palate and complements the bold flavors, making every sip an uplifting experience.

  • Chocolate Chip Cookies: For dessert, these warm, gooey cookies create a sweet finish after savoring that spicy kick, allowing for a delightful balance of flavors.

Expert Tips for Spicy Dill Pickle Burger Sauce

  • Chop Pickles Finely: A smooth distribution of finely chopped pickles ensures an even tangy flavor throughout the sauce, enhancing your burger experience.

  • Chill Before Serving: Allowing the sauce to chill for at least 15 minutes helps meld the flavors, making it taste fresher and more vibrant when served.

  • Adjust Heat Carefully: If serving kids or heat-sensitive guests, start with a smaller amount of hot sauce; you can always add more later for those who enjoy spice.

  • Taste and Modify: Always taste the sauce after mixing! Adjust salt and spices to your liking—after all, this Spicy Dill Pickle Burger Sauce should suit your palate perfectly.

  • Use Full-Fat Mayo: For the creamiest, most flavorful sauce, choose full-fat mayonnaise. It provides a richer base that enhances the overall taste.

Spicy Dill Pickle Burger Sauce Recipe FAQs

How do I choose the right pickles for this sauce?
Absolutely! For the best flavor, I recommend using dill pickles, as they add a sharp and tangy crunch that’s essential to the sauce. However, if you prefer a sweeter touch, feel free to swap in sweet pickles! Just remember, the texture might change slightly with different types of pickles.

What’s the best way to store leftovers of this sauce?
Very! Store your Spicy Dill Pickle Burger Sauce in an airtight container in the fridge, where it will stay fresh for up to 5 days. Make sure to stir it well before each use to restore its creamy texture. If you notice it getting too thick, a little drizzle of pickle juice can help bring it back to life!

Can I freeze Spicy Dill Pickle Burger Sauce?
Not recommended! Freezing this sauce may compromise its creamy texture and overall flavor. It’s best to enjoy it fresh for that delightful taste sensation. If you have leftovers, be sure to keep them in the fridge!

What should I do if the sauce is too spicy for me?
No worries! If you’ve added too much hot sauce, you can easily mellow it out. Stir in a bit more mayonnaise or some additional ketchup to balance the heat. Taste as you go until you achieve the desired spice level—remember, you can always add more, but it’s hard to take it away!

Is this sauce kid-friendly?
Absolutely! This Spicy Dill Pickle Burger Sauce can be tailored to your family’s tastes. Simply reduce or skip the hot sauce for a milder version that the kids will love. Just make sure to taste-test it, adjusting the flavors to suit everyone’s palate!

Are there any dietary considerations I should keep in mind?
Yes! If you’re catering to dietary restrictions, check the labels on your mayonnaise and hot sauce for any allergens. Most mayos are gluten-free, but it’s wise to double-check in case you are accommodating someone with food sensitivities. If you’re concerned about dairy, look for egg-free mayonnaise alternatives!

Spicy Dill Pickle Burger Sauce

Mouthwatering Spicy Dill Pickle Burger Sauce You’ll Love

A delicious Spicy Dill Pickle Burger Sauce that elevates any burger experience with its creamy and tangy flavors.
Prep Time 10 minutes
Chill Time 15 minutes
Total Time 25 minutes
Servings: 8 servings
Course: Appetizer
Cuisine: American
Calories: 100

Ingredients
  

For the Base
  • 1 cup Mayonnaise full-fat offers the best taste
  • 2 tablespoons Ketchup consider low-sugar for a healthier alternative
  • 1 tablespoon Yellow Mustard Dijon mustard can be substituted
For the Flavor
  • 1/4 cup Dill Pickles finely chopped
  • 2 tablespoons Pickle Juice essential for flavor
  • 1 teaspoon Hot Sauce adjust based on spice preference
  • 1/2 teaspoon Garlic Powder or use fresh minced garlic
  • 1/2 teaspoon Onion Powder fresh onion can be used
  • 1/2 teaspoon Smoked Paprika regular paprika can substitute
  • to taste Salt adjust as necessary

Equipment

  • Mixing Bowl
  • Spatula
  • knife

Method
 

Step-by-Step Instructions for Spicy Dill Pickle Burger Sauce
  1. In a clean, medium mixing bowl, place 1 cup of mayonnaise as the base for your Spicy Dill Pickle Burger Sauce. Stir until smooth and lump-free.
  2. Finely chop 1/4 cup of dill pickles and add them to the mayonnaise. Fold gently to maintain some crunch.
  3. Pour in 2 tablespoons of pickle juice, followed by 2 tablespoons of ketchup and 1 tablespoon of yellow mustard. Add 1 teaspoon of hot sauce and stir thoroughly.
  4. Sprinkle in 1/2 teaspoon of garlic powder, 1/2 teaspoon of onion powder, and 1/2 teaspoon of smoked paprika. Add salt to taste and mix well.
  5. Taste your sauce and adjust the heat with more hot sauce if desired. Stir again to combine thoroughly.
  6. Cover the bowl and refrigerate for at least 15 minutes to allow flavors to meld.

Nutrition

Serving: 2tablespoonsCalories: 100kcalCarbohydrates: 2gFat: 10gSaturated Fat: 1gMonounsaturated Fat: 4gCholesterol: 5mgSodium: 200mgPotassium: 30mgSugar: 1gVitamin A: 60IUVitamin C: 2mgCalcium: 2mg

Notes

This sauce is versatile and can be used beyond burgers, like on grilled chicken or as a dip for fries.

Tried this recipe?

Let us know how it was!

Tart with Silky Vanilla Bean Pastry Cream Bliss for Every Occasion

As I whisked together the silky vanilla bean pastry cream, the aroma danced through my kitchen, transporting me straight to a quaint café in Paris. This Decadent Tart with Silky Vanilla Bean Pastry Cream Bliss is my homage to the classic French patisserie, combining a crisp, buttery crust with an indulgent custard that melts in your mouth. Not only does this recipe impress with its sophistication, but it’s also surprisingly accessible for home bakers, no matter your skill level. In just a few steps, you can create a show-stopping dessert that’s perfect for celebrations or simply elevating your afternoon tea. Curious how to unlock this sweet French delight? Let’s dive in!

Why is This Tart a Must-Try?

Irresistible flavor combination: Experience the rich taste of silky vanilla bean pastry cream nestled within a buttery, flaky crust.

Beginner-friendly yet impressive: You don’t need to be a pro to master this dessert. With simple techniques, you’ll wow guests effortlessly.

Versatile options: Customize with seasonal berries or different extracts to make it your own—ideal for any occasion.

Perfect balance of textures: The contrast of the crisp crust with the smooth custard is a texture lover’s dream.

Make-ahead convenience: Prepare the pastry cream in advance, streamlining your dessert prep for dinner parties.

Café-quality indulgence at home: Create that gourmet bakery experience right in your kitchen, letting you savor each elegant bite!

Ingredients for Tart with Silky Vanilla Bean Pastry Cream Bliss

Experience the wonders of this decadent tart by gathering these essential ingredients.

For the Crust

  • Butter – Adds richness and flavor to both the crust and cream; substitute with margarine for dairy-free options.
  • All-Purpose Flour – Provides structure to the crust; for gluten-free, use a gluten-free all-purpose blend.
  • Powdered Sugar – Sweetens the crust and gives it a tender crumb; regular sugar can be used but may alter texture.
  • Eggs – Essential for binding the crust and creating the perfect custard texture; substitute with flax eggs for vegan.

For the Pastry Cream

  • Vanilla Beans – Infuses the cream with rich flavor; quality vanilla extract can work as a substitute in a pinch.
  • Milk/Heavy Cream – Creates a rich, smooth consistency for the pastry cream; replace with whole milk for a lighter option.
  • Sugar – Sweetens the pastry cream; ensure it dissolves completely for a silky result.

For Garnishing

  • Fresh Berries – Optional garnish for vibrancy and fresh flavor; feel free to use any seasonal berries to enhance your tart.

Step‑by‑Step Instructions for Tart with Silky Vanilla Bean Pastry Cream Bliss

Step 1: Prepare the Crust
In a mixing bowl, combine softened butter, powdered sugar, and all-purpose flour until the mixture resembles coarse crumbs. Add an egg, mixing until the dough comes together in a smooth ball. Once formed, wrap the dough in plastic wrap and chill in the refrigerator for at least 30 minutes, allowing it to firm up for easy handling.

Step 2: Bake the Crust
Preheat your oven to 375°F (190°C). Once the dough has chilled, roll it out on a lightly floured surface to fit your tart pan. Gently press the dough into the pan, trimming any excess. Bake for about 20 minutes or until the crust is golden and fragrant. Remove from the oven and let it cool completely on a wire rack.

Step 3: Make the Pastry Cream
In a heatproof bowl, whisk together eggs and sugar until pale and creamy. Gradually add warmed milk mixed with scraped vanilla bean seeds, whisking constantly to prevent curdling. Pour the mixture into a saucepan and cook over medium heat, stirring until it thickens (about 5-7 minutes) and coats the back of a spoon. Remove from heat and cool completely.

Step 4: Assemble Tart
Once the crust is fully cooled, fill it with your silky vanilla bean pastry cream, smoothing the top with a spatula for an even finish. Ensure that the cream reaches the edges of the crust for a beautifully presented tart. Chill the assembled tart in the refrigerator for at least 1 hour to allow the flavors to meld and the cream to set properly.

Step 5: Garnish
Before serving your Tart with Silky Vanilla Bean Pastry Cream Bliss, carefully decorate the top with fresh berries, a dusting of powdered sugar, and optional almond slivers or mint leaves. This final touch not only enhances the visual appeal but also adds a burst of freshness. Slice and serve chilled for an elegant dessert experience.

Make Ahead Options

These Tart with Silky Vanilla Bean Pastry Cream Bliss are perfect for busy home cooks looking to streamline their dessert prep! You can prepare the pastry cream up to 2 days in advance, storing it in an airtight container in the refrigerator to maintain its silky texture and prevent a skin from forming. The tart crust can also be baked up to 24 hours ahead—just make sure it cools completely and is stored loosely covered to keep its crispness. When you’re ready to serve, simply fill the cooled crust with your creamy filling, chill for an hour to let the flavors marry, and garnish with fresh berries. This makes it easy to enjoy a sophisticated dessert with minimal effort!

Expert Tips for Tart with Silky Vanilla Bean Pastry Cream Bliss

Perfectly Chilled Dough: Allowing the dough to chill for at least 30 minutes is essential to maintain its structure while baking; this prevents shrinkage.

Egg Temperature Matters: Use room temperature eggs for the pastry cream to ensure a smooth texture; cold eggs can lead to lumps.

Whisk Constantly: When making the pastry cream, whisk constantly while cooking to avoid curdling; this allows for a silky vanilla bean pastry cream.

Cooling Time: Make sure both the crust and pastry cream are completely cool before assembling to prevent sogginess and maintain texture.

Garnish Wisely: Add garnishes just before serving for freshness; this not only enhances flavor but keeps the tart looking stunning at the table.

How to Store and Freeze Tart with Silky Vanilla Bean Pastry Cream Bliss

Fridge: Store the tart loosely covered in the refrigerator for up to 2 days. This keeps the crust from becoming too soggy while preserving the luscious vanilla bean pastry cream.

Freezer: If you need to store the tart longer, freeze the assembled tart without the toppings for up to 1 month. Wrap it tightly in plastic wrap and then foil for best protection from freezer burn.

Reheating: When ready to enjoy, let the tart thaw overnight in the fridge. Avoid reheating, as the pastry cream is best served chilled for optimal texture.

Pastry Cream Storage: You can also make the vanilla bean pastry cream in advance and store it in an airtight container in the refrigerator for up to 48 hours. Just give it a gentle whisk before filling the tart.

What to Serve with Tart with Silky Vanilla Bean Pastry Cream Bliss?

Elevate your dessert experience by finding the perfect accompaniments to enhance this delicious indulgence.

  • Coffee or Espresso: The boldness of coffee complements the sweet creaminess of the tart, creating a delightful flavor pairing.

  • Fresh Seasonal Fruit: Adding raspberries or strawberries adds a pop of color and a refreshing contrast to the rich pastry cream.

  • Whipped Cream: A dollop of lightly sweetened whipped cream adds a light, airy texture, balancing out the tart’s richness.

  • Chocolate Sauce: Drizzling warm chocolate sauce over the tart introduces a decadent layer of flavor, perfect for chocolate lovers.

  • Herbal Tea: A fragrant herbal tea, like chamomile or mint, offers a calming counterpoint to the richness, enhancing the overall experience.

  • Almond Biscotti: The crunchy texture of almond biscotti is a delightful contrast to the smooth tart, perfect for dipping into your coffee or tea.

  • Sparkling Wine: Celebrate with a glass of sparkling wine, its effervescence amplifying the tart’s elegance and sweet notes, making every bite feel special.

  • Vanilla Ice Cream: Serving a scoop of creamy vanilla ice cream alongside the tart takes indulgence to the next level; it’s pure bliss!

Tart with Silky Vanilla Bean Pastry Cream Bliss Variations

Feel inspired to put your unique spin on this beloved dessert with delightful adaptations sure to elevate your tart experience.

  • Dairy-Free: Substitute butter with margarine and use almond or coconut milk in the pastry cream for a creamy, indulgent option.
  • Gluten-Free: Swap out all-purpose flour with a gluten-free blend to enjoy a texture that’s just as delightful without gluten.
  • Flavor Infusion: Experiment with different extracts like almond or lemon zest to give the pastry cream a refreshing twist.
  • Seasonal Fruits: Swap fresh berries for peaches or kiwi to celebrate a deliciously vibrant tart all year round; the flavor pairings are endless!
  • Added Crunch: Sprinkle toasted almond slivers on top for a delightful crunch that contrasts beautifully with the silky cream.
  • Chocolatey Delights: Incorporate cocoa powder into the pastry dough or make a chocolate pastry cream for a rich twist on this classic.
  • Heat Factor: For a kick, mix in a pinch of cayenne pepper or a drizzle of chili oil in your cream—perfect for adventurous palates.
  • Layered Elegance: Create a multi-layered dessert by adding a layer of fruit compote underneath the pastry cream for added depth of flavor.

For more inspiration, try pairing this tart with Rhubarb Scones Vanilla for brunch or enjoy it with a refreshing Pumpkin Cream Cold to elevate your dessert experience!

Tart with Silky Vanilla Bean Pastry Cream Bliss Recipe FAQs

What’s the best way to select ripe berries for garnish?
Absolutely! Look for berries that are vibrant in color, plump, and firm to the touch. They should smell sweet and fragrant. Avoid any with dark spots or bruises, as this indicates overripeness. Using fresh seasonal berries will enhance your tart’s flavor and presentation.

How should I store my tart after I make it?
Very simple! Store your tart loosely covered in the refrigerator for up to 2 days. This method ensures the crust remains crisp while keeping the pastry cream fresh and delicious. If you notice any excess moisture, it’s a good idea to place a paper towel under the cover to absorb it!

Can I freeze the tart, and if so, how?
Absolutely! To freeze your Tart with Silky Vanilla Bean Pastry Cream Bliss, wrap it tightly in plastic wrap, followed by aluminum foil or place it in a freezer-safe container. This helps prevent freezer burn! You can freeze it for up to 1 month. Just remember to thaw it overnight in the fridge before serving, as the texture is best enjoyed chilled.

What if my pastry cream doesn’t thicken properly?
If your pastry cream seems too runny, don’t worry! First, ensure that you whisk constantly while cooking to avoid lumps and curdling. If it still doesn’t thicken after cooking for around 5-7 minutes, return it to heat and continue to stir until it reaches the desired thickness. If it’s overcooked, it may become grainy, so keep an eye on it!

Are there any dietary considerations I should keep in mind?
Certainly! For vegan adaptations, you can use flax eggs instead of regular eggs and opt for dairy-free milk and butter alternatives. If you’re catering to gluten-free diets, be sure to swap the all-purpose flour for a gluten-free all-purpose blend. Always check your berry selection to avoid potential allergens, especially for guests!

Can I make the pastry cream in advance?
Yes, you can make the vanilla bean pastry cream up to 48 hours in advance! Store it in an airtight container in the refrigerator. Upon using, give it a gentle whisk before filling your tart. This not only saves time but also allows the flavors to deepen, making your tart taste that much better!

Tart with Silky Vanilla Bean Pastry Cream Bliss

Tart with Silky Vanilla Bean Pastry Cream Bliss for Every Occasion

A decadent tart combining a crispy crust with silky vanilla bean pastry cream for the perfect dessert.
Prep Time 30 minutes
Cook Time 20 minutes
Chilling Time 1 hour
Total Time 1 hour 50 minutes
Servings: 8 slices
Course: Dessert
Cuisine: French
Calories: 250

Ingredients
  

For the Crust
  • 1 cup Butter Softened, can substitute margarine for dairy-free options.
  • 2 cups All-Purpose Flour Can use gluten-free blend.
  • 1/2 cup Powdered Sugar Regular sugar may alter texture.
  • 1 large Egg Flax egg can be used for vegan.
For the Pastry Cream
  • 2 whole Vanilla Beans Quality vanilla extract can substitute.
  • 2 cups Milk/Heavy Cream Whole milk can be used for a lighter option.
  • 1/2 cup Sugar Ensure it dissolves completely.
For Garnishing
  • 1 cup Fresh Berries Use any seasonal berries.

Equipment

  • Mixing Bowl
  • Tart Pan
  • Saucepan
  • Whisk
  • Spatula
  • Wire Rack

Method
 

Step‑by‑Step Instructions
  1. In a mixing bowl, combine softened butter, powdered sugar, and all-purpose flour until the mixture resembles coarse crumbs. Add an egg, mixing until the dough comes together in a smooth ball. Wrap the dough in plastic wrap and chill in the refrigerator for at least 30 minutes.
  2. Preheat your oven to 375°F (190°C). Roll out the chilled dough on a floured surface to fit your tart pan, press it into the pan, and bake for 20 minutes until golden. Let it cool on a wire rack.
  3. In a heatproof bowl, whisk together eggs and sugar until pale. Gradually add warmed milk mixed with vanilla, whisking constantly. Cook over medium heat until thickened (5-7 minutes), remove from heat, and cool completely.
  4. Once the crust is cooled, fill it with the pastry cream, smoothing the top. Chill for at least 1 hour to set.
  5. Before serving, decorate the tart with fresh berries, powdered sugar, and optional almond slivers or mint leaves. Serve chilled.

Nutrition

Serving: 1sliceCalories: 250kcalCarbohydrates: 30gProtein: 3gFat: 15gSaturated Fat: 9gPolyunsaturated Fat: 1gMonounsaturated Fat: 5gCholesterol: 70mgSodium: 150mgPotassium: 150mgFiber: 1gSugar: 12gVitamin A: 500IUVitamin C: 2mgCalcium: 50mgIron: 1mg

Notes

Allow dough to chill for at least 30 minutes to maintain structure. Use room temperature eggs for a smooth pastry cream texture. Whisk constantly to avoid curdling and serve garnishes just before serving for freshness.

Tried this recipe?

Let us know how it was!

Tart with Silky Vanilla Bean Pastry Cream Bliss Delight

As I sifted through a trove of fresh berries, the vibrant colors instantly brightened my kitchen. It was in this moment that I decided to whip up a Tart with Silky Vanilla Bean Pastry Cream Bliss. This recipe captures the essence of homemade elegance, and trust me—it’s easier than it looks! Not only is it perfect for impressing guests at gatherings, but it also makes for a delightful treat when you need a moment of indulgence. The smooth vanilla bean pastry cream pairs beautifully with any fruit you have on hand, creating a customizable dessert that tantalizes the senses. So, are you ready to dive into this dreamy tart creation that promises to delight your palate?

Why is this tart so irresistible?

Unforgettable flavor: The silky vanilla bean pastry cream brings an air of sophistication, elevating your dessert game.

Versatile delight: You can easily mix and match with seasonal fruits or other toppings, making it equally perfect for summer picnics or cozy winter gatherings.

Quick and easy: With simple steps, you’ll find this tart can be mastered in no time, letting you focus on enjoying the moment rather than stressing in the kitchen.

Impressive presentation: Each slice reveals a stunning layer, making it an instant crowd-pleaser at any gathering—perfect for impressing guests without the fuss, much like my Parmesan Crusted Chicken recipe!

Homemade happiness: Experience the joy of creating something from scratch that warms both your heart and stomach, just like my beloved Rhubarb Scones Vanilla.

Dive into this delightful tart and let your culinary creativity shine!

Tart with Silky Vanilla Bean Pastry Cream Bliss Ingredients

• Get ready to create a delightful masterpiece!

For the Tart Crust

  • All-purpose flour – A classic choice that gives your tart a flaky texture.
  • Unsalted butter – Use chilled for a perfect melt-in-your-mouth pastry.
  • Powdered sugar – Adds sweetness to the crust without grittiness.
  • Salt – Just a pinch enhances the overall flavor of the crust.
  • Ice water – Helps bind the dough without making it tough.

For the Silky Vanilla Bean Pastry Cream

  • Whole milk – Full-fat milk contributes to the rich, creamy texture.
  • Granulated sugar – Balances the flavors in the creamy filling.
  • Egg yolks – Acts as a thickener, creating that luxurious custard vibe.
  • Cornstarch – Ensures your pastry cream sets perfectly without lumps.
  • Vanilla bean pod – Infuses a deep, aromatic vanilla flavor that’s irresistible.
  • Unsalted butter – Adds richness and smoothness, rounding out the cream.

For the Topping

  • Fresh berries – Use seasonal fruits for the perfect burst of color and flavor.
  • Mint leaves – A fresh garnish that adds a pop of color and a hint of coolness.

Get ready to indulge in a Tart with Silky Vanilla Bean Pastry Cream Bliss that will have everyone asking for seconds!

Step‑by‑Step Instructions for Tart with Silky Vanilla Bean Pastry Cream Bliss

Step 1: Prepare the Tart Crust
Start by preheating your oven to 375°F (190°C). In a mixing bowl, combine 1 ½ cups of all-purpose flour, ½ cup of chilled unsalted butter, ¼ cup of powdered sugar, and a pinch of salt. Use a pastry cutter or your fingers to mix until the texture resembles coarse crumbs. Gradually add ice water, one tablespoon at a time, mixing until the dough holds together. Press the dough into a tart pan and chill it for 15 minutes.

Step 2: Bake the Tart Crust
Once chilled, take the tart crust and poke the bottom with a fork to prevent bubbling. Bake in the preheated oven for 20–25 minutes or until golden brown. Keep an eye on it, as the crust should be firm to the touch and lightly browned on the edges. Once baked, remove from the oven and let it cool completely while you prepare the silky vanilla bean pastry cream.

Step 3: Make the Pastry Cream
In a medium saucepan, heat 2 cups of whole milk over medium heat until it’s steaming, but not boiling. In a separate bowl, whisk together ½ cup of granulated sugar and 3 egg yolks until pale and creamy. Gradually whisk in ¼ cup of cornstarch, ensuring there are no lumps. Pour the hot milk into the egg mixture in a slow stream, stirring constantly to temper the eggs.

Step 4: Thicken the Cream
Return the mixture to the saucepan over medium heat. Stir continuously until it thickens, about 5-7 minutes, until it coats the back of a spoon. Remove from heat and add the seeds scraped from 1 vanilla bean pod and 2 tablespoons of unsalted butter. Stir until the butter melts and the pastry cream is smooth and glossy. Transfer to a bowl, cover with plastic wrap pressed directly onto the surface, and let it cool completely.

Step 5: Assemble the Tart
Once both the tart shell and pastry cream are cool, pour the silky vanilla bean pastry cream into the baked tart shell, smoothing the top with a spatula. Spread it evenly to the edges, creating a beautiful layer of creamy delight. Chill the filled tart in the refrigerator for at least 2 hours to allow the flavors to meld and set perfectly.

Step 6: Add Fresh Toppings
Before serving, arrange a colorful mix of fresh berries on top of the pastry cream, creating a stunning presentation. You can use strawberries, blueberries, raspberries, or any fruit you love. For a touch of elegance, garnish with fresh mint leaves just before serving to bring a delightful freshness to your Tart with Silky Vanilla Bean Pastry Cream Bliss.

Step 7: Slice and Serve
When ready to serve, carefully slice the tart into wedges using a sharp knife. The creamy filling and buttery crust should hold together beautifully. Set the slices on plates, and enjoy the praises for your exquisite homemade tart, perfect for any occasion!

Tart with Silky Vanilla Bean Pastry Cream Variations

Feel free to unleash your creativity and customize this delightful tart to suit your taste buds!

  • Dairy-Free: Substitute the milk and butter with almond milk and coconut oil for a creamy yet dairy-free tart experience.

  • Gluten-Free: Use a gluten-free all-purpose flour blend for the crust. This way, everyone can indulge in the deliciousness, including those with dietary restrictions.

  • Flavor Boost: Swap out the vanilla bean for almond or hazelnut extract to add a nutty twist that will wow your guests.

  • Choco-Cream: Fold in melted chocolate into the pastry cream for a decadent chocolate version; just think of the rich flavor!

  • Citrusy Zest: Incorporate the zest of a lemon or orange into the pastry cream for a bright, refreshing flavor, perfect for summer.

  • Seasonal Fruits: Replace berries with beautifully roasted peaches or apricots. They add a lovely caramelized flavor that complements the cream splendidly.

  • Spiced Cream: Introduce a pinch of cinnamon or cardamom into the pastry cream for a warm, comforting note that brings cozy vibes.

  • Nutty Crunch: Top the tart with toasted almond slivers or pistachios for added texture and a satisfying crunch.

Creating your own twist on this tart not only makes it special but also turns a classic dessert into a personalized delight! For more ideas, try mixing up toppings like I did with my Savory Turkey Patties for delicious variations. Enjoy your baking adventure!

Expert Tips for Tart with Silky Vanilla Bean Pastry Cream

  • Chill Your Dough: A well-chilled crust ensures that it holds its shape during baking, preventing shrinkage. Don’t skip the chilling step!

  • Tempering Eggs: To avoid scrambling, slowly mix hot milk into the egg mixture while whisking continuously. This creates a smooth, silky pastry cream for your tart.

  • Watch the Baking Time: Keep an eye on the tart crust; overbaking can lead to a dry texture. It should be golden brown yet tender.

  • Cool Completely: Always let the cream and crust cool fully before assembly. This prevents the cream from melting and ensures a perfect layer of silky pastry cream.

  • Flavor Variations: Feel free to mix up the vanilla bean with other extracts like almond or orange for a twist on the classic tart with silky vanilla bean pastry cream bliss!

  • Fresh Garnishes: Use seasonal fruits and herbs for vibrant toppings. They not only enhance flavor but also add a beautiful touch to your presentation.

How to Store and Freeze Tart with Silky Vanilla Bean Pastry Cream

Fridge: Store the tart loosely covered in the refrigerator, where it will stay fresh for up to 2 days. This will help maintain the tart crust’s texture while keeping the pastry cream silky.

Freezer: If you need to freeze the tart, wrap it tightly in plastic wrap and foil. It can be stored for up to 1 month, but it’s best to freeze only the crust and cream separately for optimal freshness.

Thawing: To enjoy your frozen tart, transfer it to the fridge the day before serving and allow it to thaw gradually, ensuring the cream remains creamy without losing its luscious texture.

Reheating: If you’re just freezing the crust, you can reheat it at 350°F (175°C) for about 10 minutes to restore crispness before adding the silky vanilla bean pastry cream.

Make Ahead Options

These delightful Tart with Silky Vanilla Bean Pastry Cream are perfect for busy home cooks looking to save time! You can prepare the tart crust up to 3 days in advance—just bake it, cool it completely, and store it tightly wrapped in the refrigerator to maintain its crispiness. The silky vanilla bean pastry cream can also be made up to 48 hours ahead; simply cool it, cover with plastic wrap directly on the surface to prevent a skin from forming, and refrigerate. When you’re ready to serve, fill the cooled tart shell with the pastry cream, chill for at least 2 hours to set, then top with fresh berries before slicing. This way, you’ll have a beautiful, indulgent dessert without the last-minute rush!

What to Serve with Tart with Silky Vanilla Bean Pastry Cream Bliss?

Treat yourself to a stunning dining experience that elevates your dessert game to new heights.

  • Fresh Berries: Bright and juicy seasonal fruits provide a burst of flavor, enhancing each creamy bite of your tart.
  • Whipped Cream: A dollop of lightly sweetened whipped cream adds a delightful airiness, balancing the rich pastry cream perfectly.
  • Chocolate Sauce: Drizzling warm chocolate sauce over the tart adds an indulgent contrast, creating a decadent fusion of flavors.
  • Citrus Salad: A refreshing citrus salad with oranges and grapefruits cuts through the sweetness, bringing a light and zesty touch to your dessert.
  • Almond Biscotti: The crunchiness of almond biscotti offers a lovely textural contrast, perfect for dipping into the silky pastry cream.
  • Tea or Coffee: Pair with a soothing cup of herbal tea or a rich espresso, which enhances the creamy flavors and makes dessert feel more refined.
  • Mint Leaves: Garnishing with fresh mint not only adds a pop of color but also a refreshing flavor that complements the warm vanilla notes.
  • Ice Cream: Serve with a scoop of vanilla or raspberry ice cream for a delightful contrast between temperatures and textures, perfect for any occasion.

Tart with Silky Vanilla Bean Pastry Cream Bliss Recipe FAQs

How do I know when my ingredients are ripe or fresh?
Absolutely! For the best tart, choose fresh berries with vibrant colors and no dark spots. They should be firm to the touch, not mushy. For the vanilla beans, look for plump pods, as they contain the most flavor.

How should I store the tart once it’s baked?
Store your tart loosely covered in the refrigerator for up to 2 days to retain freshness and texture. Make sure to keep it in a container that allows airflow, as excess moisture can soften that beautiful tart crust.

Can I freeze the tart for later enjoyment?
Certainly! To freeze, wrap the tart tightly in plastic wrap and then in foil. This way, it can last for up to 1 month. However, for the finest results, I recommend freezing the crust and silky vanilla bean pastry cream separately.

What’s the best way to thaw a frozen tart?
To thaw your frozen tart, simply place it in the refrigerator the night before serving. This gentle method will keep the pastry cream creamy and luscious, avoiding any unpleasant texture changes.

What should I do if my pastry cream doesn’t thicken properly?
Very good question! If your cream doesn’t thicken, it may be due to not cooking it long enough. Here’s what to do: return the mixture to medium heat, whisking continuously until it thickens enough to coat the back of a spoon—about 5-7 minutes. You can also add a little cornstarch mixed with water if needed.

Are there any dietary considerations for my guests?
Absolutely! For guests with dietary restrictions, consider using dairy-free substitutes such as almond or coconut milk for the pastry cream. You can also use flax eggs instead of traditional eggs for vegan guests. Just ensure all substitutions maintain the original flavors as much as possible!

Tart with Silky Vanilla Bean Pastry Cream Bliss Delight

Experience the indulgence of a Tart with Silky Vanilla Bean Pastry Cream Bliss, perfect for any occasion.
Prep Time 45 minutes
Cook Time 25 minutes
Chilling Time 2 hours
Total Time 3 hours 10 minutes
Servings: 8 slices
Course: Dessert
Cuisine: French
Calories: 300

Ingredients
  

Tart Crust
  • 1.5 cups all-purpose flour A classic choice for a flaky texture.
  • 0.5 cups unsalted butter Chilled for best results.
  • 0.25 cups powdered sugar Adds sweetness without grittiness.
  • 1 pinch salt Enhances overall flavor.
  • ice water as needed Helps bind the dough.
Silky Vanilla Bean Pastry Cream
  • 2 cups whole milk Full-fat for a rich, creamy texture.
  • 0.5 cups granulated sugar Balances flavors in the filling.
  • 3 large egg yolks Acts as a thickener.
  • 0.25 cups cornstarch Ensures the cream sets perfectly.
  • 1 pod vanilla bean Infuses aromatic vanilla flavor.
  • 2 tablespoons unsalted butter Adds richness and smoothness.
Topping
  • 2 cups fresh berries Seasonal fruits for color and flavor.
  • as desired mint leaves For garnish.

Equipment

  • Mixing Bowl
  • pastry cutter
  • Tart Pan
  • Medium saucepan
  • Whisk
  • Spatula

Method
 

Tart Preparation
  1. Preheat the oven to 375°F (190°C). Combine flour, butter, powdered sugar, and salt in a mixing bowl. Mix until resembling coarse crumbs. Gradually add ice water to form dough.
  2. Press the dough into a tart pan and chill for 15 minutes. Poke the bottom with a fork to prevent bubbling. Bake for 20-25 minutes until golden brown. Let cool completely.
  3. Heat the milk in a medium saucepan over medium heat until steaming. In a separate bowl, whisk sugar and egg yolks until creamy. Gradually whisk in cornstarch, ensuring no lumps.
  4. Pour hot milk into the egg mixture slowly while stirring. Return the mixture to the saucepan and stir continuously until thickened, about 5-7 minutes. Remove from heat and add vanilla bean seeds and butter.
  5. Pour the pastry cream into the cooled tart shell and chill in the refrigerator for at least 2 hours.
  6. Arrange fresh berries on top of the pastry cream. Garnish with mint leaves before serving.
  7. Slice the tart into wedges and enjoy!

Nutrition

Serving: 1sliceCalories: 300kcalCarbohydrates: 45gProtein: 5gFat: 12gSaturated Fat: 7gPolyunsaturated Fat: 1gMonounsaturated Fat: 4gCholesterol: 100mgSodium: 150mgPotassium: 200mgFiber: 1gSugar: 20gVitamin A: 5IUVitamin C: 10mgCalcium: 15mgIron: 5mg

Notes

Feel free to explore different fruit toppings to personalize your tart!

Tried this recipe?

Let us know how it was!

Delightful Coconut Ube Besito Cookies for a Tropical Treat

As I sifted through my pantry looking for inspiration, a vibrant purple hue caught my eye—ube, the starlit gem of many tropical desserts. It dawned on me that the perfect way to celebrate this unique ingredient was by baking Coconut Ube Besito Cookies. These delightful treats boast a rich, chewy texture entwined with the lightness of coconut, making them an instant crowd-pleaser. Whether you’re hosting a casual gathering or just seeking a sweet escape, these cookies are a fantastic choice with their enticing flavor and beautiful presentation. Plus, they offer options for both vegan and gluten-free diets, so everyone can join in on the fun. Are you ready to wow your family and friends with a tropical twist that’s simple to whip up? Let’s get baking!

Why are Coconut Ube Besito Cookies irresistible?

Tropical Appeal: These cookies are a vibrant explosion of color and flavor that transport you to a sun-kissed paradise with every bite.

Easy to Make: You don’t need to be a baking expert; this recipe is designed for anyone who loves to whip up something special in the kitchen.

Versatile Options: With simple substitutions, you can create vegan or gluten-free variations, ensuring everyone can enjoy this treat!

Creamy Surprise: The luscious ube pastry cream nestled inside each cookie adds a delightful surprise, elevating the cookie experience to something unforgettable.

Crowd-Pleasing Treat: Perfect for gatherings or as a cozy dessert at home, these cookies are guaranteed to impress your friends and family. Enhance your dessert repertoire with an indulgent pairing like Mango Coconut Pudding or our refreshing Pineapple Coconut Mojito.

Coconut Ube Besito Cookies Ingredients

• Here’s everything you need to make these tropical delights!

For the Cookie Base

  • Unsalted Butter – Adds richness and flavor; substitute with plant-based butter for a dairy-free version.
  • White Sugar – Sweetens and helps with texture; brown sugar can be used for a deeper flavor.
  • Brown Sugar – Moistens and enhances flavor; can be substituted with coconut sugar.
  • Coconut Extract – Infuses cookies with lovely coconut aroma; vanilla extract can serve as a substitute.
  • Eggs – Bind the ingredients together; for a vegan version, opt for flax eggs (1 tbsp flaxseed meal + 2.5 tbsp water).
  • All-Purpose Flour – Provides structure; use a 1:1 gluten-free flour blend as a substitute.
  • Baking Soda – Helps the cookie puff up; ensure it’s fresh for the best results.
  • Cornstarch – Contributes to a tender texture; can be replaced with an equal amount of extra flour in a pinch.
  • Salt – Enhances the overall flavor.
  • Shredded Coconut – Adds delightful texture; toasted coconut can provide an additional flavor boost.
  • White Chocolate Chips – Bring sweetness and creaminess; dark chocolate chips can be an alternative.

For the Ube Pastry Cream

  • Egg Yolks – Enrich the pastry cream for extra flavor; substitute with aquafaba for a vegan option.
  • Ube Condensed Milk – Introduces the signature ube flavor; regular condensed milk can be used for a non-ube variant.
  • Whole Milk – Adds creaminess to the pastry cream; substitute with almond or coconut milk for a non-dairy option.

Dive into this magical recipe for Coconut Ube Besito Cookies, and let the tropical flavors whisk you away!

Step‑by‑Step Instructions for Coconut Ube Besito Cookies

Step 1: Prepare Ube Pastry Cream
In a saucepan, combine whole milk and ube condensed milk over medium heat, stirring until it reaches a bubbling boil. In a separate bowl, whisk egg yolks with sugar, ube extract, and cornstarch until smooth. Gradually temper the egg mixture with the hot milk before returning it to the heat, cooking while stirring until thickened, about 5-7 minutes. Once thickened, transfer to a bowl and chill in the refrigerator.

Step 2: Make Ube Besito Mixture
In a mixing bowl, combine shredded coconut and remaining ube condensed milk, stirring until well mixed. Gently fold in beaten egg whites, ensuring not to deflate them. Line a baking sheet with parchment paper, and scoop spoonfuls of the mixture onto it. Bake at 325°F for 12-15 minutes until the edges are golden and crispy. Allow them to cool on the sheet before transferring to a wire rack.

Step 3: Prepare Doughs
In a large mixing bowl, cream together unsalted butter, white sugar, and brown sugar until light and fluffy, about 3-5 minutes. Add coconut extract and eggs, mixing until well incorporated. Gradually combine the dry ingredients—flour, baking soda, cornstarch, and salt—until a smooth dough forms. Stir in shredded coconut and white chocolate chips until evenly distributed in the coconut dough.

Step 4: Assemble Cookies
Divide the prepared dough in half, adding ube extract to one portion to create the ube dough. Roll both doughs into balls and flatten them slightly. Place a tablespoon of the chilled ube pastry cream in the center of half the cookies, then cover with the other half and seal the edges. Arrange the stuffed cookies on a baking sheet, and freeze them for at least 30 minutes to maintain their shape during baking.

Step 5: Bake Cookies
Preheat your oven to 410°F, and line a baking sheet with parchment paper, if needed. Remove the frozen cookies from the freezer and place them on the prepared baking sheet. Bake for 10-12 minutes or until the cookie tops are no longer shiny, indicating they are done. Let the cookies cool on the sheet for a few minutes before transferring to a wire rack.

Step 6: Finish Cookies
In a microwave-safe bowl, melt white chocolate chips until smooth, stirring every 30 seconds to avoid burning. Dip the bottoms of the cooled Coconut Ube Besito Cookies into the melted white chocolate, allowing any excess to drip off. Return the dipped cookies to parchment paper, and let them set until the chocolate hardens. Enjoy the delightful tropical flavors!

What to Serve with Coconut Ube Besito Cookies

As the aroma of freshly baked cookies fills your home, it’s time to make the most of this tropical treat by pairing it with delightful accompaniments that enhance your experience.

  • Fresh Fruit Salad: A vibrant mix of tropical fruits balances the sweetness of the cookies, offering a refreshing, juicy contrast.
  • Coconut Ice Cream: Creamy coconut ice cream complements the tropical flavors and adds a cool, dreamy touch to each bite, perfect for warm days.
  • Pineapple Coconut Mojito: This refreshing cocktail brings a burst of citrus and mint, enhancing the cookie’s tropical vibe while cooling you down.

Indulge in the comforting flavors by serving the Coconut Ube Besito Cookies alongside a rich and creamy coconut custard or even a light vanilla yogurt parfait for an unforgettable treat that’s loved by all.

  • Mango Coconut Pudding: Another tropical delight with a creamy texture that mirrors the cookie’s filling, making for a harmonious pairing that’s beautifully sweet.
  • Chai Tea: The warm spices of chai provide a comforting contrast, elevating the tropical sweetness with a hint of aromatic warmth.

With these pairings, each bite of your Coconut Ube Besito Cookies becomes part of a delightful, multi-layered experience that’s sure to please everyone at your table!

How to Store and Freeze Coconut Ube Besito Cookies

Room Temperature: Store cookies in an airtight container at room temperature for up to 1 week to maintain their delightful texture and flavor.

Fridge: For extended freshness, refrigerate the cookies for up to 2 weeks. Just make sure they’re in an airtight container to avoid drying out.

Freezer: Unbaked assembled cookies can be frozen for up to 3 months. Just freeze them on a baking sheet first, then transfer to a container.

Reheating: To enjoy cookies warm, pop them in a preheated oven at 350°F for a few minutes. Each Coconut Ube Besito Cookie will be just as delicious as the day you made them!

Make Ahead Options

These Coconut Ube Besito Cookies are ideal for busy cooks looking to save time without sacrificing flavor! You can prepare the ube pastry cream up to 24 hours in advance—just keep it chilled in an airtight container to maintain its creamy consistency. Additionally, the dough balls can be assembled and frozen for up to 3 months. To do this, simply follow the assembly instructions and freeze the filled cookies on a baking sheet before transferring them to a freezer bag. When it’s time to bake, preheat your oven and bake directly from frozen (no need to thaw), for delicious, fresh Coconut Ube Besito Cookies that taste just as delightful as if they were made that day!

Coconut Ube Besito Cookies Variations & Substitutions

Feel free to make these delightful cookies your own by exploring various twists and substitutions that cater to your taste buds!

  • Vegan Option: Replace eggs with flax eggs and use coconut or almond milk along with dairy-free chocolate chips for guilt-free indulgence.

  • Gluten-Free Variation: Simply swap out all-purpose flour with a 1:1 gluten-free flour blend, allowing those with gluten sensitivities to savor each delicious bite.

  • Flavor Twists: Experiment by switching out the ube pastry cream for a rich chocolate or classic vanilla version, which will lend a different yet equally delicious flavor profile.

  • Nutty Addition: Fold in finely chopped nuts like macadamia or pistachios into the cookie dough for a delightful crunch that complements the chewy interior and adds an extra layer of flavor.

  • Coconut Variants: For a more intense coconut flavor, use toasted coconut in place of shredded coconut. The nutty aroma will elevate the cookies to a whole new level!

  • Tropical Fruit Surprise: Incorporate small pieces of dried mango or pineapple for a tropical twist that bursts with sweetness, making each bite a mini-vacation.

  • Spicy Kick: If you’re feeling adventurous, add a pinch of cayenne pepper or ginger to the cookie batter for a surprising zing that melds beautifully with the sweetness.

To enhance your cookie experience even further, try pairing these treats with our refreshing Pineapple Coconut Mojito or another delicious favorite like Mango Coconut Pudding. Your taste buds will thank you!

Expert Tips for Coconut Ube Besito Cookies

  • Whip Egg Whites: Make sure to whip egg whites until they form stiff peaks to ensure a light and airy texture in the Coconut Ube Besito Cookies.

  • Temper Carefully: Always temper the egg yolks with hot milk slowly to prevent scrambling and achieve a silky ube pastry cream.

  • Freeze for Shape: Don’t skip the freezing step! Freezing the assembled cookies for at least 30 minutes before baking helps maintain their shape and ensures a delightful bite.

  • Check Baking Soda: Always check the freshness of your baking soda. Stale baking soda may prevent the cookies from rising properly.

  • Use Quality Ingredients: For the best flavor, opt for high-quality coconut extract and ube condensed milk, as they significantly enhance the overall taste of your cookies.

Coconut Ube Besito Cookies Recipe FAQs

What is the best way to select ripe ube for this recipe?
Absolutely! When choosing ube, look for ones with a smooth, firm skin and no dark spots or blemishes. The color should be vibrant, indicating freshness. Smaller ube tend to have a sweeter flavor, making them ideal for these cookies.

How should I store my Coconut Ube Besito Cookies?
Very! Store your cookies in an airtight container at room temperature for up to 1 week to keep them fresh and chewy. If you want to extend their life, place them in the refrigerator, where they can last for up to 2 weeks.

Can I freeze the assembled cookies before baking?
Yes! To freeze unbaked Coconut Ube Besito Cookies, first arrange them on a baking sheet and freeze until solid. Then, transfer them to an airtight container or freezer bag, where they can be kept for up to 3 months. When ready to bake, you can bake them directly from frozen—just add a couple of extra minutes to the baking time.

What should I do if my cookies spread too much during baking?
If you find your cookies spreading more than desired, it might be due to the dough being too warm or not properly chilled. Ensure you freeze your assembled cookies for at least 30 minutes before baking. Also, check your butter temperature; using softened butter instead of melted can help maintain their shape.

Are these cookies suitable for people with dietary restrictions?
Absolutely! You can easily adapt these Coconut Ube Besito Cookies for a vegan or gluten-free diet. For a vegan version, substitute the eggs with flax eggs (1 tbsp flaxseed meal + 2.5 tbsp water) and use dairy-free chocolate chips. For gluten-free cookies, replace all-purpose flour with a 1:1 gluten-free blend.

How can I tell if my baking soda is still fresh?
To ensure your baking soda is fresh, you can perform a simple test. Add a teaspoon of baking soda to about 2 teaspoons of vinegar or lemon juice. If it fizzes vigorously, it’s good to go! If there’s little to no reaction, it’s time to replace it for best results in your baking.

Coconut Ube Besito Cookies

Delightful Coconut Ube Besito Cookies for a Tropical Treat

Coconut Ube Besito Cookies are delightful treats that perfectly blend chewy textures with coconut flavor, catering to vegan and gluten-free diets.
Prep Time 30 minutes
Cook Time 25 minutes
Chilling Time 30 minutes
Total Time 1 hour 25 minutes
Servings: 12 cookies
Course: Dessert
Cuisine: Tropical
Calories: 180

Ingredients
  

For the Cookie Base
  • 1 cup Unsalted Butter Substitute with plant-based butter for vegan
  • 1 cup White Sugar
  • 1/2 cup Brown Sugar Can be substituted with coconut sugar
  • 1 tbsp Coconut Extract Or use vanilla extract
  • 2 large Eggs For vegan version, use flax eggs
  • 2 cups All-Purpose Flour Use 1:1 gluten-free flour blend as a substitute
  • 1 tsp Baking Soda Ensure freshness
  • 1 tbsp Cornstarch Can be replaced with flour
  • 1/4 tsp Salt
  • 1 cup Shredded Coconut Toasted coconut can add extra flavor
  • 1 cup White Chocolate Chips Dark chocolate chips can be an alternative
For the Ube Pastry Cream
  • 4 large Egg Yolks Substitute with aquafaba for vegan option
  • 1 cup Ube Condensed Milk Regular condensed milk can be used
  • 1 cup Whole Milk Substitute with almond or coconut milk

Equipment

  • Saucepan
  • Mixing Bowl
  • Baking Sheet
  • Parchment paper
  • Whisk
  • Microwave-safe bowl

Method
 

Steps
  1. Prepare Ube Pastry Cream: Combine whole milk and ube condensed milk in a saucepan over medium heat until boiling. Whisk egg yolks with sugar, ube extract, and cornstarch. Gradually temper this mixture with hot milk before returning to heat, cooking until thickened, about 5-7 minutes. Chill in the refrigerator.
  2. Make Ube Besito Mixture: In a bowl, mix shredded coconut with remaining ube condensed milk. Fold in beaten egg whites, scoop onto a lined baking sheet, bake at 325°F for 12-15 minutes until edges are golden. Cool on a wire rack.
  3. Prepare Doughs: Cream unsalted butter, white sugar, and brown sugar until fluffy. Add coconut extract and eggs, mix well. Gradually combine flour, baking soda, cornstarch, and salt. Stir in shredded coconut and white chocolate chips.
  4. Assemble Cookies: Divide dough, add ube extract to one half. Roll into balls, flatten, place ube pastry cream in the center, cover and seal. Freeze for at least 30 minutes.
  5. Bake Cookies: Preheat oven to 410°F. Place frozen cookies on a baking sheet and bake for 10-12 minutes until done. Cool before transferring to a wire rack.
  6. Finish Cookies: Melt white chocolate, dip cookie bottoms, let set on parchment paper until chocolate hardens. Enjoy!

Nutrition

Serving: 1cookieCalories: 180kcalCarbohydrates: 25gProtein: 2gFat: 8gSaturated Fat: 5gCholesterol: 30mgSodium: 150mgPotassium: 100mgFiber: 1gSugar: 12gVitamin A: 200IUCalcium: 15mgIron: 1mg

Notes

Ensure to whip egg whites until stiff peaks form for light, airy cookies. Always temper egg yolks with hot milk slowly to avoid scrambling. Freeze the cookies for at least 30 minutes for shape retention during baking. Use quality ingredients for the best flavor.

Tried this recipe?

Let us know how it was!