Garlic Butter Beef Cheeseburger Roll-Ups: A Tasty Treat!

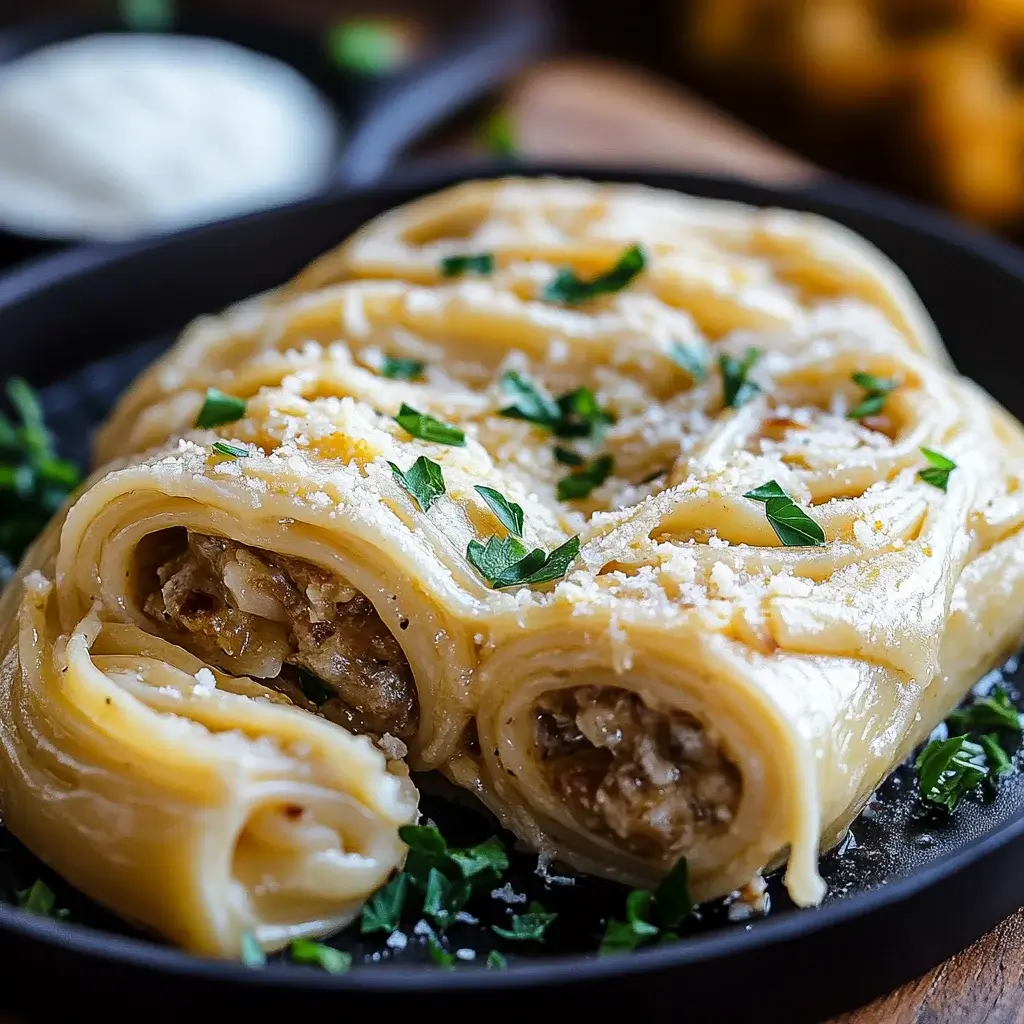
Introduction to Garlic Butter Beef Cheeseburger Roll-Ups

There’s something magical about the combination of garlic, butter, and beef that instantly transports me back to my childhood kitchen. The aroma wafting through the air as I prepared meals with my family always felt like a warm hug. Now, as a passionate home cook, I’m excited to share my take on this nostalgia with Garlic Butter Beef Cheeseburger Roll-Ups. This recipe is a quick solution for busy weeknights or a fun dish to impress your loved ones. With just a few simple ingredients, you can create a mouthwatering treat that everyone will love!

Why You’ll Love This Garlic Butter Beef Cheeseburger Roll-Ups

These Garlic Butter Beef Cheeseburger Roll-Ups are a game changer for any home cook. They’re incredibly easy to whip up, making them perfect for those hectic evenings when time is tight. The flavors are a delightful nod to classic cheeseburgers, but in a fun, portable form. Plus, they’re a hit with both kids and adults, ensuring everyone at the table leaves satisfied. What’s not to love?

Ingredients for Garlic Butter Beef Cheeseburger Roll-Ups

Gathering the right ingredients is the first step to creating these delicious Garlic Butter Beef Cheeseburger Roll-Ups. Here’s what you’ll need:

  • Ground beef: The star of the show! Choose lean ground beef for a healthier option.
  • Garlic powder: Adds a rich, savory flavor that complements the beef perfectly.
  • Onion powder: Enhances the overall taste, giving it that classic cheeseburger essence.
  • Worcestershire sauce: A splash of this sauce brings depth and umami to the beef.
  • Salt and pepper: Essential seasonings to elevate the flavors. Adjust to your taste.
  • Shredded cheddar cheese: Melts beautifully and adds that gooey cheeseburger goodness.
  • Crescent roll dough: The convenient base that wraps everything up in a flaky embrace.
  • Unsalted butter: Used for brushing, it adds richness and helps achieve a golden crust.
  • Minced garlic: Fresh garlic brings a punch of flavor that’s hard to resist.
  • Fresh parsley (optional): A sprinkle of green for a pop of color and freshness.

For those looking to spice things up, consider adding diced jalapeños to the beef mixture. If you want to switch up the cheese, pepper jack or mozzarella can offer a different flavor profile. Remember, the exact quantities for each ingredient are listed at the bottom of the article for easy printing!

How to Make Garlic Butter Beef Cheeseburger Roll-Ups

Creating these Garlic Butter Beef Cheeseburger Roll-Ups is a straightforward process that anyone can master. Follow these simple steps, and you’ll have a delicious snack or meal ready in no time!

Step 1: Preheat the Oven

Start by preheating your oven to 375°F. Preheating is crucial because it ensures that your roll-ups cook evenly and achieve that perfect golden brown color. Trust me, you want that crispy exterior!

Step 2: Cook the Ground Beef

In a large skillet over medium heat, add your ground beef. Use a spatula to break it apart as it cooks. Aim for a nice brown color, which adds flavor. Once browned, drain any excess fat to keep your roll-ups from being greasy. A leaner beef will help with this!

Step 3: Season the Beef

Now it’s time to add flavor! Stir in the garlic powder, onion powder, Worcestershire sauce, salt, and pepper. These seasonings are what make your beef taste like a classic cheeseburger. Cook for an additional two minutes to let those flavors meld together, then remove from heat and let it cool slightly.

Step 4: Prepare the Crescent Roll Dough

Unroll the crescent roll dough on a clean surface. Carefully separate it into triangles. This dough is your canvas, so handle it gently to avoid tearing. Each triangle will cradle your delicious filling!

Step 5: Assemble the Roll-Ups

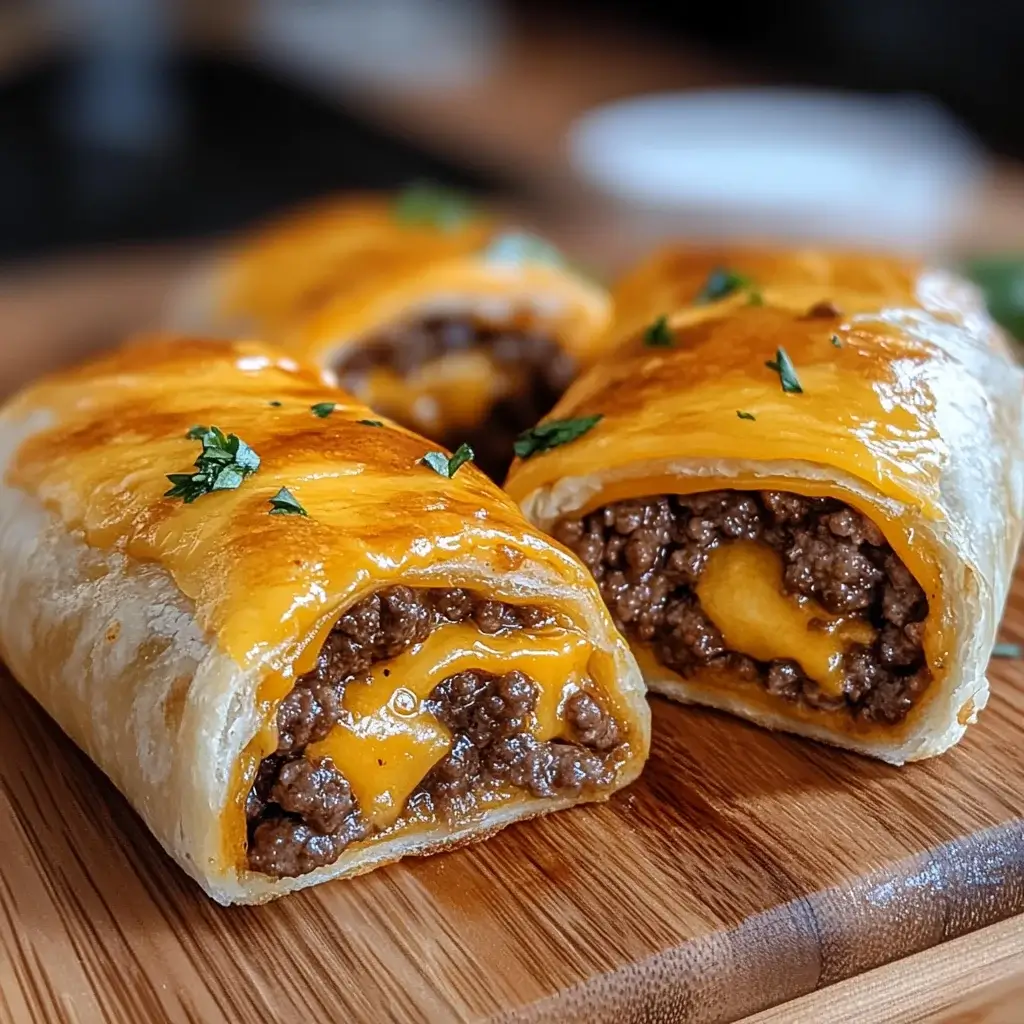
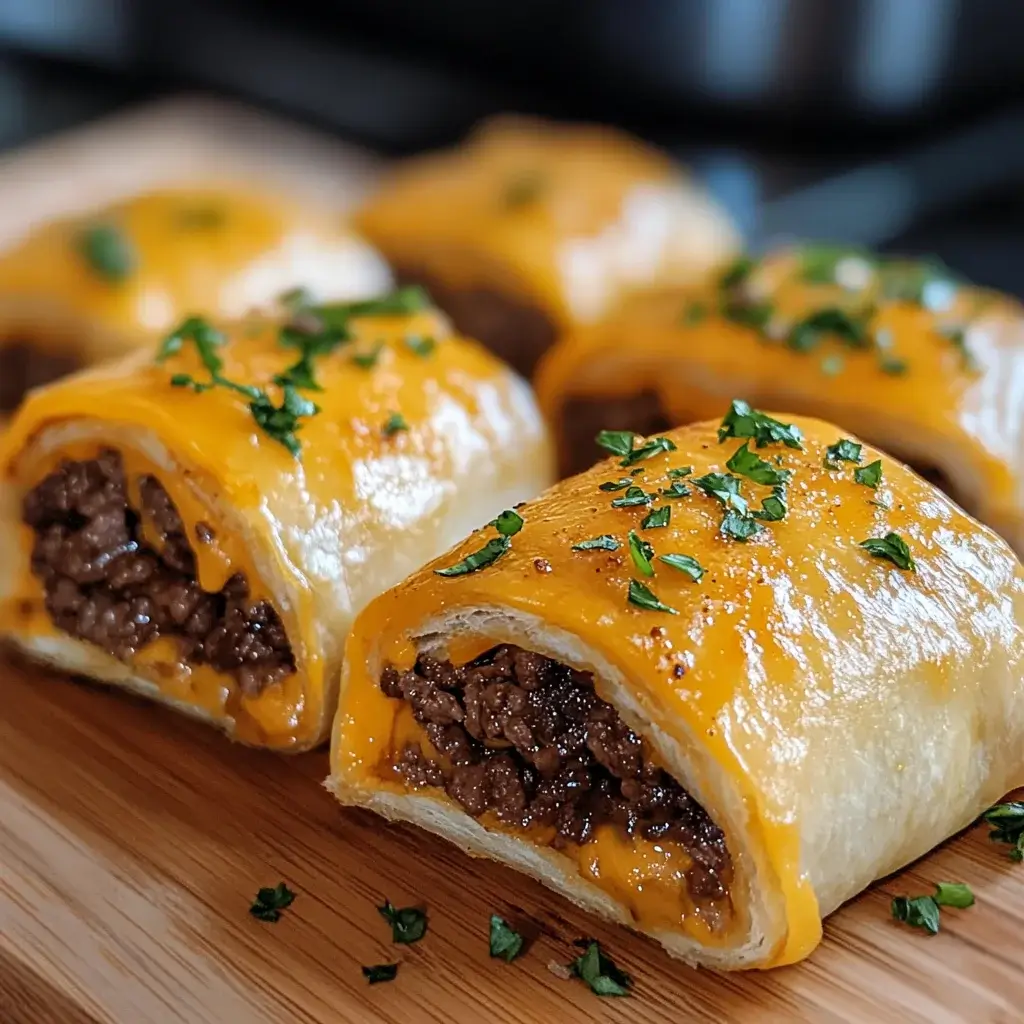
Take a spoonful of the beef mixture and place it at the wide end of each triangle. Don’t be shy with the filling! Then, sprinkle some shredded cheddar cheese on top. Roll up each triangle starting from the wide end to the point, tucking in the sides as you go. This will keep all that cheesy goodness inside.

Step 6: Brush with Garlic Butter

In a small bowl, mix the melted butter, minced garlic, and optional parsley. This garlic butter mixture is the secret to a flavorful crust. Brush it generously over each roll-up, ensuring every inch is coated. This step adds richness and a beautiful shine!

Step 7: Bake the Roll-Ups

Place your roll-ups on a baking sheet lined with parchment paper. Bake them in the preheated oven for 12-15 minutes, or until they’re golden brown. Keep an eye on them; you want that perfect crispy exterior. Once done, let them cool for a few minutes before serving. Enjoy the aroma that fills your kitchen!

Tips for Success

  • Use lean ground beef to reduce excess grease and enhance flavor.
  • Don’t overcrowd the baking sheet; give each roll-up space for even cooking.
  • Experiment with different cheeses for unique flavor combinations.
  • Let the roll-ups cool slightly before serving to avoid burns.
  • For extra crunch, broil for the last minute of baking.

Equipment Needed

  • Large skillet: A non-stick skillet works best for browning the beef.
  • Baking sheet: Use a standard baking sheet lined with parchment paper for easy cleanup.
  • Spatula: A sturdy spatula helps break apart the beef while cooking.
  • Mixing bowl: For combining the garlic butter ingredients.

Variations

  • Spicy Kick: Add diced jalapeños or crushed red pepper flakes to the beef mixture for a fiery twist.
  • Cheese Swap: Try pepper jack for a spicy flavor or mozzarella for a milder, gooey texture.
  • Veggie Delight: Incorporate finely chopped bell peppers or mushrooms into the beef for added nutrition and flavor.
  • Gluten-Free Option: Use gluten-free crescent roll dough to make this dish suitable for gluten-sensitive eaters.
  • Herb Infusion: Mix in fresh herbs like thyme or oregano with the beef for an aromatic touch.

Serving Suggestions

  • Side Salad: Pair with a fresh garden salad for a light and refreshing contrast.
  • Dipping Sauces: Serve with ketchup, mustard, or a zesty ranch dressing for added flavor.
  • Drink Pairing: Enjoy with a cold beer or a classic soda for a nostalgic touch.
  • Presentation: Arrange on a platter and garnish with fresh parsley for a pop of color.

FAQs about Garlic Butter Beef Cheeseburger Roll-Ups

Can I make Garlic Butter Beef Cheeseburger Roll-Ups ahead of time?

Absolutely! You can prepare the beef mixture and assemble the roll-ups a few hours in advance. Just cover them and refrigerate until you’re ready to bake. This makes for a quick meal when you’re short on time!

What can I substitute for ground beef?

If you’re looking for alternatives, ground turkey or chicken works well. For a vegetarian option, try using black beans or lentils mixed with your favorite spices. The flavor will still shine through!

How do I store leftovers?

Store any leftover Garlic Butter Beef Cheeseburger Roll-Ups in an airtight container in the fridge for up to three days. Reheat them in the oven for a few minutes to regain that crispy texture.

Can I freeze these roll-ups?

Yes! You can freeze the assembled roll-ups before baking. Just wrap them tightly in plastic wrap and place them in a freezer-safe bag. When you’re ready to enjoy, bake them straight from the freezer, adding a few extra minutes to the cooking time.

What dipping sauces pair well with these roll-ups?

These roll-ups are delicious on their own, but they pair wonderfully with ketchup, mustard, or a creamy ranch dressing. You can even whip up a spicy mayo for an extra kick!

Final Thoughts

Making Garlic Butter Beef Cheeseburger Roll-Ups is more than just cooking; it’s about creating memories. The joy of pulling these golden, cheesy delights from the oven fills the kitchen with warmth and excitement. Each bite is a delicious reminder of backyard barbecues and family gatherings, bringing a smile to everyone’s face. Whether you’re serving them at a game night or a casual dinner, these roll-ups are sure to impress. So roll up your sleeves, gather your loved ones, and enjoy the delightful experience of sharing this tasty treat together. Trust me, it’s a moment you won’t forget!

Ranis

Garlic Butter Beef Cheeseburger Roll-Ups: A Tasty Treat!

Garlic Butter Beef Cheeseburger Roll-Ups are a delicious and easy-to-make snack or meal that combines the flavors of a cheeseburger with the convenience of crescent roll dough.
Prep Time 15 minutes
Cook Time 15 minutes
Total Time 30 minutes
Servings: 4 servings
Course: Appetizer
Cuisine: American
Calories: 320

Ingredients
  

  • 1 pound ground beef
  • 1 teaspoon garlic powder
  • 1 teaspoon onion powder
  • 1 teaspoon Worcestershire sauce
  • Salt and pepper to taste
  • 1 cup shredded cheddar cheese
  • 1 package 8 ounces refrigerated crescent roll dough
  • 4 tablespoons unsalted butter melted
  • 2 cloves garlic minced
  • 2 tablespoons fresh parsley chopped (optional)

Method
 

  1. Preheat the oven to 375°F.
  2. In a large skillet over medium heat, cook the ground beef until browned, breaking it apart with a spatula. Drain excess fat.
  3. Stir in garlic powder, onion powder, Worcestershire sauce, salt, and pepper. Cook for an additional 2 minutes. Remove from heat and let cool slightly.
  4. Unroll the crescent roll dough on a clean surface and separate it into triangles.
  5. Place a spoonful of the beef mixture at the wide end of each triangle, then sprinkle with shredded cheddar cheese.
  6. Roll up each triangle starting from the wide end to the point.
  7. In a small bowl, mix melted butter, minced garlic, and chopped parsley. Brush the garlic butter mixture over each roll-up.
  8. Place the roll-ups on a baking sheet lined with parchment paper and bake for 12-15 minutes or until golden brown.
  9. Let cool for a few minutes before serving.

Nutrition

Serving: 1roll-upCalories: 320kcalCarbohydrates: 10gProtein: 20gFat: 22gSaturated Fat: 10gPolyunsaturated Fat: 8gCholesterol: 70mgSodium: 500mgFiber: 1gSugar: 1g

Notes

  • For a spicier kick, add diced jalapeños to the beef mixture.
  • You can substitute the cheddar cheese with pepper jack or mozzarella for different flavor profiles.

Tried this recipe?

Let us know how it was!

Grilled Fiesta Lime Chicken with Avocado Salsa Recipe Unveiled!

Introduction to Grilled Fiesta Lime Chicken with Avocado Salsa

When summer rolls around, I find myself craving vibrant flavors and fresh ingredients. That’s where this Grilled Fiesta Lime Chicken with Avocado Salsa comes in. It’s not just a meal; it’s a celebration on a plate!

This dish is perfect for those busy weeknights when you want something quick yet impressive. The zesty lime marinade infuses the chicken with a burst of flavor, while the creamy avocado salsa adds a refreshing touch. Whether you’re cooking for family or friends, this recipe is sure to bring smiles and satisfied appetites to the table.

Why You’ll Love This Grilled Fiesta Lime Chicken with Avocado Salsa

This Grilled Fiesta Lime Chicken with Avocado Salsa is a game-changer for your summer meals.

It’s quick to prepare, taking just 25 minutes from start to finish.

The vibrant flavors will transport your taste buds straight to a sunny beach.

Plus, it’s a healthy option packed with protein and fresh ingredients.

You’ll impress your loved ones without spending hours in the kitchen. What’s not to love?

Ingredients for Grilled Fiesta Lime Chicken with Avocado Salsa

To create this mouthwatering Grilled Fiesta Lime Chicken with Avocado Salsa, you’ll need a handful of fresh ingredients that pack a punch. Here’s what you’ll gather:

  • Boneless, skinless chicken breasts: The star of the show! They’re lean, easy to grill, and soak up the marinade beautifully.
  • Fresh lime juice: This zesty ingredient brightens the dish and adds a refreshing tang that complements the chicken perfectly.
  • Olive oil: A must for marinating! It helps keep the chicken moist and adds a rich flavor.
  • Garlic: Minced garlic brings a savory depth to the marinade, making every bite irresistible.
  • Ground cumin: This warm spice adds an earthy note, enhancing the overall flavor profile.
  • Chili powder: A dash of this spice gives the chicken a mild kick, perfect for those who enjoy a little heat.
  • Salt and black pepper: Essential for seasoning, these staples elevate the flavors of all the ingredients.
  • Cayenne pepper (optional): If you like it spicy, toss in a pinch for an extra kick!
  • Avocado: The creamy base of the salsa, it adds richness and balances the zesty lime.
  • Tomato: Fresh diced tomato brings a juicy sweetness to the salsa, making it vibrant and colorful.
  • Red onion: Finely chopped, it adds a sharp bite that contrasts beautifully with the creamy avocado.
  • Cilantro: This herb adds a fresh, aromatic touch that brightens the salsa and ties all the flavors together.
  • Salt and pepper to taste: Always adjust to your preference for the perfect flavor.

For exact measurements, check the bottom of the article where you can find everything listed for easy printing. Enjoy gathering these ingredients; they’re the foundation of a dish that’s sure to impress!

How to Make Grilled Fiesta Lime Chicken with Avocado Salsa

Step 1: Prepare the Marinade

Start by whisking together the fresh lime juice, olive oil, minced garlic, ground cumin, chili powder, salt, black pepper, and cayenne pepper in a medium bowl.

This marinade is where the magic begins! The lime juice will tenderize the chicken while infusing it with zesty flavor.

Make sure everything is well combined; you want each piece of chicken to soak up that deliciousness.

Step 2: Marinate the Chicken

Place the chicken breasts in a resealable plastic bag or a shallow dish.

Pour the marinade over the chicken, ensuring it’s well coated.

Seal the bag or cover the dish and refrigerate for at least 30 minutes.

If you have time, let it marinate for up to 2 hours. The longer, the better!

This step is crucial for achieving that bold flavor in your Grilled Fiesta Lime Chicken.

Step 3: Make the Avocado Salsa

While the chicken is marinating, it’s time to whip up the avocado salsa.

In a separate bowl, combine the diced avocado, tomato, finely chopped red onion, and cilantro.

Season with salt and pepper to taste.

Gently toss everything together, being careful not to mash the avocado.

Set it aside to let those flavors meld. Trust me, this salsa is the perfect complement to your chicken!

Step 4: Preheat the Grill

Now, let’s get that grill ready! Preheat it to medium-high heat.

This is key for achieving those beautiful grill marks and ensuring the chicken cooks evenly.

If you’re using a charcoal grill, wait until the coals are glowing and covered with ash.

A hot grill means juicy chicken, so don’t skip this step!

Step 5: Grill the Chicken

Remove the chicken from the marinade and discard the marinade.

Place the chicken on the grill and cook for about 6-7 minutes on each side.

You’re looking for an internal temperature of 165°F to ensure it’s fully cooked.

Keep an eye on it; grilling is all about timing!

Once done, the chicken should have those gorgeous grill marks and a tantalizing aroma.

Step 6: Rest and Serve

After grilling, let the chicken rest for about 5 minutes.

This allows the juices to redistribute, making each bite tender and juicy.

Slice the chicken and serve it topped with that vibrant avocado salsa.

For an extra touch, consider serving it with warm tortillas or over a bed of greens.

Enjoy the burst of flavors in every bite of your Grilled Fiesta Lime Chicken with Avocado Salsa!

Tips for Success

  • Marinate the chicken overnight for even more flavor.
  • Use a meat thermometer to ensure perfect doneness at 165°F.
  • Let the chicken rest after grilling to keep it juicy.
  • Customize the salsa by adding diced jalapeños for extra heat.
  • Pair with a refreshing drink like iced tea or a light beer.

Equipment Needed

  • Grill: A gas or charcoal grill works great. If you don’t have one, a grill pan on the stovetop will do.
  • Mixing bowl: For whisking the marinade and combining the salsa.
  • Meat thermometer: Essential for checking chicken doneness. A simple knife will work if you don’t have one.
  • Resealable plastic bag or shallow dish: For marinating the chicken.
  • Cutting board and knife: For chopping ingredients and slicing the chicken.

Variations

  • Spicy Fiesta: Add diced jalapeños to the marinade for an extra kick. This will elevate the heat level and add a nice crunch to your chicken.
  • Herb-Infused: Swap out cilantro for fresh basil or parsley in the avocado salsa for a different flavor profile. Each herb brings its own unique twist!
  • Grilled Veggies: Toss some bell peppers, zucchini, or corn on the grill alongside the chicken. They’ll soak up the smoky flavor and make a colorful side.
  • Low-Carb Option: Serve the chicken over a bed of mixed greens instead of tortillas for a lighter, keto-friendly meal.
  • Marinade Variations: Experiment with different citrus juices like orange or grapefruit for a fruity twist in the marinade.

Serving Suggestions

  • Pair your Grilled Fiesta Lime Chicken with Avocado Salsa with warm corn tortillas for a delightful wrap.
  • Serve alongside a refreshing cucumber salad to balance the flavors.
  • A chilled glass of margarita or iced tea complements the zesty chicken perfectly.
  • For presentation, garnish with extra cilantro and lime wedges for a pop of color.

FAQs about Grilled Fiesta Lime Chicken with Avocado Salsa

Can I use chicken thighs instead of breasts?

Absolutely! Chicken thighs are juicier and can add a different flavor profile. Just adjust the cooking time slightly, as they may take a bit longer to reach the safe internal temperature of 165°F.

How can I make this dish spicier?

If you’re looking for a kick, add more cayenne pepper to the marinade or toss in some diced jalapeños into the avocado salsa. You can also serve it with a spicy hot sauce on the side!

Can I prepare the avocado salsa in advance?

While you can chop the ingredients ahead of time, I recommend making the salsa fresh. Avocado tends to brown quickly, but you can squeeze extra lime juice on it to help preserve its color.

What can I serve with Grilled Fiesta Lime Chicken?

This dish pairs wonderfully with warm tortillas, a fresh salad, or grilled vegetables. You could also serve it over rice or quinoa for a heartier meal.

Is this recipe gluten-free?

Yes! The Grilled Fiesta Lime Chicken with Avocado Salsa is naturally gluten-free, making it a great option for those with dietary restrictions. Enjoy without worry!

Final Thoughts

Cooking this Grilled Fiesta Lime Chicken with Avocado Salsa is more than just preparing a meal; it’s about creating memories.

The vibrant colors and zesty flavors bring a taste of summer right to your table, making every bite a celebration.

Whether you’re grilling for family or friends, this dish sparks joy and laughter, turning any gathering into a festive occasion.

Plus, it’s a breeze to make, leaving you more time to enjoy the company of your loved ones.

So fire up that grill, and let the flavors of summer fill your kitchen and your heart!

Ranis

Grilled Fiesta Lime Chicken with Avocado Salsa Recipe Unveiled!

A delicious and zesty grilled chicken recipe topped with fresh avocado salsa, perfect for a summer meal.
Prep Time 10 minutes
Cook Time 15 minutes
Total Time 25 minutes
Servings: 4 servings
Course: Main Dish
Cuisine: Mexican
Calories: 290

Ingredients
  

  • 2 large boneless skinless chicken breasts (about 1 pound total)
  • 1/4 cup fresh lime juice
  • 2 tablespoons olive oil
  • 2 cloves garlic minced
  • 1 teaspoon ground cumin
  • 1 teaspoon chili powder
  • 1/2 teaspoon salt
  • 1/4 teaspoon black pepper
  • 1/4 teaspoon cayenne pepper optional for heat
  • 1 avocado diced
  • 1 medium tomato diced
  • 1/4 cup red onion finely chopped
  • 1/4 cup fresh cilantro chopped
  • Salt and pepper to taste

Method
 

  1. In a medium bowl, whisk together lime juice, olive oil, minced garlic, cumin, chili powder, salt, black pepper, and cayenne pepper (if using).
  2. Place the chicken breasts in a resealable plastic bag or shallow dish and pour the marinade over the chicken. Seal the bag or cover the dish and refrigerate for at least 30 minutes, or up to 2 hours for more flavor.
  3. While the chicken is marinating, prepare the avocado salsa. In a separate bowl, combine diced avocado, tomato, red onion, cilantro, and season with salt and pepper to taste. Gently toss to combine and set aside.
  4. Preheat the grill to medium-high heat. Remove the chicken from the marinade and discard the marinade.
  5. Grill the chicken for 6-7 minutes on each side, or until the internal temperature reaches 165°F and the chicken is cooked through.
  6. Remove the chicken from the grill and let it rest for 5 minutes before slicing.
  7. Serve the sliced chicken topped with avocado salsa.

Nutrition

Serving: 1servingCalories: 290kcalCarbohydrates: 8gProtein: 30gFat: 15gSaturated Fat: 2gPolyunsaturated Fat: 13gCholesterol: 70mgSodium: 300mgFiber: 5gSugar: 1g

Notes

  • For added flavor, try marinating the chicken overnight.
  • Serve with warm tortillas or over a bed of greens for a complete meal.

Tried this recipe?

Let us know how it was!

Tuscan Chicken Soup: Deliciously Easy Instant Pot Recipe

Introduction to Tuscan Chicken Soup

There’s something magical about a warm bowl of soup, especially when it’s a hearty Tuscan Chicken Soup. This dish brings together tender chicken, vibrant spinach, and a creamy broth that wraps around you like a cozy blanket. Whether you’re coming home after a long day or looking to impress your family with minimal effort, this recipe is your go-to. It’s quick, easy, and packed with flavor, making it perfect for busy weeknights or lazy weekends. Trust me, once you try this, it’ll become a staple in your kitchen!

Why You’ll Love This Tuscan Chicken Soup

This Tuscan Chicken Soup is a game-changer for anyone who craves comfort without the fuss. It’s incredibly easy to whip up in your Instant Pot, taking just 25 minutes from start to finish. The rich flavors of garlic, herbs, and creamy broth will have your taste buds dancing. Plus, it’s a nutritious option that even picky eaters will love. You’ll find yourself reaching for this recipe time and again!

Ingredients for Tuscan Chicken Soup

Gathering the right ingredients is the first step to creating a delicious Tuscan Chicken Soup. Here’s what you’ll need:

  • Olive oil: This adds a rich flavor and helps sauté the aromatics.
  • Onion: Diced onion brings sweetness and depth to the soup.
  • Garlic: Minced garlic adds a fragrant kick that elevates the dish.
  • Dried oregano: A classic Italian herb that enhances the soup’s flavor profile.
  • Dried basil: Another staple herb that complements the oregano beautifully.
  • Red pepper flakes (optional): For those who enjoy a bit of heat, these add a nice kick.
  • Boneless, skinless chicken breasts: The star of the show, providing protein and heartiness.
  • Chicken broth: This forms the base of the soup, adding moisture and flavor.
  • Diced tomatoes: Canned tomatoes add acidity and a touch of sweetness.
  • Heavy cream: This creates a luscious, creamy texture that makes the soup comforting.
  • Fresh spinach: Chopped spinach adds color and nutrition, making the dish vibrant.
  • Parmesan cheese: Grated cheese adds a salty, nutty flavor that ties everything together.
  • Salt and pepper: Essential for seasoning, enhancing all the flavors in the soup.

For those looking to lighten things up, consider substituting half-and-half for the heavy cream. You can also throw in other vegetables like zucchini or bell peppers for extra nutrition and flavor. The exact quantities for each ingredient are listed at the bottom of the article, ready for printing!

How to Make Tuscan Chicken Soup

Making Tuscan Chicken Soup in your Instant Pot is a breeze. Follow these simple steps, and you’ll have a delicious meal ready in no time. Let’s dive in!

Step 1: Sauté the Aromatics

Start by heating the olive oil in your Instant Pot on the sauté setting. Once it’s shimmering, toss in the diced onion. Cook for about 3-4 minutes until it softens and becomes translucent. The aroma will fill your kitchen, making your mouth water. Next, add the minced garlic, dried oregano, dried basil, and red pepper flakes if you’re feeling adventurous. Sauté for another minute until everything is fragrant. This step lays the flavorful foundation for your soup!

Step 2: Add Chicken and Broth

Now it’s time to bring in the main attraction: the chicken. Season the boneless, skinless chicken breasts with salt and pepper, then place them in the pot. Pour in the chicken broth and add the undrained diced tomatoes. Give it a gentle stir to combine. Close the lid securely and set the Instant Pot to high pressure for 10 minutes. This is where the magic happens, transforming simple ingredients into a comforting soup.

Step 3: Release Pressure and Shred Chicken

Once the cooking time is up, let the pressure release naturally for 5 minutes. After that, carefully perform a quick release for any remaining pressure. Open the lid, and you’ll be greeted by a delicious aroma. Remove the chicken breasts and shred them using two forks. It’s okay if they’re a bit hot; just be careful! Return the shredded chicken to the pot, mixing it back into the flavorful broth.

Step 4: Incorporate Cream and Spinach

Now for the finishing touches! Stir in the heavy cream, chopped spinach, and grated Parmesan cheese. Cook on the sauté setting for an additional 3-5 minutes until the spinach wilts and the soup is heated through. The creaminess combined with the vibrant greens creates a beautiful contrast. Taste and adjust the seasoning with more salt and pepper if needed. Your Tuscan Chicken Soup is now ready to be served!

Tips for Success

  • Prep your ingredients ahead of time to streamline the cooking process.
  • Don’t skip the sauté step; it builds essential flavors.
  • Use a meat thermometer to ensure chicken is cooked to 165°F.
  • Feel free to customize with your favorite veggies for added nutrition.
  • Store leftovers in an airtight container for up to three days.

Equipment Needed

  • Instant Pot: The star of the show, but a stovetop pot works too.
  • Cutting board: Essential for chopping veggies and chicken.
  • Sharp knife: A good knife makes prep a breeze.
  • Measuring cups and spoons: For accurate ingredient portions.
  • Wooden spoon: Perfect for stirring and mixing.

Variations

  • Vegetarian Option: Swap the chicken for chickpeas or white beans for a hearty, plant-based version.
  • Spicy Kick: Add more red pepper flakes or a splash of hot sauce for those who love heat.
  • Herb Infusion: Experiment with fresh herbs like thyme or rosemary for a fragrant twist.
  • Low-Carb Version: Replace the heavy cream with coconut milk and skip the potatoes for a keto-friendly soup.
  • Extra Veggies: Toss in diced carrots, celery, or bell peppers for added nutrition and flavor.

Serving Suggestions

  • Crusty Bread: Serve with a slice of warm, crusty bread for dipping.
  • Salad: Pair with a fresh green salad for a balanced meal.
  • Wine: Enjoy with a glass of white wine, like Pinot Grigio.
  • Garnish: Top with extra Parmesan and a sprinkle of fresh herbs for presentation.

FAQs about Tuscan Chicken Soup

As you dive into making this delightful Tuscan Chicken Soup, you might have a few questions. Here are some common queries that can help you along the way:

Can I make Tuscan Chicken Soup ahead of time?

Absolutely! This soup actually tastes even better the next day as the flavors meld together. Just store it in an airtight container in the fridge for up to three days. Reheat gently on the stove or in the microwave.

Can I freeze Tuscan Chicken Soup?

Yes, you can freeze this soup! Just let it cool completely before transferring it to freezer-safe containers. It will keep well for up to three months. When you’re ready to enjoy it, thaw in the fridge overnight and reheat on the stove.

What can I substitute for heavy cream?

If you’re looking for a lighter option, half-and-half works well. For a dairy-free alternative, try coconut milk or cashew cream. Each will give a different flavor, but they all add creaminess to the soup.

Can I add more vegetables to the soup?

Definitely! Feel free to toss in your favorite veggies like zucchini, carrots, or bell peppers. Just chop them into small pieces and add them during the sauté step for a nutritious boost.

Is this soup spicy?

The soup has a mild kick from the red pepper flakes, which are optional. If you prefer a spicier version, simply increase the amount or add a dash of hot sauce when serving. Adjust it to your taste!

Final Thoughts

Cooking this Tuscan Chicken Soup is more than just preparing a meal; it’s about creating a moment of warmth and comfort. The rich flavors and creamy texture invite you to slow down and savor each spoonful. Whether you’re sharing it with family or enjoying a quiet night in, this soup has a way of bringing people together. Plus, the ease of making it in an Instant Pot means you can focus on what really matters—enjoying good food and great company. So, grab your ingredients and let this delightful recipe become a cherished part of your culinary repertoire!

Ranis

Tuscan Chicken Soup: Deliciously Easy Instant Pot Recipe

A delicious and easy recipe for Tuscan Chicken Soup made in an Instant Pot, featuring tender chicken, fresh spinach, and creamy broth.
Prep Time 10 minutes
Cook Time 15 minutes
Total Time 25 minutes
Servings: 6 servings
Course: Soup
Cuisine: Italian
Calories: 320

Ingredients
  

  • 2 tablespoons olive oil
  • 1 medium onion diced
  • 2 cloves garlic minced
  • 1 teaspoon dried oregano
  • 1 teaspoon dried basil
  • 1/2 teaspoon red pepper flakes optional
  • 1 pound boneless skinless chicken breasts
  • 4 cups chicken broth
  • 1 can 14.5 ounces diced tomatoes, undrained
  • 1 cup heavy cream
  • 2 cups fresh spinach chopped
  • 1/2 cup grated Parmesan cheese
  • Salt and pepper to taste

Method
 

  1. In an Instant Pot, heat the olive oil on the sauté setting. Add the diced onion and cook for about 3-4 minutes until softened. Stir in the minced garlic, oregano, basil, and red pepper flakes, cooking for another minute until fragrant.
  2. Season the chicken breasts with salt and pepper, then add them to the pot. Pour in the chicken broth and diced tomatoes. Close the lid and set the Instant Pot to high pressure for 10 minutes.
  3. Once the cooking time is complete, allow the pressure to release naturally for 5 minutes, then perform a quick release for any remaining pressure.
  4. Remove the chicken breasts and shred them using two forks. Return the shredded chicken to the pot.
  5. Stir in the heavy cream, chopped spinach, and grated Parmesan cheese. Cook on the sauté setting for an additional 3-5 minutes until the spinach is wilted and the soup is heated through.
  6. Taste and adjust seasoning with additional salt and pepper if needed. Serve hot.

Nutrition

Serving: 1bowlCalories: 320kcalCarbohydrates: 7gProtein: 25gFat: 22gSaturated Fat: 10gPolyunsaturated Fat: 8gCholesterol: 90mgSodium: 800mgFiber: 2gSugar: 2g

Notes

  • For a lighter version, substitute half-and-half for the heavy cream.
  • Add other vegetables like zucchini or bell peppers for extra nutrition and flavor.

Tried this recipe?

Let us know how it was!

Savory Red Wine Braised Beef Brisket Recipe Delight!

Introduction to Savory Red Wine Braised Beef Brisket

There’s something magical about the aroma of Savory Red Wine Braised Beef Brisket wafting through the house. It takes me back to family gatherings, where laughter mingled with the scent of slow-cooked goodness. This recipe is not just a meal; it’s a comforting embrace on a chilly evening. Perfect for impressing your loved ones or simply treating yourself after a long day, this dish is a true crowd-pleaser. With minimal effort and maximum flavor, you’ll find that this hearty brisket is the ultimate solution for any occasion, making it a staple in my kitchen.

Why You’ll Love This Savory Red Wine Braised Beef Brisket

This Savory Red Wine Braised Beef Brisket is a game-changer for your dinner table. It’s incredibly easy to prepare, allowing you to spend more time with family and less time in the kitchen. The rich, deep flavors develop beautifully as it cooks, making every bite a delight. Plus, the leftovers (if there are any!) taste even better the next day, ensuring you’ll savor this dish long after it’s served.

Ingredients for Savory Red Wine Braised Beef Brisket

Gathering the right ingredients is the first step to creating a memorable dish. For this Savory Red Wine Braised Beef Brisket, you’ll need a few key players that come together to create a symphony of flavors.

  • Beef Brisket: The star of the show! Choose a well-marbled cut for tenderness and flavor.
  • Olive Oil: This adds richness and helps in searing the brisket to perfection.
  • Onion: Chopped onions bring sweetness and depth to the dish as they caramelize.
  • Garlic: Minced garlic adds a punch of flavor that elevates the entire meal.
  • Carrots: Diced carrots contribute a subtle sweetness and vibrant color.
  • Celery: Diced celery adds a nice crunch and aromatic quality to the braise.
  • Red Wine: A good quality wine, like Cabernet Sauvignon, enhances the dish with its rich flavors.
  • Beef Broth: This provides the necessary liquid for braising and adds depth to the sauce.
  • Tomato Paste: A small amount of tomato paste adds umami and richness to the braising liquid.
  • Dried Thyme: This herb infuses the dish with earthy notes that complement the beef beautifully.
  • Bay Leaves: These leaves add a subtle aromatic flavor that rounds out the dish.
  • Salt and Pepper: Essential for seasoning, they enhance all the flavors in the dish.
  • Fresh Parsley: Chopped parsley is a lovely garnish that adds freshness and color.

For those looking to experiment, consider adding mushrooms or potatoes for extra texture and flavor. You can find the exact quantities for each ingredient at the bottom of the article, ready for printing!

How to Make Savory Red Wine Braised Beef Brisket

Creating this Savory Red Wine Braised Beef Brisket is a journey filled with rich flavors and comforting aromas. Follow these simple steps, and you’ll have a dish that warms the heart and pleases the palate.

Step 1: Preheat the Oven

Start by preheating your oven to 300°F (150°C). This low and slow temperature is crucial for braising, allowing the brisket to become tender and juicy. A properly preheated oven ensures even cooking, so don’t skip this step!

Step 2: Season the Brisket

Generously season the brisket with salt and pepper on both sides. This simple step enhances the meat’s natural flavors and creates a delicious crust when seared. Remember, seasoning is key to a flavorful dish!

Step 3: Sear the Brisket

In a large Dutch oven, heat olive oil over medium-high heat. Once hot, add the brisket and sear it for about 4-5 minutes on each side until it’s beautifully browned. Searing locks in juices and adds depth to the flavor, making your Savory Red Wine Braised Beef Brisket even more irresistible.

Step 4: Sauté the Vegetables

After removing the brisket, toss in the chopped onion, garlic, carrots, and celery. Sauté for about 5-7 minutes until the vegetables soften. This step builds a flavorful base for your braise, infusing the dish with sweetness and aroma.

Step 5: Deglaze with Red Wine

Now, it’s time to deglaze! Pour in the red wine, scraping the bottom of the pot to release those tasty browned bits. This process adds layers of flavor to your braising liquid, making every bite of brisket a delight.

Step 6: Add Remaining Ingredients

Next, stir in the beef broth, tomato paste, dried thyme, and bay leaves. These ingredients work together to create a rich, savory sauce that envelops the brisket. Make sure everything is well combined before moving on!

Step 7: Braise in the Oven

Return the brisket to the pot, ensuring it’s submerged in the liquid. Cover the pot with a lid and transfer it to your preheated oven. Braise for 3 to 4 hours, or until the brisket is tender and shreds easily with a fork. Patience is key here; the longer it cooks, the more flavorful it becomes!

Step 8: Rest and Serve

Once the brisket is done, remove the pot from the oven and let it rest for about 15 minutes. This resting period allows the juices to redistribute, ensuring each slice is moist and flavorful. Serve the sliced brisket with the braising liquid spooned over the top, and don’t forget to garnish with fresh parsley for a pop of color!

Tips for Success

  • Marinate the brisket overnight in wine and herbs for deeper flavor.
  • Use a meat thermometer to check for doneness; aim for 190°F for perfect tenderness.
  • Don’t rush the braising process; low and slow is the way to go.
  • Feel free to customize with your favorite vegetables for added flavor.
  • Save any leftover braising liquid for a delicious sauce or soup base.

Equipment Needed

  • Large Dutch Oven: Ideal for braising; a heavy pot with a lid works too.
  • Cutting Board: Essential for prepping your ingredients; any sturdy board will do.
  • Sharp Knife: For slicing the brisket; a chef’s knife is perfect.
  • Meat Thermometer: Optional, but helpful for checking doneness.

Variations

  • Herb-Infused: Add fresh herbs like rosemary or oregano for a fragrant twist.
  • Spicy Kick: Incorporate a pinch of red pepper flakes or a splash of hot sauce for heat.
  • Vegetarian Option: Substitute brisket with hearty mushrooms or jackfruit for a plant-based version.
  • Sweet and Savory: Add a tablespoon of brown sugar or honey to balance the acidity of the wine.
  • Smoky Flavor: Use smoked paprika or chipotle peppers to introduce a smoky depth to the dish.

Serving Suggestions

  • Mashed Potatoes: Creamy mashed potatoes are a classic pairing, soaking up the delicious braising liquid.
  • Roasted Vegetables: A medley of seasonal roasted veggies adds color and nutrition to your plate.
  • Red Wine: Serve with a glass of the same red wine used in cooking for a perfect match.
  • Crusty Bread: A loaf of crusty bread is great for mopping up the savory sauce.

FAQs about Savory Red Wine Braised Beef Brisket

Can I use a different cut of beef for this recipe?
Absolutely! While brisket is ideal for braising, you can also use chuck roast or short ribs. Just keep in mind that cooking times may vary slightly depending on the cut.

What type of red wine should I use?
A good quality red wine, like Cabernet Sauvignon or Merlot, works best. Avoid cooking wines, as they often contain added salt and preservatives that can affect the flavor of your Savory Red Wine Braised Beef Brisket.

How do I store leftovers?
Store any leftover brisket in an airtight container in the refrigerator for up to 3 days. The flavors will continue to develop, making it even tastier the next day!

Can I freeze the braised brisket?
Yes! Once cooled, wrap the brisket tightly in plastic wrap and then in aluminum foil. It can be frozen for up to 3 months. Thaw in the refrigerator before reheating.

What sides pair well with this dish?
Savory Red Wine Braised Beef Brisket pairs wonderfully with creamy mashed potatoes, roasted vegetables, or a fresh green salad. A glass of the same red wine used in cooking makes for a perfect accompaniment!

Final Thoughts

Cooking Savory Red Wine Braised Beef Brisket is more than just preparing a meal; it’s about creating memories. The rich aromas that fill your kitchen invite family and friends to gather around the table, sharing stories and laughter. Each tender slice of brisket, drenched in that luscious sauce, brings comfort and satisfaction. Whether it’s a special occasion or a cozy weeknight dinner, this dish transforms any moment into something extraordinary. I hope you find as much joy in making this recipe as I do, and that it becomes a cherished favorite in your home, just as it is in mine.

Ranis

Savory Red Wine Braised Beef Brisket Recipe Delight!

A delicious and hearty recipe for Savory Red Wine Braised Beef Brisket, perfect for a comforting meal.
Prep Time 20 minutes
Total Time 3 hours 20 minutes
Servings: 6 servings
Course: Main Course
Cuisine: American
Calories: 350

Ingredients
  

  • 2 to 3 pounds beef brisket
  • 2 tablespoons olive oil
  • 1 large onion chopped
  • 3 cloves garlic minced
  • 2 carrots diced
  • 2 celery stalks diced
  • 2 cups red wine such as Cabernet Sauvignon
  • 2 cups beef broth
  • 2 tablespoons tomato paste
  • 2 teaspoons dried thyme
  • 2 bay leaves
  • Salt and pepper to taste
  • Fresh parsley chopped (for garnish)

Method
 

  1. Preheat your oven to 300°F (150°C).
  2. Season the brisket generously with salt and pepper on both sides.
  3. In a large Dutch oven, heat the olive oil over medium-high heat. Add the brisket and sear for about 4-5 minutes on each side until browned. Remove the brisket and set aside.
  4. In the same pot, add the chopped onion, garlic, carrots, and celery. Sauté for about 5-7 minutes until the vegetables are softened.
  5. Stir in the red wine, scraping the bottom of the pot to release any browned bits. Bring to a simmer and let it cook for about 5 minutes.
  6. Add the beef broth, tomato paste, thyme, and bay leaves. Stir well to combine.
  7. Return the brisket to the pot, ensuring it is submerged in the liquid. Cover the pot with a lid and transfer it to the preheated oven.
  8. Braise in the oven for 3 to 4 hours, or until the brisket is tender and easily shreds with a fork.
  9. Once done, remove the pot from the oven and let the brisket rest for about 15 minutes before slicing.
  10. Serve the sliced brisket with the braising liquid spooned over the top and garnish with fresh parsley.

Nutrition

Serving: 1servingCalories: 350kcalCarbohydrates: 5gProtein: 30gFat: 20gSaturated Fat: 7gPolyunsaturated Fat: 13gCholesterol: 90mgSodium: 600mgFiber: 1gSugar: 2g

Notes

  • For a richer flavor, let the brisket marinate in the wine and herbs overnight before cooking.
  • You can add mushrooms or potatoes to the braise for additional texture and flavor.

Tried this recipe?

Let us know how it was!

Creamy Garlic Parmesan Pasta: A Rich Delight Awaits!

Introduction to Creamy Garlic Parmesan Pasta

There’s something magical about a bowl of pasta that wraps you in warmth and comfort. Creamy Garlic Parmesan Pasta is just that—a rich delight that feels like a hug on a plate. Whether you’re racing against the clock after a long day or looking to impress someone special, this dish is your go-to solution. With its velvety sauce and the irresistible aroma of garlic, it transforms an ordinary evening into something extraordinary. Trust me, once you try this recipe, it’ll become a staple in your kitchen, ready to satisfy cravings and create lasting memories.

Why You’ll Love This Creamy Garlic Parmesan Pasta

This Creamy Garlic Parmesan Pasta is a culinary dream come true. It’s quick to whip up, taking just 25 minutes from start to finish. The rich, creamy sauce envelops each strand of pasta, creating a flavor explosion that’s hard to resist. Plus, it’s versatile! You can easily customize it with your favorite proteins or veggies. Perfect for busy weeknights or a cozy dinner, this dish is sure to impress.

Ingredients for Creamy Garlic Parmesan Pasta

Gathering the right ingredients is the first step to culinary success. For this Creamy Garlic Parmesan Pasta, you’ll need a few simple yet flavorful components that come together beautifully.

  • Pasta: Fettuccine or spaghetti works best, providing a perfect base for the creamy sauce.
  • Olive Oil: A splash of this liquid gold adds richness and helps sauté the garlic to perfection.
  • Garlic: Freshly minced garlic is essential for that aromatic kick. It’s the heart of this dish!
  • Heavy Cream: This is what makes the sauce luxuriously creamy. For a lighter option, consider half-and-half.
  • Parmesan Cheese: Grated Parmesan brings a salty, nutty flavor that elevates the dish. Freshly grated is always best!
  • Salt: A pinch enhances all the flavors, making each bite more delicious.
  • Black Pepper: Freshly cracked black pepper adds a subtle heat and depth to the sauce.
  • Red Pepper Flakes: Optional, but they add a delightful kick if you like a bit of spice.
  • Fresh Parsley: Chopped parsley not only adds color but also a fresh flavor that brightens the dish.

For those looking to mix things up, consider adding cooked chicken, shrimp, or sautéed veggies like spinach or broccoli for extra nutrition. You can find the exact quantities for each ingredient at the bottom of the article, ready for printing!

How to Make Creamy Garlic Parmesan Pasta

Now that you have your ingredients ready, let’s dive into the cooking process. Making Creamy Garlic Parmesan Pasta is straightforward and fun. Follow these steps, and you’ll have a delicious meal in no time!

Step 1: Cook the Pasta

Start by boiling a large pot of salted water. Once it’s bubbling, add your fettuccine or spaghetti. Cook according to the package instructions until it’s al dente. This usually takes about 8-10 minutes. Remember to reserve half a cup of that pasta water before draining. It’s liquid gold for your sauce!

Step 2: Sauté the Garlic

While the pasta cooks, grab a large skillet and heat up the olive oil over medium heat. Add the minced garlic and sauté for about a minute. You want it fragrant but not browned. That’s the sweet spot! The aroma will fill your kitchen, making it hard to resist sneaking a taste.

Step 3: Prepare the Creamy Sauce

Next, pour in the heavy cream and bring it to a gentle simmer. Lower the heat and stir in the grated Parmesan cheese. Keep stirring until it melts into a smooth, creamy sauce. If it seems too thick, don’t worry! Just add a splash of that reserved pasta water until you reach your desired consistency.

Step 4: Combine and Season

Now it’s time to bring it all together. Add the drained pasta to the skillet and toss it in the creamy sauce. Season with salt, black pepper, and red pepper flakes if you’re feeling adventurous. Let it cook for an additional 2-3 minutes. This allows the pasta to soak up all that delicious flavor.

Step 5: Toss and Serve

Finally, remove the skillet from heat. Garnish your Creamy Garlic Parmesan Pasta with chopped fresh parsley for a pop of color and freshness. Serve it hot, and watch as everyone digs in with delight. Enjoy every creamy, cheesy bite!

Tips for Success

  • Always salt your pasta water; it enhances the flavor of the pasta.
  • Use freshly grated Parmesan for the best taste and texture.
  • Don’t overcook the garlic; it should be fragrant, not browned.
  • Reserve pasta water to adjust the sauce consistency as needed.
  • Feel free to experiment with add-ins like grilled chicken or sautéed veggies.

Equipment Needed

  • Large Pot: For boiling pasta. A Dutch oven works well too.
  • Skillet: A non-stick skillet is ideal for making the sauce.
  • Colander: To drain the pasta. A slotted spoon can be a handy alternative.
  • Measuring Cups: For accurate ingredient portions.
  • Wooden Spoon: Perfect for stirring the sauce and pasta together.

Variations

  • Protein Boost: Add cooked chicken, shrimp, or bacon for a heartier meal.
  • Veggie Delight: Toss in sautéed spinach, broccoli, or sun-dried tomatoes for extra nutrition and flavor.
  • Herb Infusion: Experiment with fresh herbs like basil or thyme to elevate the dish.
  • Spicy Kick: Increase the red pepper flakes or add a dash of hot sauce for those who love heat.
  • Dairy-Free Option: Substitute heavy cream with coconut cream or a dairy-free alternative for a vegan version.

Serving Suggestions

  • Side Salad: A crisp Caesar or mixed greens salad pairs perfectly with the creamy pasta.
  • Bread: Serve with warm garlic bread or a crusty baguette to soak up the sauce.
  • Wine: A chilled white wine, like Pinot Grigio, complements the flavors beautifully.
  • Presentation: Serve in a large bowl, garnished with extra parsley and a sprinkle of Parmesan for a restaurant-style touch.

FAQs about Creamy Garlic Parmesan Pasta

As you embark on your culinary journey with Creamy Garlic Parmesan Pasta, you might have a few questions. Here are some common queries that can help you navigate this delicious dish.

Can I make Creamy Garlic Parmesan Pasta ahead of time?

Absolutely! You can prepare the sauce in advance and store it in the fridge. Just reheat it gently before adding the cooked pasta. This makes it a great option for meal prep!

What can I substitute for heavy cream?

If you’re looking for a lighter option, half-and-half works well. For a dairy-free alternative, try coconut cream or a plant-based cream substitute. Both will still give you that creamy texture.

How can I make this dish spicier?

To kick up the heat, simply add more red pepper flakes or a splash of hot sauce. You can also toss in some diced jalapeños for an extra punch!

What proteins pair well with this pasta?

Grilled chicken, shrimp, or even crispy bacon are fantastic additions. They not only enhance the flavor but also make the dish more filling.

Can I freeze Creamy Garlic Parmesan Pasta?

While it’s best enjoyed fresh, you can freeze the sauce separately. Just remember that the texture may change slightly upon reheating, so it’s ideal to consume it within a month.

Final Thoughts

Cooking Creamy Garlic Parmesan Pasta is more than just preparing a meal; it’s about creating a moment of joy. The rich, velvety sauce clings to each strand of pasta, making every bite a delightful experience. Whether you’re sharing it with family or enjoying a quiet night in, this dish brings warmth and comfort to the table. It’s a reminder that good food can turn an ordinary day into something special. So, roll up your sleeves, embrace the process, and let the aroma of garlic and cheese fill your kitchen. You’ll be glad you did!

Ranis

Creamy Garlic Parmesan Pasta: A Rich Delight Awaits!

Creamy Garlic Parmesan Pasta is a rich and indulgent dish that combines the flavors of garlic and Parmesan cheese with a creamy sauce, perfect for a comforting meal.
Prep Time 10 minutes
Cook Time 15 minutes
Total Time 25 minutes
Servings: 4 servings
Course: Pasta
Cuisine: Italian
Calories: 550

Ingredients
  

  • 8 ounces fettuccine or spaghetti
  • 2 tablespoons olive oil
  • 4 cloves garlic minced
  • 1 cup heavy cream
  • 1 cup grated Parmesan cheese
  • 1 teaspoon salt
  • 1/2 teaspoon black pepper
  • 1/4 teaspoon red pepper flakes optional
  • 1/4 cup chopped fresh parsley for garnish

Method
 

  1. Cook the pasta according to package instructions in a large pot of salted boiling water until al dente. Drain and set aside, reserving 1/2 cup of pasta water.
  2. In a large skillet, heat the olive oil over medium heat. Add the minced garlic and sauté for about 1 minute, until fragrant but not browned.
  3. Pour in the heavy cream and bring to a gentle simmer. Reduce the heat to low and stir in the grated Parmesan cheese until melted and smooth.
  4. Season the sauce with salt, black pepper, and red pepper flakes if using. If the sauce is too thick, add a little reserved pasta water to reach desired consistency.
  5. Add the cooked pasta to the skillet and toss to coat in the creamy sauce. Cook for an additional 2-3 minutes, allowing the pasta to absorb some of the sauce.
  6. Remove from heat and garnish with chopped parsley before serving.

Nutrition

Serving: 1servingCalories: 550kcalCarbohydrates: 45gProtein: 18gFat: 36gSaturated Fat: 20gPolyunsaturated Fat: 10gCholesterol: 100mgSodium: 800mgFiber: 2gSugar: 1g

Notes

  • For added protein, consider adding cooked chicken, shrimp, or sautéed vegetables like spinach or broccoli to the pasta.
  • Substitute half-and-half for heavy cream for a lighter version, or use a dairy-free cream alternative for a vegan option.

Tried this recipe?

Let us know how it was!

BBQ Chicken Cottage Cheese Bowl: A Delicious Healthy Twist

Introduction to BBQ Chicken Cottage Cheese Bowl

After a long day, the last thing I want is to spend hours in the kitchen. That’s where my BBQ Chicken Cottage Cheese Bowl comes in—a quick solution that’s both satisfying and healthy. This dish is perfect for busy weeknights or when you want to impress your loved ones without breaking a sweat. With its vibrant colors and delicious flavors, it’s a meal that brings comfort and joy. Plus, it’s packed with protein, making it a guilt-free indulgence. Let’s dive into this delightful recipe that’s sure to become a staple in your home!

Why You’ll Love This BBQ Chicken Cottage Cheese Bowl

This BBQ Chicken Cottage Cheese Bowl is a game-changer for anyone juggling a busy lifestyle. It’s incredibly easy to whip up, taking just 15 minutes from start to finish. The combination of tender chicken, creamy cottage cheese, and fresh veggies creates a flavor explosion that’s hard to resist. Plus, it’s a healthy option that doesn’t skimp on taste, making it perfect for satisfying those cravings without the guilt.

Ingredients for BBQ Chicken Cottage Cheese Bowl

Gathering the right ingredients is key to making this BBQ Chicken Cottage Cheese Bowl a success. Here’s what you’ll need:

  • Cooked, shredded chicken: This is the star of the dish. Use rotisserie chicken for convenience or cook your own for a fresher taste.
  • Barbecue sauce: Choose your favorite brand or make your own for a personalized touch. The sauce adds a sweet and tangy flavor that pairs perfectly with the chicken.
  • Cottage cheese: This creamy base is not only high in protein but also adds a delightful texture. If you prefer a different flavor, Greek yogurt is a great substitute.
  • Cherry tomatoes: These little bursts of sweetness add freshness and color. Feel free to use diced regular tomatoes if that’s what you have on hand.
  • Corn kernels: Whether fresh, frozen, or canned, corn brings a sweet crunch to the bowl. It’s a versatile ingredient that complements the other flavors beautifully.
  • Avocado: Diced avocado adds creaminess and healthy fats. If you’re not a fan, you can skip it or replace it with diced cucumbers for a different texture.
  • Chopped green onions: These provide a mild onion flavor and a pop of color. They’re a simple way to elevate the dish.
  • Garlic powder: A sprinkle of garlic powder enhances the overall flavor without overpowering the dish.
  • Salt and pepper: Essential for seasoning, adjust these to your taste preferences.
  • Olive oil: A drizzle adds richness and helps bring all the flavors together.
  • Smoked paprika (optional): This adds a subtle smokiness that can take your bowl to the next level. If you like a bit of heat, consider adding some cayenne pepper or chili flakes.

For exact measurements, check the bottom of the article where you can find everything available for printing. Now that you have your ingredients ready, let’s get cooking!

How to Make BBQ Chicken Cottage Cheese Bowl

Creating your BBQ Chicken Cottage Cheese Bowl is a breeze. Follow these simple steps, and you’ll have a delicious meal ready in no time. Let’s get started!

Step 1: Prepare the BBQ Chicken Mixture

In a medium bowl, combine your cooked, shredded chicken with the barbecue sauce. Use a fork or spoon to mix them thoroughly. You want every piece of chicken to be coated in that tangy goodness. This step is crucial because it ensures that each bite is bursting with flavor. Set this mixture aside while you prepare the other components.

Step 2: Mix the Cottage Cheese

In another bowl, take your cottage cheese and add garlic powder, salt, and pepper. Stir it all together until well combined. This mixture will serve as a creamy base for your bowl. The garlic powder enhances the flavor, making the cottage cheese even more delicious. Plus, it adds a nice texture that complements the chicken perfectly.

Step 3: Layer the Ingredients

Now, grab a large serving bowl or individual bowls if you prefer. Start by layering the cottage cheese mixture at the bottom. This creamy layer is the foundation of your dish. Next, spoon the BBQ chicken mixture on top of the cottage cheese. The contrast of textures is already starting to look appealing!

Step 4: Add Fresh Ingredients

It’s time to add some color and freshness! Scatter the halved cherry tomatoes, corn, and diced avocado over the chicken. These ingredients not only enhance the visual appeal but also add a burst of flavor and crunch. The vibrant colors make the dish inviting and appetizing, perfect for impressing your family or friends.

Step 5: Final Touches

To finish off your BBQ Chicken Cottage Cheese Bowl, drizzle a little olive oil over the top. This adds richness and helps meld the flavors together. If you’re feeling adventurous, sprinkle some smoked paprika for an extra layer of flavor. Finally, garnish with chopped green onions for a fresh, zesty touch. Your bowl is now ready to serve!

Tips for Success

  • Use rotisserie chicken for a quick and easy option.
  • Adjust the barbecue sauce to your taste; try different flavors!
  • For a creamier texture, mix in a bit of Greek yogurt with the cottage cheese.
  • Don’t skip the garnishes; they add flavor and visual appeal.
  • Make it a meal prep favorite by storing components separately for easy assembly.

Equipment Needed

  • Medium mixing bowls: Use any size you have on hand; they’re perfect for combining ingredients.
  • Fork or spoon: Essential for mixing the chicken and sauce thoroughly.
  • Serving bowls: Individual bowls work great for presentation, but a large bowl is fine too.
  • Measuring cups: Handy for portioning ingredients, though you can eyeball it if you prefer.

Variations

  • Spicy BBQ Chicken: Add diced jalapeños or a splash of hot sauce to the chicken mixture for a fiery kick.
  • Vegetarian Option: Substitute the chicken with black beans or chickpeas for a hearty, plant-based version.
  • Low-Carb Twist: Replace corn with diced bell peppers or zucchini to cut down on carbs while keeping the crunch.
  • Herbed Cottage Cheese: Mix in fresh herbs like cilantro or parsley into the cottage cheese for an aromatic touch.
  • Cheesy Delight: Sprinkle shredded cheese on top before serving for an extra layer of flavor and creaminess.

Serving Suggestions

  • Pair your BBQ Chicken Cottage Cheese Bowl with a side of crispy sweet potato fries for a satisfying crunch.
  • Serve with a refreshing cucumber salad to balance the richness of the dish.
  • For drinks, try a cold iced tea or a light beer to complement the flavors.
  • Garnish with fresh herbs for an extra pop of color and flavor.

FAQs about BBQ Chicken Cottage Cheese Bowl

Can I use leftover chicken for this recipe?

Absolutely! Leftover chicken works perfectly in this BBQ Chicken Cottage Cheese Bowl. Just shred it and mix it with the barbecue sauce. It’s a great way to use up what you have and save time!

Is this dish suitable for meal prep?

Yes! This bowl is fantastic for meal prep. You can store the components separately in the fridge and assemble them when you’re ready to eat. It keeps well for a few days, making it a convenient option for busy weeks.

Can I make this dish vegetarian?

Definitely! For a vegetarian version, simply replace the chicken with black beans or chickpeas. They add protein and a hearty texture, making it just as satisfying.

What can I substitute for cottage cheese?

If you’re not a fan of cottage cheese, Greek yogurt is a great alternative. It offers a creamy texture and boosts the protein content, making your bowl even more nutritious.

How can I make this BBQ Chicken Cottage Cheese Bowl spicier?

For a spicy kick, add diced jalapeños or a splash of your favorite hot sauce to the BBQ chicken mixture. You can also sprinkle some red pepper flakes on top for an extra heat boost!

Final Thoughts

Creating this BBQ Chicken Cottage Cheese Bowl is more than just a cooking experience; it’s a celebration of flavors and convenience. Each bite is a delightful mix of creamy, tangy, and fresh ingredients that come together effortlessly. Whether you’re enjoying it solo after a long day or sharing it with family and friends, this dish brings a sense of joy and satisfaction. It’s a reminder that healthy meals can be quick, easy, and delicious. So, roll up your sleeves, gather your ingredients, and let this bowl become a new favorite in your kitchen!

Ranis

BBQ Chicken Cottage Cheese Bowl: A Delicious Healthy Twist

A delicious and healthy twist on a classic dish, this BBQ Chicken Cottage Cheese Bowl combines shredded chicken, barbecue sauce, and fresh ingredients for a satisfying meal.
Prep Time 15 minutes
Total Time 15 minutes
Servings: 4 servings
Course: Main Dish
Cuisine: American
Calories: 350

Ingredients
  

  • 2 cups cooked shredded chicken
  • 1 cup barbecue sauce
  • 2 cups cottage cheese
  • 1 cup cherry tomatoes halved
  • 1 cup corn kernels fresh, frozen, or canned
  • 1 avocado diced
  • 1/2 cup chopped green onions
  • 1 teaspoon garlic powder
  • Salt and pepper to taste
  • 1 tablespoon olive oil
  • 1 teaspoon smoked paprika optional

Method
 

  1. In a medium bowl, combine the shredded chicken and barbecue sauce. Mix well until the chicken is fully coated. Set aside.
  2. In a separate bowl, mix the cottage cheese with garlic powder, salt, and pepper. Stir until well combined.
  3. In a large serving bowl or individual bowls, layer the cottage cheese mixture at the bottom.
  4. Top the cottage cheese with the BBQ chicken mixture.
  5. Add cherry tomatoes, corn, and diced avocado on top of the chicken.
  6. Drizzle with olive oil and sprinkle with smoked paprika if using.
  7. Garnish with chopped green onions before serving.

Nutrition

Serving: 1bowlCalories: 350kcalCarbohydrates: 15gProtein: 30gFat: 15gSaturated Fat: 3gPolyunsaturated Fat: 10gCholesterol: 70mgSodium: 600mgFiber: 3gSugar: 6g

Notes

  • For a spicy kick, add diced jalapeños or a splash of hot sauce to the BBQ chicken mixture.
  • Substitute the cottage cheese with Greek yogurt for a creamier texture and added protein.

Tried this recipe?

Let us know how it was!

Slow Cooker Shredded Beef and Gravy Made Easy Here!

Introduction to Slow Cooker Shredded Beef and Gravy

There’s something undeniably comforting about a hearty meal that practically cooks itself.

Slow Cooker Shredded Beef and Gravy is just that—a warm embrace on a plate.

After a long day, the last thing you want is to spend hours in the kitchen.

This recipe is your quick solution for busy evenings or a dish to impress your loved ones during a cozy gathering.

With just a few simple ingredients and a slow cooker, you can create a tender, flavorful beef dish that fills your home with mouthwatering aromas.

Let’s dive into this culinary adventure together!

Why You’ll Love This Slow Cooker Shredded Beef and Gravy

This recipe is a game-changer for anyone who craves comfort food without the fuss.

The slow cooker does all the heavy lifting, allowing you to focus on your day while it works its magic.

In just a few hours, you’ll have tender, flavorful beef that practically melts in your mouth.

Plus, it’s versatile enough to serve over mashed potatoes, rice, or even in a sandwich.

What’s not to love?

Ingredients for Slow Cooker Shredded Beef and Gravy

Gathering the right ingredients is the first step to culinary success.

For this Slow Cooker Shredded Beef and Gravy, you’ll need a few staples that pack a punch of flavor.

– **Beef Chuck Roast**: This cut is perfect for slow cooking. It becomes tender and juicy as it simmers away.

– **Salt and Black Pepper**: Essential for seasoning, these two enhance the natural flavors of the beef.

– **Garlic Powder and Onion Powder**: These add depth and a savory aroma, making your dish irresistible.

– **Olive Oil**: A splash of this helps to sear the roast, locking in those delicious juices.

– **Beef Broth**: This is the base of your gravy, providing richness and moisture.

– **Onion**: Sliced onions add sweetness and texture, complementing the beef beautifully.

– **Mushrooms (optional)**: If you’re a fan, these earthy gems bring an extra layer of flavor.

– **Worcestershire Sauce**: A dash of this tangy sauce elevates the taste, giving it that umami kick.

– **Cornstarch and Water**: These are your thickening agents, turning the broth into a luscious gravy.

You can find the exact quantities for each ingredient at the bottom of the article, ready for printing.

Feel free to experiment with substitutions, like using pork shoulder for a different flavor profile or adding a pinch of red pepper flakes for some heat.

The beauty of this recipe lies in its flexibility!

How to Make Slow Cooker Shredded Beef and Gravy

Creating this Slow Cooker Shredded Beef and Gravy is a straightforward process that rewards you with a comforting meal.

Let’s break it down step by step, ensuring you have all the tips you need for success.

Step 1: Season the Beef

Start by seasoning your beef chuck roast generously.

Sprinkle salt, black pepper, garlic powder, and onion powder on all sides.

This simple step enhances the flavor, setting the stage for a delicious dish.

Step 2: Sear the Roast

Next, heat a tablespoon of olive oil in a skillet over medium-high heat.

Once hot, carefully place the seasoned roast in the skillet.

Sear it for about 3-4 minutes on each side until it’s beautifully browned.

This caramelization adds depth to your Slow Cooker Shredded Beef and Gravy.

Step 3: Transfer to Slow Cooker

After searing, it’s time to transfer the roast to your slow cooker.

This is where the magic happens, as the beef will slowly cook to tender perfection.

Step 4: Sauté Onions and Mushrooms

In the same skillet, toss in your sliced onions and mushrooms, if you’re using them.

Sauté for about 5 minutes until they soften and become fragrant.

This step builds layers of flavor that will enrich your gravy.

Step 5: Create the Gravy Mixture

Now, add the beef broth and Worcestershire sauce to the skillet.

Scrape up any browned bits from the bottom—these are flavor gold!

Stir well to combine everything into a savory mixture.

Step 6: Combine in Slow Cooker

Pour this delicious gravy mixture over the roast in the slow cooker.

Make sure the beef is well-coated; this will keep it moist and flavorful.

Step 7: Cook the Beef

Cover the slow cooker and set it to cook on low for 8 hours or high for 4 hours.

The goal is tender beef that shreds easily, so resist the urge to peek!

Step 8: Shred the Beef

Once the cooking time is up, carefully remove the roast from the slow cooker.

Using two forks, shred the beef into bite-sized pieces.

It should fall apart effortlessly—this is a good sign!

Step 9: Thicken the Gravy

In a small bowl, mix cornstarch and water to create a slurry.

Stir this into the gravy in the slow cooker.

Cook on high for an additional 15-20 minutes until the gravy thickens to your liking.

Step 10: Return Beef to Gravy

Finally, return the shredded beef to the slow cooker and mix well.

This ensures every bite is coated in that rich, savory gravy.

Now, you’re ready to serve up a comforting meal that’s sure to impress!

Tips for Success

  • Always season your beef generously for maximum flavor.
  • Don’t skip the searing step; it adds a rich depth to the dish.
  • Use a meat thermometer to ensure your beef reaches the perfect tenderness.
  • Let the shredded beef rest for a few minutes before serving to enhance the flavors.
  • Feel free to customize the gravy with your favorite herbs or spices.

Equipment Needed

  • Slow Cooker: The star of the show; any size will do, but a 6-quart is ideal.
  • Skillet: For searing the roast; a non-stick or cast iron works great.
  • Meat Forks: Perfect for shredding the beef; regular forks can work in a pinch.
  • Measuring Cups: For accurate ingredient portions.
  • Cutting Board: A must for prepping your ingredients.

Variations

  • **Spicy Kick**: Add a teaspoon of red pepper flakes or a splash of hot sauce for a fiery twist.
  • **Herb Infusion**: Toss in fresh herbs like rosemary or thyme for an aromatic touch.
  • **Vegetarian Option**: Substitute the beef with jackfruit or mushrooms for a plant-based version.
  • **BBQ Style**: Mix in your favorite barbecue sauce during the last hour of cooking for a smoky flavor.
  • **Creamy Gravy**: Stir in a splash of heavy cream or sour cream at the end for a richer gravy.

Serving Suggestions

  • Serve the Slow Cooker Shredded Beef and Gravy over creamy mashed potatoes for a classic comfort meal.
  • Pair it with steamed green beans or roasted vegetables for a balanced plate.
  • A crusty baguette or dinner rolls are perfect for soaking up the delicious gravy.
  • For drinks, consider a robust red wine or a cold beer to complement the flavors.

FAQs about Slow Cooker Shredded Beef and Gravy

Can I use a different cut of beef for this recipe?

Absolutely! While beef chuck roast is ideal for its tenderness, you can also use brisket or even pork shoulder for a different flavor profile. Just keep in mind that cooking times may vary slightly.

How do I store leftovers of Slow Cooker Shredded Beef and Gravy?

Store any leftovers in an airtight container in the refrigerator for up to 3 days. You can also freeze it for up to 3 months. Just reheat gently on the stove or in the microwave when you’re ready to enjoy it again!

Can I make this recipe ahead of time?

Yes! You can prepare everything the night before and store it in the fridge. In the morning, just pop it in the slow cooker and let it do its thing while you go about your day.

What can I serve with Slow Cooker Shredded Beef and Gravy?

This dish pairs wonderfully with mashed potatoes, rice, or even in a sandwich. Add some steamed veggies or a fresh salad on the side for a complete meal.

Is this recipe gluten-free?

Yes! As long as you use gluten-free Worcestershire sauce and cornstarch, this Slow Cooker Shredded Beef and Gravy is a delicious gluten-free option for everyone to enjoy.

Final Thoughts

Cooking is more than just a task; it’s a way to connect with those we love.

This Slow Cooker Shredded Beef and Gravy brings warmth and comfort to the table, making it perfect for family dinners or gatherings with friends.

The aroma wafting through your home as it cooks is simply irresistible.

With minimal effort, you can create a dish that feels like a warm hug on a chilly evening.

So, roll up your sleeves, embrace the process, and enjoy the joy this recipe brings to your kitchen and your heart!

Ranis

Slow Cooker Shredded Beef and Gravy Made Easy Here!

A delicious and easy recipe for Slow Cooker Shredded Beef and Gravy, perfect for a comforting meal.
Prep Time 15 minutes
Servings: 6 servings
Course: Main Dish
Cuisine: American
Calories: 320

Ingredients
  

  • 2 pounds beef chuck roast
  • 1 teaspoon salt
  • 1 teaspoon black pepper
  • 1 teaspoon garlic powder
  • 1 teaspoon onion powder
  • 1 tablespoon olive oil
  • 1 cup beef broth
  • 1 cup onion sliced
  • 1 cup mushrooms sliced (optional)
  • 2 tablespoons Worcestershire sauce
  • 2 tablespoons cornstarch
  • 2 tablespoons water

Method
 

  1. Season the beef chuck roast with salt, black pepper, garlic powder, and onion powder on all sides.
  2. In a large skillet, heat olive oil over medium-high heat and sear the roast for about 3-4 minutes on each side until browned.
  3. Transfer the roast to the slow cooker.
  4. In the same skillet, add sliced onions and mushrooms (if using) and sauté for about 5 minutes until softened.
  5. Add the beef broth and Worcestershire sauce to the skillet, scraping up any browned bits from the bottom.
  6. Pour this mixture over the roast in the slow cooker.
  7. Cover and cook on low for 8 hours or on high for 4 hours, until the beef is tender and easily shredded.
  8. Once cooked, remove the roast from the slow cooker and shred it using two forks.
  9. In a small bowl, mix cornstarch and water to create a slurry.
  10. Stir this into the gravy in the slow cooker and cook on high for an additional 15-20 minutes until thickened.
  11. Return the shredded beef to the slow cooker and mix well.
  12. Serve the shredded beef and gravy over mashed potatoes, rice, or in sandwiches.

Nutrition

Serving: 1servingCalories: 320kcalCarbohydrates: 5gProtein: 30gFat: 20gSaturated Fat: 7gPolyunsaturated Fat: 13gCholesterol: 90mgSodium: 600mgSugar: 1g

Notes

  • For a spicier version, add a teaspoon of red pepper flakes or a dash of hot sauce to the slow cooker.
  • You can substitute the beef chuck roast with pork shoulder for a different flavor profile.

Tried this recipe?

Let us know how it was!

Savory Skillet Beef Pot Pie: A Quick Family Favorite!

Introduction to Savory Skillet Beef Pot Pie

There’s something undeniably comforting about a warm, hearty meal that brings the family together. The Savory Skillet Beef Pot Pie is just that—a quick solution for those busy weeknights when you want to impress your loved ones without spending hours in the kitchen.

With its rich flavors and flaky crust, this dish is sure to become a family favorite. I remember the first time I made it; the aroma filled my home, and my kids couldn’t wait to dig in. Trust me, this recipe will not only satisfy your hunger but also create lasting memories around the dinner table.

Why You’ll Love This Savory Skillet Beef Pot Pie

This Savory Skillet Beef Pot Pie is a game-changer for busy nights.

It’s quick to whip up, taking just 45 minutes from start to finish.

The one-pan method means less cleanup, and the flavors? Absolutely mouthwatering!

With tender beef, vibrant veggies, and a golden crust, it’s a dish that pleases everyone.

You’ll find yourself making it again and again, turning dinner into a delightful experience.

Ingredients for Savory Skillet Beef Pot Pie

Gathering the right ingredients is the first step to creating this delicious Savory Skillet Beef Pot Pie.

Here’s what you’ll need:

  • Ground beef: The star of the show, providing rich flavor and protein.
  • Onion: Adds sweetness and depth; a must for any savory dish.
  • Garlic: A little goes a long way in enhancing the overall taste.
  • Mixed vegetables: Frozen peas, carrots, and corn bring color and nutrition; feel free to use fresh if you have them!
  • Beef broth: This adds moisture and a savory base to the filling.
  • Worcestershire sauce: A splash of this sauce gives a tangy kick that elevates the flavor.
  • Dried thyme: A fragrant herb that complements the beef beautifully.
  • Salt and black pepper: Essential seasonings to enhance all the flavors.
  • All-purpose flour: Used to thicken the filling, giving it that comforting, hearty texture.
  • Milk: Adds creaminess to the mixture, making it rich and satisfying.
  • Pre-made pie crust: A time-saver that ensures a flaky, golden topping without the fuss.
  • Egg: Beaten for an egg wash, it gives the crust that beautiful golden finish.

For those looking to mix things up, consider substituting ground turkey or chicken for a lighter option.

Fresh herbs like parsley or rosemary can also be added for an extra flavor boost.

You can find the exact quantities for each ingredient at the bottom of the article, ready for printing!

How to Make Savory Skillet Beef Pot Pie

Creating this Savory Skillet Beef Pot Pie is a breeze!

Follow these simple steps, and you’ll have a delicious meal ready in no time.

Step 1: Brown the Ground Beef

Start by heating a large skillet over medium heat.

Add the ground beef and cook it until it’s fully browned, about 5-7 minutes.

Make sure to break it apart with a spatula as it cooks.

Once browned, drain any excess fat to keep the dish from becoming greasy.

This step is crucial for a flavorful base!

Step 2: Sauté the Vegetables

Next, toss in the diced onion and minced garlic.

Cook them until the onion turns translucent, which should take about 3-4 minutes.

The aroma will be heavenly!

This step adds depth to your filling, making it even more savory.

Step 3: Combine Ingredients

Now, stir in the mixed vegetables, beef broth, Worcestershire sauce, thyme, salt, and pepper.

Bring the mixture to a gentle simmer.

This is where the magic happens!

The flavors meld together, creating a rich filling that’s hard to resist.

Step 4: Thicken the Mixture

Sprinkle the flour over the simmering mixture.

Stir it in well and cook for an additional 2 minutes.

You’ll notice the filling starting to thicken, which is exactly what you want.

This step ensures a hearty texture that will hold up under the crust.

Step 5: Add Creaminess

Pour in the milk and stir until the mixture is creamy and heated through.

This adds a luscious quality to your filling.

Remove the skillet from heat, and let it cool slightly while you prepare the crust.

Step 6: Prepare for Baking

Preheat your oven to 400°F.

Roll out the pre-made pie crust over the beef mixture in the skillet.

Tuck the edges down into the sides of the skillet for a neat finish.

Don’t forget to cut a few slits in the crust to allow steam to escape!

Step 7: Bake to Perfection

Brush the top of the crust with the beaten egg for that golden finish.

Place the skillet in the preheated oven and bake for 25-30 minutes.

Keep an eye on it; you want the crust to be golden brown.

Once done, let it cool for about 5 minutes before serving.

Your Savory Skillet Beef Pot Pie is now ready to be enjoyed!

Tips for Success

  • Use a cast-iron skillet for even cooking and a beautiful crust.
  • Don’t rush the browning of the beef; it adds flavor.
  • Feel free to customize the mixed vegetables based on your family’s favorites.
  • Let the pot pie cool slightly before serving to avoid burns.
  • For extra flavor, add a splash of red wine to the filling.

Equipment Needed

  • Large skillet: A non-stick or cast-iron skillet works best for even cooking.
  • Spatula: Essential for breaking up the beef and mixing ingredients.
  • Measuring cups and spoons: For accurate ingredient measurements.
  • Rolling pin: If you choose to make your own crust instead of using pre-made.

Variations

  • Vegetarian Option: Swap the ground beef for lentils or mushrooms for a hearty, meatless version.
  • Spicy Kick: Add diced jalapeños or a dash of hot sauce to the filling for some heat.
  • Cheesy Delight: Mix in shredded cheese like cheddar or mozzarella for a creamy, cheesy filling.
  • Herb Infusion: Experiment with fresh herbs like basil or oregano to elevate the flavor profile.
  • Gluten-Free Crust: Use a gluten-free pie crust or make your own with almond flour for a gluten-free option.

Serving Suggestions

  • Side Salad: A crisp green salad with a tangy vinaigrette complements the richness of the pot pie.
  • Mashed Potatoes: Creamy mashed potatoes make for a comforting side that pairs perfectly.
  • Red Wine: A glass of red wine enhances the flavors beautifully.
  • Presentation: Serve in individual bowls for a cozy, rustic feel.

FAQs about Savory Skillet Beef Pot Pie

Can I use a different type of meat in this Savory Skillet Beef Pot Pie?

Absolutely! Ground turkey or chicken works well as a lighter alternative. You can even try using shredded beef for a different texture.

How do I store leftovers of the Savory Skillet Beef Pot Pie?

Store any leftovers in an airtight container in the fridge for up to three days. Reheat in the oven for the best results, ensuring the crust stays crispy.

Can I freeze the Savory Skillet Beef Pot Pie?

Yes, you can freeze it before baking. Just wrap it tightly in plastic wrap and foil. When ready to bake, thaw it in the fridge overnight and then bake as directed.

What can I serve with the Savory Skillet Beef Pot Pie?

A crisp side salad or creamy mashed potatoes pairs beautifully with this dish. A glass of red wine can also enhance the meal.

How long does it take to make this pot pie?

This Savory Skillet Beef Pot Pie takes about 45 minutes from start to finish, making it a quick and satisfying dinner option!

Final Thoughts

Cooking this Savory Skillet Beef Pot Pie is more than just preparing a meal; it’s about creating moments.

The laughter around the table, the satisfied smiles, and the comforting aroma wafting through the house all contribute to a warm atmosphere.

This dish is a reminder that good food can bring us together, even on the busiest of nights.

With its rich flavors and flaky crust, it’s bound to become a staple in your home.

So roll up your sleeves, gather your loved ones, and enjoy the delightful experience of sharing this hearty pot pie!

Ranis

Savory Skillet Beef Pot Pie: A Quick Family Favorite!

A quick and delicious Savory Skillet Beef Pot Pie that the whole family will love.
Prep Time 15 minutes
Cook Time 30 minutes
Total Time 45 minutes
Servings: 4 servings
Course: Main Course
Cuisine: American
Calories: 450

Ingredients
  

  • 1 pound ground beef
  • 1 medium onion diced
  • 2 cloves garlic minced
  • 2 cups mixed vegetables frozen peas, carrots, and corn
  • 1 cup beef broth
  • 1 tablespoon Worcestershire sauce
  • 1 teaspoon dried thyme
  • 1 teaspoon salt
  • ½ teaspoon black pepper
  • 2 tablespoons all-purpose flour
  • 1 cup milk
  • 1 pre-made pie crust store-bought
  • 1 egg beaten (for egg wash)

Method
 

  1. In a large skillet over medium heat, brown the ground beef until fully cooked, about 5-7 minutes. Drain excess fat if necessary.
  2. Add the diced onion and minced garlic to the skillet, cooking until the onion is translucent, about 3-4 minutes.
  3. Stir in the mixed vegetables, beef broth, Worcestershire sauce, thyme, salt, and pepper. Bring to a simmer.
  4. Sprinkle the flour over the mixture and stir to combine, cooking for an additional 2 minutes until thickened.
  5. Pour in the milk and stir until the mixture is creamy and heated through. Remove from heat.
  6. Preheat your oven to 400°F.
  7. Roll out the pie crust over the beef mixture in the skillet, tucking the edges down into the sides of the skillet. Cut a few slits in the crust to allow steam to escape.
  8. Brush the top of the crust with the beaten egg for a golden finish.
  9. Bake in the preheated oven for 25-30 minutes, or until the crust is golden brown.
  10. Allow to cool for 5 minutes before serving.

Nutrition

Serving: 1servingCalories: 450kcalCarbohydrates: 30gProtein: 25gFat: 25gSaturated Fat: 10gPolyunsaturated Fat: 15gCholesterol: 80mgSodium: 800mgFiber: 3gSugar: 5g

Notes

  • For a healthier version, substitute ground turkey or chicken for the beef.
  • Add fresh herbs like parsley or rosemary for an extra flavor boost.

Tried this recipe?

Let us know how it was!

Pomegranate Pistachio Whipped Feta Dip is Irresistible!

Introduction to Pomegranate Pistachio Whipped Feta Dip

When I think of gatherings with friends, I can almost hear the laughter and feel the warmth of shared moments. One dish that never fails to impress is Pomegranate Pistachio Whipped Feta Dip. It’s creamy, flavorful, and a total crowd-pleaser.

This dip is not just a quick solution for a busy day; it’s a delightful way to elevate any occasion. Whether you’re hosting a game night or simply enjoying a cozy evening at home, this dip brings a touch of Mediterranean flair that everyone will love. Trust me, once you try it, you’ll be hooked!

Why You’ll Love This Pomegranate Pistachio Whipped Feta Dip

This Pomegranate Pistachio Whipped Feta Dip is a game-changer in the kitchen.

It’s incredibly easy to whip up, taking just 10 minutes of prep time.

The combination of creamy feta and crunchy pistachios creates a delightful texture that dances on your palate.

Plus, the vibrant pomegranate seeds add a burst of color and sweetness, making it not just tasty but visually stunning.

Perfect for impressing guests or treating yourself!

Ingredients for Pomegranate Pistachio Whipped Feta Dip

Creating this Pomegranate Pistachio Whipped Feta Dip is a breeze, thanks to a handful of simple ingredients.

Here’s what you’ll need:

  • Feta cheese: The star of the show! Its tangy flavor adds depth and creaminess.
  • Cream cheese: This softens the feta, making the dip smooth and luscious.
  • Plain Greek yogurt: Adds a touch of tang and a boost of protein, enhancing the dip’s creaminess.
  • Heavy cream: For that rich texture, it elevates the dip to a whole new level.
  • Unsalted pistachios: These provide a delightful crunch and nutty flavor, complementing the creamy base.
  • Pomegranate seeds: Bursting with sweetness and color, they add a refreshing contrast to the dip.
  • Honey: A drizzle of sweetness balances the tanginess of the feta.
  • Lemon juice: Brightens the flavors and adds a zesty kick.
  • Black pepper: Just a pinch enhances the overall flavor without overpowering it.
  • Salt: Essential for bringing all the flavors together.
  • Fresh herbs: Mint or parsley can be used for garnish, adding a pop of freshness.

Feel free to get creative! You can swap out pomegranate seeds for diced roasted red peppers for a different flavor profile.

For exact measurements, check the bottom of the article where you can find everything available for printing.

How to Make Pomegranate Pistachio Whipped Feta Dip

Making this Pomegranate Pistachio Whipped Feta Dip is as easy as pie, or should I say, as easy as dip!

Let’s dive into the steps that will have your taste buds dancing in no time.

Step 1: Blend the Base

Start by grabbing your food processor.

Toss in the crumbled feta cheese, softened cream cheese, Greek yogurt, and heavy cream.

Add the honey, lemon juice, black pepper, and salt.

Blend everything together until it’s smooth and creamy.

You want a texture that’s velvety, almost like a cloud of flavor.

Trust me, this base is the heart of your dip!

Step 2: Transfer to Serving Bowl

Once your mixture is beautifully blended, it’s time to transfer it to a serving bowl.

This step is crucial because it allows you to present your dip in style.

A nice bowl can elevate the whole experience.

Plus, it’s easier to serve and share with friends and family.

Step 3: Fold in Toppings

Now, let’s add some crunch and color!

Gently fold in the chopped pistachios and pomegranate seeds.

Be careful not to overmix; you want those vibrant bits to stand out.

Reserve a few pistachios and pomegranate seeds for garnishing later.

This will make your dip look even more inviting!

Step 4: Chill the Dip

Here comes the waiting game, but it’s worth it!

Cover your bowl with plastic wrap and chill the dip in the refrigerator for at least 30 minutes.

This allows the flavors to meld together beautifully.

Trust me, the wait will only make the dip taste even better!

Step 5: Garnish and Serve

Before serving, it’s time to make your dip shine!

Garnish with the reserved pistachios, pomegranate seeds, and a sprinkle of fresh herbs.

This adds a pop of color and freshness that’s hard to resist.

Serve it up with pita chips, crackers, or fresh veggies.

Your guests will be raving about this dip long after the last bite!

Tips for Success

  • Use room temperature cream cheese for easier blending.
  • Don’t skip the chilling step; it enhances the flavors.
  • For a spicier kick, add a pinch of red pepper flakes.
  • Experiment with different nuts like walnuts or almonds for variety.
  • Serve with a variety of dippers like veggies, crackers, or bread for a fun spread.

Equipment Needed

  • Food processor: Essential for blending the dip smoothly. A blender can work in a pinch.
  • Serving bowl: Choose something that showcases your dip. Any bowl will do, but a decorative one adds flair.
  • Measuring cups and spoons: For precise ingredient amounts, though eyeballing can be fun!

Variations

  • Spicy Feta Dip: Add a pinch of red pepper flakes or diced jalapeños for a fiery twist.
  • Herbed Feta Dip: Mix in fresh herbs like dill or basil for an aromatic flavor boost.
  • Nut-Free Option: Omit the pistachios and replace them with sunflower seeds for a nut-free alternative.
  • Vegan Version: Substitute feta with a plant-based feta and use coconut cream instead of heavy cream.
  • Roasted Red Pepper Feta Dip: Blend in some roasted red peppers for a smoky flavor that pairs beautifully with the feta.

Serving Suggestions

  • Pair with crispy pita chips for a satisfying crunch.
  • Fresh veggies like cucumber, bell peppers, and carrots add a healthy touch.
  • Serve alongside a selection of crackers for variety.
  • For drinks, consider a light white wine or sparkling water with lemon.
  • Present in a colorful bowl, garnished with herbs for visual appeal.

FAQs about Pomegranate Pistachio Whipped Feta Dip

Can I make Pomegranate Pistachio Whipped Feta Dip ahead of time?

Absolutely! This dip can be made a day in advance. Just store it in the refrigerator, and it will taste even better as the flavors meld together. Just remember to garnish right before serving!

What can I serve with this dip?

This dip pairs wonderfully with pita chips, fresh veggies, or a variety of crackers. You can also spread it on sandwiches or use it as a topping for grilled meats for an extra flavor boost.

Is this dip suitable for vegetarians?

Yes, the Pomegranate Pistachio Whipped Feta Dip is vegetarian-friendly! It’s a great option for gatherings where you want to cater to different dietary preferences.

Can I substitute the feta cheese?

If you’re looking for a different flavor profile, you can try using goat cheese or a plant-based feta alternative. Just keep in mind that the taste and texture will vary slightly.

How long does this dip last in the fridge?

When stored in an airtight container, this dip can last up to 3 days in the refrigerator. Just give it a good stir before serving again!

Final Thoughts

Creating Pomegranate Pistachio Whipped Feta Dip is more than just a cooking task; it’s an experience that brings joy to any gathering.

The creamy texture, combined with the crunch of pistachios and the burst of pomegranate, creates a symphony of flavors that delights the senses.

Every bite is a reminder of the simple pleasures in life—good food, great company, and shared laughter.

So, whether you’re hosting a party or enjoying a quiet night in, this dip is sure to elevate your culinary game.

Trust me, it will become a staple in your kitchen repertoire!

Ranis

Pomegranate Pistachio Whipped Feta Dip is Irresistible!

A creamy and flavorful dip made with whipped feta, topped with pomegranate seeds and pistachios, perfect for any gathering.
Prep Time 10 minutes
Total Time 40 minutes
Servings: 6 servings
Course: Appetizer
Cuisine: Mediterranean
Calories: 180

Ingredients
  

  • 8 ounces feta cheese crumbled
  • 4 ounces cream cheese softened
  • 1/4 cup plain Greek yogurt
  • 1/4 cup heavy cream
  • 1/4 cup unsalted pistachios chopped
  • 1/2 cup pomegranate seeds
  • 1 tablespoon honey
  • 1 teaspoon lemon juice
  • 1/4 teaspoon black pepper
  • 1/4 teaspoon salt
  • Fresh herbs such as mint or parsley for garnish

Method
 

  1. In a food processor, combine the crumbled feta cheese, softened cream cheese, Greek yogurt, heavy cream, honey, lemon juice, black pepper, and salt. Blend until smooth and creamy.
  2. Transfer the whipped feta mixture to a serving bowl.
  3. Gently fold in the chopped pistachios and pomegranate seeds, reserving a few for garnish.
  4. Cover the bowl with plastic wrap and chill in the refrigerator for at least 30 minutes to allow the flavors to meld.
  5. Before serving, garnish with the reserved pistachios, pomegranate seeds, and fresh herbs. Serve with pita chips, crackers, or fresh vegetables.

Nutrition

Serving: 1servingCalories: 180kcalCarbohydrates: 6gProtein: 6gFat: 15gSaturated Fat: 8gPolyunsaturated Fat: 7gCholesterol: 40mgSodium: 300mgFiber: 1gSugar: 2g

Notes

  • For a spicier kick, add a pinch of red pepper flakes to the whipped feta mixture.
  • Substitute the pomegranate seeds with diced roasted red peppers for a different flavor profile.

Tried this recipe?

Let us know how it was!

Creamy Spring Salmon with Asparagus: A Must-Try Delight!

Introduction to Creamy Spring Salmon with Asparagus

There’s something magical about springtime, isn’t there? The air is fresh, flowers bloom, and the days grow longer. It’s the perfect season to whip up a delightful dish like Creamy Spring Salmon with Asparagus.

This recipe is not just a meal; it’s a celebration of flavors and colors that can brighten any busy day. Whether you’re looking to impress your loved ones or simply treat yourself, this dish is quick and easy to prepare.

With tender salmon and vibrant asparagus, it’s a wholesome choice that brings the essence of spring right to your table.

Why You’ll Love This Creamy Spring Salmon with Asparagus

This Creamy Spring Salmon with Asparagus is a game-changer for your weeknight dinners.

It’s not just about the taste—though the rich, creamy sauce and tender salmon are hard to resist.

The beauty lies in its simplicity.

In just 30 minutes, you can serve a restaurant-quality meal that feels special.

Plus, it’s packed with nutrients, making it a guilt-free indulgence you’ll want to repeat.

Ingredients for Creamy Spring Salmon with Asparagus

Creating this Creamy Spring Salmon with Asparagus is a breeze, especially with the right ingredients. Here’s what you’ll need to bring this dish to life:

  • Salmon fillets: Fresh, high-quality salmon is key. Look for vibrant color and a firm texture.
  • Olive oil: A drizzle adds richness and helps the salmon crisp up beautifully.
  • Salt and black pepper: Essential for seasoning, enhancing the natural flavors of the salmon.
  • Asparagus: Tender and bright green, asparagus adds a lovely crunch and a pop of color.
  • Heavy cream: This is what makes the sauce creamy and luxurious. For a lighter option, consider Greek yogurt.
  • Chicken broth: Adds depth to the sauce. You can use vegetable broth for a vegetarian twist.
  • Dijon mustard: A touch of tanginess that elevates the flavor profile of the dish.
  • Lemon juice: Freshly squeezed lemon juice brightens the dish and balances the creaminess.
  • Dill: Fresh dill brings a fragrant herbaceous note. Dried dill works too if fresh isn’t available.
  • Parmesan cheese: Grated Parmesan adds a savory finish, melting beautifully over the salmon.

For exact measurements, check the bottom of the article where you can find everything listed for easy printing.

Feel free to get creative! You can toss in cherry tomatoes or spinach for extra color and nutrients. The beauty of this dish lies in its versatility, so don’t hesitate to make it your own.

How to Make Creamy Spring Salmon with Asparagus

Cooking this Creamy Spring Salmon with Asparagus is a delightful journey.

Let’s break it down into simple steps that will have you feeling like a culinary pro in no time.

Step 1: Preheat the Oven

Start by preheating your oven to 400°F (200°C).

This step is crucial because it ensures even cooking.

While the oven heats up, line a baking sheet with parchment paper.

This makes cleanup a breeze and prevents the salmon from sticking.

Step 2: Prepare the Salmon

Next, place the salmon fillets on the prepared baking sheet.

Drizzle them with olive oil, which adds flavor and helps achieve that perfect crisp.

Sprinkle salt and black pepper generously over the fillets.

This simple seasoning enhances the natural taste of the salmon, making it shine.

Step 3: Sauté the Asparagus

In a skillet over medium heat, add a splash of olive oil and toss in the asparagus.

Sauté for about 3-4 minutes until they’re tender but still crisp.

You want that vibrant green color to pop!

This quick cooking method keeps the asparagus crunchy and full of flavor.

Step 4: Make the Cream Sauce

In a small saucepan, combine heavy cream, chicken broth, Dijon mustard, lemon juice, and dill.

Heat this mixture over low heat, stirring occasionally until warmed through.

This creamy sauce is the heart of the dish, bringing everything together with its rich flavor.

Step 5: Assemble the Dish

Now it’s time to layer the ingredients.

Pour the cream sauce over the salmon fillets, letting it cascade down.

Arrange the sautéed asparagus around the salmon, and sprinkle grated Parmesan cheese on top.

This adds a savory finish that melts beautifully during baking.

Step 6: Bake the Salmon

Slide the baking sheet into the preheated oven and bake for 15-20 minutes.

Keep an eye on the salmon; it’s done when it flakes easily with a fork.

Timing is key here—overcooking can dry it out, so check for doneness around the 15-minute mark.

Once ready, serve immediately and enjoy the burst of spring flavors!

Tips for Success

  • Use fresh salmon for the best flavor and texture.
  • Don’t skip preheating the oven; it ensures even cooking.
  • For a creamier sauce, let it simmer gently without boiling.
  • Check the salmon at 15 minutes to avoid overcooking.
  • Feel free to experiment with herbs like parsley or tarragon for a twist.

Equipment Needed

  • Baking sheet: A standard sheet works, but a cast iron skillet can add a nice sear.
  • Parchment paper: Use aluminum foil if you don’t have parchment; it’ll still prevent sticking.
  • Skillet: Any non-stick skillet will do for sautéing the asparagus.
  • Small saucepan: A regular saucepan is perfect for making the cream sauce.
  • Spatula: A silicone spatula is great for mixing and serving.

Variations

  • Herb-Infused: Swap dill for fresh basil or tarragon for a different flavor profile.
  • Spicy Kick: Add a pinch of red pepper flakes to the cream sauce for a bit of heat.
  • Vegetarian Option: Replace salmon with firm tofu or portobello mushrooms for a plant-based twist.
  • Low-Carb Delight: Serve over zucchini noodles instead of traditional pasta for a lighter meal.
  • Cheesy Variation: Mix in some crumbled feta cheese with the asparagus for an extra layer of flavor.

Serving Suggestions

  • Side Salad: Pair with a light arugula salad dressed in lemon vinaigrette for a refreshing contrast.
  • Wine Pairing: A chilled Sauvignon Blanc complements the creamy salmon beautifully.
  • Presentation: Serve on a colorful plate, garnished with extra dill and lemon wedges for a pop of color.

FAQs about Creamy Spring Salmon with Asparagus

Can I use frozen salmon for this recipe?

Absolutely! Just make sure to thaw it completely before cooking. Frozen salmon can be just as delicious when prepared correctly.

What can I substitute for heavy cream?

If you’re looking for a lighter option, Greek yogurt works well. You can also use coconut cream for a dairy-free alternative.

How do I know when the salmon is done?

The salmon is perfectly cooked when it flakes easily with a fork and has an internal temperature of 145°F (63°C). Keep an eye on it around the 15-minute mark!

Can I add other vegetables to this dish?

Definitely! Cherry tomatoes, spinach, or even bell peppers can add color and nutrients. Just sauté them along with the asparagus.

Is this dish suitable for meal prep?

Yes! You can prepare the salmon and sauce ahead of time. Just store them separately in the fridge and bake when you’re ready to eat.

Final Thoughts

Cooking Creamy Spring Salmon with Asparagus is more than just preparing a meal; it’s about creating a moment.

The vibrant colors and rich flavors bring the essence of spring right to your table, making every bite a celebration.

Whether you’re sharing it with family or enjoying a quiet dinner alone, this dish offers warmth and comfort.

It’s quick, easy, and packed with nutrients, making it a perfect choice for busy weeknights.

So, roll up your sleeves, embrace the joy of cooking, and let this delightful recipe brighten your dining experience!

Ranis

Creamy Spring Salmon with Asparagus: A Must-Try Delight!

A delicious and creamy salmon dish paired with tender asparagus, perfect for spring.
Prep Time 10 minutes
Cook Time 20 minutes
Total Time 30 minutes
Course: Main Course
Cuisine: American
Calories: 450

Ingredients
  

  • 2 6-ounce salmon fillets
  • 1 tablespoon olive oil
  • 1 teaspoon salt
  • 1/2 teaspoon black pepper
  • 1 cup asparagus trimmed and cut into 2-inch pieces
  • 1/2 cup heavy cream
  • 1/4 cup chicken broth
  • 1 tablespoon Dijon mustard
  • 1 tablespoon lemon juice
  • 1 tablespoon fresh dill chopped (or 1 teaspoon dried dill)
  • 1/4 cup grated Parmesan cheese

Method
 

  1. Preheat your oven to 400°F (200°C). Line a baking sheet with parchment paper.
  2. Place the salmon fillets on the prepared baking sheet. Drizzle with olive oil and season with salt and pepper.
  3. In a skillet over medium heat, sauté the asparagus for about 3-4 minutes until tender but still crisp. Remove from heat and set aside.
  4. In a small saucepan, combine the heavy cream, chicken broth, Dijon mustard, lemon juice, and dill. Heat over low heat until warmed through, stirring occasionally.
  5. Pour the cream mixture over the salmon fillets. Sprinkle the sautéed asparagus around the salmon and top with grated Parmesan cheese.
  6. Bake in the preheated oven for 15-20 minutes, or until the salmon is cooked through and flakes easily with a fork.
  7. Serve immediately, garnished with additional dill if desired.

Nutrition

Serving: 1servingCalories: 450kcalCarbohydrates: 4gProtein: 36gFat: 32gSaturated Fat: 15gPolyunsaturated Fat: 10gCholesterol: 100mgSodium: 800mgFiber: 1gSugar: 1g

Notes

  • For a lighter version, substitute half of the heavy cream with Greek yogurt.
  • Add cherry tomatoes or spinach to the asparagus for extra color and nutrients.

Tried this recipe?

Let us know how it was!