Beef Carnitas Tacos: A Must-Try Recipe for Flavor!

Introduction to Beef Carnitas Tacos

There’s something magical about the aroma of slow-cooked beef wafting through the house. It takes me back to family gatherings where laughter and good food filled the air. Beef Carnitas Tacos are not just a meal; they’re a celebration of flavor and comfort. Perfect for a busy weeknight or a weekend gathering, these tacos are easy to whip up and sure to impress. With tender, seasoned beef nestled in warm corn tortillas, they offer a delightful bite that brings everyone together. Trust me, once you try these, they’ll become a staple in your kitchen!

Why You’ll Love This Beef Carnitas Tacos

Beef Carnitas Tacos are a game-changer for any home cook. They’re incredibly easy to make, requiring minimal prep time and just a few ingredients. The slow cooking process transforms tough beef into tender, flavorful bites that practically melt in your mouth. Plus, they’re versatile! You can customize them with your favorite toppings, making them perfect for everyone at the table. Trust me, these tacos will quickly become a family favorite!

Ingredients for Beef Carnitas Tacos

Gathering the right ingredients is the first step to creating mouthwatering Beef Carnitas Tacos. Here’s what you’ll need:

  • Beef Chuck Roast: This cut is perfect for slow cooking, becoming tender and flavorful as it cooks.
  • Olive Oil: A splash of this helps to sear the beef, locking in those delicious juices.
  • Salt and Black Pepper: Essential seasonings that enhance the natural flavors of the beef.
  • Ground Cumin: Adds a warm, earthy flavor that’s a staple in Mexican cuisine.
  • Chili Powder: This spice brings a mild heat and depth to the dish.
  • Garlic Powder: A quick way to infuse that beloved garlic flavor without the fuss of fresh cloves.
  • Onion Powder: Similar to garlic powder, it adds a savory note that complements the beef.
  • Beef Broth: This liquid helps to keep the meat moist and adds richness to the flavor.
  • Lime Juice: A splash of acidity brightens the dish and balances the richness of the beef.
  • Corn Tortillas: These are the perfect vessel for your beef, providing a soft and slightly sweet base.
  • Diced Onion: Fresh onion adds crunch and a sharp flavor that contrasts beautifully with the tender beef.
  • Chopped Fresh Cilantro: This herb brings a burst of freshness and color to your tacos.
  • Lime Wedges: For serving, these are essential for squeezing over the tacos, enhancing the flavors.

For those looking to spice things up, consider adding diced jalapeños or your favorite hot sauce. If you prefer a different texture, flour tortillas can be a great alternative. Exact measurements for these ingredients can be found at the bottom of the article, ready for printing!

How to Make Beef Carnitas Tacos

Creating Beef Carnitas Tacos is a straightforward process that rewards you with incredible flavor. Follow these simple steps, and you’ll have a delicious meal ready to impress your family or friends.

Step 1: Sear the Beef

Start by seasoning your beef chunks with salt, black pepper, cumin, chili powder, garlic powder, and onion powder. This blend of spices is key to building flavor. In a large skillet, heat olive oil over medium-high heat. Once hot, add the seasoned beef and sear it on all sides until it’s beautifully browned, about 5-7 minutes. This browning process is crucial; it locks in the juices and adds depth to the flavor of your Beef Carnitas Tacos.

Step 2: Slow Cook the Beef

After searing, transfer the beef to a slow cooker. Pour in the beef broth and lime juice, which will keep the meat moist and add a zesty kick. Cover the slow cooker and set it to low for 8 hours or high for 4 hours. The longer you cook, the more tender the beef will become, making it easy to shred later. Trust me, the wait is worth it!

Step 3: Shred the Beef

Once the cooking time is up, it’s time to shred the beef. Using two forks, pull the meat apart until it’s in bite-sized pieces. Mix the shredded beef with the cooking juices in the slow cooker. This step ensures every bite is packed with flavor, making your Beef Carnitas Tacos irresistible.

Step 4: Warm the Tortillas

To prepare the corn tortillas, heat a separate skillet over medium heat. Warm each tortilla for about 30 seconds on each side until they’re pliable. This step is essential; warm tortillas make it easier to fold and hold all that delicious filling without tearing.

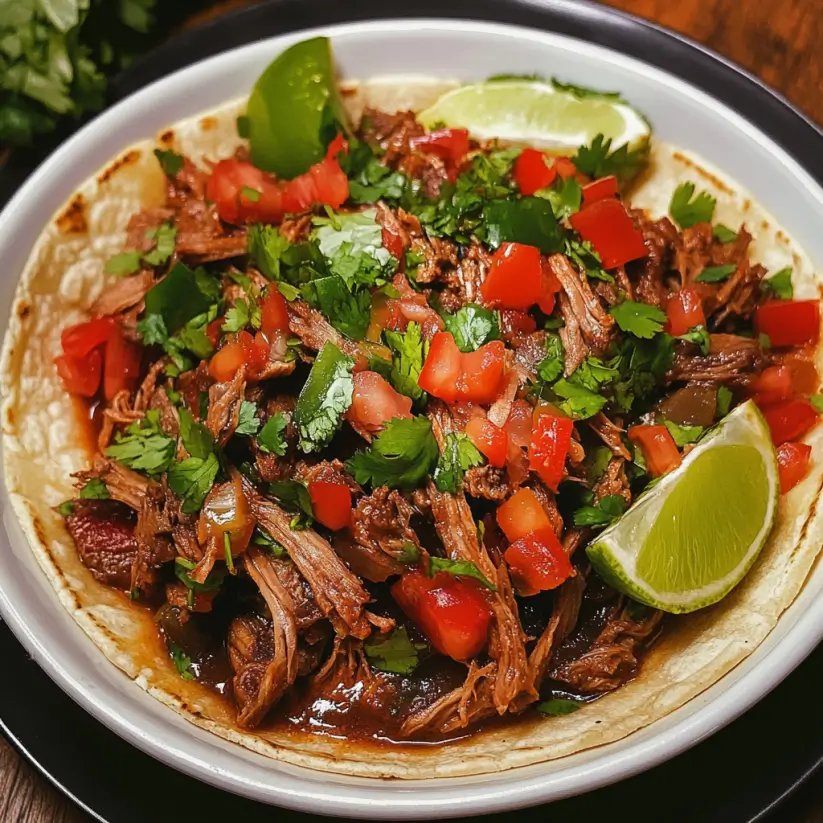
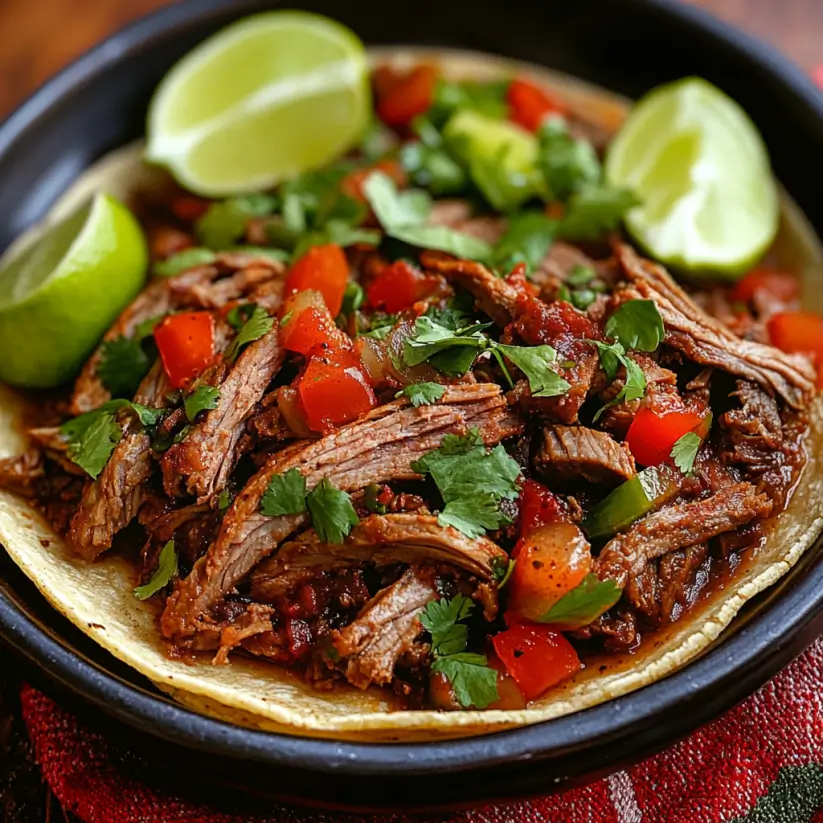
Step 5: Assemble the Tacos

Now comes the fun part—assembling your tacos! Take a warm tortilla and place a generous portion of shredded beef in the center. Top it off with diced onion and chopped cilantro for a fresh crunch. Don’t forget to serve with lime wedges on the side for that extra zing. Your Beef Carnitas Tacos are now ready to be devoured!

Tips for Success

  • Always sear the beef for maximum flavor; don’t skip this step!
  • Let the beef rest for a few minutes after shredding to absorb the juices.
  • Warm tortillas in batches to keep them pliable.
  • Experiment with toppings like avocado or pickled jalapeños for extra flavor.
  • Make extra beef and freeze leftovers for a quick meal later.

Equipment Needed

  • Slow Cooker: Essential for tender beef; a Dutch oven can work too.
  • Skillet: For searing the beef; a non-stick or cast iron skillet is ideal.
  • Two Forks: Perfect for shredding the beef; you can also use tongs.
  • Spatula: Handy for flipping tortillas and mixing ingredients.

Variations

  • Spicy Beef Carnitas: Add diced jalapeños or a splash of your favorite hot sauce to the beef mixture for an extra kick.
  • Vegetarian Option: Substitute the beef with jackfruit or mushrooms, seasoned similarly, for a delicious plant-based taco.
  • Different Tortillas: Try using flour tortillas for a softer texture or even lettuce wraps for a low-carb option.
  • Flavorful Marinade: Marinate the beef overnight in a mixture of lime juice, garlic, and spices for deeper flavor.
  • Slow Cooker Alternatives: If you don’t have a slow cooker, use a pressure cooker for a quicker cooking time while still achieving tender beef.

Serving Suggestions

  • Side Dishes: Serve with Mexican rice or refried beans for a hearty meal.
  • Fresh Salsa: A side of pico de gallo or mango salsa adds a refreshing touch.
  • Drinks: Pair with a cold cerveza or a zesty margarita for the perfect combo.
  • Presentation: Arrange tacos on a colorful platter, garnished with lime wedges and cilantro for a vibrant look.

FAQs about Beef Carnitas Tacos

Can I use a different cut of beef for my carnitas?

Absolutely! While beef chuck roast is ideal for its tenderness, you can also use brisket or even flank steak. Just remember that cooking times may vary based on the cut.

How can I make Beef Carnitas Tacos spicier?

If you’re looking for a kick, consider adding diced jalapeños to the beef mixture or drizzling your favorite hot sauce over the assembled tacos. You can also mix in some cayenne pepper with the spices.

Can I prepare the beef ahead of time?

Yes! You can cook the beef a day in advance and store it in the fridge. Just reheat it gently before assembling your Beef Carnitas Tacos. This makes for a quick meal on busy days!

What toppings do you recommend for Beef Carnitas Tacos?

Some great toppings include diced onions, fresh cilantro, avocado slices, and crumbled queso fresco. A squeeze of lime juice adds a refreshing zing that complements the flavors beautifully.

Are Beef Carnitas Tacos gluten-free?

Yes, as long as you use corn tortillas, Beef Carnitas Tacos are gluten-free. Just double-check any additional toppings or sauces to ensure they meet your dietary needs.

Final Thoughts

Beef Carnitas Tacos are more than just a meal; they’re an experience that brings people together. The tender, flavorful beef wrapped in warm tortillas creates a comforting dish that’s perfect for any occasion. Whether you’re hosting friends or enjoying a quiet dinner at home, these tacos are sure to impress. The joy of sharing a delicious meal, filled with laughter and good conversation, is what cooking is all about. So, roll up your sleeves, gather your ingredients, and let the magic of Beef Carnitas Tacos transform your kitchen into a hub of flavor and happiness!

Ranis

Beef Carnitas Tacos: A Must-Try Recipe for Flavor!

Beef Carnitas Tacos are a flavorful and tender dish made with slow-cooked beef chuck roast, seasoned with spices and served in warm corn tortillas.
Prep Time 15 minutes
Servings: 8 servings
Course: Main Dish
Cuisine: Mexican
Calories: 280

Ingredients
  

  • 2 pounds beef chuck roast cut into large chunks
  • 1 tablespoon olive oil
  • 1 teaspoon salt
  • 1 teaspoon black pepper
  • 1 tablespoon ground cumin
  • 1 tablespoon chili powder
  • 1 teaspoon garlic powder
  • 1 teaspoon onion powder
  • 1 cup beef broth
  • 1 tablespoon lime juice
  • 8 small corn tortillas
  • 1 cup diced onion
  • 1 cup chopped fresh cilantro
  • Lime wedges for serving

Method
 

  1. In a large skillet, heat the olive oil over medium-high heat. Season the beef chunks with salt, black pepper, cumin, chili powder, garlic powder, and onion powder. Sear the beef on all sides until browned, about 5-7 minutes.
  2. Transfer the seared beef to a slow cooker. Pour the beef broth and lime juice over the meat. Cover and cook on low for 8 hours or high for 4 hours until the beef is tender and easily shredded.
  3. Once cooked, shred the beef using two forks and mix it with the cooking juices.
  4. In a separate skillet, warm the corn tortillas over medium heat for about 30 seconds on each side until pliable.
  5. To assemble the tacos, place a generous portion of shredded beef on each tortilla. Top with diced onion and chopped cilantro.
  6. Serve with lime wedges on the side for squeezing over the tacos.

Nutrition

Serving: 1tacoCalories: 280kcalCarbohydrates: 10gProtein: 22gFat: 18gSaturated Fat: 6gPolyunsaturated Fat: 10gCholesterol: 70mgSodium: 500mgFiber: 2gSugar: 1g

Notes

  • For a spicier kick, add diced jalapeños to the tacos or mix in some hot sauce.
  • Try using flour tortillas instead of corn for a different texture and flavor.

Tried this recipe?

Let us know how it was!

Thai Chicken Lettuce Wraps: A Quick & Tasty Meal!

Introduction to Thai Chicken Lettuce Wraps

There’s something magical about a meal that feels light yet satisfying, isn’t there? Thai Chicken Lettuce Wraps are just that—a delightful blend of flavors and textures that come together in a matter of minutes. Whether you’re racing against the clock after a long day or looking to impress friends at a casual gathering, these wraps are your go-to solution. The crisp lettuce leaves cradle a savory filling of ground chicken and fresh veggies, making each bite a burst of flavor. Trust me, once you try these, they’ll become a staple in your kitchen!

Why You’ll Love This Thai Chicken Lettuce Wraps

These Thai Chicken Lettuce Wraps are a game-changer for busy weeknights. They come together in just 30 minutes, making them perfect for those evenings when time is tight. The combination of fresh ingredients and bold flavors means you won’t sacrifice taste for speed. Plus, they’re healthy and gluten-free, so you can enjoy a guilt-free meal that satisfies your cravings without weighing you down. What’s not to love?

Ingredients for Thai Chicken Lettuce Wraps

Gathering the right ingredients is key to making these Thai Chicken Lettuce Wraps a success. Here’s what you’ll need:

  • Ground chicken: The star of the show! It’s lean, flavorful, and cooks quickly.
  • Vegetable oil: For sautéing the aromatics and chicken, providing a nice base for flavor.
  • Onion: Finely chopped, it adds sweetness and depth to the dish.
  • Garlic: Minced for that aromatic punch that elevates the entire meal.
  • Fresh ginger: Grated ginger brings a zesty warmth that complements the chicken beautifully.
  • Red bell pepper: Diced for a pop of color and crunch, enhancing the texture.
  • Shredded carrots: They add sweetness and a lovely crunch, making the filling more vibrant.
  • Soy sauce: A must-have for that umami flavor, tying all the ingredients together.
  • Fish sauce: Just a touch adds a depth of flavor that’s quintessential in Thai cuisine.
  • Brown sugar: Balances the savory elements with a hint of sweetness.
  • Lime juice: Freshly squeezed for a zesty kick that brightens the dish.
  • Red pepper flakes: Optional, but they bring a nice heat if you’re feeling adventurous.
  • Lettuce leaves: Butter or iceberg lettuce works best, providing a crisp wrap for the filling.
  • Cilantro: Chopped for a fresh, herbaceous finish that enhances the flavors.
  • Green onions: Chopped for a mild onion flavor and a bit of crunch.
  • Chopped peanuts: Optional garnish that adds a delightful crunch and nuttiness.

For those looking to mix things up, consider substituting ground chicken with crumbled tofu or tempeh for a vegetarian option. You can also toss in diced water chestnuts for an extra crunch. The exact quantities for each ingredient are listed at the bottom of the article, ready for printing!

How to Make Thai Chicken Lettuce Wraps

Creating these Thai Chicken Lettuce Wraps is a breeze! Follow these simple steps, and you’ll have a delicious meal ready in no time. Let’s dive in!

Step 1: Sauté the Aromatics

Start by heating the vegetable oil in a large skillet over medium heat. Once the oil is shimmering, toss in the finely chopped onion. Sauté for about 3 minutes until the onion softens and becomes translucent. This step lays the foundation for a flavorful dish!

Step 2: Add Garlic and Ginger

Next, add the minced garlic and grated ginger to the skillet. These two ingredients are essential for that aromatic punch that makes Thai cuisine so irresistible. Cook for an additional minute, stirring frequently, until they become fragrant. Your kitchen will smell amazing!

Step 3: Cook the Chicken

Now it’s time to add the ground chicken. Break it up with a spatula as you add it to the skillet. Cook for about 5-7 minutes, stirring occasionally, until the chicken is browned and cooked through. This is where the magic happens, as the chicken absorbs all those wonderful flavors.

Step 4: Incorporate Vegetables

Once the chicken is cooked, stir in the diced red bell pepper and shredded carrots. Cook for another 3-4 minutes until the vegetables are tender but still have a bit of crunch. This adds a vibrant color and texture to your filling, making it even more appealing!

Step 5: Mix the Sauce

In a small bowl, combine the soy sauce, fish sauce, brown sugar, lime juice, and red pepper flakes (if you’re feeling spicy). Pour this sauce over the chicken and vegetable mixture. Stir well to combine, and let it cook for another 2 minutes to heat through. This sauce is the secret to that bold, tangy flavor!

Step 6: Finish with Herbs

Remove the skillet from heat and stir in the chopped cilantro and green onions. These fresh herbs add a burst of flavor and brightness to the dish. You’ll want to make sure they’re evenly distributed throughout the filling.

Step 7: Serve in Lettuce Leaves

To serve, spoon the chicken mixture into the crisp lettuce leaves. If you like, garnish with chopped peanuts for an extra crunch. Enjoy these wraps fresh, and savor every bite of this delightful meal!

Tips for Success

  • Prep all your ingredients before starting to cook. It makes the process smoother and more enjoyable.
  • Don’t skip the fresh herbs! They elevate the flavor and freshness of the wraps.
  • Adjust the spice level by adding more or fewer red pepper flakes to suit your taste.
  • For extra crunch, consider adding diced water chestnuts to the filling.
  • Serve immediately for the best texture; the lettuce can wilt if left too long.

Equipment Needed

  • Large skillet: A non-stick skillet works best, but any large pan will do.
  • Spatula: For breaking up the chicken and stirring the mixture.
  • Cutting board: Essential for chopping vegetables safely.
  • Knife: A sharp chef’s knife makes prep easier.
  • Measuring spoons: Handy for accurate sauce measurements.

Variations

  • Vegetarian Option: Swap ground chicken for crumbled tofu or tempeh for a plant-based twist.
  • Spicy Kick: Add diced jalapeños or a splash of sriracha to the filling for an extra heat boost.
  • Crunchy Add-ins: Toss in diced water chestnuts or chopped bell peppers for added texture and flavor.
  • Herb Variations: Experiment with fresh basil or mint in place of cilantro for a different herbal note.
  • Low-Carb Version: Use cucumber slices instead of lettuce leaves for a refreshing, low-carb wrap.

Serving Suggestions

  • Side Salad: Pair with a light cucumber and tomato salad for a refreshing contrast.
  • Rice: Serve with jasmine rice or cauliflower rice for a filling meal.
  • Drink: Enjoy with a cold Thai iced tea or a crisp lager.
  • Presentation: Arrange wraps on a platter with lime wedges for a vibrant touch.

FAQs about Thai Chicken Lettuce Wraps

Can I make Thai Chicken Lettuce Wraps ahead of time?

Absolutely! You can prepare the chicken filling in advance and store it in the fridge. Just assemble the wraps when you’re ready to serve for the freshest taste.

What can I use instead of ground chicken?

If you’re looking for alternatives, crumbled tofu or tempeh works great for a vegetarian option. You can also use ground turkey or beef if you prefer.

How do I store leftovers?

Store any leftover filling in an airtight container in the fridge for up to three days. Keep the lettuce leaves separate to maintain their crispness.

Can I freeze the filling?

Yes! The filling freezes well. Just make sure to cool it completely before transferring it to a freezer-safe container. Thaw in the fridge before reheating.

What are some good dipping sauces for these wraps?

While the filling is flavorful on its own, a side of sweet chili sauce or peanut sauce can add an extra layer of deliciousness. Enjoy experimenting!

Final Thoughts

Thai Chicken Lettuce Wraps are more than just a meal; they’re an experience that brings joy to the table. Each bite is a delightful mix of flavors and textures, making it hard to resist going back for seconds. The ease of preparation means you can whip them up on a busy weeknight or serve them at a gathering with friends. Plus, the fresh ingredients and vibrant colors make for a visually appealing dish. I hope these wraps become a cherished recipe in your kitchen, just as they have in mine. Enjoy the journey of cooking and savor every delicious moment!

Ranis

Thai Chicken Lettuce Wraps: A Quick & Tasty Meal!

Thai Chicken Lettuce Wraps are a quick and tasty meal featuring ground chicken, fresh vegetables, and a flavorful sauce, all wrapped in crisp lettuce leaves.
Prep Time 15 minutes
Cook Time 15 minutes
Total Time 30 minutes
Servings: 4 servings
Course: Main Dish
Cuisine: Thai
Calories: 290

Ingredients
  

  • 1 pound ground chicken
  • 1 tablespoon vegetable oil
  • 1 small onion finely chopped
  • 2 cloves garlic minced
  • 1 tablespoon fresh ginger grated
  • 1 red bell pepper diced
  • 1 cup shredded carrots
  • 1/4 cup soy sauce
  • 1 tablespoon fish sauce
  • 1 tablespoon brown sugar
  • 1 tablespoon lime juice
  • 1/4 teaspoon red pepper flakes optional
  • 1 head of butter or iceberg lettuce leaves separated
  • 1/4 cup chopped fresh cilantro
  • 1/4 cup chopped green onions
  • Chopped peanuts for garnish optional

Method
 

  1. In a large skillet, heat the vegetable oil over medium heat. Add the chopped onion and sauté for about 3 minutes until softened.
  2. Add the minced garlic and grated ginger to the skillet, cooking for an additional minute until fragrant.
  3. Add the ground chicken to the skillet, breaking it up with a spatula. Cook until the chicken is browned and cooked through, about 5-7 minutes.
  4. Stir in the diced red bell pepper and shredded carrots, cooking for another 3-4 minutes until the vegetables are tender.
  5. In a small bowl, mix together the soy sauce, fish sauce, brown sugar, lime juice, and red pepper flakes (if using). Pour this sauce over the chicken mixture and stir to combine. Cook for another 2 minutes to heat through.
  6. Remove the skillet from heat and stir in the chopped cilantro and green onions.
  7. To serve, spoon the chicken mixture into the lettuce leaves, garnish with chopped peanuts if desired, and enjoy!

Nutrition

Serving: 1wrapCalories: 290kcalCarbohydrates: 10gProtein: 25gFat: 18gSaturated Fat: 3gPolyunsaturated Fat: 15gCholesterol: 70mgSodium: 800mgFiber: 5gSugar: 5g

Notes

  • For a vegetarian option, substitute ground chicken with crumbled tofu or tempeh.
  • Add diced water chestnuts for extra crunch and texture in the filling.

Tried this recipe?

Let us know how it was!

Caramel Banana Bread Cookies: Discover a Sweet Delight!

Introduction to Caramel Banana Bread Cookies

When I think of comfort food, caramel banana bread cookies come to mind.

These delightful treats blend the sweetness of ripe bananas with rich caramel, creating a cookie that feels like a warm hug.

Perfect for a quick solution on a busy day or a sweet surprise for loved ones, these cookies are a must-try.

Whether you’re a seasoned baker or just starting out, this recipe is simple and rewarding.

Let’s dive into the world of caramel banana bread cookies and discover how to make this delicious treat that will surely impress!

Why You’ll Love This Caramel Banana Bread Cookies

These caramel banana bread cookies are a game-changer in the dessert world.

They come together in just 27 minutes, making them perfect for those last-minute cravings.

The combination of soft, chewy cookies with gooey caramel bits is simply irresistible.

Plus, they’re a fantastic way to use up those overripe bananas sitting on your counter.

Trust me, once you try them, you’ll be hooked!

Ingredients for Caramel Banana Bread Cookies

To whip up these delightful caramel banana bread cookies, you’ll need a handful of simple ingredients that pack a punch of flavor.

Here’s what you’ll gather:

  • Ripe Bananas: The star of the show! They add natural sweetness and moisture.
  • Unsalted Butter: Softened to create a rich, creamy base for your cookies.
  • Brown Sugar: This brings a deep, caramel-like flavor that complements the bananas.
  • Granulated Sugar: For that perfect sweetness balance and a slight crunch.
  • Large Egg: Acts as a binder, helping the cookies hold their shape.
  • Vanilla Extract: A splash of this adds warmth and enhances the overall flavor.
  • All-Purpose Flour: The foundation of your cookie dough, providing structure.
  • Baking Soda and Baking Powder: These leavening agents ensure your cookies rise beautifully.
  • Salt: Just a pinch to enhance all the flavors and balance the sweetness.
  • Caramel Bits or Soft Caramel Candies: The gooey goodness that makes these cookies irresistible.
  • Chopped Walnuts or Pecans (optional): For a delightful crunch and nutty flavor, if you’re feeling adventurous.

For exact measurements, check the bottom of the article where you can find everything listed for easy printing.

Gather these ingredients, and let’s get ready to bake some magic!

How to Make Caramel Banana Bread Cookies

Making caramel banana bread cookies is a delightful journey that’s as easy as pie—well, easier!

Let’s break it down step by step, ensuring you create cookies that are soft, chewy, and bursting with flavor.

Step 1: Preheat and Prepare

First things first, preheat your oven to 350°F (175°C).

While that’s warming up, line a baking sheet with parchment paper.

This simple step ensures your cookies won’t stick and makes cleanup a breeze.

Step 2: Cream the Butter and Sugars

In a large mixing bowl, cream together the softened butter, brown sugar, and granulated sugar.

You want this mixture to be light and fluffy, which creates a rich base for your cookies.

Don’t rush this step; it’s where the magic begins!

Step 3: Mix in the Bananas and Egg

Next, beat in the mashed bananas, egg, and vanilla extract until everything is well combined.

This is where the cookies get their moisture and flavor.

The aroma of bananas and vanilla will fill your kitchen, making it hard to resist sneaking a taste!

Step 4: Combine Dry Ingredients

In a separate bowl, whisk together the flour, baking soda, baking powder, and salt.

Gradually add this dry mixture to the wet ingredients, stirring until just combined.

This ensures even distribution of the leavening agents, which is key for that perfect rise.

Step 5: Fold in Caramel and Nuts

Now, it’s time to fold in the caramel bits and nuts, if you’re using them.

This is where the magic happens!

The gooey caramel will melt into the cookies as they bake, creating pockets of sweetness.

Step 6: Shape and Bake

Drop rounded tablespoons of dough onto your prepared baking sheet, spacing them about 2 inches apart.

Bake for 10-12 minutes, or until the edges are lightly golden.

The smell wafting through your home will be irresistible!

Step 7: Cool and Enjoy

Once baked, allow the cookies to cool on the baking sheet for 5 minutes.

This helps them set perfectly before transferring them to a wire rack to cool completely.

Now, grab a glass of milk and get ready to indulge in these delicious caramel banana bread cookies!

Tips for Success

  • Use very ripe bananas for maximum sweetness and flavor.
  • Don’t overmix the dough; it should be just combined for tender cookies.
  • For a chewier texture, slightly underbake the cookies.
  • Let the cookies cool on the baking sheet to firm up before transferring.
  • Experiment with different nuts or add chocolate chips for a twist!

Equipment Needed

  • Baking Sheet: A standard baking sheet works well; a silicone mat can be a great alternative.
  • Parchment Paper: Use this for easy cleanup; aluminum foil is a good substitute.
  • Mixing Bowls: A large bowl for mixing; any size will do.
  • Whisk and Spatula: Essential for mixing; a fork can work in a pinch.

Variations

  • Chocolate Chip Delight: Add 1/2 cup of chocolate chips for a rich, decadent twist.
  • Nut-Free Option: Omit the nuts for a smooth texture, perfect for those with allergies.
  • Gluten-Free Version: Substitute all-purpose flour with a gluten-free blend for a safe alternative.
  • Spiced Up: Add a teaspoon of cinnamon or nutmeg for a warm, spiced flavor.
  • Vegan Adaptation: Replace the egg with a flax egg and use coconut oil instead of butter.

Serving Suggestions

  • Pair these cookies with a cold glass of milk for a classic treat.
  • Serve warm with a scoop of vanilla ice cream for an indulgent dessert.
  • Dust with powdered sugar for a beautiful presentation.
  • Enjoy alongside a cup of coffee or tea for a cozy afternoon snack.

FAQs about Caramel Banana Bread Cookies

Can I use frozen bananas for this recipe?

Absolutely! Just make sure to thaw and drain any excess moisture before mashing. Frozen bananas can add great flavor and sweetness to your caramel banana bread cookies.

How do I store leftover cookies?

Store your cookies in an airtight container at room temperature for up to a week. If you want to keep them longer, consider freezing them. Just make sure to separate layers with parchment paper!

Can I substitute the caramel bits?

Yes! If you can’t find caramel bits, chopped soft caramel candies work just as well. You can even use chocolate chips for a different flavor profile in your caramel banana bread cookies.

What can I serve with these cookies?

These cookies pair wonderfully with a glass of milk or a scoop of vanilla ice cream. You can also enjoy them with a hot cup of coffee or tea for a delightful afternoon treat.

How can I make these cookies healthier?

To make a healthier version, consider using whole wheat flour instead of all-purpose flour. You can also reduce the sugar slightly or add oats for extra fiber in your caramel banana bread cookies.

Final Thoughts

Baking caramel banana bread cookies is more than just a recipe; it’s an experience that fills your kitchen with warmth and joy.

Each bite offers a delightful combination of flavors that brings back memories of home and comfort.

Whether you’re sharing them with family or enjoying them solo, these cookies are sure to brighten your day.

So, roll up your sleeves, embrace the mess, and let the sweet aroma guide you.

Trust me, once you take that first bite, you’ll understand why these cookies are destined to become a favorite in your home!

Ranis

Caramel Banana Bread Cookies: Discover a Sweet Delight!

Delicious caramel banana bread cookies that combine the flavors of ripe bananas and sweet caramel for a delightful treat.
Prep Time 15 minutes
Cook Time 12 minutes
Total Time 27 minutes
Servings: 12 cookies
Course: Dessert
Cuisine: American
Calories: 150

Ingredients
  

  • 2 ripe bananas mashed
  • 1/2 cup unsalted butter softened
  • 1/2 cup brown sugar packed
  • 1/4 cup granulated sugar
  • 1 large egg
  • 1 teaspoon vanilla extract
  • 1 1/2 cups all-purpose flour
  • 1/2 teaspoon baking soda
  • 1/2 teaspoon baking powder
  • 1/4 teaspoon salt
  • 1 cup caramel bits or chopped soft caramel candies
  • 1/2 cup chopped walnuts or pecans optional

Method
 

  1. Preheat your oven to 350°F (175°C) and line a baking sheet with parchment paper.
  2. In a large mixing bowl, cream together the softened butter, brown sugar, and granulated sugar until light and fluffy.
  3. Beat in the mashed bananas, egg, and vanilla extract until well combined.
  4. In a separate bowl, whisk together the flour, baking soda, baking powder, and salt. Gradually add the dry ingredients to the wet mixture, stirring until just combined.
  5. Fold in the caramel bits and nuts, if using.
  6. Drop rounded tablespoons of dough onto the prepared baking sheet, spacing them about 2 inches apart.
  7. Bake for 10-12 minutes, or until the edges are lightly golden.
  8. Allow the cookies to cool on the baking sheet for 5 minutes before transferring them to a wire rack to cool completely.

Nutrition

Serving: 1cookieCalories: 150kcalCarbohydrates: 22gProtein: 2gFat: 6gSaturated Fat: 3gPolyunsaturated Fat: 2gCholesterol: 20mgSodium: 100mgFiber: 1gSugar: 10g

Notes

  • For a chocolate twist, add 1/2 cup of chocolate chips to the dough.
  • If you prefer a softer cookie, slightly underbake them and let them cool on the baking sheet for a few extra minutes.

Tried this recipe?

Let us know how it was!

Slow Cooker Stuffed Pepper Soup: A Flavorful Delight!

Introduction to Slow Cooker Stuffed Pepper Soup

There’s something comforting about a warm bowl of soup, especially when it’s a hearty Slow Cooker Stuffed Pepper Soup.

This dish brings together the classic flavors of stuffed peppers, but with the ease of a slow cooker.

Whether you’re juggling a busy workweek or just want to impress your family with minimal effort, this recipe is your go-to.

The best part? You can set it and forget it, letting the slow cooker do all the work while you tackle your day.

Get ready to savor a delicious meal that feels like a warm hug in a bowl!

Why You’ll Love This Slow Cooker Stuffed Pepper Soup

This Slow Cooker Stuffed Pepper Soup is a game-changer for busy nights.

It’s not just about convenience; it’s about flavor too.

With minimal prep and a hands-off cooking process, you can enjoy a rich, savory soup that tastes like it simmered all day.

Plus, it’s a one-pot wonder, making cleanup a breeze.

Trust me, your taste buds and your schedule will thank you!

Ingredients for Slow Cooker Stuffed Pepper Soup

Gathering the right ingredients is the first step to creating this delightful Slow Cooker Stuffed Pepper Soup.

Here’s what you’ll need:

  • Ground beef or turkey: This is the protein base. Choose lean options for a healthier soup.
  • Onion: Diced onion adds a sweet and savory depth to the flavor.
  • Garlic: Minced garlic brings a fragrant kick that elevates the dish.
  • Bell pepper: Any color works! It adds sweetness and a pop of color.
  • Diced tomatoes: Canned and undrained, they provide a juicy base for the soup.
  • Tomato sauce: This thickens the soup and enhances the tomato flavor.
  • Broth: Beef or vegetable broth adds richness. Use low-sodium for a healthier option.
  • Uncooked rice: White or brown rice will absorb the flavors and add heartiness.
  • Dried oregano and basil: These herbs bring that classic Italian flavor profile.
  • Salt and black pepper: Essential for seasoning and enhancing all the flavors.
  • Shredded cheese: Cheddar or mozzarella melts beautifully, adding creaminess.
  • Fresh parsley: Optional, but it adds a fresh touch when garnished.

Feel free to get creative!

For a vegetarian version, swap the meat for lentils or a plant-based alternative.

You can also toss in extra veggies like corn or zucchini for added nutrition and flavor.

Exact quantities for each ingredient are available at the bottom of the article for easy printing.

How to Make Slow Cooker Stuffed Pepper Soup

Making this Slow Cooker Stuffed Pepper Soup is as easy as pie.

With just a few simple steps, you’ll have a delicious meal ready to enjoy.

Let’s dive into the process!

Step 1: Brown the Meat

Start by heating a skillet over medium heat.

Add your ground beef or turkey, breaking it apart as it cooks.

You want it browned and fully cooked, so keep an eye on it.

Once done, drain any excess fat and transfer the meat to your slow cooker.

This step adds a rich flavor base to your soup.

Step 2: Add Vegetables

Next, toss in the diced onion, minced garlic, and bell pepper into the slow cooker.

These veggies will soften and infuse the soup with their natural sweetness.

Give everything a good stir to combine the ingredients.

The aroma will start to fill your kitchen, and trust me, it’s heavenly!

Step 3: Combine Liquids

Now, pour in the diced tomatoes (don’t drain them!) and the tomato sauce.

Add your choice of beef or vegetable broth next.

This liquid is essential for creating that comforting soup texture.

Stir everything together until well mixed.

You’re already on your way to a flavorful dish!

Step 4: Mix in Rice and Seasonings

Time to add the uncooked rice, dried oregano, basil, salt, and black pepper.

These seasonings are what make this soup sing!

Mix everything well, ensuring the rice is evenly distributed.

This will help it absorb all those delicious flavors as it cooks.

Step 5: Slow Cook

Cover your slow cooker and set it to cook on low for 6-8 hours or high for 3-4 hours.

This is where the magic happens!

The rice will become tender, and all the flavors will meld beautifully.

Just let it do its thing while you go about your day.

Step 6: Add Cheese and Serve

Once the cooking time is up, it’s time for the grand finale!

Stir in the shredded cheese until it melts into the soup.

This adds a creamy richness that takes it over the top.

Serve hot, garnished with fresh parsley if you like.

Enjoy your hearty bowl of Slow Cooker Stuffed Pepper Soup!

Tips for Success

  • Brown the meat well for deeper flavor.
  • Use low-sodium broth to control saltiness.
  • Stir occasionally during cooking for even flavor distribution.
  • Let the soup cool before storing leftovers for better preservation.
  • Feel free to adjust spices to suit your taste preferences.

Equipment Needed

  • Slow Cooker: Essential for this recipe. A 6-quart model works great.
  • Skillet: For browning the meat. A non-stick pan is a good alternative.
  • Cutting Board: To chop your veggies safely.
  • Knife: A sharp chef’s knife makes prep easier.
  • Measuring Cups: For accurate ingredient portions.

Variations

  • Vegetarian Delight: Swap the ground meat for lentils or a plant-based meat alternative for a hearty vegetarian version.
  • Spicy Kick: Add diced jalapeños or a splash of hot sauce for a spicy twist that will warm you up!
  • Extra Veggies: Toss in corn, zucchini, or spinach for added nutrition and flavor. They’ll blend beautifully with the soup.
  • Cheesy Goodness: Experiment with different cheeses like pepper jack or gouda for a unique flavor profile.
  • Quinoa Substitute: Replace rice with quinoa for a protein-packed alternative that cooks quickly and adds a nutty flavor.

Serving Suggestions

  • Crusty Bread: Serve with a side of warm, crusty bread for dipping.
  • Salad: A fresh green salad pairs perfectly to balance the richness of the soup.
  • Wine: Enjoy with a glass of red wine for a cozy dinner vibe.
  • Garnish: Top with extra cheese or a dollop of sour cream for added creaminess.

FAQs about Slow Cooker Stuffed Pepper Soup

Can I use brown rice instead of white rice in this soup?

Absolutely! Brown rice adds a nutty flavor and extra fiber. Just keep in mind that it may require a bit more cooking time, so adjust accordingly.

How can I make this soup spicier?

If you’re looking for a kick, consider adding diced jalapeños or a splash of hot sauce. You can also sprinkle in some red pepper flakes for an extra layer of heat.

Can I freeze Slow Cooker Stuffed Pepper Soup?

Yes, this soup freezes beautifully! Just let it cool completely before transferring it to an airtight container. It can be stored in the freezer for up to three months.

What can I serve with this soup?

This soup pairs wonderfully with crusty bread, a fresh salad, or even a side of garlic bread. It’s a complete meal on its own, but these sides can elevate your dining experience!

Is this soup gluten-free?

Yes! As long as you use gluten-free broth and ensure your rice is gluten-free, this Slow Cooker Stuffed Pepper Soup is a delicious option for those avoiding gluten.

Final Thoughts

Cooking is more than just a necessity; it’s a way to connect with those we love.

This Slow Cooker Stuffed Pepper Soup embodies that spirit, offering warmth and comfort in every spoonful.

The ease of preparation allows you to focus on what truly matters—sharing a meal with family or friends.

As the flavors meld together, you’ll find joy in the anticipation of that first bite.

So, gather around the table, serve up this delightful soup, and create memories that will last long after the last drop is gone.

Trust me, it’s a bowl full of happiness!

Ranis

Slow Cooker Stuffed Pepper Soup: A Flavorful Delight!

A hearty and flavorful slow cooker soup that combines the classic taste of stuffed peppers with the convenience of a slow cooker.
Prep Time 15 minutes
Servings: 6 servings
Course: Soup
Cuisine: American
Calories: 320

Ingredients
  

  • 1 pound ground beef or turkey
  • 1 medium onion diced
  • 2 cloves garlic minced
  • 1 bell pepper diced (any color)
  • 1 can 15 ounces diced tomatoes, undrained
  • 1 can 15 ounces tomato sauce
  • 2 cups beef or vegetable broth
  • 1 cup uncooked rice white or brown
  • 1 teaspoon dried oregano
  • 1 teaspoon dried basil
  • 1 teaspoon salt
  • ½ teaspoon black pepper
  • 1 cup shredded cheese cheddar or mozzarella
  • Fresh parsley chopped (for garnish, optional)

Method
 

  1. In a skillet over medium heat, brown the ground beef or turkey until fully cooked. Drain excess fat and transfer the meat to the slow cooker.
  2. Add the diced onion, minced garlic, and diced bell pepper to the slow cooker.
  3. Pour in the diced tomatoes, tomato sauce, and broth. Stir to combine.
  4. Add the uncooked rice, oregano, basil, salt, and black pepper. Mix well.
  5. Cover and cook on low for 6-8 hours or on high for 3-4 hours, until the rice is tender.
  6. Once cooked, stir in the shredded cheese until melted.
  7. Serve hot, garnished with fresh parsley if desired.

Nutrition

Serving: 1cupCalories: 320kcalCarbohydrates: 30gProtein: 24gFat: 14gSaturated Fat: 7gPolyunsaturated Fat: 5gCholesterol: 70mgSodium: 800mgFiber: 2gSugar: 5g

Notes

  • For a vegetarian version, substitute the meat with lentils or a plant-based ground meat alternative.
  • Add additional vegetables like corn or zucchini for extra nutrition and flavor.

Tried this recipe?

Let us know how it was!

Butternut Squash and Sweet Potato Soup with Crispy Cauliflower Crumbles for a Cozy Dinner Delight!

Introduction to Butternut Squash and Sweet Potato Soup with Crispy Cauliflower Crumbles

As the leaves turn and the air gets crisp, there’s nothing quite like a warm bowl of Butternut Squash and Sweet Potato Soup with Crispy Cauliflower Crumbles to wrap you in comfort. This recipe is a cozy hug on a chilly evening, perfect for those busy days when you crave something hearty yet simple. It’s not just a meal; it’s a way to gather around the table and share warmth with loved ones. Trust me, this soup will become your go-to for a delightful dinner that impresses without the fuss.

Why You’ll Love This Butternut Squash and Sweet Potato Soup with Crispy Cauliflower Crumbles

This Butternut Squash and Sweet Potato Soup with Crispy Cauliflower Crumbles is a game-changer for your dinner routine. It’s quick to whip up, taking just 45 minutes from start to finish. The flavors are rich and comforting, making it a perfect dish for chilly nights. Plus, the crispy cauliflower adds a delightful crunch that elevates the soup, ensuring every spoonful is a cozy delight. You’ll love how easy it is to impress your family and friends!

Ingredients for Butternut Squash and Sweet Potato Soup with Crispy Cauliflower Crumbles

Gathering the right ingredients is the first step to creating this cozy masterpiece. Here’s what you’ll need:

  • Olive oil: A staple in any kitchen, it adds richness and helps sauté the aromatics.
  • Onion: Diced onion brings sweetness and depth to the soup, forming the flavor base.
  • Garlic: Minced garlic adds a fragrant kick that elevates the overall taste.
  • Ground cumin: This spice introduces a warm, earthy flavor that complements the sweetness of the squash.
  • Ground coriander: A hint of citrusy notes, it brightens the soup and balances the flavors.
  • Smoked paprika: This adds a subtle smokiness, enhancing the soup’s comforting vibe.
  • Butternut squash: The star of the show, its creamy texture and natural sweetness make the soup luscious.
  • Sweet potatoes: They add a vibrant color and extra sweetness, making the soup even more delightful.
  • Vegetable broth: A flavorful base that brings everything together; feel free to use homemade or store-bought.
  • Coconut milk: This adds creaminess and a hint of tropical flavor, perfect for a cozy touch.
  • Salt and pepper: Essential for seasoning, they enhance all the flavors in the soup.
  • Cauliflower: Cut into small florets, it’s roasted to crispy perfection, adding texture to the dish.
  • Breadcrumbs: These help create the crispy cauliflower crumbles that add crunch to each bite.
  • Nutritional yeast (optional): A great addition for a cheesy flavor without dairy, perfect for vegan diets.
  • Fresh parsley: A sprinkle of this bright herb adds a pop of color and freshness to the final dish.

For exact measurements, check the bottom of the article where you can find everything listed for easy printing. Happy cooking!

How to Make Butternut Squash and Sweet Potato Soup with Crispy Cauliflower Crumbles

Creating this Butternut Squash and Sweet Potato Soup with Crispy Cauliflower Crumbles is a delightful journey. Each step builds flavor and warmth, making your kitchen feel like a cozy haven. Let’s dive into the process!

Step 1: Sauté the Aromatics

Start by heating the olive oil in a large pot over medium heat. Once it shimmers, toss in the diced onion. Sauté for about 5 minutes until it turns translucent. The aroma will fill your kitchen, inviting everyone to gather around. Add the minced garlic and cook for another minute until fragrant. This is where the magic begins!

Step 2: Toast the Spices

Next, stir in the ground cumin, coriander, and smoked paprika. Toasting these spices for about a minute enhances their flavors, making them pop in the soup. You’ll notice a warm, inviting scent wafting through the air. It’s a simple step that makes a world of difference!

Step 3: Add the Vegetables

Now, it’s time to add the cubed butternut squash and sweet potatoes to the pot. Pour in the vegetable broth, bringing everything to a boil. Once boiling, reduce the heat and let it simmer for about 20-25 minutes. You want the squash and sweet potatoes to be tender. This is the heart of your soup, where all those flavors meld together beautifully.

Step 4: Roast the Cauliflower

While the soup simmers, preheat your oven to 400°F. On a baking sheet, toss the cauliflower florets with a drizzle of olive oil, salt, and pepper. Roast them for 20-25 minutes until they’re golden and crispy, stirring halfway through. This step adds a delightful crunch that contrasts perfectly with the creamy soup.

Step 5: Blend the Soup

Once the vegetables are tender, remove the pot from heat. Using an immersion blender, puree the soup until it’s smooth and velvety. Stir in the coconut milk for that creamy texture. Taste and season with salt and pepper as needed. This is where the soup transforms into a comforting bowl of goodness!

Step 6: Serve and Garnish

To serve, ladle the soup into bowls and top with those crispy cauliflower crumbles. A sprinkle of fresh parsley adds a pop of color and freshness. Each spoonful is a warm embrace, perfect for cozy dinners. Enjoy every bite of this Butternut Squash and Sweet Potato Soup with Crispy Cauliflower Crumbles!

Tips for Success

  • Prep your ingredients ahead of time to streamline the cooking process.
  • Don’t skip toasting the spices; it enhances their flavor significantly.
  • Adjust the thickness of the soup by adding more broth or coconut milk as desired.
  • For extra crunch, consider adding nuts or seeds as a topping.
  • Store leftovers in an airtight container for up to three days for easy reheating.

Equipment Needed

  • Large pot: A sturdy pot is essential for simmering the soup. A Dutch oven works great too.
  • Immersion blender: Perfect for pureeing the soup smoothly. A regular blender can be used, but be cautious with hot liquids.
  • Baking sheet: Needed for roasting the cauliflower. Any flat oven-safe dish will do.

Variations

  • Spicy Kick: Add a pinch of red pepper flakes or a diced jalapeño to the soup for a spicy twist.
  • Herb Infusion: Experiment with fresh herbs like thyme or rosemary for an aromatic touch.
  • Protein Boost: Stir in cooked lentils or chickpeas for added protein and heartiness.
  • Nutty Flavor: Top with toasted pumpkin seeds or walnuts for an extra crunch and flavor.
  • Different Veggies: Swap in carrots or parsnips for a unique flavor profile while keeping the base ingredients.

Serving Suggestions for Butternut Squash and Sweet Potato Soup with Crispy Cauliflower Crumbles

  • Pair with crusty bread or a warm baguette for dipping.
  • Serve alongside a fresh green salad for a balanced meal.
  • Enjoy with a glass of crisp white wine, like Sauvignon Blanc.
  • Garnish with extra parsley or a drizzle of olive oil for presentation.

FAQs about Butternut Squash and Sweet Potato Soup with Crispy Cauliflower Crumbles

Can I make this soup ahead of time?
Absolutely! This Butternut Squash and Sweet Potato Soup with Crispy Cauliflower Crumbles tastes even better the next day. Just store it in an airtight container in the fridge for up to three days. Reheat gently on the stove before serving.

Can I freeze the soup?
Yes, you can freeze the soup! Allow it to cool completely, then transfer it to freezer-safe containers. It will keep well for up to three months. Just remember to leave some space in the container for expansion.

What can I substitute for coconut milk?
If you prefer a different flavor, you can substitute coconut milk with heavy cream or a dairy-free alternative like almond or oat milk. Each option will give the soup a unique twist while keeping it creamy.

How can I make this soup spicier?
For a spicy kick, add a pinch of red pepper flakes or a diced jalapeño when you sauté the aromatics. This will give your Butternut Squash and Sweet Potato Soup a delightful heat that balances the sweetness.

What can I serve with this soup?
This soup pairs wonderfully with crusty bread, a fresh green salad, or even a light sandwich. For a cozy dinner, consider serving it with a glass of crisp white wine to complement the flavors.

Final Thoughts

Cooking this Butternut Squash and Sweet Potato Soup with Crispy Cauliflower Crumbles is more than just preparing a meal; it’s about creating a moment of joy. The vibrant colors and rich flavors come together to warm your heart and home. Each spoonful is a reminder of the simple pleasures in life, perfect for sharing with family or savoring solo on a quiet evening. As the soup simmers, the delightful aroma fills the air, inviting everyone to gather around the table. This recipe is a cozy embrace, making every dinner feel special and memorable.

Ranis

Butternut Squash and Sweet Potato Soup with Crispy Cauliflower Crumbles for a Cozy Dinner Delight!

A cozy and delicious Butternut Squash and Sweet Potato Soup topped with crispy cauliflower crumbles, perfect for a comforting dinner.
Prep Time 15 minutes
Cook Time 30 minutes
Total Time 45 minutes
Servings: 6 servings
Course: Soup
Cuisine: American
Calories: 220

Ingredients
  

  • 2 tablespoons olive oil
  • 1 medium onion diced
  • 2 cloves garlic minced
  • 1 teaspoon ground cumin
  • 1 teaspoon ground coriander
  • 1/2 teaspoon smoked paprika
  • 1 medium butternut squash peeled and cubed (about 4 cups)
  • 2 medium sweet potatoes peeled and cubed (about 3 cups)
  • 4 cups vegetable broth
  • 1 cup coconut milk
  • Salt and pepper to taste
  • 1 small head of cauliflower cut into small florets
  • 1/4 cup breadcrumbs
  • 1 tablespoon nutritional yeast optional
  • Fresh parsley for garnish

Method
 

  1. In a large pot, heat the olive oil over medium heat. Add the diced onion and sauté for about 5 minutes until translucent. Add the minced garlic and cook for an additional minute until fragrant.
  2. Stir in the cumin, coriander, and smoked paprika, cooking for another minute to toast the spices.
  3. Add the cubed butternut squash and sweet potatoes to the pot. Pour in the vegetable broth and bring to a boil. Reduce the heat and let it simmer for about 20-25 minutes, or until the squash and sweet potatoes are tender.
  4. While the soup is simmering, preheat the oven to 400°F. On a baking sheet, toss the cauliflower florets with a drizzle of olive oil, salt, and pepper. Roast for 20-25 minutes until golden and crispy, stirring halfway through.
  5. Once the vegetables in the soup are tender, remove the pot from heat. Use an immersion blender to puree the soup until smooth. Stir in the coconut milk and season with salt and pepper to taste.
  6. Serve the soup hot, topped with crispy cauliflower crumbles and a sprinkle of fresh parsley.

Nutrition

Serving: 1cupCalories: 220kcalCarbohydrates: 30gProtein: 4gFat: 10gSaturated Fat: 5gPolyunsaturated Fat: 3gSodium: 500mgFiber: 6gSugar: 5g

Notes

  • For added flavor, try adding a pinch of red pepper flakes to the soup for a little heat.
  • Substitute the coconut milk with heavy cream or a dairy-free alternative if you prefer a different flavor profile.

Tried this recipe?

Let us know how it was!

Shrimp Enchiladas with Cream Sauce: A Flavorful Delight

Introduction to Shrimp Enchiladas with Cream Sauce

There’s something magical about the aroma of Shrimp Enchiladas with Cream Sauce wafting through the kitchen. It takes me back to family gatherings where laughter and delicious food filled the air. This dish is not just a meal; it’s a celebration of flavors that can turn an ordinary weeknight into a special occasion.

Whether you’re looking for a quick solution after a long day or a dish to impress your loved ones, these enchiladas are your answer. With tender shrimp wrapped in warm tortillas and smothered in a creamy sauce, every bite is a delightful experience.

Why You’ll Love This Shrimp Enchiladas with Cream Sauce

These Shrimp Enchiladas with Cream Sauce are a game-changer for busy weeknights.

They come together in just 40 minutes, making them perfect for those evenings when time is tight.

The combination of succulent shrimp and creamy sauce creates a flavor explosion that will have everyone asking for seconds.

Plus, they’re versatile enough to please even the pickiest eaters, ensuring a happy table every time.

Ingredients for Shrimp Enchiladas with Cream Sauce

Creating Shrimp Enchiladas with Cream Sauce is a delightful journey, and it all starts with the right ingredients. Here’s what you’ll need to bring this dish to life:

  • Shrimp: Large, peeled, and deveined shrimp are the star of the show. They cook quickly and soak up all the flavors beautifully.
  • Olive Oil: A splash of olive oil helps to sauté the shrimp, adding a rich flavor and preventing sticking.
  • Garlic Powder: This adds a savory depth to the shrimp. If you have fresh garlic, feel free to use that instead!
  • Cumin: A warm spice that brings a hint of earthiness, complementing the shrimp perfectly.
  • Chili Powder: For a touch of heat and color, chili powder is essential. Adjust the amount based on your spice preference.
  • Salt and Pepper: Simple seasonings that enhance the overall flavor of the dish.
  • Corn Tortillas: These are the perfect vessel for your shrimp. They’re soft, pliable, and add a lovely corn flavor.
  • Monterey Jack Cheese: This cheese melts beautifully, creating a creamy topping that ties everything together.
  • Sour Cream: Adds a tangy richness to the cream sauce, balancing the flavors.
  • Heavy Cream: For that luxurious, creamy texture in the sauce, heavy cream is a must.
  • Green Enchilada Sauce: This sauce adds a zesty kick and moisture to the enchiladas. You can use store-bought or homemade.
  • Cilantro (optional): Fresh cilantro adds a burst of color and freshness. If you’re not a fan, feel free to skip it!

For exact measurements, check the bottom of the article where you can find everything listed for easy printing. Enjoy gathering these ingredients; each one plays a vital role in crafting your delicious enchiladas!

How to Make Shrimp Enchiladas with Cream Sauce

Making Shrimp Enchiladas with Cream Sauce is a straightforward process that brings a burst of flavor to your table. Follow these simple steps, and you’ll have a delicious meal ready in no time!

Step 1: Preheat the Oven

Start by preheating your oven to 350°F (175°C).

This step is crucial because it ensures that your enchiladas cook evenly and the cheese melts to perfection.

While the oven heats up, you can prepare the shrimp and sauce.

Step 2: Cook the Shrimp

In a large skillet, heat a tablespoon of olive oil over medium heat.

Once the oil is shimmering, add the peeled and deveined shrimp.

Sprinkle in the garlic powder, cumin, chili powder, salt, and pepper.

Cook the shrimp for about 3-4 minutes, or until they turn pink and opaque.

This quick cooking time keeps the shrimp tender and juicy.

Once done, remove them from heat and set aside.

Step 3: Prepare the Cream Sauce

In a separate bowl, mix together one cup of sour cream, one cup of heavy cream, and half of the green enchilada sauce.

Stir until everything is well combined.

This creamy mixture will coat your enchiladas, adding richness and flavor.

Feel free to taste and adjust the seasoning if needed!

Step 4: Assemble the Enchiladas

Now it’s time to fill those tortillas!

Take a corn tortilla and place a few shrimp in the center.

Sprinkle a bit of Monterey Jack cheese on top, then roll the tortilla tightly around the filling.

Repeat this process for all the tortillas, placing them seam-side down in a baking dish.

This step is where the magic begins!

Step 5: Bake the Enchiladas

Spread a thin layer of the remaining green enchilada sauce on the bottom of your baking dish.

Then, pour the creamy sauce over the rolled enchiladas, ensuring they are well covered.

Top with the remaining Monterey Jack cheese for that gooey finish.

Bake in the preheated oven for 20-25 minutes, or until the cheese is bubbly and golden.

The aroma will fill your kitchen, making it hard to wait for the first bite!

Tips for Success

  • Use fresh shrimp for the best flavor and texture.
  • Warm the corn tortillas in a dry skillet to make them pliable.
  • Don’t overcook the shrimp; they should be just pink and tender.
  • Feel free to customize the spice level with jalapeños or hot sauce.
  • Let the enchiladas rest for a few minutes before serving for easier slicing.

Equipment Needed

  • Large Skillet: A non-stick skillet works best, but any large pan will do.
  • Baking Dish: A 9×13 inch dish is ideal; you can use any oven-safe dish.
  • Mixing Bowl: A medium-sized bowl for combining the cream sauce.
  • Spatula: For easy flipping and serving of the enchiladas.

Variations

  • Chicken Enchiladas: Substitute shrimp with cooked, shredded chicken for a different protein option.
  • Vegetarian Version: Use black beans, sautéed bell peppers, and zucchini instead of shrimp for a hearty vegetarian dish.
  • Spicy Kick: Add diced jalapeños or use a spicy enchilada sauce to amp up the heat.
  • Cheese Lovers: Mix in different cheeses like pepper jack or cheddar for a unique flavor twist.
  • Gluten-Free Option: Ensure your corn tortillas are certified gluten-free for a safe meal.

Serving Suggestions

  • Side Salad: A fresh green salad with avocado and lime dressing complements the richness of the enchiladas.
  • Rice: Serve with cilantro-lime rice for a flavorful side that pairs perfectly.
  • Drinks: A chilled margarita or a light beer enhances the meal’s festive vibe.
  • Garnish: Top with extra cilantro and a squeeze of lime for a burst of freshness.

FAQs about Shrimp Enchiladas with Cream Sauce

Can I use frozen shrimp for this recipe?

Absolutely! Just make sure to thaw the shrimp completely before cooking. Frozen shrimp can be just as delicious as fresh when prepared correctly.

How can I make these enchiladas spicier?

If you’re looking for a kick, consider adding diced jalapeños to the shrimp mixture or using a spicy enchilada sauce. You can also sprinkle some crushed red pepper flakes on top before serving.

Can I prepare the enchiladas ahead of time?

Yes! You can assemble the enchiladas and store them in the fridge for up to 24 hours before baking. Just cover them tightly with plastic wrap to keep them fresh.

What can I substitute for heavy cream?

If you want a lighter option, you can use half-and-half or a combination of milk and Greek yogurt. The texture will be slightly different, but it will still be creamy!

Are Shrimp Enchiladas with Cream Sauce gluten-free?

Yes, as long as you use gluten-free corn tortillas, this dish is a great gluten-free option. Always check the labels to ensure they meet your dietary needs.

Final Thoughts

Cooking Shrimp Enchiladas with Cream Sauce is more than just preparing a meal; it’s about creating memories.

The joy of gathering around the table, sharing laughter, and savoring each bite is what makes this dish special.

With its creamy texture and vibrant flavors, it’s sure to impress family and friends alike.

Whether it’s a casual weeknight dinner or a festive gathering, these enchiladas bring warmth and comfort to any occasion.

So roll up those tortillas, pour on the sauce, and enjoy the delightful experience that comes with every delicious bite!

Ranis

Shrimp Enchiladas with Cream Sauce: A Flavorful Delight

Shrimp Enchiladas with Cream Sauce is a flavorful dish featuring shrimp wrapped in corn tortillas, topped with a creamy sauce and cheese.
Prep Time 15 minutes
Cook Time 25 minutes
Total Time 40 minutes
Servings: 4 servings
Course: Main Course
Cuisine: Mexican
Calories: 450

Ingredients
  

  • 1 pound large shrimp peeled and deveined
  • 1 tablespoon olive oil
  • 1 teaspoon garlic powder
  • 1 teaspoon cumin
  • 1 teaspoon chili powder
  • Salt and pepper to taste
  • 8 small corn tortillas
  • 1 cup shredded Monterey Jack cheese
  • 1 cup sour cream
  • 1 cup heavy cream
  • 1 cup green enchilada sauce
  • 1/2 cup chopped fresh cilantro optional

Method
 

  1. Preheat your oven to 350°F (175°C).
  2. In a large skillet, heat the olive oil over medium heat. Add the shrimp, garlic powder, cumin, chili powder, salt, and pepper. Cook until the shrimp are pink and opaque, about 3-4 minutes. Remove from heat.
  3. In a separate bowl, mix together the sour cream, heavy cream, and half of the green enchilada sauce.
  4. To assemble the enchiladas, place a few shrimp in the center of each tortilla, sprinkle with a bit of Monterey Jack cheese, and roll them up tightly.
  5. Spread a thin layer of the remaining enchilada sauce on the bottom of a baking dish. Place the rolled enchiladas seam-side down in the dish.
  6. Pour the cream mixture over the enchiladas, then sprinkle the remaining cheese on top.
  7. Bake in the preheated oven for 20-25 minutes, or until the cheese is bubbly and golden.
  8. Garnish with chopped cilantro if desired, and serve hot.

Nutrition

Serving: 1enchiladaCalories: 450kcalCarbohydrates: 10gProtein: 25gFat: 30gSaturated Fat: 15gPolyunsaturated Fat: 10gCholesterol: 200mgSodium: 800mgFiber: 2gSugar: 2g

Notes

  • For a spicier kick, add diced jalapeños to the shrimp mixture or use a spicy enchilada sauce.
  • Substitute the shrimp with cooked chicken or black beans for a different protein option.

Tried this recipe?

Let us know how it was!

Creamy Steak Alfredo Pasta Bake: Irresistible Comfort Food!

Introduction to Creamy Steak Alfredo Pasta Bake

There’s something magical about a dish that wraps you in warmth and comfort, and the Creamy Steak Alfredo Pasta Bake does just that. After a long day, when the couch calls your name, this recipe is your ticket to a satisfying meal without the fuss. It’s perfect for impressing your loved ones or simply treating yourself. With tender steak, creamy sauce, and cheesy goodness, it’s a dish that brings everyone together. Trust me, once you try this, it’ll become a go-to for those busy weeknights or cozy weekends.

Why You’ll Love This Creamy Steak Alfredo Pasta Bake

This Creamy Steak Alfredo Pasta Bake is a game-changer for anyone who craves comfort food without spending hours in the kitchen. It’s quick to prepare, taking just 45 minutes from start to finish. The rich flavors of the creamy Alfredo sauce combined with tender steak and pasta create a dish that’s not only satisfying but also incredibly delicious. Plus, it’s a crowd-pleaser, making it perfect for family dinners or gatherings with friends.

Ingredients for Creamy Steak Alfredo Pasta Bake

Gathering the right ingredients is the first step to creating your Creamy Steak Alfredo Pasta Bake. Here’s what you’ll need:

  • Penne pasta: This tubular pasta holds the creamy sauce beautifully, ensuring every bite is packed with flavor.
  • Olive oil: A splash of this liquid gold helps to sear the steak, adding richness to the dish.
  • Sirloin steak: Tender and flavorful, this cut is perfect for a hearty pasta bake. You can also swap it for grilled chicken or sautéed mushrooms for a different twist.
  • Garlic powder: A sprinkle of this adds a savory depth to the steak, enhancing the overall flavor.
  • Salt and pepper: Essential seasonings that elevate the taste of every ingredient.
  • Heavy cream: The star of the show! This creates the luscious, creamy sauce that binds everything together.
  • Parmesan cheese: Grated for a nutty flavor, it adds richness to the sauce and a touch of sophistication.
  • Shredded mozzarella cheese: This melty topping creates a golden, bubbly crust that’s hard to resist.
  • Italian seasoning: A blend of herbs that brings a taste of Italy to your kitchen.
  • Fresh parsley: Optional, but a sprinkle of this vibrant herb adds a pop of color and freshness to your dish.

For exact measurements, check the bottom of the article where you can find everything listed for easy printing. Happy cooking!

How to Make Creamy Steak Alfredo Pasta Bake

Now that you have all your ingredients ready, let’s dive into the steps to create this Creamy Steak Alfredo Pasta Bake. Each step is straightforward, making it easy for anyone to whip up this delicious dish. Follow along, and soon you’ll have a comforting meal that’s sure to impress!

Step 1: Preheat the Oven

First things first, preheat your oven to 350°F (175°C). This ensures it’s nice and hot when it’s time to bake your pasta. A well-preheated oven is key to achieving that perfect golden crust on top!

Step 2: Cook the Pasta

Next, cook the penne pasta according to the package instructions until it’s al dente. This means it should be firm to the bite, not mushy. Once done, drain the pasta and set it aside. You want it to hold up well in the bake.

Step 3: Sear the Steak

In a large skillet, heat the olive oil over medium-high heat. Add the bite-sized pieces of sirloin steak, seasoning them with garlic powder, salt, and pepper. Sear the steak until it’s browned, about 5-7 minutes. This step locks in the flavor and gives the steak a nice texture. Once browned, remove it from heat.

Step 4: Prepare the Cream Mixture

In a mixing bowl, combine the heavy cream, grated Parmesan cheese, Italian seasoning, and a pinch of salt and pepper. Stir until everything is well blended. This creamy mixture is what makes your pasta bake so indulgent and rich!

Step 5: Combine Ingredients

Now, grab a large baking dish. Combine the cooked pasta, seared steak, and the creamy mixture. Mix everything together until the pasta and steak are evenly coated. This is where the magic happens, as all those flavors meld together beautifully.

Step 6: Add Cheese Topping

Sprinkle the shredded mozzarella cheese evenly over the top of your pasta bake. This cheesy layer will melt and create a deliciously gooey topping that’s hard to resist. Trust me, it’s the best part!

Step 7: Bake

Place your baking dish in the preheated oven and bake for 25-30 minutes. Keep an eye on it! You want the cheese to be bubbly and golden brown. The aroma wafting through your kitchen will be irresistible!

Step 8: Cool and Garnish

Once baked, remove the dish from the oven and let it cool for a few minutes. This helps the layers set a bit. If you like, garnish with fresh parsley for a pop of color and freshness before serving. Now, dig in and enjoy your Creamy Steak Alfredo Pasta Bake!

Tips for Success

  • Don’t overcook the pasta; it should be al dente to hold up in the bake.
  • For extra flavor, consider marinating the steak before cooking.
  • Use freshly grated cheese for the best melt and flavor.
  • Let the dish cool slightly before serving to help it set.
  • Feel free to customize with your favorite veggies for added nutrition.

Equipment Needed

  • Large pot: For boiling the pasta. A Dutch oven works well too.
  • Skillet: A non-stick skillet is ideal for searing the steak.
  • Baking dish: A 9×13 inch dish is perfect for this recipe.
  • Mixing bowl: For combining the creamy sauce ingredients.
  • Measuring cups and spoons: Essential for accurate ingredient measurements.

Variations

  • Vegetarian Option: Swap the sirloin steak for sautéed mushrooms or roasted vegetables like zucchini and bell peppers for a hearty, meatless dish.
  • Spicy Kick: Add red pepper flakes or diced jalapeños to the cream mixture for a spicy twist that will wake up your taste buds.
  • Cheesy Delight: Mix in different cheeses like gouda or fontina for a unique flavor profile and extra creaminess.
  • Gluten-Free: Use gluten-free penne pasta to make this dish suitable for those with gluten sensitivities.
  • Herb Infusion: Experiment with fresh herbs like basil or thyme in the cream mixture for an aromatic touch.

Serving Suggestions

  • Garlic Bread: Serve with warm, buttery garlic bread for a classic pairing that complements the creamy pasta.
  • Side Salad: A fresh green salad with a tangy vinaigrette adds a refreshing contrast to the richness of the bake.
  • Wine Pairing: Enjoy with a glass of Chardonnay or a light red wine like Pinot Noir for a delightful dining experience.
  • Presentation: Garnish with extra parsley and a sprinkle of Parmesan for an appealing finish.

FAQs about Creamy Steak Alfredo Pasta Bake

Can I make this Creamy Steak Alfredo Pasta Bake ahead of time?

Absolutely! You can prepare the dish up to the baking step, cover it, and refrigerate it for up to 24 hours. When you’re ready to bake, just pop it in the oven. You may need to add a few extra minutes to the baking time if it’s cold from the fridge.

What can I substitute for sirloin steak?

If steak isn’t your thing, you can easily swap it for grilled chicken or even sautéed mushrooms for a vegetarian option. Both alternatives will still deliver a delicious flavor in your Creamy Steak Alfredo Pasta Bake.

Can I freeze leftovers?

Yes, this pasta bake freezes well! Just let it cool completely, then transfer it to an airtight container. It can be frozen for up to three months. When you’re ready to enjoy it again, thaw it in the fridge overnight and reheat in the oven.

How can I make this dish lighter?

To lighten up your Creamy Steak Alfredo Pasta Bake, consider using half-and-half instead of heavy cream and reducing the amount of cheese. You can also add more vegetables to increase the nutritional value without adding too many calories.

What sides pair well with this dish?

This pasta bake is rich and filling, so I recommend serving it with a light side salad or some steamed vegetables. Garlic bread is also a classic choice that complements the creamy flavors beautifully!

Final Thoughts

Creating a Creamy Steak Alfredo Pasta Bake is more than just cooking; it’s about crafting a comforting experience that brings people together. The rich flavors and creamy texture make every bite a delight, perfect for sharing with family or friends. Whether it’s a busy weeknight or a cozy weekend gathering, this dish is sure to impress. Plus, the joy of pulling a bubbling, cheesy bake from the oven is unmatched. So, roll up your sleeves, embrace the process, and enjoy the smiles that come with serving this delicious meal. Happy cooking!

Ranis

Creamy Steak Alfredo Pasta Bake: Irresistible Comfort Food!

A delicious and creamy pasta bake featuring tender steak and a rich Alfredo sauce, perfect for a comforting meal.
Prep Time 15 minutes
Cook Time 30 minutes
Total Time 45 minutes
Servings: 6 servings
Course: Main Course
Cuisine: Italian
Calories: 550

Ingredients
  

  • 8 ounces penne pasta
  • 1 tablespoon olive oil
  • 1 pound sirloin steak cut into bite-sized pieces
  • 1 teaspoon garlic powder
  • Salt and pepper to taste
  • 2 cups heavy cream
  • 1 cup grated Parmesan cheese
  • 1 cup shredded mozzarella cheese
  • 1 teaspoon Italian seasoning
  • 1/2 cup chopped fresh parsley optional for garnish

Method
 

  1. Preheat your oven to 350°F (175°C).
  2. Cook the penne pasta according to package instructions until al dente. Drain and set aside.
  3. In a large skillet, heat the olive oil over medium-high heat. Add the steak pieces, season with garlic powder, salt, and pepper, and cook until browned, about 5-7 minutes. Remove from heat.
  4. In a mixing bowl, combine the heavy cream, Parmesan cheese, Italian seasoning, and a pinch of salt and pepper. Stir until well combined.
  5. In a large baking dish, combine the cooked pasta, cooked steak, and cream mixture. Mix until everything is evenly coated.
  6. Sprinkle the shredded mozzarella cheese evenly over the top of the pasta bake.
  7. Bake in the preheated oven for 25-30 minutes, or until the cheese is bubbly and golden brown.
  8. Remove from the oven and let it cool for a few minutes. Garnish with fresh parsley if desired before serving.

Nutrition

Serving: 1servingCalories: 550kcalCarbohydrates: 30gProtein: 35gFat: 35gSaturated Fat: 20gPolyunsaturated Fat: 10gCholesterol: 120mgSodium: 600mgFiber: 2gSugar: 2g

Notes

  • For added flavor, consider marinating the steak in a mixture of soy sauce and Worcestershire sauce for 30 minutes before cooking.
  • You can substitute the sirloin steak with grilled chicken or sautéed mushrooms for a different protein option.

Tried this recipe?

Let us know how it was!

Country Apple Fritter Bread Recipe You’ll Love Today!

Introduction to Country Apple Fritter Bread

When I think of comfort food, my mind drifts to warm, sweet aromas wafting through the kitchen. Country Apple Fritter Bread is one of those delightful recipes that brings back memories of cozy mornings and family gatherings. This bread is not just a treat; it’s a quick solution for busy days or a dish to impress your loved ones.

With its moist texture and the perfect blend of apples and spices, it’s a slice of happiness that pairs beautifully with coffee or tea. Trust me, once you try this, it’ll become a staple in your home!

Why You’ll Love This Country Apple Fritter Bread

This Country Apple Fritter Bread is a game-changer for your kitchen.

It’s incredibly easy to whip up, making it perfect for those hectic mornings or lazy weekends.

The delightful combination of sweet apples and warm spices creates a flavor explosion that will have everyone asking for seconds.

Plus, it’s versatile enough to serve as breakfast, a snack, or even dessert.

You’ll love how quickly it disappears!

Ingredients for Country Apple Fritter Bread

Creating the perfect Country Apple Fritter Bread starts with gathering the right ingredients.

Here’s what you’ll need:

  • All-purpose flour: The backbone of your bread, providing structure and a soft crumb.
  • Granulated sugar: Adds sweetness and helps create that lovely golden crust.
  • Baking powder: This leavening agent gives your bread a nice rise, making it fluffy.
  • Salt: Enhances the flavors and balances the sweetness.
  • Ground cinnamon: A warm spice that brings a cozy aroma and flavor to the bread.
  • Ground nutmeg: Just a pinch adds depth and a hint of warmth.
  • Unsalted butter: For richness and moisture; melted for easy mixing.
  • Milk: Contributes to the bread’s moist texture; you can use whole or low-fat.
  • Large eggs: Bind the ingredients together and add richness.
  • Vanilla extract: A splash of this elevates the flavor profile beautifully.
  • Peeled and diced apples: The star of the show! Use your favorite variety for sweetness and texture.
  • Brown sugar: Adds a caramel-like sweetness and a bit of moisture to the topping.
  • Powdered sugar: For the glaze, giving a sweet finish to your bread.
  • Optional ingredients: Consider adding chopped walnuts or pecans for a delightful crunch. You can also swap apples for pears for a different twist.

For exact measurements, check the bottom of the article where you can find everything listed for easy printing.

How to Make Country Apple Fritter Bread

Making Country Apple Fritter Bread is a delightful journey that fills your kitchen with warmth and sweet aromas. Follow these simple steps, and you’ll have a delicious loaf ready to enjoy in no time!

Step 1: Preheat and Prepare

Start by preheating your oven to 350°F (175°C).

While it warms up, grab a 9×5-inch loaf pan.

Grease it well or line it with parchment paper for easy removal later.

This little step ensures your bread comes out perfectly!

Step 2: Mix Dry Ingredients

In a large mixing bowl, whisk together the all-purpose flour, granulated sugar, baking powder, salt, ground cinnamon, and nutmeg.

Make sure everything is well combined.

This mixture is the foundation of your Country Apple Fritter Bread, so give it a good stir!

Step 3: Combine Wet Ingredients

In a separate bowl, mix the melted unsalted butter, milk, eggs, and vanilla extract.

Stir until everything is fully combined.

This wet mixture will add moisture and richness to your bread, making it irresistible!

Step 4: Combine Wet and Dry Mixtures

Pour the wet ingredients into the bowl with the dry ingredients.

Gently stir until just combined.

Be careful not to overmix; a few lumps are perfectly fine.

This keeps your bread light and fluffy!

Step 5: Fold in Apples

Now, it’s time to fold in those diced apples.

Gently add them to the batter, ensuring they’re evenly distributed.

These juicy pieces will add bursts of flavor in every bite!

Step 6: Prepare Topping

In a small bowl, mix together the brown sugar and the remaining ground cinnamon.

This topping will create a sweet, caramelized layer on your bread.

Set it aside for the next step!

Step 7: Layer the Batter

Pour half of the batter into your prepared loaf pan.

Sprinkle half of the brown sugar mixture over the batter.

Then, add the remaining batter on top and finish with the rest of the brown sugar mixture.

This layering creates a beautiful marbled effect!

Step 8: Swirl and Bake

Using a knife or skewer, gently swirl the topping into the batter.

This adds a lovely design and flavor throughout.

Now, place the loaf pan in the preheated oven and bake for 50-60 minutes.

You’ll know it’s done when a toothpick inserted into the center comes out clean.

Step 9: Cool and Glaze

Once baked, allow the bread to cool in the pan for about 10 minutes.

Then, transfer it to a wire rack to cool completely.

For the glaze, whisk together the powdered sugar and milk until smooth.

Drizzle it over the cooled bread before slicing.

This sweet finish takes your Country Apple Fritter Bread to the next level!

Tips for Success

  • Use room temperature ingredients for better mixing and texture.
  • Don’t skip the parchment paper; it makes removal a breeze!
  • For extra flavor, try using a mix of sweet and tart apples.
  • Check for doneness a few minutes early to avoid overbaking.
  • Let the bread cool completely before glazing for a perfect finish.

Equipment Needed

  • 9×5-inch loaf pan: Essential for baking; a round cake pan works in a pinch.
  • Mixing bowls: Use any size; a large bowl is best for combining ingredients.
  • Whisk: Perfect for mixing dry and wet ingredients; a fork can also do the job.
  • Spatula: Great for folding in apples; a wooden spoon works too.
  • Wire rack: Ideal for cooling; a plate can substitute if needed.

Variations

  • Nutty Delight: Add 1/2 cup of chopped walnuts or pecans for a crunchy texture that complements the soft bread.
  • Fruit Fusion: Swap out apples for pears or a mix of both for a unique flavor twist.
  • Spiced Up: Experiment with additional spices like ginger or allspice for a more complex flavor profile.
  • Gluten-Free Option: Use a gluten-free all-purpose flour blend to make this recipe suitable for gluten-sensitive friends.
  • Vegan Version: Substitute eggs with flax eggs and use plant-based milk and butter for a vegan-friendly treat.

Serving Suggestions

  • Pair slices of Country Apple Fritter Bread with a hot cup of coffee or tea for a cozy breakfast.
  • Serve with a dollop of whipped cream or a scoop of vanilla ice cream for a delightful dessert.
  • Top with fresh fruit or a sprinkle of cinnamon for an extra touch.

FAQs about Country Apple Fritter Bread

Can I use different types of apples for this recipe?

Absolutely! Using a mix of sweet and tart apples can enhance the flavor. Try Granny Smith for a tart kick or Honeycrisp for sweetness. Each variety brings its own unique taste to the Country Apple Fritter Bread.

How should I store leftover bread?

To keep your Country Apple Fritter Bread fresh, wrap it tightly in plastic wrap or aluminum foil. Store it at room temperature for up to three days, or refrigerate it for up to a week. You can also freeze it for longer storage!

Can I make this bread ahead of time?

Yes! You can prepare the batter a day in advance and store it in the fridge. Just remember to bring it to room temperature before baking. This makes it a great option for busy mornings!

What can I substitute for eggs in this recipe?

If you’re looking for an egg substitute, try using flax eggs. Mix one tablespoon of ground flaxseed with three tablespoons of water, let it sit for a few minutes, and use it in place of one egg. This works well in the Country Apple Fritter Bread!

Can I add more spices to the bread?

Definitely! Feel free to experiment with additional spices like ginger or allspice. Just a pinch can elevate the flavor profile of your Country Apple Fritter Bread, making it even more delightful!

Final Thoughts

Baking Country Apple Fritter Bread is more than just a recipe; it’s an experience that fills your home with warmth and joy.

Each slice is a delightful blend of sweet apples and spices, perfect for sharing with family or enjoying solo with a cup of coffee.

The simple process allows you to create something truly special, making it a go-to for any occasion.

Whether it’s a cozy breakfast or a sweet afternoon snack, this bread brings smiles and satisfaction.

I hope it becomes a cherished part of your culinary adventures, just as it has in mine!

Ranis

Country Apple Fritter Bread Recipe You'll Love Today!

A delicious and moist Country Apple Fritter Bread that combines the flavors of apples and spices, perfect for breakfast or a snack.
Prep Time 15 minutes
Cook Time 1 hour
Total Time 1 hour 15 minutes
Servings: 8 servings
Course: Dessert
Cuisine: American
Calories: 210

Ingredients
  

  • 2 cups all-purpose flour
  • 1 cup granulated sugar
  • 1 tablespoon baking powder
  • 1/2 teaspoon salt
  • 1 teaspoon ground cinnamon
  • 1/2 teaspoon ground nutmeg
  • 1/2 cup unsalted butter melted
  • 1/2 cup milk
  • 2 large eggs
  • 1 teaspoon vanilla extract
  • 2 cups peeled and diced apples about 2 medium apples
  • 1/2 cup brown sugar
  • 1 teaspoon ground cinnamon for topping
  • 1 cup powdered sugar for glaze
  • 2 tablespoons milk for glaze

Method
 

  1. Preheat your oven to 350°F (175°C). Grease a 9x5-inch loaf pan or line it with parchment paper for easy removal.
  2. In a large mixing bowl, whisk together the flour, granulated sugar, baking powder, salt, 1 teaspoon of cinnamon, and nutmeg.
  3. In a separate bowl, combine the melted butter, milk, eggs, and vanilla extract. Mix well until fully combined.
  4. Pour the wet ingredients into the dry ingredients and stir until just combined. Do not overmix.
  5. Gently fold in the diced apples until evenly distributed throughout the batter.
  6. In a small bowl, mix together the brown sugar and 1 teaspoon of cinnamon for the topping.
  7. Pour half of the batter into the prepared loaf pan. Sprinkle half of the brown sugar mixture over the batter. Add the remaining batter on top and finish with the rest of the brown sugar mixture.
  8. Use a knife or skewer to swirl the topping into the batter for a marbled effect.
  9. Bake in the preheated oven for 50-60 minutes, or until a toothpick inserted into the center comes out clean.
  10. Allow the bread to cool in the pan for about 10 minutes before transferring it to a wire rack to cool completely.
  11. For the glaze, whisk together the powdered sugar and 2 tablespoons of milk until smooth. Drizzle over the cooled bread before slicing.

Nutrition

Serving: 1sliceCalories: 210kcalCarbohydrates: 30gProtein: 3gFat: 9gSaturated Fat: 5gPolyunsaturated Fat: 4gCholesterol: 50mgSodium: 200mgFiber: 1gSugar: 15g

Notes

  • For added flavor, consider mixing in 1/2 cup of chopped walnuts or pecans into the batter.
  • Substitute the apples with pears or a mix of both for a different fruit flavor.

Tried this recipe?

Let us know how it was!

Savory Salmon Rice Muffins: A Tasty Twist Recipe!

Introduction to Savory Salmon Rice Muffins

There’s something magical about a recipe that combines convenience and flavor, and that’s exactly what Savory Salmon Rice Muffins deliver. As a busy home cook, I often find myself searching for quick solutions that don’t skimp on taste. These muffins are not just a snack; they’re a delightful way to impress your loved ones or fuel your day. Packed with protein and bursting with flavor, they’re perfect for breakfast, lunch, or a quick bite anytime. Let’s dive into this delicious twist on traditional muffins that will have everyone asking for seconds!

Why You’ll Love This Savory Salmon Rice Muffins

These Savory Salmon Rice Muffins are a game-changer for anyone juggling a busy lifestyle. They come together in just 40 minutes, making them a quick and satisfying option for any meal. The combination of tender salmon, cheesy goodness, and fluffy rice creates a flavor explosion that’s hard to resist. Plus, they’re nutritious, so you can feel good about serving them to your family or enjoying them yourself!

Ingredients for Savory Salmon Rice Muffins

Gathering the right ingredients is the first step to creating these delightful Savory Salmon Rice Muffins. Here’s what you’ll need:

  • Cooked rice: You can use either white or brown rice. It adds a hearty base and helps bind the muffins together.
  • Canned salmon: Flaked salmon is the star of the show, bringing protein and a rich flavor. If you prefer, canned tuna or cooked chicken can be great substitutes.
  • Shredded cheddar cheese: This adds a creamy, cheesy goodness that melts beautifully in the oven. Feel free to experiment with other cheeses like mozzarella or pepper jack for a kick.
  • Green onions: Chopped green onions provide a fresh, mild onion flavor that brightens up the muffins.
  • Eggs: These are essential for binding the ingredients together and adding moisture to the muffins.
  • Milk: A splash of milk helps create a tender texture. You can use any milk you have on hand, including plant-based options.
  • Garlic powder: This adds a savory depth of flavor. If you’re a garlic lover, consider using fresh minced garlic instead.
  • Salt and black pepper: These basic seasonings enhance the overall taste. Adjust to your preference.
  • Dried dill (optional): A sprinkle of dill brings a lovely herbal note that pairs well with salmon.
  • Breadcrumbs: Use these for topping the muffins, adding a delightful crunch. You can use panko for extra crispiness or even crushed crackers.

For exact measurements, check the bottom of the article where you can find everything listed for easy printing. Now that you have your ingredients ready, let’s move on to the fun part—making these muffins!

How to Make Savory Salmon Rice Muffins

Now that you have your ingredients ready, it’s time to roll up your sleeves and get cooking! Making these Savory Salmon Rice Muffins is straightforward and fun. Follow these simple steps, and you’ll have a batch of delicious muffins in no time.

Step 1: Preheat the Oven

First things first, preheat your oven to 375°F. This is crucial for achieving that perfect golden-brown finish. While the oven warms up, prepare your muffin tin by greasing it or lining it with muffin liners. This will make it easier to pop those muffins out later.

Step 2: Mix the Base Ingredients

In a large mixing bowl, combine the cooked rice, flaked salmon, shredded cheddar cheese, and chopped green onions. This is where the flavor begins to come alive! Stir everything together until well mixed. The rice acts as a hearty base, while the salmon and cheese add richness.

Step 3: Prepare the Egg Mixture

In a separate bowl, whisk together the eggs, milk, garlic powder, salt, black pepper, and dried dill if you’re using it. This mixture adds moisture and binds the muffins together. Whisk until everything is well combined and frothy. It’s like a little magic potion for your muffins!

Step 4: Combine Everything

Now, pour the egg mixture into the rice and salmon mix. Stir gently until everything is evenly combined. Make sure the flavors are distributed well. You want every bite to be just as delicious as the last!

Step 5: Fill the Muffin Tin

Spoon the mixture into the prepared muffin tin, filling each cup about 3/4 full. This allows room for the muffins to rise. For an extra crunch, sprinkle breadcrumbs on top of each muffin. It’s the finishing touch that adds texture!

Step 6: Bake to Perfection

Finally, place the muffin tin in the preheated oven and bake for 20-25 minutes. Keep an eye on them! You’ll know they’re done when the tops are golden brown and a toothpick inserted into the center comes out clean. The aroma wafting through your kitchen will be irresistible!

Tips for Success

  • Use leftover rice for a quick prep—it’s a time-saver!
  • Don’t skip the breadcrumbs; they add a delightful crunch.
  • Experiment with different cheeses for unique flavors.
  • Let the muffins cool slightly before removing them from the tin to avoid crumbling.
  • Store leftovers in an airtight container for up to three days.

Equipment Needed

  • Muffin tin: A standard 12-cup muffin tin works best. If you don’t have one, use a silicone mold for easy removal.
  • Mixing bowls: You’ll need at least two—one for the dry ingredients and one for the wet.
  • Whisk: A simple whisk is perfect for blending the egg mixture. A fork can work in a pinch!
  • Spoon or spatula: Use these for mixing and filling the muffin cups.

Variations

  • Veggie Boost: Add chopped bell peppers, spinach, or zucchini for extra nutrition and color.
  • Spicy Kick: Mix in diced jalapeños or a dash of hot sauce for a spicy twist.
  • Herb Infusion: Experiment with fresh herbs like parsley or cilantro for a fresh flavor profile.
  • Cheese Swap: Try feta or goat cheese instead of cheddar for a tangy flavor.
  • Gluten-Free Option: Use gluten-free breadcrumbs and rice to make these muffins suitable for gluten-sensitive diets.

Serving Suggestions

  • Pair these muffins with a fresh garden salad for a light lunch.
  • Serve with a dollop of sour cream or Greek yogurt for added creaminess.
  • Enjoy alongside a bowl of tomato soup for a comforting meal.
  • For drinks, try a crisp white wine or a refreshing iced tea.
  • Garnish with extra green onions for a pop of color and flavor.

FAQs about Savory Salmon Rice Muffins

Can I use fresh salmon instead of canned?
Absolutely! If you prefer fresh salmon, just cook it first, flake it, and then mix it into the batter. It will add a lovely freshness to your Savory Salmon Rice Muffins.

How do I store leftover muffins?
Store any leftover muffins in an airtight container in the fridge for up to three days. You can also freeze them for longer storage. Just reheat in the oven or microwave when you’re ready to enjoy!

Can I make these muffins ahead of time?
Yes! You can prepare the mixture a day in advance and store it in the fridge. Just fill the muffin tin and bake when you’re ready for a quick meal or snack.

What can I substitute for the breadcrumbs?
If you’re out of breadcrumbs, crushed crackers or panko work great as alternatives. You can even skip the topping for a softer muffin if you prefer.

Are these muffins suitable for kids?
Definitely! These Savory Salmon Rice Muffins are packed with protein and flavor, making them a nutritious option for kids. Plus, they’re fun to eat!

Final Thoughts

Creating Savory Salmon Rice Muffins is more than just cooking; it’s about bringing joy to your kitchen and your table. Each bite is a delightful blend of flavors and textures, making them a hit with family and friends alike. Whether you’re enjoying them fresh out of the oven or as a quick snack later, these muffins are sure to impress. Plus, they’re a fantastic way to sneak in some nutrition without sacrificing taste. So roll up your sleeves, embrace the process, and savor the satisfaction of sharing these delicious muffins with your loved ones!

Ranis

Savory Salmon Rice Muffins: A Tasty Twist Recipe!

Savory Salmon Rice Muffins are a delicious and nutritious twist on traditional muffins, packed with protein and flavor.
Prep Time 15 minutes
Cook Time 25 minutes
Total Time 40 minutes
Servings: 12 muffins
Course: Snack
Cuisine: American
Calories: 150

Ingredients
  

  • 1 cup cooked rice white or brown
  • 1 can 14.75 ounces salmon, drained and flaked
  • 1/2 cup shredded cheddar cheese
  • 1/4 cup green onions chopped
  • 2 large eggs
  • 1/4 cup milk
  • 1 teaspoon garlic powder
  • 1/2 teaspoon salt
  • 1/4 teaspoon black pepper
  • 1/2 teaspoon dried dill optional
  • 1/2 cup breadcrumbs for topping

Method
 

  1. Preheat your oven to 375°F. Grease a muffin tin or line it with muffin liners.
  2. In a large mixing bowl, combine the cooked rice, flaked salmon, shredded cheddar cheese, and chopped green onions. Mix well.
  3. In a separate bowl, whisk together the eggs, milk, garlic powder, salt, black pepper, and dried dill if using. Pour this mixture into the rice and salmon mixture, stirring until everything is well combined.
  4. Spoon the mixture into the prepared muffin tin, filling each cup about 3/4 full. Sprinkle breadcrumbs on top of each muffin for added texture.
  5. Bake in the preheated oven for 20-25 minutes, or until the tops are golden brown and a toothpick inserted into the center comes out clean.
  6. Allow the muffins to cool in the pan for 5 minutes before transferring them to a wire rack to cool completely.

Nutrition

Serving: 1muffinCalories: 150kcalCarbohydrates: 15gProtein: 10gFat: 6gSaturated Fat: 2gPolyunsaturated Fat: 3gCholesterol: 70mgSodium: 300mgFiber: 1gSugar: 1g

Notes

  • For a twist, try adding chopped bell peppers or spinach to the mixture for extra veggies.
  • You can also substitute the salmon with canned tuna or cooked chicken for a different flavor.

Tried this recipe?

Let us know how it was!

Creamy Garlic Parmesan Chicken Pasta: A Simple Delight!

Introduction to Creamy Garlic Parmesan Chicken Pasta

There’s something magical about a warm bowl of pasta that brings comfort after a long day.

Creamy Garlic Parmesan Chicken Pasta is that dish for me.

It’s rich, satisfying, and oh-so-easy to whip up, making it a perfect solution for busy weeknights or a cozy dinner with friends.

With just a handful of ingredients, you can create a meal that feels indulgent without spending hours in the kitchen.

Trust me, your loved ones will be asking for seconds, and you’ll feel like a culinary rock star.

Let’s dive into this delightful recipe!

Why You’ll Love This Creamy Garlic Parmesan Chicken Pasta

This dish is a game-changer for anyone who craves flavor without the fuss.

In just 30 minutes, you can serve up a creamy, cheesy delight that satisfies even the pickiest eaters.

The combination of tender chicken, rich garlic, and nutty Parmesan creates a symphony of taste that’s hard to resist.

Plus, it’s versatile enough to adapt to your pantry staples, making it a go-to recipe for any occasion.

Ingredients for Creamy Garlic Parmesan Chicken Pasta

Gathering the right ingredients is the first step to culinary success.

For this Creamy Garlic Parmesan Chicken Pasta, you’ll need a few staples that pack a punch of flavor.

– **Penne Pasta**: This tubular pasta holds onto the creamy sauce beautifully, making every bite a delight.

– **Olive Oil**: A splash of this liquid gold adds richness and helps cook the chicken to perfection.

– **Boneless, Skinless Chicken Breasts**: Tender and juicy, they’re the star of the show, providing protein and heartiness.

– **Salt and Black Pepper**: Essential seasonings that enhance the flavors of the dish.

– **Garlic**: Freshly minced, it brings a fragrant kick that elevates the entire meal.

– **Heavy Cream**: This is what makes the sauce luxuriously creamy. For a lighter option, consider half-and-half or a plant-based cream.

– **Parmesan Cheese**: Grated for easy melting, it adds a nutty, salty flavor that’s simply irresistible.

– **Italian Seasoning**: A blend of herbs that brings an authentic Italian flair to the dish.

– **Spinach**: Fresh and vibrant, it adds color and a nutritional boost.

– **Fresh Parsley**: Chopped for garnish, it adds a pop of freshness and a lovely presentation.

You can find these ingredients at your local grocery store, and if you’re feeling adventurous, try adding sun-dried tomatoes or grilled vegetables for extra flavor.

Exact quantities are available at the bottom of the article for easy printing!

How to Make Creamy Garlic Parmesan Chicken Pasta

Creating this Creamy Garlic Parmesan Chicken Pasta is a breeze.

Follow these simple steps, and you’ll have a delicious meal on the table in no time.

Step 1: Cook the Pasta

Start by boiling a large pot of salted water.

Add the penne pasta and cook according to the package instructions until al dente.

This usually takes about 8-10 minutes.

Once done, drain the pasta and set it aside.

Don’t forget to save a splash of that pasta water; it can help adjust the sauce later!

Step 2: Sauté the Chicken

In a large skillet, heat the olive oil over medium heat.

Add the bite-sized chicken pieces, seasoning them with salt and black pepper.

Cook for about 5-7 minutes, stirring occasionally, until the chicken is golden brown and cooked through.

This step is crucial for flavor, so don’t rush it!

Step 3: Add Garlic

Once the chicken is perfectly cooked, it’s time to add the minced garlic.

Sauté it for about 1 minute until it becomes fragrant.

Be careful not to burn it; burnt garlic can turn bitter and ruin the dish.

Step 4: Create the Sauce

Pour in the heavy cream and bring it to a gentle simmer.

Stir in the grated Parmesan cheese and Italian seasoning.

Mix until the cheese melts and the sauce becomes smooth and creamy.

If it’s too thick, add a splash of that reserved pasta water to reach your desired consistency.

Step 5: Combine Ingredients

Now, it’s time to bring everything together.

Add the cooked penne pasta and chopped spinach to the skillet.

Toss everything gently to combine, ensuring the pasta is well-coated in that luscious sauce.

Heat through for a couple of minutes until the spinach wilts.

Step 6: Garnish and Serve

Remove the skillet from heat and garnish with fresh parsley.

This adds a lovely pop of color and freshness.

Serve your Creamy Garlic Parmesan Chicken Pasta warm, and watch as everyone digs in with delight!

Enjoy the compliments that come your way!

Tips for Success

– Always taste as you go! Adjust seasoning to your preference for the best flavor.

– Reserve some pasta water; it’s a great way to adjust sauce consistency.

– Don’t rush the chicken cooking process; a golden sear adds depth to the dish.

– Use freshly grated Parmesan for a creamier texture and richer flavor.

– Feel free to customize with your favorite veggies or proteins for a personal touch.

Equipment Needed

– **Large Pot**: For boiling the pasta. A Dutch oven works well too.

– **Skillet**: A non-stick skillet is ideal for sautéing the chicken and making the sauce.

– **Colander**: To drain the pasta. A slotted spoon can also do the trick.

– **Measuring Cups and Spoons**: For accurate ingredient measurements.

– **Wooden Spoon**: Perfect for stirring and combining ingredients without scratching your cookware.

Variations

– **Add Vegetables**: Toss in some sun-dried tomatoes, bell peppers, or zucchini for extra flavor and nutrition.

– **Protein Swaps**: Substitute chicken with shrimp, turkey, or even tofu for a vegetarian option.

– **Cheese Alternatives**: Try using feta or goat cheese for a tangy twist on the classic flavor.

– **Herb Infusion**: Experiment with fresh basil or thyme instead of Italian seasoning for a different herbal profile.

– **Spicy Kick**: Add red pepper flakes or a dash of hot sauce to give your dish a little heat.

– **Gluten-Free Option**: Use gluten-free pasta to make this dish suitable for those with dietary restrictions.

Serving Suggestions

– Pair your Creamy Garlic Parmesan Chicken Pasta with a crisp green salad for a refreshing contrast.

– A side of garlic bread is perfect for soaking up that delicious sauce.

– For drinks, a chilled white wine or sparkling water with lemon complements the dish beautifully.

– Serve in warm bowls, garnished with extra parsley for a touch of elegance.

FAQs about Creamy Garlic Parmesan Chicken Pasta

Can I make this dish ahead of time?

Absolutely! You can prepare the chicken and sauce in advance. Just cook the pasta fresh when you’re ready to serve. This keeps everything from getting mushy.

What can I substitute for heavy cream?

If you’re looking for a lighter option, half-and-half or a plant-based cream works well. You can also use Greek yogurt for a tangy twist, but add it off the heat to prevent curdling.

How can I make this dish spicier?

For a spicy kick, sprinkle in some red pepper flakes while sautéing the garlic. You can also add a dash of hot sauce to the sauce for an extra layer of heat.

Can I use a different type of pasta?

Definitely! While penne is perfect for this recipe, feel free to swap it out for fettuccine, rigatoni, or even gluten-free pasta. Just adjust the cooking time as needed.

How do I store leftovers?

Store any leftovers in an airtight container in the fridge for up to three days. Reheat gently on the stovetop, adding a splash of water or cream to loosen the sauce.

Final Thoughts

Cooking should be a joyful experience, and this Creamy Garlic Parmesan Chicken Pasta embodies that spirit.

It’s not just a meal; it’s a chance to gather around the table with loved ones, sharing laughter and stories.

The creamy sauce, tender chicken, and vibrant spinach create a dish that feels both comforting and indulgent.

Whether you’re impressing guests or enjoying a quiet night in, this recipe delivers satisfaction in every bite.

So grab your apron, unleash your inner chef, and let this delightful pasta dish bring warmth and happiness to your kitchen!

Ranis

Creamy Garlic Parmesan Chicken Pasta: A Simple Delight!

A creamy and delicious pasta dish featuring chicken, garlic, and Parmesan cheese, perfect for a quick weeknight dinner.
Prep Time 10 minutes
Cook Time 20 minutes
Total Time 30 minutes
Servings: 4 servings
Course: Main Course
Cuisine: Italian
Calories: 600

Ingredients
  

  • 8 ounces penne pasta
  • 1 tablespoon olive oil
  • 1 pound boneless skinless chicken breasts, cut into bite-sized pieces
  • 1 teaspoon salt
  • 1/2 teaspoon black pepper
  • 4 cloves garlic minced
  • 1 cup heavy cream
  • 1 cup grated Parmesan cheese
  • 1/2 teaspoon Italian seasoning
  • 1 cup spinach chopped
  • 1/4 cup fresh parsley chopped (for garnish)

Method
 

  1. Cook the penne pasta according to package instructions until al dente. Drain and set aside.
  2. In a large skillet, heat the olive oil over medium heat. Add the chicken pieces, seasoning with salt and pepper. Cook until the chicken is golden brown and cooked through, about 5-7 minutes.
  3. Add the minced garlic to the skillet and sauté for about 1 minute until fragrant.
  4. Pour in the heavy cream and bring to a simmer. Stir in the Parmesan cheese and Italian seasoning, mixing until the cheese has melted and the sauce is smooth.
  5. Add the cooked penne pasta and chopped spinach to the skillet, tossing to combine and heat through.
  6. Remove from heat and garnish with fresh parsley before serving.

Nutrition

Serving: 1servingCalories: 600kcalCarbohydrates: 40gProtein: 35gFat: 35gSaturated Fat: 20gPolyunsaturated Fat: 10gCholesterol: 120mgSodium: 800mgFiber: 2gSugar: 2g

Notes

  • For a lighter version, substitute the heavy cream with half-and-half or a plant-based cream alternative.
  • You can also add sun-dried tomatoes or grilled vegetables for extra flavor and nutrition.

Tried this recipe?

Let us know how it was!