Banana Zucchini Bread: A Must-Try Recipe for You!

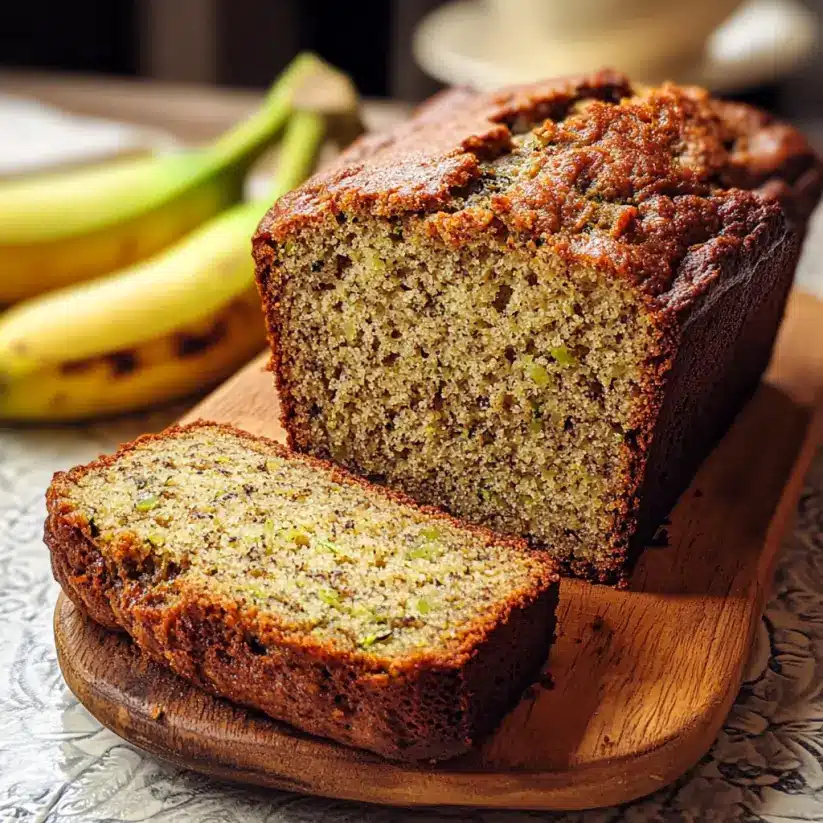
Introduction to Banana Zucchini Bread

There’s something magical about the aroma of freshly baked Banana Zucchini Bread wafting through the kitchen.

It takes me back to lazy Sunday mornings, where the world outside felt still, and the only thing that mattered was the warm slice of bread waiting on my plate.

This recipe is a delightful blend of sweet bananas and subtle zucchini, making it a perfect quick solution for busy days or a cozy snack to impress your loved ones.

Whether you’re a seasoned baker or just starting out, this Banana Zucchini Bread is sure to become a favorite in your home.

Why You’ll Love This Banana Zucchini Bread

This Banana Zucchini Bread is a game-changer in the kitchen.

It’s incredibly easy to whip up, making it perfect for those hectic mornings or lazy afternoons.

The combination of ripe bananas and zucchini creates a moist, flavorful loaf that’s hard to resist.

Plus, it’s a sneaky way to add some veggies to your diet without sacrificing taste.

Trust me, once you try it, you’ll be hooked!

Ingredients for Banana Zucchini Bread

Gathering the right ingredients is the first step to creating your delicious Banana Zucchini Bread.

Here’s what you’ll need:

  • Ripe Bananas: The star of the show! They add natural sweetness and moisture.
  • Grated Zucchini: This sneaky ingredient keeps the bread moist and adds a subtle flavor.
  • Vegetable Oil: It helps create a tender crumb. You can also use melted coconut oil for a twist.
  • Granulated Sugar: For sweetness, balancing the flavors perfectly.
  • Brown Sugar: Adds depth and a hint of caramel flavor.
  • Large Eggs: They bind everything together and provide structure.
  • Vanilla Extract: A splash of this elevates the flavor profile.
  • All-Purpose Flour: The base of your bread, giving it that classic texture.
  • Baking Soda: This is your leavening agent, helping the bread rise.
  • Baking Powder: Works alongside baking soda for extra lift.
  • Salt: Enhances all the flavors, making them pop.
  • Ground Cinnamon: A warm spice that complements the sweetness beautifully.
  • Chopped Walnuts or Pecans (optional): For a delightful crunch and nutty flavor.
  • Chocolate Chips (optional): Because who doesn’t love a little chocolate in their bread?

You can find the exact quantities for each ingredient at the bottom of the article, ready for printing.

Feel free to get creative with substitutions or additions based on what you have on hand!

How to Make Banana Zucchini Bread

Making Banana Zucchini Bread is a straightforward process that anyone can master.

Follow these simple steps, and you’ll have a delicious loaf ready to enjoy in no time!

Step 1: Preheat the Oven

Start by preheating your oven to 350°F (175°C).

While it warms up, grease a 9×5-inch loaf pan or line it with parchment paper for easy removal later.

Step 2: Mix Wet Ingredients

In a large bowl, combine the mashed bananas, grated zucchini, vegetable oil, granulated sugar, brown sugar, eggs, and vanilla extract.

Mix everything well until fully combined.

This is where the magic begins, as the sweet bananas and fresh zucchini come together!

Step 3: Combine Dry Ingredients

In another bowl, whisk together the all-purpose flour, baking soda, baking powder, salt, and ground cinnamon.

This step ensures that your leavening agents are evenly distributed, which is key for a fluffy bread.

Step 4: Combine Wet and Dry Mixtures

Gradually add the dry ingredients to the wet mixture.

Stir gently until just combined.

Be careful not to overmix; a few lumps are perfectly fine.

This will keep your Banana Zucchini Bread light and airy!

Step 5: Add Optional Ingredients

If you’re feeling adventurous, fold in the chopped walnuts or pecans and chocolate chips at this stage.

These add-ins bring a delightful crunch and a hint of sweetness that elevates the bread to another level.

Step 6: Bake the Bread

Pour the batter into your prepared loaf pan and smooth the top with a spatula.

Bake for 50-60 minutes, or until a toothpick inserted into the center comes out clean.

If the top starts browning too quickly, cover it loosely with aluminum foil.

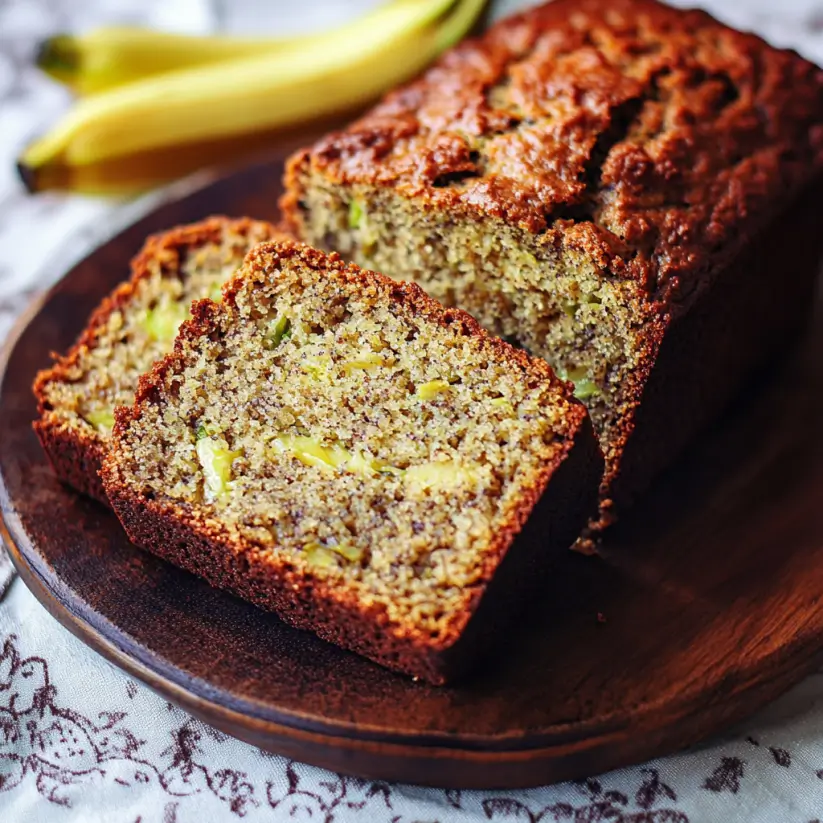
Step 7: Cool and Serve

Once baked, remove the bread from the oven and let it cool in the pan for about 10 minutes.

Then, transfer it to a wire rack to cool completely.

Slice it up and enjoy your homemade Banana Zucchini Bread warm or at room temperature!

Tips for Success

  • Use overripe bananas for maximum sweetness and moisture.
  • Grate the zucchini finely to blend seamlessly into the batter.
  • Don’t skip the resting time; it enhances the flavors.
  • Store leftovers in an airtight container to keep it fresh.
  • Experiment with spices like nutmeg for a unique twist.

Equipment Needed

  • Loaf Pan: A 9×5-inch pan is ideal, but any similar size will work.
  • Mixing Bowls: Use one large bowl for wet ingredients and another for dry.
  • Whisk: A whisk helps combine dry ingredients evenly; a fork can work too.
  • Spatula: Perfect for folding in ingredients and smoothing the batter.
  • Cooling Rack: Essential for cooling the bread evenly; a plate can substitute.

Variations

  • Whole Wheat Flour: Substitute half of the all-purpose flour with whole wheat flour for a heartier texture and added fiber.
  • Spices: Experiment with different spices like nutmeg or ginger for a unique flavor profile.
  • Fruit Additions: Toss in some dried cranberries or raisins for a chewy texture and extra sweetness.
  • Nut Butters: Swirl in a few tablespoons of almond or peanut butter for a nutty twist.
  • Gluten-Free Option: Use a gluten-free all-purpose flour blend to make this recipe suitable for gluten-sensitive friends.

Serving Suggestions

  • Pair your Banana Zucchini Bread with a dollop of cream cheese or butter for added richness.
  • Enjoy it alongside a steaming cup of coffee or tea for a cozy afternoon treat.
  • For a fun twist, serve it with a scoop of vanilla ice cream on top.
  • Garnish with a sprinkle of cinnamon or a drizzle of honey for extra flair.

FAQs about Banana Zucchini Bread

Can I use frozen bananas for this recipe?

Absolutely! Frozen bananas work great in Banana Zucchini Bread. Just thaw them first and mash them up. They’ll add the same sweetness and moisture as fresh ones.

How do I store leftover Banana Zucchini Bread?

To keep your bread fresh, store it in an airtight container at room temperature for up to three days. You can also refrigerate it for a week or freeze it for longer storage.

Can I make this bread vegan?

Yes! Substitute the eggs with flax eggs or applesauce, and use a plant-based oil. This way, you can enjoy a delicious vegan Banana Zucchini Bread without losing flavor.

What can I serve with Banana Zucchini Bread?

This bread pairs wonderfully with cream cheese, butter, or even a scoop of ice cream. A hot cup of coffee or tea makes it a perfect snack or breakfast treat!

How can I tell when the bread is done baking?

Insert a toothpick into the center of the bread. If it comes out clean or with a few moist crumbs, your Banana Zucchini Bread is ready. If it’s wet, give it a few more minutes in the oven.

Final Thoughts

Baking Banana Zucchini Bread is more than just a recipe; it’s an experience that fills your home with warmth and nostalgia.

Each slice is a delightful reminder of the simple joys in life, whether enjoyed with a cup of coffee or shared with loved ones.

The combination of sweet bananas and tender zucchini creates a moist, flavorful loaf that’s hard to resist.

So, roll up your sleeves and embrace the joy of baking.

This Banana Zucchini Bread is sure to become a cherished favorite, bringing smiles and satisfaction to your kitchen for years to come.

Ranis

Banana Zucchini Bread: A Must-Try Recipe for You!

A delicious and moist Banana Zucchini Bread that combines the sweetness of ripe bananas with the subtle flavor of zucchini, perfect for breakfast or a snack.
Prep Time 15 minutes
Cook Time 1 hour
Total Time 1 hour 15 minutes
Servings: 8 servings
Course: Baking
Cuisine: American
Calories: 180

Ingredients
  

  • 2 medium ripe bananas mashed
  • 1 cup grated zucchini about 1 medium zucchini
  • 1/3 cup vegetable oil
  • 1/2 cup granulated sugar
  • 1/2 cup brown sugar packed
  • 2 large eggs
  • 1 teaspoon vanilla extract
  • 1 1/2 cups all-purpose flour
  • 1 teaspoon baking soda
  • 1/2 teaspoon baking powder
  • 1/2 teaspoon salt
  • 1 teaspoon ground cinnamon
  • 1/2 cup chopped walnuts or pecans optional
  • 1/2 cup chocolate chips optional

Method
 

  1. Preheat your oven to 350°F (175°C). Grease a 9x5-inch loaf pan or line it with parchment paper.
  2. In a large bowl, combine the mashed bananas, grated zucchini, vegetable oil, granulated sugar, brown sugar, eggs, and vanilla extract. Mix well until fully combined.
  3. In another bowl, whisk together the flour, baking soda, baking powder, salt, and ground cinnamon.
  4. Gradually add the dry ingredients to the wet ingredients, stirring until just combined. Be careful not to overmix.
  5. If using, fold in the chopped nuts and chocolate chips.
  6. Pour the batter into the prepared loaf pan and smooth the top with a spatula.
  7. Bake for 50-60 minutes, or until a toothpick inserted into the center comes out clean. If the top is browning too quickly, cover it loosely with aluminum foil.
  8. Once baked, remove from the oven and let it cool in the pan for about 10 minutes. Then transfer the bread to a wire rack to cool completely.

Nutrition

Serving: 1sliceCalories: 180kcalCarbohydrates: 25gProtein: 3gFat: 7gSaturated Fat: 1gPolyunsaturated Fat: 6gCholesterol: 30mgSodium: 150mgFiber: 1gSugar: 12g

Notes

  • For added flavor, try incorporating a teaspoon of nutmeg or a tablespoon of lemon zest into the batter.
  • Substitute half of the all-purpose flour with whole wheat flour for a healthier twist.

Tried this recipe?

Let us know how it was!

Bacon Avocado Burger Bowl: A Flavorful Recipe Adventure!

Introduction to Bacon Avocado Burger Bowl

There’s something undeniably comforting about a burger, isn’t there? The juicy patty, crispy bacon, and creamy avocado all come together in a delightful dance of flavors. That’s why I’m excited to share my Bacon Avocado Burger Bowl with you! This dish is not just a quick solution for a busy day; it’s a hearty meal that brings the classic burger experience into a healthy bowl format. Perfect for impressing your loved ones or simply treating yourself, this recipe is a delicious way to enjoy all your favorite burger flavors without the bun. Let’s dive in!

Why You’ll Love This Bacon Avocado Burger Bowl

This Bacon Avocado Burger Bowl is a game-changer for busy weeknights. It’s quick to whip up, taking just 25 minutes from start to finish. The combination of crispy bacon, creamy avocado, and seasoned beef creates a flavor explosion that satisfies your cravings without the guilt. Plus, it’s customizable! You can easily swap ingredients to suit your taste or dietary needs. Trust me, this bowl will become a staple in your kitchen!

Ingredients for Bacon Avocado Burger Bowl

Gathering the right ingredients is key to crafting a delicious Bacon Avocado Burger Bowl. Here’s what you’ll need:

  • Ground Beef: An 80/20 blend gives the perfect balance of flavor and juiciness. You can swap it for ground turkey for a lighter option.
  • Bacon: Crispy bacon adds that smoky crunch we all love. Feel free to use turkey bacon if you prefer a healthier choice.
  • Avocado: Ripe and creamy, it brings a rich texture to the bowl. Choose one that yields slightly to pressure for the best flavor.
  • Cherry Tomatoes: These sweet little gems add freshness and color. Halve them for a burst of flavor in every bite.
  • Shredded Lettuce: A crisp base that adds crunch. Romaine or iceberg works well, but you can also use spinach for a twist.
  • Shredded Cheddar Cheese: This classic cheese melts beautifully and enhances the burger flavor. Try pepper jack for a spicy kick!
  • Red Onion: Thinly sliced for a sharp bite. If you’re not a fan, green onions or shallots can be a milder alternative.
  • Mayonnaise: It creates a creamy sauce that ties everything together. You can use Greek yogurt for a healthier version.
  • Ketchup and Mustard: These condiments add that classic burger taste. Adjust the amounts to suit your preference.
  • Salt and Pepper: Essential for seasoning the beef and enhancing all the flavors.
  • Olive Oil: A little oil for cooking the beef helps prevent sticking and adds flavor.

For exact measurements, check the bottom of the article where you can find everything listed for easy printing!

How to Make Bacon Avocado Burger Bowl

Creating a Bacon Avocado Burger Bowl is a straightforward process that packs a punch of flavor. Follow these simple steps, and you’ll have a delicious meal ready in no time!

Step 1: Cook the Bacon

Start by heating a skillet over medium heat. Lay the bacon strips in the pan, letting them sizzle and crisp up. This should take about 5-7 minutes. Keep an eye on them; nobody likes burnt bacon! Once crispy, remove the bacon and place it on paper towels to drain excess grease. Crumble it into bite-sized pieces for easy topping later.

Step 2: Brown the Ground Beef

In the same skillet, drain most of the bacon fat, leaving about a tablespoon. This adds flavor without overwhelming the dish. Add the ground beef, seasoning it with salt and pepper. Cook for 6-8 minutes, breaking it apart with a spatula until it’s browned and cooked through. If there’s too much fat, drain it off. You want juicy beef, not a greasy bowl!

Step 3: Prepare the Sauce

While the beef is cooking, grab a small bowl. Mix together mayonnaise, ketchup, and mustard. This creamy sauce is the secret weapon that ties all the flavors together. Adjust the ingredients to your taste; maybe you like it a bit tangier or sweeter. It’s your bowl, after all!

Step 4: Assemble the Bowls

Now comes the fun part! Divide the shredded lettuce among four bowls, creating a crisp base. Top each bowl with the cooked ground beef, crumbled bacon, diced avocado, halved cherry tomatoes, red onion, and shredded cheddar cheese. Drizzle your homemade sauce over the top, and voilà! Your Bacon Avocado Burger Bowl is ready to be devoured.

Tips for Success

  • Use a meat thermometer to ensure your ground beef reaches 160°F for safety.
  • Let the bacon cool before crumbling; it’ll be easier to handle.
  • Prep your ingredients ahead of time to streamline the cooking process.
  • Experiment with toppings like jalapeños or pickles for extra flavor.
  • Don’t skip the sauce; it’s the magic that brings everything together!

Equipment Needed

  • Skillet: A non-stick skillet works best, but any frying pan will do.
  • Spatula: A sturdy spatula helps in breaking up the beef and flipping bacon.
  • Mixing Bowl: Use any bowl for mixing the sauce; a small one is perfect.
  • Knife and Cutting Board: Essential for chopping veggies and dicing avocado.

Variations

  • Swap the Protein: Use ground turkey, chicken, or even plant-based meat for a lighter or vegetarian option.
  • Go Low-Carb: Replace the lettuce with cauliflower rice for a keto-friendly twist.
  • Add Spice: Incorporate diced jalapeños or a sprinkle of cayenne pepper for a kick.
  • Change the Cheese: Try feta or blue cheese for a different flavor profile.
  • Fresh Herbs: Toss in some chopped cilantro or parsley for a burst of freshness.

Serving Suggestions

  • Side Salad: A light side salad with vinaigrette complements the richness of the bowl.
  • Sweet Potato Fries: Crispy sweet potato fries add a delightful crunch and sweetness.
  • Refreshing Drink: Pair with iced tea or a cold beer for a perfect meal.
  • Presentation: Serve in colorful bowls to make the dish visually appealing.

FAQs about Bacon Avocado Burger Bowl

Can I make the Bacon Avocado Burger Bowl ahead of time?

Absolutely! You can prepare the components in advance. Cook the beef and bacon, then store them separately in the fridge. Assemble the bowls just before serving to keep everything fresh and crisp.

Is this recipe suitable for meal prep?

Yes! This Bacon Avocado Burger Bowl is perfect for meal prep. Just divide the ingredients into containers, and you’ll have a delicious, healthy lunch or dinner ready to go throughout the week.

Can I use different toppings for my burger bowl?

Definitely! Feel free to get creative. Add toppings like pickles, jalapeños, or even a fried egg for a unique twist. The beauty of this bowl is its versatility!

How can I make this recipe dairy-free?

To make a dairy-free version, simply omit the cheese or substitute it with a dairy-free alternative. You can also use avocado or a cashew cream for added creaminess.

What can I serve with the Bacon Avocado Burger Bowl?

Pair it with a light side salad, sweet potato fries, or even some grilled veggies. A refreshing drink like iced tea or a cold beer complements the flavors beautifully!

Final Thoughts

Creating a Bacon Avocado Burger Bowl is more than just cooking; it’s about bringing joy to your table. Each bite is a celebration of flavors that remind me of backyard barbecues and family gatherings. The crispy bacon, creamy avocado, and seasoned beef come together in a way that feels indulgent yet healthy. Whether you’re enjoying it solo or sharing with friends, this bowl is sure to impress. It’s a dish that invites conversation and laughter, making every meal a memorable experience. So grab your ingredients and dive into this delicious adventure—you won’t regret it!

Ranis

Bacon Avocado Burger Bowl: A Flavorful Recipe Adventure!

A delicious and hearty Bacon Avocado Burger Bowl that combines the flavors of a classic burger in a healthy bowl format.
Prep Time 10 minutes
Cook Time 15 minutes
Total Time 25 minutes
Servings: 4 servings
Course: Main Dish
Cuisine: American
Calories: 550

Ingredients
  

  • 1 pound ground beef 80/20 blend
  • 4 slices of bacon
  • 1 ripe avocado diced
  • 1 cup cherry tomatoes halved
  • 1 cup shredded lettuce
  • 1/2 cup shredded cheddar cheese
  • 1/4 cup red onion thinly sliced
  • 1/4 cup mayonnaise
  • 2 tablespoons ketchup
  • 1 tablespoon mustard
  • Salt and pepper to taste
  • Olive oil for cooking

Method
 

  1. In a skillet over medium heat, cook the bacon until crispy. Remove and drain on paper towels, then crumble into pieces.
  2. In the same skillet, drain excess bacon fat, leaving about 1 tablespoon. Add the ground beef, season with salt and pepper, and cook until browned, about 6-8 minutes. Drain excess fat if necessary.
  3. In a small bowl, mix together mayonnaise, ketchup, and mustard to create a sauce.
  4. To assemble the bowls, divide the shredded lettuce among four bowls. Top each with cooked ground beef, crumbled bacon, diced avocado, cherry tomatoes, red onion, and shredded cheddar cheese.
  5. Drizzle the sauce over each bowl and serve immediately.

Nutrition

Serving: 1bowlCalories: 550kcalCarbohydrates: 6gProtein: 30gFat: 45gSaturated Fat: 15gPolyunsaturated Fat: 30gCholesterol: 100mgSodium: 800mgFiber: 2gSugar: 2g

Notes

  • For a lighter option, substitute ground turkey for the beef.
  • You can also add other toppings like pickles or jalapeños for extra flavor.
  • If you prefer a warm bowl, you can heat the assembled bowls in the oven for a few minutes before serving.

Tried this recipe?

Let us know how it was!

Lemon Chicken Ricotta Meatballs with Garlic Orzo Delight!

Introduction to Lemon Chicken Ricotta Meatballs with Garlic Orzo

Cooking has always been my way of connecting with family and friends. When I discovered the magic of Lemon Chicken Ricotta Meatballs with Garlic Orzo, it felt like a culinary hug. This dish is not just a meal; it’s a quick solution for those busy weeknights when you want something hearty yet impressive. The bright flavors of lemon and the creamy ricotta create a delightful balance that will have everyone asking for seconds. Whether you’re cooking for yourself or hosting a gathering, this recipe is sure to bring smiles around the table.

Why You’ll Love This Lemon Chicken Ricotta Meatballs with Garlic Orzo

This recipe is a game-changer for anyone looking to whip up a delicious meal without spending hours in the kitchen. The Lemon Chicken Ricotta Meatballs are not only easy to make, but they also pack a punch of flavor that will impress your family and friends. Plus, the garlic orzo complements the meatballs perfectly, making it a complete dish that’s both satisfying and quick to prepare. You’ll love how simple it is to create a restaurant-quality meal at home!

Ingredients for Lemon Chicken Ricotta Meatballs with Garlic Orzo

Gathering the right ingredients is the first step to culinary success. For this delightful dish, you’ll need:

  • Ground chicken: The star of the show, providing a lean protein base for the meatballs.
  • Ricotta cheese: This creamy cheese adds moisture and richness, making the meatballs tender.
  • Grated Parmesan cheese: A sprinkle of this brings a savory depth and enhances the overall flavor.
  • Breadcrumbs: They help bind the meatball mixture together, ensuring a perfect texture.
  • Egg: Acts as a binder, keeping everything cohesive and delicious.
  • Minced garlic: A must for that aromatic kick, infusing the meatballs with flavor.
  • Fresh lemon juice: Brightens the dish, adding a zesty freshness that complements the chicken.
  • Lemon zest: Intensifies the lemon flavor, giving a fragrant aroma to the meatballs.
  • Dried oregano: This herb adds an Italian flair, enhancing the overall taste profile.
  • Salt and black pepper: Essential seasonings that elevate the flavors of all the ingredients.
  • Olive oil: Used for drizzling over the meatballs, it helps achieve that golden-brown finish.
  • Orzo pasta: A small pasta that cooks quickly and pairs beautifully with the meatballs.
  • Chicken broth: Provides a flavorful cooking liquid for the orzo, enhancing its taste.
  • Fresh parsley: A garnish that adds a pop of color and freshness to the final dish.
  • Lemon wedges: Perfect for serving, allowing everyone to add a little extra zing to their plate.

For those looking to mix things up, consider adding sautéed spinach or kale to the orzo for added nutrition. You can also swap out ground chicken for turkey or beef if you prefer a different flavor. Exact measurements for these ingredients can be found at the bottom of the article, ready for printing!

How to Make Lemon Chicken Ricotta Meatballs with Garlic Orzo

Creating Lemon Chicken Ricotta Meatballs with Garlic Orzo is a straightforward process that yields delicious results. Follow these simple steps, and you’ll have a hearty meal ready in no time!

Step 1: Prepare the Meatball Mixture

In a large bowl, combine the ground chicken, ricotta cheese, grated Parmesan, breadcrumbs, egg, minced garlic, fresh lemon juice, lemon zest, dried oregano, salt, and black pepper.

Mix everything together until well combined. Don’t be afraid to get your hands in there; it’s the best way to ensure everything is evenly distributed. The mixture should be moist but hold together well.

Step 2: Preheat the Oven

While you’re mixing, preheat your oven to 400°F.

Line a baking sheet with parchment paper to prevent sticking and make cleanup a breeze. This step is crucial for achieving that perfect golden-brown finish on your meatballs.

Step 3: Form the Meatballs

Now it’s time to shape the mixture into meatballs.

Aim for about 1.5 inches in diameter—think golf ball size. Place them on the prepared baking sheet, leaving a little space between each one. This allows for even cooking and browning.

Step 4: Bake the Meatballs

Drizzle a bit of olive oil over the meatballs.

This will help them crisp up nicely in the oven. Bake for 20-25 minutes, or until they are cooked through and golden brown. You’ll know they’re done when they reach an internal temperature of 165°F.

Step 5: Cook the Orzo

While the meatballs are baking, bring chicken broth to a boil in a medium saucepan.

Add the orzo and cook according to the package instructions, usually about 8-10 minutes. Stir occasionally to prevent sticking. The orzo should be tender but still have a slight bite to it.

Step 6: Combine and Serve

Once the orzo is cooked, drain it and return it to the pot.

Stir in a tablespoon of olive oil and season with salt and pepper to taste. Serve the meatballs over the garlic orzo, garnished with fresh parsley and lemon wedges on the side.

This dish is not just a meal; it’s a celebration of flavors!

Tips for Success

  • Use fresh ingredients for the best flavor, especially the lemon and herbs.
  • Don’t overmix the meatball mixture; it can make them tough.
  • For extra moisture, consider adding a splash of chicken broth to the mixture.
  • Let the meatballs rest for a few minutes after baking for better texture.
  • Experiment with different herbs like basil or thyme for a unique twist.

Equipment Needed

  • Mixing bowl: A large bowl for combining ingredients. A sturdy pot can work in a pinch.
  • Baking sheet: Essential for roasting meatballs. A cast-iron skillet is a great alternative.
  • Parchment paper: Helps prevent sticking. Aluminum foil can also do the trick.
  • Medium saucepan: For cooking orzo. Any pot will suffice.
  • Meat thermometer: Ensures meatballs are cooked through. A knife can check doneness too.

Variations

  • Herb-Infused Meatballs: Add fresh herbs like basil or thyme to the meatball mixture for an aromatic twist.
  • Spicy Kick: Mix in some red pepper flakes or diced jalapeños for a spicy version that packs a punch.
  • Vegetarian Option: Substitute ground chicken with a plant-based meat alternative or finely chopped mushrooms for a vegetarian delight.
  • Cheesy Surprise: Incorporate small cubes of mozzarella cheese into the meatballs for a gooey, cheesy center.
  • Whole Wheat Orzo: Use whole wheat orzo for a healthier, fiber-rich alternative that still tastes great.

Serving Suggestions

  • Fresh Salad: Pair with a crisp arugula or mixed greens salad drizzled with lemon vinaigrette for a refreshing contrast.
  • Wine Pairing: A chilled Sauvignon Blanc complements the lemony flavors beautifully.
  • Presentation: Serve on a large platter, garnished with extra parsley and lemon wedges for a vibrant look.

FAQs about Lemon Chicken Ricotta Meatballs with Garlic Orzo

Can I make Lemon Chicken Ricotta Meatballs ahead of time?

Absolutely! You can prepare the meatballs in advance and store them in the fridge for up to 24 hours before baking. Just remember to cover them tightly to keep them fresh. This makes it easy to whip up a delicious meal on a busy night!

What can I serve with Garlic Orzo?

Garlic Orzo pairs wonderfully with a variety of sides. Consider a fresh salad, roasted vegetables, or even some crusty bread to soak up the flavors. Each option adds a delightful touch to your meal!

Can I freeze the meatballs?

Yes, you can freeze the Lemon Chicken Ricotta Meatballs! Just bake them first, let them cool, and then store them in an airtight container. They’ll keep well for up to three months. When you’re ready to enjoy, simply reheat them in the oven.

What if I don’t have ricotta cheese?

If ricotta isn’t available, you can substitute it with cottage cheese or cream cheese. Both options will still provide a creamy texture, ensuring your meatballs remain moist and flavorful.

How can I make this dish gluten-free?

To make Lemon Chicken Ricotta Meatballs with Garlic Orzo gluten-free, simply use gluten-free breadcrumbs and orzo. There are many great gluten-free pasta options available that will work perfectly in this recipe!

Final Thoughts

Cooking Lemon Chicken Ricotta Meatballs with Garlic Orzo is more than just preparing a meal; it’s about creating memories. The vibrant flavors and comforting textures come together to make every bite a celebration. Whether you’re sharing it with family or enjoying a quiet dinner at home, this dish brings warmth and joy to the table. Plus, the ease of preparation means you can focus on what truly matters—connecting with loved ones. So, roll up your sleeves, embrace the process, and let this delightful recipe become a staple in your kitchen. You won’t regret it!

Ranis

Lemon Chicken Ricotta Meatballs with Garlic Orzo Delight!

A delicious recipe for Lemon Chicken Ricotta Meatballs served with garlic orzo, perfect for a hearty meal.
Prep Time 15 minutes
Cook Time 30 minutes
Total Time 45 minutes
Servings: 4 servings
Course: Main Course
Cuisine: Italian
Calories: 450

Ingredients
  

  • 1 pound ground chicken
  • 1 cup ricotta cheese
  • 1/2 cup grated Parmesan cheese
  • 1/2 cup breadcrumbs
  • 1 large egg
  • 2 cloves garlic minced
  • 1 tablespoon fresh lemon juice
  • 1 teaspoon lemon zest
  • 1 teaspoon dried oregano
  • 1/2 teaspoon salt
  • 1/4 teaspoon black pepper
  • 2 tablespoons olive oil
  • 8 ounces orzo pasta
  • 2 cups chicken broth
  • 1 tablespoon fresh parsley chopped (for garnish)
  • Lemon wedges for serving

Method
 

  1. In a large bowl, combine ground chicken, ricotta cheese, Parmesan cheese, breadcrumbs, egg, minced garlic, lemon juice, lemon zest, oregano, salt, and pepper. Mix until well combined.
  2. Preheat your oven to 400°F. Line a baking sheet with parchment paper.
  3. Form the mixture into meatballs, about 1.5 inches in diameter, and place them on the prepared baking sheet.
  4. Drizzle olive oil over the meatballs and bake for 20-25 minutes, or until they are cooked through and golden brown.
  5. While the meatballs are baking, bring chicken broth to a boil in a medium saucepan. Add orzo and cook according to package instructions, usually about 8-10 minutes.
  6. Drain the orzo and return it to the pot. Stir in a tablespoon of olive oil and season with salt and pepper to taste.
  7. Serve the meatballs over the garlic orzo, garnished with fresh parsley and lemon wedges on the side.

Nutrition

Serving: 1servingCalories: 450kcalCarbohydrates: 30gProtein: 30gFat: 20gSaturated Fat: 8gPolyunsaturated Fat: 10gCholesterol: 120mgSodium: 600mgFiber: 2gSugar: 2g

Notes

  • For added flavor, sauté some chopped spinach or kale with garlic before mixing it into the orzo.
  • Substitute ground turkey or beef for the ground chicken for a different taste.

Tried this recipe?

Let us know how it was!

Cheesy Turkey Stuffed Zucchini Boats: Delight Your Tastebuds!

Introduction to Cheesy Turkey Stuffed Zucchini Boats

When I think of comfort food, Cheesy Turkey Stuffed Zucchini Boats always come to mind.

This dish is not just a meal; it’s a warm hug on a plate.

Perfect for busy weeknights or when you want to impress your loved ones, these zucchini boats are a delightful blend of flavors and textures.

They’re healthy, filling, and oh-so-cheesy!

Plus, they’re a fantastic way to sneak in some veggies without anyone noticing.

Trust me, once you try these, they’ll become a staple in your kitchen.

Why You’ll Love This Cheesy Turkey Stuffed Zucchini Boats

These Cheesy Turkey Stuffed Zucchini Boats are a game-changer for any home cook.

They come together in just 45 minutes, making them perfect for those hectic evenings.

The combination of savory ground turkey, fluffy quinoa, and gooey mozzarella creates a flavor explosion that will have everyone asking for seconds.

Plus, they’re a healthy option that doesn’t skimp on taste, so you can feel good about serving them.

Ingredients for Cheesy Turkey Stuffed Zucchini Boats

Creating these Cheesy Turkey Stuffed Zucchini Boats is a breeze with the right ingredients.

Here’s what you’ll need:

  • Zucchinis: The star of the show! Choose medium-sized zucchinis for the perfect boat shape.
  • Ground Turkey: A lean protein that keeps the dish healthy and satisfying. You can also swap it for ground chicken or beef if you prefer.
  • Cooked Quinoa: This adds a nutty flavor and a boost of fiber. It’s a great way to make the filling hearty.
  • Marinara Sauce: A rich, tangy sauce that ties all the flavors together. Feel free to use homemade or store-bought.
  • Shredded Mozzarella Cheese: The gooey goodness that melts beautifully on top. You can use other cheeses like cheddar for a twist.
  • Italian Seasoning: A blend of herbs that brings a burst of flavor. It’s a must-have for that Italian flair.
  • Garlic Powder: Adds depth and aroma to the filling. Fresh garlic works too if you have it on hand.
  • Onion Powder: A subtle sweetness that enhances the overall taste.
  • Salt and Pepper: Essential for seasoning. Adjust to your taste for the best flavor.
  • Olive Oil: Used for cooking the turkey, it adds richness and helps prevent sticking.
  • Fresh Basil (optional): A lovely garnish that adds a pop of color and freshness.

For exact measurements, check the bottom of the article where you can find everything listed for easy printing.

With these ingredients, you’re well on your way to creating a delicious and healthy meal that everyone will love!

How to Make Cheesy Turkey Stuffed Zucchini Boats

Making Cheesy Turkey Stuffed Zucchini Boats is a straightforward process that anyone can master.

Follow these simple steps, and you’ll have a delicious meal ready in no time!

Step 1: Preheat the Oven

Start by preheating your oven to 375°F (190°C).

This step is crucial because it ensures even cooking.

A hot oven helps the zucchini become tender while the cheese melts to perfection.

Trust me, you don’t want to skip this!

Step 2: Prepare the Zucchini

Next, grab those zucchinis and cut them in half lengthwise.

Using a spoon, scoop out the center to create little boats.

Don’t toss the scooped-out flesh; you’ll use it in the filling!

Aim for about a quarter-inch thickness to keep the boats sturdy.

Step 3: Cook the Turkey

In a skillet, heat a couple of tablespoons of olive oil over medium heat.

Add the ground turkey and cook until it’s browned, about 5-7 minutes.

Browning the turkey adds flavor and texture, making your filling even more delicious.

Make sure to break it up with a spatula as it cooks.

Step 4: Mix the Filling

Now, it’s time to combine the reserved zucchini flesh with the cooked turkey.

Stir in the cooked quinoa, marinara sauce, Italian seasoning, garlic powder, onion powder, salt, and pepper.

Cook this mixture for another 3-4 minutes until everything is heated through.

The aroma will be irresistible!

Step 5: Stuff the Zucchini

Spoon the turkey mixture evenly into each zucchini boat.

Don’t be shy; pack it in there!

This is where all the flavors come together, so make sure each boat is filled generously.

Step 6: Add Cheese and Bake

Top each stuffed zucchini with a generous amount of shredded mozzarella cheese.

This is the gooey goodness that makes these boats so special.

Place the zucchini boats on a baking sheet and pop them in the oven.

Bake for 20-25 minutes, or until the zucchinis are tender and the cheese is bubbly and golden.

Step 7: Garnish and Serve

Once they’re out of the oven, let the zucchini boats cool for a few minutes.

This helps the cheese set a bit.

If you like, sprinkle some fresh basil on top for a burst of color and flavor.

Now, serve them up and enjoy the deliciousness of your Cheesy Turkey Stuffed Zucchini Boats!

Tips for Success

  • Choose zucchinis that are firm and free of blemishes for the best texture.
  • Don’t overcook the turkey; it will finish cooking in the oven.
  • Feel free to customize the filling with your favorite veggies or spices.
  • For extra flavor, let the filling cool slightly before stuffing the zucchini.
  • Keep an eye on the cheese while baking to avoid burning.

Equipment Needed

  • Baking Sheet: A standard sheet works great, but a cast-iron skillet can add a nice touch.
  • Skillet: Any non-stick skillet will do for cooking the turkey.
  • Spoon: Use a regular spoon for scooping out the zucchini; a grapefruit spoon is even better!
  • Knife: A sharp chef’s knife makes cutting the zucchinis a breeze.

Variations

  • Spicy Kick: Add red pepper flakes or diced jalapeños to the turkey mixture for a fiery twist.
  • Vegetarian Option: Substitute ground turkey with black beans or lentils for a hearty, meatless filling.
  • Cheese Lovers: Experiment with different cheeses like feta or pepper jack for unique flavors.
  • Herb Infusion: Mix in fresh herbs like parsley or cilantro for an extra layer of freshness.
  • Grain Swap: Replace quinoa with brown rice or farro for a different texture and taste.

Serving Suggestions

  • Side Salad: Pair your zucchini boats with a crisp garden salad for a refreshing contrast.
  • Garlic Bread: Serve with warm garlic bread to soak up any leftover marinara sauce.
  • Wine Pairing: A light white wine, like Pinot Grigio, complements the flavors beautifully.
  • Presentation: Garnish with extra basil or a sprinkle of Parmesan for a restaurant-style finish.

FAQs about Cheesy Turkey Stuffed Zucchini Boats

Can I make Cheesy Turkey Stuffed Zucchini Boats ahead of time?

Absolutely! You can prepare the filling and stuff the zucchini boats a day in advance. Just cover them and store them in the fridge. When you’re ready to bake, pop them in the oven straight from the fridge, adding a few extra minutes to the cooking time.

What can I substitute for ground turkey?

If ground turkey isn’t your thing, feel free to swap it out for ground chicken or even lean beef. For a vegetarian option, black beans or lentils work wonderfully, providing a hearty texture and flavor.

How do I store leftovers?

Leftover Cheesy Turkey Stuffed Zucchini Boats can be stored in an airtight container in the fridge for up to three days. Reheat them in the oven or microwave until warmed through. They make for a quick and tasty lunch!

Can I freeze Cheesy Turkey Stuffed Zucchini Boats?

Yes, you can freeze them! Just make sure to wrap them tightly in plastic wrap and then in foil. They can be frozen for up to three months. Thaw in the fridge overnight before baking.

What sides pair well with Cheesy Turkey Stuffed Zucchini Boats?

These zucchini boats are versatile! Pair them with a fresh side salad, garlic bread, or even some roasted vegetables for a complete meal. A light white wine can also enhance the dining experience.

Final Thoughts

Cooking Cheesy Turkey Stuffed Zucchini Boats is more than just preparing a meal; it’s about creating a moment of joy in your kitchen.

The aroma wafting through your home as they bake is simply irresistible.

Each bite is a delightful combination of flavors that brings comfort and satisfaction.

Whether you’re feeding a family or impressing friends, these zucchini boats are sure to be a hit.

Plus, they’re a fantastic way to enjoy healthy ingredients without sacrificing taste.

So roll up your sleeves, get cooking, and savor the happiness that comes from sharing this delicious dish!

Ranis

Cheesy Turkey Stuffed Zucchini Boats: Delight Your Tastebuds!

Delicious and healthy Cheesy Turkey Stuffed Zucchini Boats filled with ground turkey, quinoa, and topped with melted mozzarella cheese.
Prep Time 15 minutes
Cook Time 30 minutes
Total Time 45 minutes
Servings: 4 servings
Course: Main Dish
Cuisine: American
Calories: 320

Ingredients
  

  • 2 medium zucchinis
  • 1 pound ground turkey
  • 1 cup cooked quinoa
  • 1 cup marinara sauce
  • 1 cup shredded mozzarella cheese
  • 1 teaspoon Italian seasoning
  • 1/2 teaspoon garlic powder
  • 1/2 teaspoon onion powder
  • Salt and pepper to taste
  • 2 tablespoons olive oil
  • Fresh basil for garnish optional

Method
 

  1. Preheat the oven to 375°F (190°C).
  2. Cut the zucchinis in half lengthwise and scoop out the center using a spoon to create boats. Reserve the scooped-out zucchini flesh.
  3. In a skillet, heat the olive oil over medium heat. Add the ground turkey and cook until browned, about 5-7 minutes.
  4. Stir in the reserved zucchini flesh, cooked quinoa, marinara sauce, Italian seasoning, garlic powder, onion powder, salt, and pepper. Cook for an additional 3-4 minutes until heated through.
  5. Spoon the turkey mixture evenly into the zucchini boats.
  6. Top each stuffed zucchini with shredded mozzarella cheese.
  7. Place the zucchini boats on a baking sheet and bake for 20-25 minutes, or until the zucchinis are tender and the cheese is bubbly and golden.
  8. Remove from the oven and let cool for a few minutes. Garnish with fresh basil if desired before serving.

Nutrition

Serving: 1stuffed zucchini boatCalories: 320kcalCarbohydrates: 10gProtein: 28gFat: 18gSaturated Fat: 7gPolyunsaturated Fat: 11gCholesterol: 90mgSodium: 600mgFiber: 2gSugar: 4g

Notes

  • For a spicier kick, add red pepper flakes to the turkey mixture.
  • Substitute ground turkey with ground chicken or beef for a different flavor profile.

Tried this recipe?

Let us know how it was!

Creamy Garlic Parmesan Pasta: A Delightful Recipe Guide

Introduction to Creamy Garlic Parmesan Pasta

There’s something magical about a bowl of pasta that wraps you in warmth and comfort. Creamy Garlic Parmesan Pasta is just that—a delightful dish that feels like a hug on a plate. Whether you’re racing against the clock after a long day or looking to impress someone special, this recipe is your go-to solution. With its rich flavors and creamy texture, it transforms a simple meal into a culinary experience. Plus, it’s quick and easy to whip up, making it perfect for any occasion. Let’s dive into this delicious journey together!

Why You’ll Love This Creamy Garlic Parmesan Pasta

This Creamy Garlic Parmesan Pasta is a game-changer for busy weeknights. It’s not just about the taste—though, trust me, it’s heavenly! The beauty lies in its simplicity. In just 25 minutes, you can serve a restaurant-quality dish that will have everyone asking for seconds. Plus, the creamy sauce clings to every noodle, creating a comforting embrace that satisfies even the pickiest eaters. It’s a win-win for your taste buds and your schedule!

Ingredients for Creamy Garlic Parmesan Pasta

Gathering the right ingredients is the first step to creating this creamy masterpiece. Here’s what you’ll need:

  • Pasta: Fettuccine or spaghetti works beautifully, providing a perfect base for the sauce.
  • Olive Oil: A splash of this liquid gold adds richness and helps sauté the garlic to perfection.
  • Garlic: Freshly minced garlic is essential for that aromatic kick. It’s the heart of this dish!
  • Heavy Cream: This is what makes the sauce luxuriously creamy. For a lighter option, consider half-and-half.
  • Parmesan Cheese: Grated Parmesan brings a salty, nutty flavor that elevates the dish. Freshly grated is best!
  • Salt: A pinch enhances all the flavors, making each bite more delicious.
  • Black Pepper: Freshly cracked adds a subtle heat that balances the creaminess.
  • Red Pepper Flakes: Optional, but they give a nice kick if you’re feeling adventurous!
  • Fresh Parsley: Chopped parsley not only adds color but also a fresh taste to finish off the dish.

For those looking to customize, consider adding cooked chicken, shrimp, or sautéed veggies like spinach or mushrooms for extra flavor and nutrition. You can find the exact quantities for each ingredient at the bottom of the article, ready for printing!

How to Make Creamy Garlic Parmesan Pasta

Now that you have your ingredients ready, let’s get cooking! This process is straightforward and fun. Follow these steps, and you’ll have a delicious meal in no time.

Step 1: Cook the Pasta

Start by boiling a large pot of salted water. Once it’s bubbling, add your fettuccine or spaghetti. Cook according to the package instructions until it’s al dente. This usually takes about 8-10 minutes. Remember, you want it firm to the bite! When it’s done, drain the pasta, but save about half a cup of that starchy pasta water. Trust me, it’ll come in handy later!

Step 2: Sauté the Garlic

In a large skillet, heat two tablespoons of olive oil over medium heat. Once it’s shimmering, toss in the minced garlic. Sauté it for about a minute, just until it’s fragrant. Be careful not to let it burn; burnt garlic can turn bitter and ruin your sauce. You want it golden and aromatic, like a warm hug for your taste buds!

Step 3: Prepare the Creamy Sauce

Next, pour in the heavy cream and bring it to a gentle simmer. Stir it occasionally to keep it from sticking. Now, add the grated Parmesan cheese, salt, black pepper, and red pepper flakes if you’re feeling spicy. Stir until the cheese melts and the sauce becomes smooth and creamy. This is where the magic happens! The aroma will fill your kitchen, making it hard to resist sneaking a taste.

Step 4: Combine Pasta and Sauce

Once your sauce is ready, it’s time to bring everything together. Add the cooked pasta to the skillet, tossing it gently to coat every strand in that luscious sauce. If the sauce seems too thick, gradually add some of that reserved pasta water until you reach your desired consistency. You want it creamy but not soupy—just right!

Step 5: Garnish and Serve

Finally, remove the skillet from heat. Sprinkle chopped fresh parsley over the top for a pop of color and freshness. Serve your Creamy Garlic Parmesan Pasta immediately, and watch as everyone digs in with delight. This dish is best enjoyed fresh, but leftovers (if there are any!) can be stored in the fridge for a day or two.

Tips for Success

  • Always salt your pasta water; it enhances the flavor of the noodles.
  • Use freshly grated Parmesan for the best taste and texture.
  • Don’t rush the garlic; sauté it just until fragrant to avoid bitterness.
  • Reserve pasta water to adjust sauce consistency without losing flavor.
  • Feel free to customize with your favorite proteins or veggies for added nutrition.

Equipment Needed

  • Large Pot: For boiling pasta. A deep skillet can work in a pinch.
  • Skillet: A non-stick skillet is ideal for making the sauce.
  • Colander: To drain the pasta. A slotted spoon can also do the job.
  • Measuring Cups: For accurate ingredient portions.
  • Wooden Spoon: Perfect for stirring the sauce and pasta together.

Variations

  • Protein Boost: Add grilled chicken, shrimp, or sautéed sausage for a heartier meal.
  • Veggie Delight: Toss in sautéed spinach, mushrooms, or roasted bell peppers for extra nutrition and flavor.
  • Herb Infusion: Experiment with fresh herbs like basil or thyme to elevate the dish’s aroma and taste.
  • Spicy Kick: Increase the red pepper flakes or add a dash of hot sauce for those who love heat.
  • Dairy-Free Option: Substitute heavy cream with coconut cream or a dairy-free alternative for a vegan-friendly version.

Serving Suggestions

  • Side Salad: A crisp Caesar or mixed greens salad pairs perfectly with the creamy pasta.
  • Bread: Serve with warm garlic bread or a crusty baguette to soak up the sauce.
  • Wine: A chilled white wine, like Pinot Grigio, complements the dish beautifully.
  • Presentation: Serve in a large bowl, garnished with extra parsley and a sprinkle of Parmesan for a restaurant-style touch.

FAQs about Creamy Garlic Parmesan Pasta

Can I make Creamy Garlic Parmesan Pasta ahead of time?

While this dish is best enjoyed fresh, you can prepare the sauce in advance. Just reheat it gently and add the cooked pasta when you’re ready to serve. This way, you save time without sacrificing flavor!

What can I substitute for heavy cream?

If you’re looking for a lighter option, half-and-half works well. For a dairy-free alternative, try coconut cream or a plant-based cream substitute. Both will still give you that creamy texture!

How do I store leftovers?

Store any leftovers in an airtight container in the fridge for up to two days. When reheating, add a splash of water or extra cream to loosen the sauce, as it may thicken in the fridge.

Can I add vegetables to this pasta dish?

Absolutely! Sautéed spinach, mushrooms, or even roasted broccoli can enhance the dish’s flavor and nutrition. Just toss them in when you combine the pasta and sauce.

Is this recipe suitable for a vegetarian diet?

Yes! Creamy Garlic Parmesan Pasta is vegetarian-friendly. Just ensure that the Parmesan cheese you use is made without animal rennet for a fully vegetarian dish.

Final Thoughts

Cooking Creamy Garlic Parmesan Pasta is more than just preparing a meal; it’s about creating a moment of joy. The rich, velvety sauce envelops each strand of pasta, making every bite a comforting experience. Whether you’re sharing it with family or enjoying a quiet night in, this dish brings warmth and satisfaction. It’s a reminder that good food doesn’t have to be complicated. With just a few ingredients and a little love, you can whip up something truly special. So, roll up your sleeves and let the magic of this creamy delight fill your kitchen and your heart!

Ranis

Creamy Garlic Parmesan Pasta: A Delightful Recipe Guide

A creamy and delicious pasta dish made with garlic and Parmesan cheese, perfect for a comforting meal.
Prep Time 10 minutes
Cook Time 15 minutes
Total Time 25 minutes
Servings: 4 servings
Course: Main Course
Cuisine: Italian
Calories: 450

Ingredients
  

  • 8 ounces fettuccine or spaghetti
  • 2 tablespoons olive oil
  • 4 cloves garlic minced
  • 1 cup heavy cream
  • 1 cup grated Parmesan cheese
  • 1 teaspoon salt
  • 1/2 teaspoon black pepper
  • 1/4 teaspoon red pepper flakes optional
  • 1/4 cup chopped fresh parsley for garnish

Method
 

  1. Cook the fettuccine or spaghetti according to package instructions until al dente. Drain and set aside, reserving 1/2 cup of the pasta water.
  2. In a large skillet, heat the olive oil over medium heat. Add the minced garlic and sauté for about 1 minute until fragrant, being careful not to burn it.
  3. Pour in the heavy cream and bring to a gentle simmer. Stir in the grated Parmesan cheese, salt, black pepper, and red pepper flakes (if using). Continue to stir until the cheese is melted and the sauce is smooth.
  4. Add the cooked pasta to the skillet, tossing to coat it in the creamy sauce. If the sauce is too thick, gradually add some reserved pasta water until you reach your desired consistency.
  5. Remove from heat and garnish with chopped fresh parsley before serving.

Nutrition

Serving: 1servingCalories: 450kcalCarbohydrates: 35gProtein: 12gFat: 30gSaturated Fat: 15gPolyunsaturated Fat: 10gCholesterol: 80mgSodium: 800mgFiber: 2gSugar: 1g

Notes

  • For added protein, consider adding cooked chicken, shrimp, or sautéed vegetables like spinach or mushrooms.
  • Substitute half-and-half for the heavy cream for a lighter version, or use a dairy-free cream alternative for a vegan option.

Tried this recipe?

Let us know how it was!

Sheet Pan Shrimp Boil: Easy Recipe for Flavorful Meals

Introduction to Sheet Pan Shrimp Boil

There’s something magical about a meal that brings everyone together, and this Sheet Pan Shrimp Boil does just that.

Picture a bustling kitchen filled with laughter, the aroma of spices wafting through the air, and a colorful spread that makes your mouth water.

This recipe is a quick solution for those busy weeknights when you want to impress your loved ones without spending hours in the kitchen.

With just one pan and a handful of fresh ingredients, you can create a flavorful feast that’s as easy to make as it is to enjoy.

Let’s dive into this delicious adventure!

Why You’ll Love This Sheet Pan Shrimp Boil

This Sheet Pan Shrimp Boil is a game-changer for busy cooks.

It’s not just about the ease of preparation; it’s about the explosion of flavors that dance on your palate.

In just 45 minutes, you can whip up a meal that feels like a special occasion.

Plus, cleanup is a breeze with only one pan to wash.

Trust me, your taste buds and your schedule will thank you!

Ingredients for Sheet Pan Shrimp Boil

Creating a delicious Sheet Pan Shrimp Boil starts with gathering the right ingredients.

Here’s what you’ll need:

  • Large shrimp: Peeled and deveined, these are the stars of the dish, bringing a sweet and briny flavor.
  • Baby potatoes: Halved for even cooking, they add heartiness and soak up all the delicious seasonings.
  • Fresh corn: Cut into 1-inch pieces, it adds a pop of sweetness and color to the mix.
  • Smoked sausage: Sliced for a smoky, savory kick that complements the shrimp beautifully.
  • Olive oil: This helps everything roast to perfection, adding richness and helping the spices stick.
  • Old Bay seasoning: A classic blend that brings a taste of the coast, enhancing the seafood flavor.
  • Garlic powder: For that aromatic punch that makes everything taste better.
  • Paprika: Adds a subtle smokiness and vibrant color to the dish.
  • Salt and pepper: Essential for balancing flavors and enhancing the overall taste.
  • Lemon wedges: For serving, they brighten up the dish with a zesty finish.
  • Fresh parsley: Chopped for garnish, it adds a fresh touch and a pop of color.

Feel free to get creative!

For a spicier kick, toss in some cayenne pepper or diced jalapeños.

If you’re looking for alternatives, chicken breast or tofu can easily replace the shrimp for a different protein option.

You can find the exact quantities for each ingredient at the bottom of the article, ready for printing!

How to Make Sheet Pan Shrimp Boil

Creating a Sheet Pan Shrimp Boil is as easy as pie, and trust me, it’s just as satisfying!

Let’s break it down step by step, so you can enjoy this flavorful meal without any fuss.

Step 1: Preheat the Oven

Start by preheating your oven to 400°F (200°C).

This is crucial for getting that perfect roast on your ingredients.

While the oven warms up, you can gather everything else you need.

Step 2: Prepare the Potato and Sausage Mixture

In a large bowl, combine the halved baby potatoes and sliced smoked sausage.

Drizzle in the olive oil, then sprinkle the Old Bay seasoning, garlic powder, paprika, salt, and pepper.

Toss everything together until the potatoes and sausage are well coated.

This mixture is the foundation of your dish, so make sure it’s evenly seasoned!

Step 3: Roast the Potatoes and Sausage

Spread the potato and sausage mixture evenly on a large sheet pan.

Roast in the preheated oven for 20 minutes.

This initial roasting allows the potatoes to soften and the sausage to release its smoky flavor.

The aroma will start to fill your kitchen, and you’ll know you’re on the right track!

Step 4: Add the Corn

After 20 minutes, carefully remove the pan from the oven.

Add the corn pieces to the mix, tossing everything together gently.

Return the pan to the oven for another 10 minutes.

The corn will become tender and sweet, adding a delightful crunch to your dish.

Step 5: Incorporate the Shrimp

Now it’s time for the star of the show!

Add the peeled and deveined shrimp to the pan, tossing gently to combine.

Roast for an additional 5-7 minutes, or until the shrimp turn pink and are cooked through.

Keep an eye on them; shrimp cook quickly, and you don’t want to overdo it!

Step 6: Serve and Enjoy

Once everything is cooked to perfection, remove the pan from the oven.

Let it cool for a couple of minutes before serving.

Garnish with fresh parsley and serve with lemon wedges on the side.

The bright citrus will elevate the flavors, making each bite a burst of deliciousness.

Dig in and enjoy your homemade Sheet Pan Shrimp Boil!

Tips for Success

  • Make sure your shrimp are fresh or properly thawed for the best flavor.
  • Don’t overcrowd the pan; give everything space to roast evenly.
  • Feel free to adjust the seasoning to match your taste preferences.
  • For a crispy finish, broil the dish for a minute or two at the end.
  • Serve immediately for the best texture and flavor experience.

Equipment Needed

  • Large sheet pan: A sturdy option for even roasting; a baking dish works too.
  • Mixing bowl: For combining ingredients; any large bowl will do.
  • Measuring spoons: Essential for accurate seasoning; you can eyeball it if you’re confident!
  • Spatula or tongs: For tossing ingredients; a wooden spoon can work in a pinch.

Variations

  • Spicy Twist: Add diced jalapeños or a pinch of cayenne pepper for an extra kick.
  • Vegetarian Option: Substitute shrimp with chickpeas or tofu for a hearty plant-based meal.
  • Herb Infusion: Experiment with fresh herbs like thyme or dill for a fragrant twist.
  • Seasonal Veggies: Swap in seasonal vegetables like bell peppers or zucchini for added color and nutrition.
  • Garlic Lovers: Increase the garlic powder or add fresh minced garlic for a bolder flavor.

Serving Suggestions

  • Side Salad: A crisp green salad with a light vinaigrette complements the richness of the shrimp boil.
  • Crusty Bread: Serve with warm, crusty bread to soak up the delicious juices.
  • Refreshing Drink: Pair with a cold beer or a citrusy lemonade for a refreshing contrast.
  • Presentation: Serve family-style on the sheet pan for a casual, fun dining experience.

FAQs about Sheet Pan Shrimp Boil

Can I use frozen shrimp for this recipe?

Absolutely! Just make sure to thaw the shrimp completely before using them. This will help them cook evenly and absorb all those delicious flavors.

What can I substitute for Old Bay seasoning?

If you don’t have Old Bay on hand, a mix of paprika, celery salt, and black pepper can work well. You can also try Cajun seasoning for a different flavor profile.

How do I know when the shrimp are cooked?

Perfectly cooked shrimp turn pink and opaque. They should also curl slightly. Keep an eye on them, as they cook quickly!

Can I make this dish ahead of time?

While it’s best enjoyed fresh, you can prep the ingredients ahead of time. Just store them separately in the fridge and assemble before roasting.

What sides pair well with a Sheet Pan Shrimp Boil?

A light salad, crusty bread, or even some coleslaw make great accompaniments. They balance the richness of the shrimp and sausage beautifully!

Final Thoughts

Cooking this Sheet Pan Shrimp Boil is more than just preparing a meal; it’s about creating memories.

The vibrant colors and enticing aromas fill your kitchen, inviting everyone to gather around the table.

Each bite bursts with flavor, making it a dish that’s sure to impress.

Whether it’s a weeknight dinner or a weekend gathering, this recipe brings a sense of joy and togetherness.

So, roll up your sleeves, embrace the simplicity, and enjoy the deliciousness that comes from one pan.

Trust me, your taste buds will thank you, and your loved ones will be asking for seconds!

Ranis

Sheet Pan Shrimp Boil: Easy Recipe for Flavorful Meals

A delicious and easy recipe for a flavorful Sheet Pan Shrimp Boil, perfect for a quick meal.
Prep Time 10 minutes
Cook Time 35 minutes
Total Time 45 minutes
Servings: 4 servings
Course: Main Course
Cuisine: American
Calories: 400

Ingredients
  

  • 1 pound large shrimp peeled and deveined
  • 1 pound baby potatoes halved
  • 1 pound fresh corn cut into 1-inch pieces (about 3 ears)
  • 8 ounces smoked sausage sliced
  • 4 tablespoons olive oil
  • 2 teaspoons Old Bay seasoning
  • 1 teaspoon garlic powder
  • 1 teaspoon paprika
  • Salt and pepper to taste
  • Lemon wedges for serving
  • Fresh parsley chopped, for garnish

Method
 

  1. Preheat your oven to 400°F (200°C).
  2. In a large bowl, combine the halved baby potatoes, sliced smoked sausage, olive oil, Old Bay seasoning, garlic powder, paprika, salt, and pepper. Toss until everything is well coated.
  3. Spread the potato and sausage mixture evenly on a large sheet pan. Roast in the preheated oven for 20 minutes.
  4. After 20 minutes, remove the pan from the oven and add the corn pieces. Toss everything together and return to the oven for an additional 10 minutes.
  5. Finally, add the shrimp to the pan, tossing gently to combine. Roast for another 5-7 minutes, or until the shrimp are pink and cooked through.
  6. Remove from the oven and let cool for a couple of minutes. Serve with lemon wedges and garnish with chopped parsley.

Nutrition

Serving: 1servingCalories: 400kcalCarbohydrates: 30gProtein: 28gFat: 20g

Notes

  • For a spicier kick, add a pinch of cayenne pepper or some diced jalapeños to the mix.
  • Substitute the shrimp with chicken breast or tofu for a different protein option.

Tried this recipe?

Let us know how it was!

Fluffy 2-Ingredient Biscuits: Easy Recipe for Success!

Introduction to Fluffy 2-Ingredient Biscuits

There’s something magical about the smell of freshly baked biscuits wafting through the kitchen. Fluffy 2-Ingredient Biscuits are not just a recipe; they’re a warm hug on a plate. Whether you’re rushing to get dinner on the table or looking to impress your friends at brunch, these biscuits are your go-to solution. With just two simple ingredients, you can whip up a batch in no time. Trust me, your taste buds will thank you, and your loved ones will be asking for seconds. Let’s dive into this delightful baking adventure!

Why You’ll Love This Fluffy 2-Ingredient Biscuits

These Fluffy 2-Ingredient Biscuits are a game changer for anyone who loves good food but hates complicated recipes. They come together in a flash, making them perfect for busy weeknights or lazy weekends. The taste? Oh, it’s like biting into a cloud of buttery goodness. Plus, with just two ingredients, you can easily remember the recipe, making it a staple in your kitchen. Who doesn’t love a quick win in the kitchen?

Ingredients for Fluffy 2-Ingredient Biscuits

Let’s get down to the essentials for these Fluffy 2-Ingredient Biscuits. You won’t need a long grocery list, just a couple of key players that work wonders together.

  • Self-Rising Flour: This magical flour already has baking powder and salt mixed in, making it a time-saver. It’s the backbone of your biscuits, giving them that fluffy rise.
  • Heavy Cream: Rich and luscious, heavy cream adds moisture and a delightful richness to the dough. It’s what makes these biscuits melt in your mouth.

Feeling adventurous? You can also add a few optional ingredients to jazz things up:

  • Sugar: A tablespoon can sweeten the deal if you’re in the mood for a sweeter biscuit.
  • Shredded Cheese: Mix in a cup of your favorite cheese for a savory twist. Cheddar or mozzarella works wonders!
  • Herbs: Fresh herbs like rosemary or thyme can elevate the flavor profile, making your biscuits a standout side dish.

For exact measurements, check the bottom of the article where you can find everything you need for printing. Now, let’s get ready to bake!

How to Make Fluffy 2-Ingredient Biscuits

Now that we have our ingredients ready, let’s roll up our sleeves and get baking! Making Fluffy 2-Ingredient Biscuits is a straightforward process that anyone can master. Follow these simple steps, and you’ll be enjoying warm, fluffy biscuits in no time.

Step 1: Preheat the Oven

First things first, preheat your oven to 450°F. This step is crucial because a hot oven helps the biscuits rise beautifully. While the oven heats up, line a baking sheet with parchment paper. This will prevent sticking and make cleanup a breeze. Trust me, you’ll thank yourself later!

Step 2: Mix the Ingredients

In a large mixing bowl, combine the self-rising flour and heavy cream. Use a spatula or wooden spoon to stir until a dough forms. It should be slightly sticky but manageable. If it feels too dry, add a splash more cream. This is where the magic begins, as the flour and cream come together to create a soft, fluffy dough.

Step 3: Knead the Dough

Now, turn the dough out onto a floured surface. Gently knead it for about 30 seconds. The goal here is to bring the dough together without overworking it. You want it smooth and soft, not tough. Think of it as giving your dough a little love—just enough to make it happy!

Step 4: Shape the Biscuits

Next, pat the dough into a rectangle about 1 inch thick. Use a round cutter or a glass to cut out your biscuits. Place them on the prepared baking sheet, leaving some space between each one. This allows them to rise and get that lovely golden color. Don’t worry if they’re not perfect; rustic is charming!

Step 5: Bake the Biscuits

Pop the baking sheet into your preheated oven and bake for 12-15 minutes. Keep an eye on them! You’ll know they’re done when they’re golden brown on top. The aroma will fill your kitchen, making it hard to resist sneaking a taste before they cool!

Step 6: Cool and Serve

Once baked, remove the biscuits from the oven and let them cool slightly on the baking sheet. This step is important; it allows the steam to escape, keeping them fluffy. Serve them warm, and watch as everyone dives in for a bite. Enjoy the moment—you’ve just created something delicious!

Tips for Success

  • Use cold heavy cream for a fluffier texture; it helps the biscuits rise better.
  • Don’t over-knead the dough; gentle handling keeps them light and airy.
  • For even baking, make sure your biscuits are uniform in size.
  • Experiment with different herbs or cheeses to find your favorite flavor combination.
  • Serve immediately for the best taste, but they can be stored in an airtight container for a day or two.

Equipment Needed

  • Mixing Bowl: A large bowl for combining ingredients. A sturdy pot can work in a pinch.
  • Spatula or Wooden Spoon: For mixing the dough. A fork can also do the trick.
  • Baking Sheet: A flat tray for baking. If you don’t have one, a cast-iron skillet is a great alternative.
  • Parchment Paper: For easy cleanup. If unavailable, grease the baking sheet with butter or oil.
  • Round Cutter or Glass: To cut out biscuits. A knife can also work for a rustic look.

Variations

  • Sweet Biscuits: Add a tablespoon of sugar to the flour for a hint of sweetness. Perfect for breakfast or dessert!
  • Cheesy Biscuits: Mix in a cup of shredded cheese like cheddar or pepper jack for a savory twist that pairs well with soups.
  • Herb-Infused Biscuits: Incorporate fresh herbs such as rosemary, thyme, or chives into the dough for a fragrant and flavorful biscuit.
  • Spicy Kick: Add a teaspoon of red pepper flakes or jalapeños for a spicy version that adds excitement to your meal.
  • Gluten-Free Option: Substitute self-rising flour with a gluten-free blend that includes baking powder and salt for a gluten-free treat.

Serving Suggestions

  • Butter and Jam: Spread a pat of butter and your favorite jam for a classic touch.
  • Soup Pairing: Serve alongside a warm bowl of chicken noodle or tomato soup for a comforting meal.
  • Breakfast Delight: Enjoy them with scrambled eggs and crispy bacon for a hearty breakfast.
  • Presentation: Arrange biscuits on a rustic wooden board for a charming display at brunch.

FAQs about Fluffy 2-Ingredient Biscuits

Can I use all-purpose flour instead of self-rising flour?

Yes, you can! Just add 1 tablespoon of baking powder and a pinch of salt to your all-purpose flour to mimic self-rising flour. This will help your biscuits achieve that fluffy texture.

How do I store leftover biscuits?

To keep your Fluffy 2-Ingredient Biscuits fresh, store them in an airtight container at room temperature for up to two days. You can also freeze them for longer storage. Just reheat in the oven when you’re ready to enjoy!

Can I make these biscuits ahead of time?

Absolutely! You can prepare the dough and cut out the biscuits in advance. Just cover them and refrigerate until you’re ready to bake. This way, you can have fresh biscuits with minimal effort!

What can I serve with these biscuits?

These biscuits are incredibly versatile! They pair wonderfully with soups, stews, or even as a side for breakfast. Try them with butter and jam, or alongside a hearty chili for a comforting meal.

Can I add other flavors to the biscuits?

Definitely! Feel free to experiment with different herbs, cheeses, or spices. Adding a tablespoon of sugar for sweetness or mixing in some shredded cheese can elevate your Fluffy 2-Ingredient Biscuits to a whole new level!

Final Thoughts

Creating Fluffy 2-Ingredient Biscuits is more than just baking; it’s about sharing joy and warmth with those you love. The simplicity of this recipe allows anyone to feel like a kitchen pro, even on the busiest days. Each bite is a reminder that good food doesn’t have to be complicated. Whether you’re enjoying them fresh from the oven or experimenting with flavors, these biscuits bring a sense of comfort and satisfaction. So, roll up your sleeves, embrace the process, and let the delightful aroma fill your home. You’re not just making biscuits; you’re creating memories!

Ranis

Fluffy 2-Ingredient Biscuits: Easy Recipe for Success!

A simple and quick recipe for fluffy biscuits made with just two ingredients.
Prep Time 10 minutes
Cook Time 15 minutes
Total Time 25 minutes
Servings: 8 biscuits
Course: Baking
Cuisine: American
Calories: 150

Ingredients
  

  • 2 cups self-rising flour
  • 1 cup heavy cream

Method
 

  1. Preheat your oven to 450°F. Line a baking sheet with parchment paper.
  2. In a large mixing bowl, combine the self-rising flour and heavy cream. Stir until a dough forms.
  3. Turn the dough out onto a floured surface and knead gently for about 30 seconds until smooth.
  4. Pat the dough into a 1-inch thick rectangle. Cut out biscuits using a round cutter or a glass.
  5. Place the biscuits on the prepared baking sheet, leaving space between them.
  6. Bake in the preheated oven for 12-15 minutes or until golden brown on top.
  7. Remove from the oven and let cool slightly before serving.

Nutrition

Serving: 1biscuitCalories: 150kcalCarbohydrates: 24gProtein: 3gFat: 6g

Notes

  • For a sweeter biscuit, add 1 tablespoon of sugar to the flour mixture.
  • For a savory twist, mix in 1 cup of shredded cheese or herbs like rosemary or thyme before adding the cream.

Tried this recipe?

Let us know how it was!

Peach Sorbet: Discover the Easiest Homemade Recipe!

Introduction to Peach Sorbet

Summer days can be sweltering, and nothing beats the heat quite like a refreshing scoop of peach sorbet. This delightful treat is not just a dessert; it’s a moment of joy, a burst of sunshine in a bowl. I remember the first time I made it—peaches bursting with flavor, the sweet aroma filling my kitchen. It’s the perfect solution for a busy day or a simple way to impress your loved ones. With just a few ingredients and minimal effort, you can create a homemade peach sorbet that will have everyone asking for seconds!

Why You’ll Love This Peach Sorbet

This peach sorbet is a game-changer for hot summer days. It’s incredibly easy to whip up, taking just a few minutes of your time. The taste? Pure bliss! Each spoonful is a sweet, fruity explosion that dances on your palate. Plus, it’s a guilt-free dessert that’s vegan and refreshing. Whether you’re cooling off after a long day or hosting friends, this sorbet is sure to impress and satisfy everyone’s sweet tooth.

Ingredients for Peach Sorbet

Creating your own peach sorbet is a delightful adventure, and it all starts with the right ingredients. Here’s what you’ll need:

  • Ripe Peaches: The star of the show! Choose peaches that are fragrant and slightly soft to the touch for the best flavor.
  • Granulated Sugar: This sweetener balances the tartness of the peaches, enhancing their natural sweetness.
  • Water: Used to create a simple syrup, it helps dissolve the sugar and blend the flavors smoothly.
  • Lemon Juice: A splash of acidity brightens the sorbet, making the peach flavor pop even more.
  • Vanilla Extract: This adds a warm, aromatic note that complements the fruity goodness of the peaches.

For those looking to experiment, consider adding coconut milk or heavy cream for a creamier texture. You can also swap out peaches for other fruits like mango or berries to create unique flavor combinations. If you’re curious about exact measurements, they’re available at the bottom of the article for easy printing!

How to Make Peach Sorbet

Step 1: Prepare the Sugar Syrup

Start by combining granulated sugar and water in a medium saucepan. Heat the mixture over medium heat, stirring constantly until the sugar dissolves completely. This simple syrup is the foundation of your peach sorbet, enhancing the sweetness of the fruit. Once the sugar is dissolved, remove the saucepan from the heat and let it cool to room temperature. This cooling step is crucial, as it prevents the peaches from cooking when blended.

Step 2: Blend the Ingredients

Now, it’s time to bring the flavors together! In a blender, combine the chopped ripe peaches, cooled sugar syrup, lemon juice, and vanilla extract. Blend everything until you achieve a smooth and creamy consistency. The vibrant color and aroma will make your mouth water! If you’re adding coconut milk or heavy cream for a richer texture, do it now. This step is where the magic happens, transforming simple ingredients into a luscious peach mixture.

Step 3: Freeze the Mixture

Pour the peach mixture into a shallow dish, spreading it evenly. Place it in the freezer and let it freeze for about two hours. Here’s the key: every 30 minutes, take it out and stir vigorously with a fork. This helps break up any ice crystals that form, ensuring a smooth sorbet. Trust me, this little effort makes a big difference in texture, giving you that delightful scoopability!

Step 4: Final Freezing

After two hours of stirring, it’s time for the final freeze. Let the sorbet sit in the freezer until it’s firm, which usually takes about two more hours. This step solidifies the mixture, transforming it into the perfect frozen treat. If you’re feeling adventurous, you can taste it at this stage to see if it needs any adjustments. Just remember, patience is key for that perfect scoop!

Step 5: Serve and Enjoy

When you’re ready to serve, take the sorbet out of the freezer and let it sit at room temperature for about five minutes. This softens it slightly, making it easier to scoop. Use an ice cream scoop to serve the peach sorbet into bowls. For a touch of elegance, garnish with fresh mint leaves or a slice of peach. Enjoy this refreshing dessert on a hot day, and watch everyone smile with delight!

Tips for Success

  • Choose perfectly ripe peaches for the best flavor and sweetness.
  • Don’t skip the stirring every 30 minutes; it’s crucial for a smooth texture.
  • For a fun twist, try adding a splash of your favorite liqueur before freezing.
  • Use a shallow dish for freezing; it helps the sorbet freeze faster and more evenly.
  • Store any leftovers in an airtight container to maintain freshness.

Equipment Needed

  • Medium Saucepan: Essential for making the sugar syrup. A small pot works too!
  • Blender: For blending the peach mixture. A food processor can be a great alternative.
  • Shallow Dish: Perfect for freezing the sorbet. A baking dish or pie plate will do just fine.
  • Fork: Handy for stirring the mixture. A whisk can also work in a pinch.

Variations

  • Mango Peach Sorbet: Swap half of the peaches for ripe mangoes for a tropical twist.
  • Berry Peach Sorbet: Add a cup of mixed berries like strawberries or blueberries for a vibrant color and flavor.
  • Spicy Peach Sorbet: Incorporate a pinch of cayenne pepper or fresh ginger for a surprising kick.
  • Herb-Infused Sorbet: Blend in fresh basil or mint leaves for a refreshing herbal note.
  • Alcohol-Infused Sorbet: Add a splash of peach schnapps or rum for an adult version of this treat.

Serving Suggestions

  • Pair your peach sorbet with a slice of warm pound cake for a delightful contrast.
  • Serve alongside fresh berries for a colorful and refreshing dessert plate.
  • Drizzle with a bit of honey or agave syrup for added sweetness.
  • Enjoy with a glass of iced tea or sparkling water for a refreshing drink.
  • Garnish with mint leaves or a peach slice for an elegant touch.

FAQs about Peach Sorbet

Can I use frozen peaches for this recipe?

Absolutely! Frozen peaches can work just as well as fresh ones. Just make sure to thaw them slightly before blending to achieve a smooth consistency. This is a great option if fresh peaches aren’t in season.

How long does homemade peach sorbet last in the freezer?

Homemade peach sorbet can last up to two weeks in the freezer when stored in an airtight container. However, for the best texture and flavor, try to enjoy it within the first week.

Can I make peach sorbet without sugar?

Yes! You can substitute granulated sugar with natural sweeteners like honey or agave syrup. Just keep in mind that this may alter the flavor slightly, but it can still be delicious!

Is peach sorbet vegan?

Yes, this peach sorbet recipe is completely vegan! It’s made with simple plant-based ingredients, making it a perfect treat for everyone, regardless of dietary preferences.

What can I do if my sorbet is too hard?

If your peach sorbet is too hard, let it sit at room temperature for a few minutes before scooping. You can also blend it again briefly to soften it up. This will help achieve that perfect scoopable texture!

Final Thoughts

Making peach sorbet is more than just a recipe; it’s a delightful experience that brings joy to both the cook and those who indulge in it. The vibrant colors and sweet aroma fill your kitchen, creating a warm atmosphere that invites everyone to gather around. Each scoop is a reminder of summer’s sweetness, a moment to savor with family and friends. Whether you’re enjoying it on a hot day or serving it at a gathering, this homemade peach sorbet is sure to create lasting memories. So grab those ripe peaches and let the fun begin!

Ranis

Peach Sorbet: Discover the Easiest Homemade Recipe!

A refreshing and easy homemade peach sorbet recipe perfect for hot summer days.
Prep Time 15 minutes
Cook Time 5 minutes
Total Time 4 hours 20 minutes
Servings: 6 servings
Course: Dessert
Cuisine: American
Calories: 120

Ingredients
  

  • 4 ripe peaches pitted and chopped
  • 1 cup granulated sugar
  • 1 cup water
  • 1 tablespoon lemon juice
  • 1 teaspoon vanilla extract

Method
 

  1. In a medium saucepan, combine the sugar and water. Heat over medium heat, stirring until the sugar dissolves completely. Remove from heat and let cool to room temperature.
  2. In a blender, combine the chopped peaches, cooled sugar syrup, lemon juice, and vanilla extract. Blend until smooth.
  3. Pour the peach mixture into a shallow dish and place it in the freezer. Freeze for about 2 hours, stirring every 30 minutes to break up any ice crystals.
  4. After 2 hours, continue to freeze until the sorbet is firm, about 2 more hours.
  5. Before serving, let the sorbet sit at room temperature for about 5 minutes to soften slightly. Scoop into bowls and enjoy!

Nutrition

Serving: 1servingCalories: 120kcalCarbohydrates: 28gProtein: 1gFiber: 1gSugar: 24g

Notes

  • For a creamier texture, add 1/2 cup of coconut milk or heavy cream to the peach mixture before blending.
  • Experiment with different fruits like mango or berries for a unique flavor twist.

Tried this recipe?

Let us know how it was!

Caramel Apple Nachos: A Deliciously Fun Recipe!

Introduction to Caramel Apple Nachos

There’s something magical about the combination of sweet and crunchy that brings back memories of childhood treats. Caramel Apple Nachos are a delightful twist on a classic favorite, perfect for those busy days when you want to whip up something special without spending hours in the kitchen. This recipe is not just a dessert; it’s a fun way to share a moment with family or friends. Whether you’re hosting a game night or just looking for a quick indulgence, these nachos will impress everyone at the table. Let’s dive into this delicious adventure!

Why You’ll Love This Caramel Apple Nachos

Caramel Apple Nachos are the ultimate dessert for anyone who craves something quick, easy, and downright delicious. In just 10 minutes, you can create a stunning treat that’s perfect for sharing. The balance of tart apples, rich caramel, and crunchy granola makes every bite a delightful experience. Plus, it’s a versatile dish that can be customized to suit your taste, making it a hit for everyone at the table!

Ingredients for Caramel Apple Nachos

Gathering the right ingredients is key to making your Caramel Apple Nachos a hit. Here’s what you’ll need:

  • Apples: Choose medium-sized apples like Granny Smith for a tart kick or Honeycrisp for sweetness. Their crisp texture holds up beautifully.
  • Granola: This adds a delightful crunch. Opt for your favorite variety, whether it’s nutty, fruity, or even chocolatey.
  • Caramel Sauce: The star of the show! A rich, gooey caramel sauce brings everything together. You can use store-bought or make your own for an extra touch.
  • Chocolate Chips: These little morsels add a sweet, melty contrast to the tart apples. Dark, milk, or even white chocolate works well.
  • Chopped Nuts: Pecans or walnuts add a nutty flavor and extra crunch. Feel free to skip them if you’re nut-free.
  • Cinnamon: A sprinkle of this warm spice enhances the flavors and adds a cozy touch.
  • Whipped Cream: Optional, but who can resist a dollop of whipped cream for dipping or drizzling?

For those looking to mix it up, consider adding dried fruits like cranberries or raisins for a chewy texture. If you want a healthier twist, swap the caramel sauce for a yogurt-based dip. You’ll find the exact quantities for each ingredient at the bottom of the article, ready for printing!

How to Make Caramel Apple Nachos

Creating Caramel Apple Nachos is as easy as pie—well, easier! Follow these simple steps to whip up a dessert that’s sure to impress. Let’s get started!

Step 1: Prepare the Apples

First things first, wash your apples thoroughly. I like to use a mix of Granny Smith and Honeycrisp for that perfect balance of tart and sweet. Slice them into wedges, about a quarter-inch thick. This thickness ensures they hold up under all the delicious toppings. Trust me, the right apple variety makes all the difference in flavor!

Step 2: Arrange the Base

Now, grab a large serving platter or a baking sheet lined with parchment paper. Arrange the apple slices in a single layer, overlapping them slightly if needed. This creates a beautiful base for your nachos. Plus, it makes it easier to grab a slice when it’s time to dig in!

Step 3: Add the Crunch

Next up, it’s time to add some crunch! Sprinkle a generous amount of granola over the apple slices. This not only adds texture but also a delightful nutty flavor. Make sure every apple slice gets a bit of that crunchy goodness. It’s the perfect contrast to the soft apples!

Step 4: Drizzle the Caramel

Here comes the fun part—drizzling the caramel sauce! Grab your favorite caramel sauce and drizzle it generously over the apples and granola. Don’t be shy; the more, the merrier! If you’re feeling adventurous, you can even warm the caramel slightly for an extra gooey effect.

Step 5: Top with Treats

Now, let’s take it up a notch. Sprinkle chocolate chips and chopped nuts over the top. The chocolate adds a sweet, melty touch, while the nuts provide an extra crunch. Feel free to mix and match your favorite types of chocolate and nuts. It’s all about personal preference!

Step 6: Finish with Cinnamon

To elevate the flavors, dust the entire platter with a sprinkle of cinnamon. This warm spice adds a cozy note that complements the sweetness of the caramel and apples. It’s like a warm hug for your taste buds!

Step 7: Serve with Whipped Cream

Finally, if you want to take your Caramel Apple Nachos to the next level, serve them with a side of whipped cream. Whether you drizzle it on top or use it for dipping, it adds an indulgent touch that’s hard to resist. Enjoy every bite!

Tips for Success

  • Choose firm apples for the best texture; they hold up well under toppings.
  • Warm the caramel sauce slightly for easier drizzling.
  • Mix different types of granola for added flavor and crunch.
  • Experiment with toppings like coconut flakes or mini marshmallows.
  • Assemble just before serving to keep everything fresh and crunchy.

Equipment Needed

  • Cutting Board: A sturdy surface for slicing apples. A plate can work in a pinch.
  • Sharp Knife: Essential for cutting apples into wedges. A butter knife can be used for softer fruits.
  • Serving Platter: To display your nachos. A baking sheet lined with parchment works too.
  • Measuring Cups: For precise ingredient portions. You can eyeball it if you’re feeling adventurous!

Variations

  • Nut-Free Option: Skip the nuts and use seeds like pumpkin or sunflower for crunch without the allergens.
  • Chocolate Lovers: Use chocolate syrup instead of caramel for a double chocolate experience.
  • Fruit Medley: Add sliced bananas or strawberries for a fruity twist that enhances the flavor.
  • Spiced Up: Mix in a pinch of nutmeg or ginger with the cinnamon for an extra kick.
  • Vegan Delight: Use dairy-free chocolate chips and a vegan caramel sauce for a plant-based treat.

Serving Suggestions

  • Pair with a scoop of vanilla ice cream for a delightful contrast in temperature.
  • Serve alongside a warm cup of spiced cider for a cozy fall vibe.
  • Garnish with fresh mint leaves for a pop of color and freshness.
  • Use colorful plates to make the presentation even more inviting.

FAQs about Caramel Apple Nachos

Can I make Caramel Apple Nachos ahead of time?

While it’s best to assemble them just before serving for maximum freshness, you can prepare the apple slices and toppings in advance. Just keep everything stored separately in the fridge to maintain their crunch.

What type of apples work best for this recipe?

I recommend using Granny Smith for a tart flavor or Honeycrisp for sweetness. Both varieties hold up well and add a delightful contrast to the caramel and chocolate.

Can I use a different sauce instead of caramel?

Absolutely! You can swap caramel for chocolate sauce or even a yogurt-based dip for a healthier option. The key is to choose something that complements the apples.

How can I make this dessert healthier?

To lighten things up, consider using a yogurt dip instead of caramel. You can also add more fruits like berries or bananas for added nutrition and flavor.

What can I serve with Caramel Apple Nachos?

These nachos pair wonderfully with a scoop of vanilla ice cream or a warm cup of spiced cider. They also look great on colorful plates, making them a hit at any gathering!

Final Thoughts

Caramel Apple Nachos are more than just a dessert; they’re a celebration of flavors and textures that bring people together. Each bite is a delightful mix of sweet, tart, and crunchy, making it a treat that appeals to all ages. Whether you’re enjoying them during a cozy family night or sharing them at a gathering with friends, these nachos create moments of joy and laughter. Plus, the simplicity of this recipe means you can whip it up in no time, leaving you free to savor the experience. Dive in and enjoy the deliciousness!

Ranis

Caramel Apple Nachos: A Deliciously Fun Recipe!

Caramel Apple Nachos are a fun and delicious dessert made with sliced apples, granola, caramel sauce, chocolate chips, and nuts, perfect for sharing.
Prep Time 10 minutes
Total Time 10 minutes
Course: Dessert
Cuisine: American
Calories: 250

Ingredients
  

  • 3 medium apples such as Granny Smith or Honeycrisp, sliced
  • 1 cup granola
  • 1/2 cup caramel sauce
  • 1/2 cup chocolate chips
  • 1/4 cup chopped nuts such as pecans or walnuts
  • 1/4 teaspoon cinnamon
  • Whipped cream optional, for serving

Method
 

  1. Begin by washing and slicing the apples into thin wedges. Arrange the apple slices on a large serving platter or a baking sheet lined with parchment paper.
  2. Evenly sprinkle the granola over the apple slices, ensuring each slice gets a bit of crunch.
  3. Drizzle the caramel sauce generously over the apples and granola. Use as much or as little as you prefer.
  4. Sprinkle the chocolate chips and chopped nuts over the top for added flavor and texture.
  5. Dust the entire platter with cinnamon for a warm spice note.
  6. If desired, serve with whipped cream on the side for dipping or drizzling.

Nutrition

Serving: 1servingCalories: 250kcalProtein: 3gFat: 10g

Notes

  • For a healthier option, substitute the caramel sauce with a yogurt-based dip.
  • Try adding dried fruits like cranberries or raisins for extra sweetness and texture.

Tried this recipe?

Let us know how it was!

Teriyaki Turkey Rice Bowl: A Quick and Easy Recipe!

Introduction to Teriyaki Turkey Rice Bowl

When life gets hectic, finding a meal that’s both quick and satisfying can feel like a treasure hunt. That’s where my Teriyaki Turkey Rice Bowl comes in—a delightful dish that’s ready in just 25 minutes!

This recipe is perfect for those busy weeknights when you want something delicious without spending hours in the kitchen. With its savory flavors and colorful veggies, it’s not just a meal; it’s a way to bring a little joy to your table.

So, grab your skillet and let’s dive into this easy, healthy dinner that’s sure to impress your loved ones!

Why You’ll Love This Teriyaki Turkey Rice Bowl

This Teriyaki Turkey Rice Bowl is a game-changer for busy nights.

It’s not just quick to make; it’s also packed with flavor and nutrition.

The combination of tender turkey, vibrant veggies, and a sweet-savory sauce creates a satisfying meal that pleases everyone at the table.

Plus, it’s versatile enough to adapt to your taste buds, making it a go-to recipe for any occasion.

Ingredients for Teriyaki Turkey Rice Bowl

Creating a delicious Teriyaki Turkey Rice Bowl starts with gathering the right ingredients. Here’s what you’ll need:

  • Ground Turkey: The star of the dish, lean and packed with protein. It cooks quickly and absorbs flavors beautifully.
  • Soy Sauce: This adds a salty umami kick, enhancing the overall taste of the turkey.
  • Teriyaki Sauce: A sweet and savory sauce that brings a delightful glaze to the turkey.
  • Sesame Oil: Just a touch of this oil adds a nutty aroma and richness to the dish.
  • Garlic Powder: A must-have for that aromatic depth; it’s convenient and blends well.
  • Ginger Powder: This spice adds warmth and a hint of spice, balancing the sweetness of the teriyaki sauce.
  • Cooked White Rice: The perfect base for your bowl, providing a hearty texture to soak up all the flavors.
  • Broccoli Florets: These add a pop of color and crunch, plus they’re packed with nutrients.
  • Sliced Bell Peppers: Any color works! They bring sweetness and a vibrant look to your bowl.
  • Shredded Carrots: These add a nice crunch and a touch of sweetness, making the dish even more appealing.
  • Sliced Green Onions: A fresh garnish that adds a mild onion flavor and a splash of color.
  • Sesame Seeds: Optional, but they add a lovely crunch and a nutty finish to your bowl.

Feel free to mix and match ingredients based on what you have on hand. For instance, if you’re looking for a vegetarian option, swap the ground turkey for tofu.

Exact quantities for each ingredient can be found at the bottom of the article, ready for printing!

How to Make Teriyaki Turkey Rice Bowl

Making a Teriyaki Turkey Rice Bowl is as easy as pie, and trust me, it’s just as satisfying! Follow these simple steps, and you’ll have a delicious meal on the table in no time.

Step 1: Cook the Ground Turkey

Start by heating sesame oil in a large skillet over medium heat.

Once the oil is hot, add the ground turkey.

Cook it for about 5-7 minutes, breaking it apart with a spatula as it browns.

You want it to be fully cooked and no longer pink.

This step is crucial because the turkey is the heart of your dish!

Step 2: Add the Sauces and Spices

Now, it’s time to amp up the flavor!

Stir in the soy sauce, teriyaki sauce, garlic powder, and ginger powder.

Mix everything well and let it cook for an additional 2-3 minutes.

This allows the turkey to soak up all those delicious flavors.

The aroma will have your mouth watering!

Step 3: Steam the Vegetables

While the turkey is cooking, let’s get those veggies ready.

Steam the broccoli and bell peppers until they’re tender, about 4-5 minutes.

You can use a microwave steamer or a pot with a small amount of boiling water.

These vibrant veggies not only add color but also a nutritious crunch to your bowl.

Step 4: Assemble the Bowl

Now comes the fun part—assembly!

In serving bowls, layer the cooked white rice first.

Next, add the teriyaki turkey mixture on top.

Then, pile on the steamed vegetables and shredded carrots.

This colorful presentation is sure to impress!

Step 5: Garnish and Serve

To finish, sprinkle sliced green onions and sesame seeds on top.

These little touches add flavor and a beautiful finish.

Serve your Teriyaki Turkey Rice Bowl warm, and watch everyone dig in with delight.

It’s a meal that’s not just tasty but also a feast for the eyes!

Tips for Success

  • Prep your ingredients ahead of time to save on cooking time.
  • Use a non-stick skillet for easy cooking and cleanup.
  • Don’t overcook the vegetables; they should be tender but still crisp.
  • Feel free to customize the sauce to your taste—add more teriyaki for sweetness!
  • For extra flavor, marinate the turkey in the sauces for 30 minutes before cooking.

Equipment Needed

  • Large Skillet: A non-stick skillet works best for easy cooking and cleanup.
  • Spatula: Use a sturdy spatula to break apart the turkey as it cooks.
  • Steamer: A microwave steamer or a pot with boiling water for veggies.
  • Serving Bowls: Any bowls will do, but wide ones showcase the colorful layers!

Variations

  • Spicy Teriyaki: Add a teaspoon of sriracha or red pepper flakes to the turkey mixture for a fiery kick.
  • Vegetarian Delight: Swap ground turkey for crumbled tofu or tempeh for a plant-based option.
  • Quinoa Base: Replace white rice with quinoa for a protein-packed, gluten-free alternative.
  • Extra Veggies: Toss in snap peas, zucchini, or mushrooms for added texture and flavor.
  • Different Sauces: Experiment with hoisin or sweet chili sauce for a unique twist on the classic teriyaki flavor.

Serving Suggestions

  • Side Salad: A crisp cucumber and avocado salad pairs perfectly with the bowl.
  • Drink Pairing: Serve with a refreshing iced green tea or a light beer.
  • Presentation: Use colorful bowls to showcase the vibrant layers of your Teriyaki Turkey Rice Bowl.
  • Chopsticks: For a fun twist, serve with chopsticks for an authentic Asian dining experience.

FAQs about Teriyaki Turkey Rice Bowl

Can I use a different protein instead of ground turkey?

Absolutely! Ground chicken or even tofu works great in this Teriyaki Turkey Rice Bowl. Just adjust the cooking time as needed.

How can I make this dish gluten-free?

To make a gluten-free version, simply use tamari instead of soy sauce. It has a similar flavor without the gluten.

Can I prepare this meal in advance?

Yes! You can cook the turkey and veggies ahead of time. Just store them separately in the fridge and assemble when ready to eat.

What can I serve with the Teriyaki Turkey Rice Bowl?

A side salad or some steamed dumplings would complement this dish nicely. They add variety and enhance the meal experience.

How do I store leftovers?

Store any leftovers in an airtight container in the fridge for up to three days. Reheat in the microwave or on the stovetop for a quick meal!

Final Thoughts

Cooking this Teriyaki Turkey Rice Bowl is more than just preparing a meal; it’s about creating a moment of joy in your busy life.

The vibrant colors and rich flavors come together to make a dish that not only satisfies hunger but also warms the heart.

Whether you’re sharing it with family or enjoying a quiet dinner alone, this bowl brings a sense of comfort and satisfaction.

Plus, the ease of preparation means you can whip it up any night of the week.

So, roll up your sleeves and enjoy the delightful experience of making this quick and tasty meal!

Ranis

Teriyaki Turkey Rice Bowl: A Quick and Easy Recipe!

A quick and easy recipe for a delicious Teriyaki Turkey Rice Bowl, perfect for a weeknight dinner.
Prep Time 10 minutes
Cook Time 15 minutes
Total Time 25 minutes
Servings: 4 servings
Course: Main Dish
Cuisine: Asian
Calories: 350

Ingredients
  

  • 1 pound ground turkey
  • 2 tablespoons soy sauce
  • 2 tablespoons teriyaki sauce
  • 1 tablespoon sesame oil
  • 1 teaspoon garlic powder
  • 1 teaspoon ginger powder
  • 2 cups cooked white rice
  • 1 cup broccoli florets
  • 1 cup sliced bell peppers any color
  • 1 cup shredded carrots
  • 2 green onions sliced
  • Sesame seeds for garnish optional

Method
 

  1. In a large skillet, heat the sesame oil over medium heat. Add the ground turkey and cook until browned, breaking it apart with a spatula, about 5-7 minutes.
  2. Stir in the soy sauce, teriyaki sauce, garlic powder, and ginger powder. Cook for an additional 2-3 minutes until the turkey is fully cooked and the sauce is well combined.
  3. While the turkey is cooking, steam the broccoli and bell peppers until tender, about 4-5 minutes. You can use a microwave steamer or a pot with a small amount of boiling water.
  4. In serving bowls, layer the cooked rice, followed by the teriyaki turkey mixture, steamed vegetables, and shredded carrots.
  5. Top with sliced green onions and sesame seeds, if desired. Serve warm.

Nutrition

Serving: 1bowlCalories: 350kcalCarbohydrates: 40gProtein: 28gFat: 12gSaturated Fat: 2gPolyunsaturated Fat: 8gCholesterol: 80mgSodium: 600mgFiber: 3gSugar: 5g

Notes

  • For a spicy kick, add a teaspoon of sriracha or red pepper flakes to the turkey mixture.
  • You can substitute ground turkey with ground chicken or tofu for a vegetarian option.

Tried this recipe?

Let us know how it was!