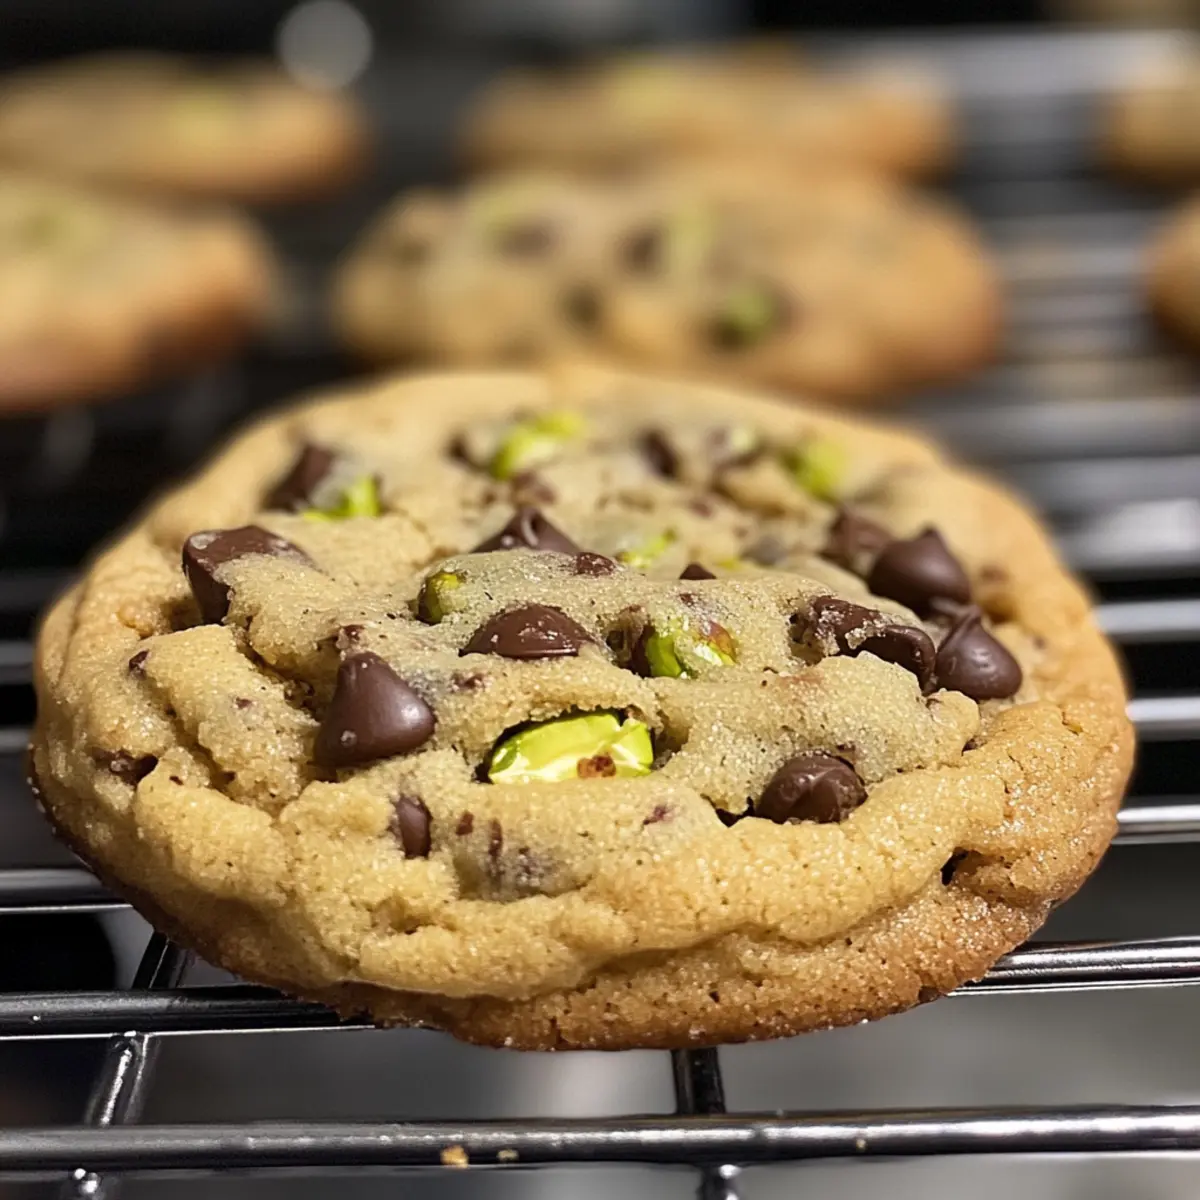
Keto Avocado Egg Salad – Creamy, Quick & Guilt-Free Delight

In just ten minutes, you can whip up a meal that feels indulgent yet keeps your goals in check. Enter the Keto Avocado Egg Salad, a refreshing low-carb lunch that combines the creaminess of avocado with protein-packed eggs, making it both satisfying and nutritious. Not only is this salad quick to prepare, but it’s also perfect for meal prep, giving you a delightful dish to reach for during busy days. Whether you’re on a keto journey or simply want a delicious alternative to fast food, this recipe is your ticket to a vibrant, health-conscious meal. Curious about how to personalize it and make it your own? Let’s dive in!

Why is this Keto Avocado Egg Salad special?

Quick and Easy: You can prepare this delightful salad in just 10 minutes, making it perfect for those hectic days.

Creamy Texture: The avocado adds a rich creaminess that pairs beautifully with hard-boiled eggs.

Low-Carb Delight: With only 3 net carbs per serving, it’s a guilt-free choice for keto enthusiasts.

Meal Prep Friendly: Prepare it in advance and enjoy it throughout the week; it stores well in the refrigerator.

Flavor Variations: Customize your salad by adding crumbled bacon or spicy jalapeños, keeping every bite exciting!

Fresh and Wholesome: Packed with fresh ingredients, it not only nourishes but also satisfies your cravings — a far cry from fast food! Try serving it in butter lettuce wraps for a refreshing twist.

Keto Avocado Egg Salad Ingredients

• Perfect for a flavorful low-carb meal!

For the Salad

  • Avocado – Provides creaminess and healthy fats; ensure it’s ripe for the best taste.
  • Eggs – Essential for protein; use hard-boiled eggs for quick assembly.
  • Mayonnaise – Adds richness; opt for sugar-free options like avocado oil mayo to keep it keto-friendly.
  • Lime Juice – Adds acidity for a fresh kick; substitute with lemon juice if needed. Freshly squeezed is ideal!
  • Minced Chives – Introduces a mild onion flavor; green onions can work as an alternative.
  • Salt and Pepper – Essential seasonings to amplify the flavors.
  • Butter Lettuce – Acts as a healthy wrap; large leaves are best for holding the salad.

Optional Additions

  • Crumbled Bacon – For a smoky flavor twist that elevates the dish.
  • Diced Jalapeños – Adds a spicy kick for those who enjoy heat.
  • Fresh Herbs – Swap chives with dill or cilantro for varied herbal notes.

Step‑by‑Step Instructions for Keto Avocado Egg Salad

Step 1: Prepare the Ingredients
Begin by gathering all the ingredients for your Keto Avocado Egg Salad. Rinse one ripe avocado, then carefully cut it in half, remove the pit, and dice the flesh into small cubes. Hard-boil three eggs, cooling them under cold water for a few minutes before peeling. Ensure you have your mayo, lime juice, chives, salt, and pepper ready to go.

Step 2: Combine Avocado and Eggs
In a large mixing bowl, add the diced avocado and chopped hard-boiled eggs. Use a fork to gently mash the avocado while keeping some chunks intact for texture. The avocado should be creamy, creating a delightful base for your salad, while the eggs provide a hearty protein boost. The vibrant green color will be inviting as you combine these ingredients.

Step 3: Mix in the Dressing
Next, introduce a quarter cup of mayonnaise and a tablespoon of freshly squeezed lime juice into the bowl. Stir gently with a spatula or spoon, ensuring the avocado and eggs are coated in the creamy mixture. Look for a cohesive blend where the flavors meld together but the mixture remains slightly chunky, showcasing the avocado and egg pieces.

Step 4: Season and Garnish
Now, season your Keto Avocado Egg Salad with salt and pepper to taste, enhancing the overall flavors. Add minced chives for a burst of freshness, which will also add a lovely hint of color. Mix everything well until the salad is evenly seasoned and vibrant. If desired, a little extra lime juice can be drizzled on top for added zest.

Step 5: Serve and Enjoy
For the final touch, prepare large leaves of butter lettuce to serve your salad in as wraps. Spoon generous portions of the creamy Keto Avocado Egg Salad onto the lettuce leaves, creating a beautiful presentation. This step ensures a delightful crunchy contrast between the rich salad and the fresh leaves, making for an appealing low-carb meal perfect for lunches or snacks.

What to Serve with Keto Avocado Egg Salad

Transform your quick lunch into a satisfying spread that’s sure to delight the senses.

  • Crispy Veggie Sticks: A crunchy mix of carrots, celery, and bell peppers adds a fresh contrast that pairs perfectly with the creamy salad.

  • Zesty Cucumber Salad: Lightly dressed with vinegar, this simple salad enhances your meal with a refreshing bite, balancing the richness of the egg salad.

  • Cheesy Cauliflower Rice: A warm side option, this will add comforting texture while keeping it low-carb and flavor-packed.

  • Garlic Butter Shrimp: A delectable protein boost, sautéed shrimp seasoned with garlic and herbs will complement the richness of the avocado perfectly.

  • Tangy Pickles: The sharpness of pickles provides a delightful crunch and acidity that cuts through the creaminess, making each bite more exciting.

  • Sparkling Lemonade: A refreshing drink with a hint of sweetness enhances your meal experience, keeping it vibrant and light-hearted.

  • Coconut Flour Tortillas: For those looking for a low-carb wrap option, these tortillas are perfect for making handheld bites that offer a fun twist.

Feel free to mix and match for a wholesome feast that’s not just a meal, but a joyful culinary experience!

Make Ahead Options

These Keto Avocado Egg Salad portions are perfect for busy home cooks seeking to simplify meal prep! You can hard-boil the eggs and prepare the avocado mixture up to 24 hours in advance, which allows the flavors to meld beautifully while saving time. To maintain the avocado’s vibrant color, mix lime juice directly with the diced avocado as soon as you cut it, then combine it with the eggs, mayonnaise, and seasonings right before serving. Store the mixture in an airtight container in the refrigerator for optimal freshness. When you’re ready to enjoy the salad, simply spoon it into butter lettuce wraps for a quick, guilt-free lunch that’s just as delicious!

Keto Avocado Egg Salad Variations

Mix things up and let your creativity shine with these delightful twists on the classic salad!

  • Bacon Boost: Add crumbled bacon to introduce a smoky flavor that complements the creaminess of avocado and eggs. It’s a hearty addition that feels indulgent!

  • Spicy Kick: Toss in diced jalapeños for a zesty heat that ignites your taste buds. This adds excitement and a fiery touch to your lunchtime!

  • Herbal Twist: Substitute chives with fresh dill or cilantro for an aromatic surprise. Each herb brings its own unique flavor profile that can completely transform the dish!

  • Crunchy Element: Incorporate chopped celery for a satisfying crunch that contrasts beautifully with the creamy textures. It’s an easy way to add more freshness!

  • Creamy Avocado Smoothie Inspiration: For a unique twist, blend a small portion of the salad ingredients into a smoothie for a creamy, nutrient-packed drink. It’s like a meal in a glass!

  • Nutritional Boost: Mix in some chopped spinach or kale for added vitamins and minerals. These leafy greens fit seamlessly into the dish while enhancing its health benefits.

  • Flavorful Marination: Allow your salad to marinate with the lime juice and seasonings for a few hours in the fridge. This deepens the flavors, resulting in an even tastier experience!

Exploring variations can elevate your salad to new heights. For more refreshing ideas, check out this Strawberry Spinach Salad or try serving it along with a lovely Tuna Salad Sandwich for a delightful combo!

Expert Tips for Keto Avocado Egg Salad

  • Choose Ripe Avocados: Make sure your avocados are perfectly ripe to achieve that creamy texture; unripe avocados will be hard and lack flavor.
  • Prevent Browning: To keep your avocado fresh, add lime juice immediately after cutting. This helps preserve the avocado’s vibrant green color.
  • Storage Savvy: Store leftovers in an airtight container to maintain freshness; it typically lasts up to a week in the fridge and tastes great in the Keto Avocado Egg Salad!
  • Customize Flavors: Feel free to experiment with assorted ingredients like crumbled bacon or fresh herbs to elevate your salad, creating your unique variations.
  • Keep Eggs Fresh: Hard-boiled eggs can sometimes cause a funky aroma if not stored correctly; try to peel and refrigerate them immediately after cooling.

How to Store and Freeze Keto Avocado Egg Salad

Fridge: Store your Keto Avocado Egg Salad in an airtight container; it will stay fresh for up to 7 days. Always mix well before serving again.

Prevent Browning: To keep the avocado vibrant, make sure to add lime juice right after cutting and seal tightly. This helps preserve its color and flavor.

Freezer: While it’s best enjoyed fresh, you can freeze the salad for up to 2 months. Just be aware that the texture may change slightly upon thawing.

Reheating: If thawed, enjoy the salad chilled; it’s not suitable for reheating due to the nature of the ingredients.

Keto Avocado Egg Salad Recipe FAQs

How do I choose the perfect avocado for my salad?
Absolutely! Look for avocados that are slightly soft to the touch, with a rich green color beneath the skin. If you press gently and it gives a bit, it’s ripe and ready for your Keto Avocado Egg Salad. Avoid avocados with dark spots or large indentations, as they may be overripe or bruised.

How should I store leftover Keto Avocado Egg Salad?
For optimal freshness, store your salad in an airtight container in the refrigerator. It will stay good for up to 7 days. Before enjoying leftovers, give it a gentle stir to reincorporate any ingredients that may have settled.

Can I freeze Keto Avocado Egg Salad?
While it’s best enjoyed fresh, you can freeze it for up to 2 months if necessary. To do this, place the salad in a freezer-safe container, leaving some space at the top for expansion. Once thawed, enjoy it cold as the texture may change slightly, and avoid reheating to preserve the quality.

What’s the best way to prevent browning in the avocado?
To keep your avocados looking fresh in your Keto Avocado Egg Salad, add freshly squeezed lime juice right after cutting. This not only adds flavor but acts as a natural preservative. If browning occurs, it’s okay, though. Just mix well before serving, and it will still taste delicious!

Are there any dietary considerations I should keep in mind?
Very! This salad is naturally low in carbs, making it ideal for keto dieters. However, if you have specific allergies, be mindful of the mayonnaise used. Opt for sugar-free and dairy-free versions if needed, ensuring all ingredients fit your dietary restrictions. Enjoy customizing it to cater to your needs!

Can I make variations of this Keto Avocado Egg Salad?
The more the merrier! Feel free to customize your salad by adding crumbled bacon for a smoky flavor or stirring in diced jalapeños for a spicy kick. Fresh herbs like dill or cilantro can offer a delightful twist, allowing you to enjoy a new flavor profile with every batch!

Keto Avocado Egg Salad

Keto Avocado Egg Salad – Creamy, Quick & Guilt-Free Delight

Keto Avocado Egg Salad is a quick, creamy, low-carb dish perfect for a healthy meal.
Prep Time 10 minutes
Total Time 10 minutes
Servings: 4 servings
Course: Salad
Cuisine: American
Calories: 200

Ingredients
  

For the Salad
  • 1 Avocado Ensure it’s ripe for the best taste.
  • 3 Eggs Hard-boiled.
  • 1/4 cup Mayonnaise Opt for sugar-free options like avocado oil mayo.
  • 1 tablespoon Lime Juice Freshly squeezed is ideal; lemon juice can be used as a substitute.
  • 2 tablespoons Minced Chives Green onions can work as an alternative.
  • to taste Salt
  • to taste Pepper
  • 4 leaves Butter Lettuce Large leaves are best for holding the salad.
Optional Additions
  • 1/2 cup Crumbled Bacon For a smoky flavor twist.
  • 1/4 cup Diced Jalapeños For a spicy kick.
  • to taste Fresh Herbs Dill or cilantro can be used.

Equipment

  • Mixing Bowl
  • Fork
  • Spatula or spoon

Method
 

Step-by-Step Instructions
  1. Gather all ingredients. Rinse avocado, cut it in half, remove the pit, and dice it. Hard-boil three eggs and cool them under cold water before peeling.
  2. In a large mixing bowl, add diced avocado and chopped hard-boiled eggs. Mash the avocado using a fork, keeping some chunks intact.
  3. Add mayonnaise and lime juice into the bowl. Stir gently until the mixture is slightly chunky.
  4. Season with salt and pepper to taste. Mix in minced chives.
  5. Serve in large leaves of butter lettuce as wraps, spooning salad onto the leaves.

Nutrition

Serving: 1servingCalories: 200kcalCarbohydrates: 3gProtein: 7gFat: 18gSaturated Fat: 3gPolyunsaturated Fat: 1gMonounsaturated Fat: 12gCholesterol: 186mgSodium: 200mgPotassium: 350mgFiber: 5gSugar: 1gVitamin A: 500IUVitamin C: 10mgCalcium: 20mgIron: 1mg

Notes

Store leftovers in an airtight container for up to 7 days. Add lime juice after cutting the avocado to prevent browning.

Tried this recipe?

Let us know how it was!

Crispy Asian Chicken Air Fryer Delight in Just 30 Minutes

The air fryer has revolutionized my weeknight cooking, especially when I crave something delicious yet uncomplicated. Enter my Crispy Asian Chicken Thighs in the Air Fryer—a dish that’s not only gluten-free but also ready in under an hour! Marinated in a delightful blend of soy sauce, sesame oil, honey, and fresh ginger, these chicken thighs come out perfectly crispy on the outside and succulent inside. This recipe is truly a game-changer, whether you’re catering to a busy evening or looking to impress guests at a weekend dinner. Plus, the versatility of marinades adds a fun twist, allowing you to customize flavors to your liking! So, are you ready to transform your dinner routine with this healthy and quick meal?

Why is This Recipe a Must-Try?

Simplicity at Its Best: Preparing these crispy Asian chicken thighs is a breeze, making it perfect for both novice cooks and seasoned chefs.

Flavor-Packed Goodness: The marinade of soy sauce, honey, and ginger guarantees a juicy explosion of flavor with each bite.

Quick and Convenient: In just 30 minutes, enjoy a wholesome meal that’s gluten-free and family-friendly, perfect for busy weeknights or unexpected guests.

Versatile for All Palates: Feel free to innovate! Replace traditional ingredients or add veggies like bell peppers to the air fryer for a complete meal. For more delightful chicken dishes, don’t miss my Air Fryer Chicken Drumsticks and Air Fryer Chicken Wings.

Crowd Pleaser: The enticing aroma and crispy texture will have everyone eagerly awaiting dinner, ensuring even leftovers are delicious!

Asian Chicken Air Fryer Ingredients

Dive into a simple yet flavorful culinary journey with these essential ingredients!

For the Marinade

  • Soy Sauce – Adds a rich umami flavor; substitute with tamari for a gluten-free option.
  • Sesame Oil – Provides a nutty aroma; can be replaced with olive oil for a lighter taste.
  • Honey – Contributes sweetness and helps achieve a beautiful caramelization; maple syrup or agave nectar works too.
  • Garlic (minced) – Enhances the overall flavor profile; fresh or powdered garlic will suffice.
  • Ginger (grated) – Imparts a zesty warmth; ground ginger is a great alternative if fresh isn’t available.
  • Rice Vinegar – Balances the flavors with a hint of acidity; apple cider vinegar can be used for a different twist.
  • Black Pepper – Adds a mild kick; feel free to omit for a milder dish.

For the Chicken

  • Boneless Skinless Chicken Thighs – The main protein, ensuring juiciness; chicken breasts or other proteins can be swapped as desired.

For Garnishing

  • Green Onions – Provides freshness and a pop of color; slice thinly for best presentation.

Prepare to create an irresistible meal with this Asian Chicken Air Fryer recipe!

Step‑by‑Step Instructions for Asian Chicken Air Fryer

Step 1: Prepare the Marinade
In a medium bowl, combine soy sauce, sesame oil, honey, minced garlic, grated ginger, rice vinegar, and black pepper. Whisk until smooth, allowing all ingredients to blend harmoniously. This marinade is essential for infusing flavor into your Asian Chicken Air Fryer recipe, so make sure it’s well mixed and evenly combined.

Step 2: Marinate the Chicken
Add the boneless skinless chicken thighs to the marinade, ensuring each piece is thoroughly coated. Allow the chicken to marinate for at least 30 minutes; for optimal flavor, pop it in the refrigerator for up to 1 hour or even overnight if time permits. This step will result in tender, flavorful chicken that is the star of your dish.

Step 3: Preheat the Air Fryer
While the chicken is marinating, preheat your air fryer to 375°F (190°C). This temperature is ideal for achieving that crispy exterior while keeping the inside juicy. Allow the air fryer about 5 minutes to come to temperature, ensuring your chicken will begin cooking evenly as soon as it hits the basket.

Step 4: Cook the Chicken
Once preheated, place the marinated chicken thighs in a single layer in the air fryer basket, ensuring not to overcrowd it. Cook for 20-25 minutes, flipping the chicken halfway through the cooking time. The chicken is done when it reaches an internal temperature of 165°F (74°C) and has a beautiful golden-brown crispy exterior.

Step 5: Garnish and Serve
After cooking, carefully remove the chicken from the air fryer and let it rest for a few minutes. For a vibrant touch, garnish with thinly sliced green onions. Serve your succulent Asian Chicken Air Fryer dish hot, paired with steamed rice or your favorite vegetables for a delightful meal that everyone will love.

Storage Tips for Asian Chicken Air Fryer

Fridge: Store any leftover Asian chicken in an airtight container for up to 3-4 days. Reheat in the air fryer to restore crispiness.

Freezer: For a freezer-friendly option, freeze the marinated chicken for up to 2-3 months. Thaw in the refrigerator before cooking.

Reheating: When reheating, place the chicken in the air fryer at 350°F (175°C) for about 5-7 minutes, ensuring it stays crispy and delicious.

Marinating Ahead: You can marinate the chicken thighs up to overnight, enhancing the flavors and optimizing your dinner prep.

What to Serve with Crispy Asian Chicken Thighs in the Air Fryer?

A sensory journey awaits as you create a meal to complement the delightful flavors of your Asian chicken dish.

  • Steamed Jasmine Rice: The perfect base for soaking up the savory sauce, fluffy rice adds a comforting touch to every bite.
  • Sautéed Bok Choy: Crisp and slightly bitter, these greens provide a refreshing contrast and a pop of vibrant color to your plate.
  • Asian Slaw with Sesame Vinaigrette: The crunch of cabbage and carrots, paired with a zesty dressing, elevates your meal with fresh textures and a tangy kick.
  • Coconut Sticky Rice: Slightly sweet and creamy, this fragrant rice balances the savory chicken beautifully, creating a harmonious flavor experience.
  • Miso Soup: Warm and soothing, this traditional soup adds depth and umami, making your meal feel even more authentic and fulfilling.
  • Chilled Cucumber Salad: Refreshing and light, the coolness of cucumber complements the warm chicken, providing a perfect palate cleanser.
  • Spicy Edamame: A delightful appetizer or side, these seasoned pods introduce a savory, spicy element that enhances your Asian theme.
  • Green Tea or Jasmine Tea: Serve these alongside your meal to add an aromatic experience that enhances the flavors of your dish.

Transform any weeknight dinner into a festive feast with these delicious pairings!

Expert Tips for Asian Chicken Air Fryer

  • Marinade Time Matters: Allowing the chicken to marinate for at least 30 minutes enhances flavor. For a bold taste, marinate overnight if possible.

  • Air Fryer Capacity: Avoid overcrowding the air fryer basket to ensure even cooking and crispy results. Cook in batches if you have more chicken.

  • Check the Temperature: Use a meat thermometer to confirm that chicken reaches an internal temperature of 165°F (74°C). This ensures it’s fully cooked and safe to eat.

  • Preheat for Perfection: Always preheat your air fryer before adding chicken. This helps achieve that wonderfully crispy exterior.

  • Adapt to Your Taste: Feel free to experiment with the marinade by adding different spices or citrus juices to create your unique version of this Asian Chicken Air Fryer recipe.

Make Ahead Options

Preparing these crispy Asian chicken thighs in advance is a fantastic time-saver for busy home cooks! You can marinate the chicken up to 24 hours in advance for maximum flavor—just store the marinated thighs in an airtight container in the refrigerator to keep them fresh and flavorful. Additionally, if you have leftovers, they can be stored for 3-4 days in the fridge; simply reheat in the air fryer for a crispy finish that tastes just as delicious as when they were first cooked. When ready to serve, follow the cooking instructions, and enjoy a quick, hassle-free dinner that the whole family will love.

Asian Chicken Air Fryer Variations

Feel free to customize this dish, elevating your meal experience with delightful twists and substitutions!

  • Dairy-Free: Omit any dairy products—this recipe is already dairy-free and can be enjoyed as is!
  • Citrus Twist: Substitute rice vinegar with orange or lime juice for a refreshing zing. The citrus will brighten the flavors superbly.
  • Veggie Boost: Add vegetables like bell peppers or snap peas into the air fryer. Toss them in leftover marinade for a vibrant, all-in-one meal.
  • Heat It Up: Include red pepper flakes or sriracha in your marinade to add a spicy kick. A little heat goes a long way in transforming your chicken thighs!
  • Herb Infusion: Experiment with fresh herbs! Add chopped cilantro or basil to the marinade for a garden-fresh flavor that enhances the Asian profile.
  • Alternative Proteins: Swap chicken thighs for pork tenderloin or tofu for a completely different yet equally delicious dish. Each protein will absorb the marinade beautifully, offering unique textures and flavors.
  • Nutty Addition: Stir in a few tablespoons of crushed peanuts or cashews just before serving to introduce a delightful crunch and nutty flavor that complements the dish perfectly.

For more amazing chicken ideas, don’t forget to check out my Air Fryer Chicken Wings or consider making savory Jerk Chicken Burritos—both are sure to satisfy your cravings!

Asian Chicken Air Fryer Recipe FAQs

How do I select the best chicken thighs for this recipe?
Absolutely! Look for boneless skinless chicken thighs that are firm and have a nice pink hue. Avoid any with dark spots or a slimy texture, as these can indicate spoilage. Opt for thighs that feel plump and are evenly shaped for uniform cooking.

What’s the best way to store leftover Asian chicken?
For optimum freshness, store any leftover Asian chicken in an airtight container in the fridge for up to 3-4 days. Reheating in the air fryer at 350°F (175°C) for 5-7 minutes will help restore that delightful crispiness!

Can I freeze this Asian chicken for later?
Absolutely! To freeze, marinate the chicken as usual, then place it in a freezer-safe bag or container. It can be stored for up to 2-3 months. Just remember to thaw it in the fridge overnight before cooking, and you’re good to go!

What should I do if my chicken is not cooking evenly?
The key to even cooking is not overcrowding the air fryer basket. Make sure there’s enough space between each chicken thigh for air to circulate. If you find that it’s still uneven, try cooking in batches next time to achieve that perfect golden-brown texture!

Are there any dietary concerns I should be aware of?
Great question! This recipe is naturally gluten-free when using tamari in place of regular soy sauce. If you have allergies—like to sesame—consider substituting with olive oil and omitting sesame oil altogether. Always check the labels for any pre-made ingredients to ensure they meet your dietary needs.

Asian Chicken Air Fryer

Crispy Asian Chicken Air Fryer Delight in Just 30 Minutes

This Crispy Asian Chicken recipe is gluten-free and perfect for weeknight cooking, made in an air fryer and ready in 30 minutes.
Prep Time 30 minutes
Cook Time 25 minutes
Total Time 55 minutes
Servings: 4 servings
Course: Chicken
Cuisine: Asian
Calories: 350

Ingredients
  

For the Marinade
  • 1/4 cup Soy Sauce Substitute with tamari for gluten-free
  • 2 tablespoons Sesame Oil Can be replaced with olive oil
  • 2 tablespoons Honey Maple syrup or agave nectar works too
  • 2 cloves Garlic (minced) Fresh or powdered garlic will suffice
  • 1 tablespoon Ginger (grated) Ground ginger is a good alternative
  • 1 tablespoon Rice Vinegar Apple cider vinegar can be used
  • 1/2 teaspoon Black Pepper Omit for a milder dish
For the Chicken
  • 2 pounds Boneless Skinless Chicken Thighs Can swap with chicken breasts or other proteins
For Garnishing
  • 2 stalks Green Onions Slice thinly for best presentation

Equipment

  • Air fryer

Method
 

Step-by-Step Instructions
  1. In a medium bowl, combine soy sauce, sesame oil, honey, minced garlic, grated ginger, rice vinegar, and black pepper. Whisk until smooth.
  2. Add the chicken thighs to the marinade, ensuring each piece is coated. Marinate for at least 30 minutes, preferably in the refrigerator for up to 1 hour or overnight.
  3. Preheat your air fryer to 375°F (190°C) for about 5 minutes.
  4. Place the marinated chicken thighs in a single layer in the air fryer basket. Cook for 20-25 minutes, flipping halfway through.
  5. Carefully remove the chicken and let it rest for a few minutes. Garnish with sliced green onions and serve hot.

Nutrition

Serving: 1servingCalories: 350kcalCarbohydrates: 12gProtein: 28gFat: 22gSaturated Fat: 4gPolyunsaturated Fat: 5gMonounsaturated Fat: 9gCholesterol: 120mgSodium: 800mgPotassium: 400mgSugar: 8gVitamin A: 200IUCalcium: 30mgIron: 2mg

Notes

Marinade for at least 30 minutes for better flavor. Use a meat thermometer to check for an internal temperature of 165°F (74°C).

Tried this recipe?

Let us know how it was!

Savor the Comfort of Carne con Papas: A Cozy Family Favorite

As I lifted the lid on my simmering pot, the rich aroma of Carne con Papas wrapped around me like a cozy blanket, instantly transporting me to a bustling Mexican kitchen. This traditional Mexican stew, featuring tender beef and hearty potatoes bathed in a savory tomato sauce, promises to warm not just your body but your soul. It’s comforting and simple—perfect for those days when you crave a wholesome meal without spending hours in the kitchen. You’ll love how quickly it comes together, making it an ideal choice for busy weeknights or a relaxed family gathering. Ready to take a flavorful journey through my kitchen? Let’s dive into this delightful recipe for Carne con Papas!

Why is Carne con Papas So Beloved?

Comforting Warmth: This traditional Mexican stew envelops you in its soothing embrace, perfect for chilly evenings.

Savory Richness: Made with tender beef and hearty potatoes simmered in a luscious tomato sauce, every bite ignites your taste buds.

Quick and Easy: With straightforward steps, you’ll have a delicious meal ready in no time—ideal for busy weeknights!

Family-Friendly: This dish is sure to please everyone at the table, making it a go-to for family gatherings.

Customizable Dish: Feeling adventurous? Add carrots or sweet potatoes to mix things up, or try it with chicken for a lighter twist.

This recipe is truly about bringing comfort to the dinner table, similar to my Rhubarb Scones Vanilla where family loves come together!

Carne con Papas Ingredients

• Get ready for a comforting journey!

  • For the Stew
  • Beef Chuck Roast – Diced into 1-inch cubes for even cooking, providing rich flavor and tenderness.
  • Kosher Salt – Enhances flavor; use sea salt as a substitute if needed.
  • Ground Black Pepper – Adds subtle heat; adjust to your taste.
  • Garlic Powder – Offers a base aromatic flavor; fresh garlic can be a great substitute.
  • Dried Oregano – Complements the stew with earthy notes; use fresh if available.
  • Ground Cumin – Brings warmth and depth; essential for achieving that authentic Carne con Papas flavor.
  • Olive Oil – Used for browning the meat, contributing to the overall flavor; vegetable oil is a suitable substitute.
  • Roma Tomatoes – Key component of the sauce; fresh tomatoes will provide the best flavor.
  • White Onion – Adds depth to the sauce; yellow onion works well as a substitute.
  • Serrano Pepper – Delivers spice; for less heat, opt for a jalapeño or omit.
  • Garlic Cloves – Fresh aroma enhances the flavor profile of the dish.
  • Beef Broth – Forms the stew base; homemade is best for richness.
  • Bay Leaf – Adds subtle background flavors; don’t forget to remove it before serving.
  • Russet Potatoes – Acts as the main starch component, absorbing flavors beautifully.
  • Cilantro – Fresh garnish that adds brightness; parsley can be a different but nice alternative.

Step‑by‑Step Instructions for Carne con Papas

Step 1: Prepare the Beef
In a mixing bowl, combine diced beef chuck roast with 2.5 teaspoons of kosher salt, ground black pepper, garlic powder, dried oregano, and ground cumin. Ensure every piece is well-seasoned to enhance the flavor of your Carne con Papas. Let it sit for about 15 minutes to allow the spices to penetrate the meat while you prepare the cooking equipment.

Step 2: Brown the Meat
Heat a Dutch oven over medium-high heat and add 2 tablespoons of olive oil. Once shimmering, carefully add the seasoned beef to the pot in a single layer. Sear the meat for about 10 minutes, turning occasionally, until it is evenly browned on all sides. This step develops a deep flavor base for your stew, so watch for a nice caramelization.

Step 3: Make the Sauce
While the beef is browning, prepare the sauce by blending together 4 chopped Roma tomatoes, 1 diced white onion, 1 chopped serrano pepper, and 3 minced garlic cloves in a blender until smooth. Pour in 1 cup of beef broth, add the remaining 1 teaspoon of kosher salt, and blend until fully combined. This rich mix will form the heart of your Carne con Papas.

Step 4: Combine Ingredients
Once the beef is browned, strain the blended tomato mixture into the pot, discarding any solids. Add a bay leaf to the stew, then reduce the heat to medium-low. Allow the mixture to simmer for about 10 minutes, stirring occasionally, until it thickens slightly and the flavors meld together beautifully.

Step 5: Add Potatoes
Stir in 4 cubed russet potatoes, ensuring they’re fully submerged in the sauce. Cover the pot and let it cook for an additional 25 minutes. This simmering stage allows the potatoes to absorb all those delicious flavors while becoming tender, perfectly complementing the beef in your Carne con Papas.

Step 6: Final Touches
After 25 minutes, check for tenderness by piercing the potatoes with a fork. Once done, discard the bay leaf, and stir in a handful of freshly chopped cilantro for a burst of freshness. Allow the stew to rest for 10 minutes before serving to let the flavors set, ensuring a wholesome taste in every bowl of Carne con Papas.

How to Store and Freeze Carne con Papas

Fridge: Keep leftover Carne con Papas in an airtight container for up to 5-7 days. Reheat gently on the stove over low heat, adding a splash of broth to restore moisture.

Freezer: For longer storage, freeze the stew in a freezer-safe container for up to 3 months. Allow it to cool completely before sealing to prevent freezer burn.

Defrosting: When ready to eat, defrost in the refrigerator overnight. Reheat on the stove or in the microwave, ensuring it’s heated thoroughly to 165°F.

Portioning: Consider portioning Carne con Papas into individual servings before freezing for easy meals. Perfect for those busy days when you crave comforting flavors!

Carne con Papas Variations & Substitutions

Feel free to get creative and customize your Carne con Papas to suit your taste preferences!

  • Veggie Boost: Add diced carrots or green beans for a pop of color and added nutrients.

  • Sweet Potato Swap: Use sweet potatoes instead of russet for a sweeter twist that pairs wonderfully with the spices.

  • Chicken Version: Swap beef for chicken thighs; just remember to reduce cooking time for tender, juicy results.

  • Herb Infusion: Experiment with fresh thyme or rosemary to enhance the aromatic profile of your stew.

  • Spicy Kick: For an extra layer of heat, toss in some diced jalapeños or a sprinkle of crushed red pepper flakes.

  • Tomato Twist: Try blending in roasted red peppers for a richer flavor depth in your tomato sauce.

  • Coconut Cream: For a unique touch, add a splash of coconut milk towards the end of cooking for creaminess and a hint of sweetness.

  • Serve with Flair: Pair with a side of warm, homemade cilantro lime rice for a delightful flavor combination, reminiscent of my Mango Coconut Pudding or alongside a refreshing Pineapple Coconut Mojito.

Expert Tips for Perfect Carne con Papas

  • Choose Quality Beef: Selecting a well-marbled beef chuck roast will enhance flavor and tenderness, making your Carne con Papas truly exceptional.

  • Timing is Key: Allow your stew to simmer adequately; rushing this step can lead to tougher meat and less flavorful broth.

  • Adjust Seasonings Gradually: When seasoning, taste as you go to avoid overpowering the dish. It’s easier to add more than to balance out too much salt or spice.

  • Let It Rest: Allowing the stew to rest off the heat for about 10 minutes before serving will help thicken the sauce and meld the flavors beautifully.

  • Serve with Love: A sprinkle of fresh cilantro and a squeeze of lime can brighten up the dish, providing a vibrant finish to your comforting Carne con Papas.

  • Storage Wisdom: If you have leftovers, store them in an airtight container and let the flavors deepen when reheated!

Make Ahead Options

These Carne con Papas are perfect for meal prep enthusiasts! You can season and brown the beef up to 24 hours in advance, storing it in the refrigerator to allow the flavors to meld together. Additionally, you can prepare the sauce by blending the tomatoes, onion, serrano pepper, and garlic, refrigerating it for up to 3 days. On the day you plan to enjoy your Carne con Papas, combine the beef and sauce in the Dutch oven, add the potatoes, and simmer until everything is tender. This way, you’ll have a delicious homemade meal ready with minimal effort—just as comforting and flavorful as if freshly made!

What to Serve with Traditional Carne con Papas

As you savor every bite of this hearty stew, consider complementing it with delicious sides that enhance its comforting flavors.

  • Cilantro Lime Rice: Bright and fragrant, this rice adds a refreshing contrast to the rich stew and is perfect for soaking up the savory sauce.
  • Warm Flour Tortillas: Soft and pillowy, these tortillas are ideal for wrapping around tender beef and potatoes, making each bite even more delightful.
  • Mexican Street Corn: Grilled corn topped with cotija cheese and spices brings a sweet, smoky flavor that pairs beautifully with the stew.
  • Avocado Salad: Fresh avocado cubes tossed with lime juice and tomatoes add a creamy, cool element that balances the warmth of Carne con Papas.
  • Spicy Pickled Vegetables: Add a burst of tangy heat alongside your meal; they offer a crunchy, vibrant contrast to the tender stew and contribute exciting textures.
  • Churros with Chocolate Sauce: For dessert, these fried pastries dusted in cinnamon sugar provide a sweet finish to your meal, with the warm chocolate dip being the perfect way to indulge a little further.

Carne con Papas Recipe FAQs

How do I select the best beef for Carne con Papas?
Absolutely! When choosing beef for Carne con Papas, I recommend looking for a chuck roast with good marbling. The marbled fat will melt during cooking, ensuring that the meat stays tender and flavorful. If possible, ask your butcher for recommendations based on freshness and quality.

What’s the best way to store leftover Carne con Papas?
To keep your leftovers fresh, store Carne con Papas in an airtight container in the refrigerator for up to 5-7 days. Make sure to cool the stew completely before sealing to maintain its flavors. When reheating, do so gently on the stove over low heat, adding a splash of beef broth to restore moisture.

Can I freeze Carne con Papas?
Absolutely! You can freeze your Carne con Papas in a freezer-safe container for up to 3 months. To do this, let the stew cool completely, then portion it out into containers. This not only saves space but also makes for quick meals on busy days. When you’re ready to enjoy your stew, simply defrost it in the refrigerator overnight, and then reheat it on the stove or in the microwave until it’s piping hot.

What should I do if my Carne con Papas is too salty?
Very! If your stew turns out too salty, consider adding more vegetables or potatoes to absorb the excess salt. You could also add a splash of water or broth to dilute the saltiness. Let it simmer for a few more minutes to allow the flavors to meld, and taste frequently to achieve the perfect balance.

Are there any dietary considerations I should be aware of when making Carne con Papas?
This hearty dish generally contains ingredients that may not be suitable for everyone. For those with beef allergies or dietary restrictions, you can substitute the beef with chicken or even plant-based proteins. Additionally, be mindful of the spice level if serving to kids or those sensitive to heat by potentially using a milder pepper like a jalapeño instead of serrano. Always check with guests regarding allergies, particularly for common allergens like garlic and onions.

How do I know when the potatoes are properly cooked in Carne con Papas?
To ensure your potatoes are perfectly tender, look for a fork to easily pierce through them. This usually takes about 25 minutes of cooking but checking in the last few minutes is a good idea. Once they’re done, you’ll find they have absorbed the savory flavors of the stew beautifully, creating that comforting essence that we all love in Carne con Papas!

Carne con Papas

Savor the Comfort of Carne con Papas: A Cozy Family Favorite

This Carne con Papas recipe is a comforting Mexican stew with tender beef and potatoes, perfect for family gatherings.
Prep Time 15 minutes
Cook Time 1 hour
Resting Time 10 minutes
Total Time 1 hour 25 minutes
Servings: 6 servings
Course: Beef
Cuisine: Mexican
Calories: 350

Ingredients
  

For the Stew
  • 2 pounds Beef Chuck Roast Diced into 1-inch cubes
  • 2.5 teaspoons Kosher Salt Enhances flavor
  • 1 teaspoon Ground Black Pepper Adjust to taste
  • 1 teaspoon Garlic Powder Fresh garlic can be a great substitute
  • 1 teaspoon Dried Oregano Use fresh if available
  • 1 teaspoon Ground Cumin Essential for authentic flavor
  • 2 tablespoons Olive Oil For browning the meat
  • 4 medium Roma Tomatoes Chopped
  • 1 medium White Onion Diced
  • 1 medium Serrano Pepper Chopped, for spice
  • 3 cloves Garlic Minced
  • 1 cup Beef Broth Homemade is best
  • 1 leaf Bay Leaf Remove before serving
  • 4 medium Russet Potatoes Cubed
  • 0.5 cup Cilantro Fresh garnish

Equipment

  • Dutch oven
  • blender
  • Mixing Bowl

Method
 

Instructions
  1. In a mixing bowl, combine diced beef chuck roast with kosher salt, ground black pepper, garlic powder, dried oregano, and ground cumin. Let sit for about 15 minutes.
  2. Heat a Dutch oven over medium-high heat and add olive oil. Once shimmering, sear the seasoned beef for about 10 minutes until browned.
  3. Blend together chopped Roma tomatoes, diced white onion, chopped serrano pepper, and minced garlic in a blender. Pour in beef broth and add remaining kosher salt, blending until smooth.
  4. Strain the blended tomato mixture into the pot with browned beef, discarding solids. Add bay leaf and reduce heat to medium-low; simmer for about 10 minutes.
  5. Stir in cubed russet potatoes, cover the pot, and cook for an additional 25 minutes until potatoes are tender.
  6. Check for tenderness and discard the bay leaf. Stir in chopped cilantro and let rest for 10 minutes before serving.

Nutrition

Serving: 1servingCalories: 350kcalCarbohydrates: 30gProtein: 25gFat: 15gSaturated Fat: 5gPolyunsaturated Fat: 1gMonounsaturated Fat: 9gCholesterol: 85mgSodium: 600mgPotassium: 800mgFiber: 5gSugar: 4gVitamin A: 500IUVitamin C: 15mgCalcium: 40mgIron: 3mg

Notes

Serve with a sprinkle of fresh cilantro and a squeeze of lime for added brightness.

Tried this recipe?

Let us know how it was!

Heavenly Portuguese Coconut Cakes for a Tropical Delight

The tropical aroma wafting through your kitchen is no accident—it’s the magic of Portuguese Coconut Cakes, or Bolos de Coco, coming to life! These delightful little treats are not just easy to whip up but also a perfectly light dessert choice that can brighten any occasion. With a moist, fluffy texture and a hint of coconut sweetness, they stand out as a crowd-pleaser, whether served warm with coffee or at gatherings with friends. Imagine surprising your loved ones with a bite of the tropics right at home! Ready to add a bit of Portuguese flair to your baking repertoire? Let’s dive into this easy recipe that is sure to bring a smile to everyone’s face!

Why are Portuguese Coconut Cakes irresistible?

Light, Fluffy Texture: Each bite of these Bolos de Coco is a cloud-like experience, making them a delightful treat that feels indulgent without the heaviness.
Tropical Flavor: The rich coconut flavor transports you straight to a sunny beach, perfect for those seeking a taste of paradise.
Easy to Make: With simple ingredients and straightforward steps, even novice bakers can impress with this recipe!
Customization Options: Feel free to get creative! Mix in citrus zest or even nuts for a unique twist.
Perfect for Sharing: Whether at brunch or a cozy gathering, these cakes are the ideal size for sharing and enjoying with others, just like a Pineapple Coconut Mojito or a slice of Mango Coconut Pudding.
Get ready to turn ordinary moments into celebrations with these heavenly coconut cakes!

Portuguese Coconut Cakes Ingredients

For the Batter

  • Coconut Milk – Adds creaminess and moisture; substitute with almond milk for a dairy-free option.
  • Shredded Coconut – Provides texture and coconut flavor; use unsweetened for less sweetness or fine coconut for a smoother texture.
  • Eggs – Acts as a binding agent and adds moisture; flax eggs can be used as a vegan alternative.
  • Sugar – Sweetens the cakes; brown sugar can add a hint of caramel flavor.
  • Flour – Gives structure; whole wheat flour can serve as a healthier alternative.
  • Baking Powder – Helps the cakes rise; ensure it is fresh for best results.

Enjoy creating these delightful Portuguese Coconut Cakes that encapsulate the joy of tropical flavors with every single bite!

Step‑by‑Step Instructions for Portuguese Coconut Cakes

Step 1: Preheat the Oven
Begin by preheating your oven to 350°F (175°C). While the oven heats, grab a muffin tin, and line it with paper liners or lightly grease each cup with cooking spray or butter. This extra step ensures that your delightful Portuguese Coconut Cakes will release easily once they’re baked to perfection.

Step 2: Mix Wet Ingredients
In a mixing bowl, pour in the creamy coconut milk, followed by the shredded coconut, eggs, and sugar. Using a whisk or fork, mix these ingredients together until they’re beautifully combined, about 1-2 minutes. The inviting aroma of coconut should begin to fill your kitchen—it’s a wonderful prelude to the deliciousness ahead!

Step 3: Combine Dry Ingredients
In a separate bowl, whisk together the flour and baking powder. Make sure to break up any lumps in the flour for a smooth batter. This step is crucial as it helps distribute the baking powder evenly, ensuring your Portuguese Coconut Cakes rise beautifully and achieve that fluffy texture.

Step 4: Integrate Wet and Dry Mixtures
Gradually add the dry mixture into the bowl of wet ingredients. Gently fold the mixtures together using a spatula, being careful not to overmix. Stop as soon as everything is combined, leaving small flecks of flour visible. This technique helps maintain the light, airy quality of your cakes.

Step 5: Fill the Muffin Cups
Using a spoon or a ladle, carefully fill each muffin cup about 2/3 full with the batter. Ensure the distribution is even so each of your Portuguese Coconut Cakes bakes uniformly. With the vibrant batter in place, you’re just moments away from a delightful treat.

Step 6: Bake the Cakes
Place your filled muffin tin into the preheated oven and bake for 25 minutes. Keep an eye on them—watch for the tops to turn a lovely golden brown. To check for doneness, insert a toothpick into the center of a cake; it should come out clean, signaling that your cakes are ready to shine.

Step 7: Cool and Serve
Once baked, remove the muffin tin from the oven and let it cool for about 5-10 minutes. Afterward, transfer the cakes to a wire rack to cool completely or serve them warm. Savor each fluffy bite of your Portuguese Coconut Cakes, perfect alongside a cup of coffee or enjoyed on their own!

Make Ahead Options

These Portuguese Coconut Cakes are a fantastic choice for meal prep, saving you time during busy weeknights. You can prepare the batter up to 24 hours in advance; simply combine the wet and dry ingredients, then refrigerate the mixture in an airtight container. For an even quicker option, you can bake the cakes and store them in an airtight container at room temperature for up to 3 days or freeze them individually wrapped for up to 1 month. When you’re ready to serve, just reheat the cakes in a warm oven for a few minutes, and they’ll be just as delightful and fluffy as when they were freshly baked!

Storage Tips for Portuguese Coconut Cakes

  • Room Temperature: Store your Portuguese Coconut Cakes in an airtight container at room temperature for up to 3 days. This keeps them moist and delicious, perfect for snacking!
  • Fridge: If you need to extend their freshness, you can refrigerate the cakes for up to a week in an airtight container. Allow them to come to room temperature before serving for the best flavor.
  • Freezer: For longer storage, freeze the cakes individually wrapped in plastic wrap or foil for up to a month. Thaw at room temperature or gently reheat in the oven for a warm treat.
  • Reheating: To enjoy them warm, preheat the oven to 350°F (175°C), place the cakes on a baking sheet, and heat for about 5-10 minutes. Perfect for reliving that fresh-out-of-the-oven experience!

Portuguese Coconut Cakes Variations

Feel free to explore different flavors and textures with these delightful tweaks that will elevate your Portuguese Coconut Cakes!

  • Dairy-Free: Substitute coconut milk with almond or oat milk for a creamy, dairy-free version that’s just as delicious.

  • Zesty Kick: Add the zest of lemon or orange to the batter for a refreshing twist that brightens each bite.

    This not only enhances the flavor but also adds a touch of citrus fragrance, transforming the cakes into a vibrant treat ideal for any occasion.

  • Nutty Crunch: Fold in chopped nuts like almonds or walnuts for a delightful crunch alongside the soft cake texture.

    The added nuts won’t only add flavor but also create a satisfying contrast with the tender crumb.

  • Chocolate Delight: Swirl in some chocolate chips for a sweet experience that balances beautifully with the coconut flavor.

    This variation brings an indulgent touch, pleasing chocolate lovers while still keeping the essence of the original recipe intact.

  • Gluten-Free: Use a gluten-free flour blend to make these cakes safe for those with gluten sensitivities, ensuring everyone can enjoy them.

    The key is to find a blend that suits your taste, providing a cake that’s as delightful and fluffy as the traditional version.

  • Coconut Syrup: Drizzle warm coconut-infused syrup over the finished cakes for an extra touch of sweetness that encapsulates the island vibe.

    It creates a luscious topping that enhances each bite, making your desserts even more memorable.

  • Spiced Up: Incorporate a dash of cinnamon or nutmeg into the batter for a cozy, warming flavor that’s perfect for cool evenings.

    These spices will envelop your kitchen in warmth, adding a familiar comfort to your tropical treats.

  • Fruit-Topped: Serve your cakes with a topping of fresh fruit like mango or pineapple for a refreshing finish that screams summer.

    The fruity addition not only enhances the visual appeal but also adds another layer of flavor, making each bite a delightful experience.

Embrace your creativity in the kitchen, and let these variations inspire you to craft your very own unique batch of Portuguese Coconut Cakes! And don’t forget, paired with a slice of Mango Coconut Pudding or a Coconut Curry Soup, your gatherings will truly transport everyone to the tropics!

What to Serve with Delightfully Light Portuguese Coconut Cakes?

Indulge your senses and create a tropical feast that enhances every bite of these fluffy cakes.

  • Fresh Berries: Juicy strawberries or vibrant blueberries add a burst of freshness, balancing the sweetness and creating a colorful presentation.
  • Coconut Whipped Cream: For an extra touch of decadence, top your cakes with light coconut whipped cream, echoing their tropical flavor.
  • Iced Coffee: A chilled glass of iced coffee complements the cakes beautifully, making for a refreshing afternoon treat.
  • Lemon Sorbet: The tartness of lemon sorbet serves as a palate cleanser, providing a vibrant contrast against the sweet cakes.
  • Tropical Fruit Salad: A blend of pineapple, mango, and kiwi enhances the tropical theme, bringing a medley of textures and a zesty kick.
  • Herbal Tea: A fragrant herbal tea, like chamomile or peppermint, rounds out this delightful pairing, perfect for a cozy chill-out session.
  • Almond Biscotti: Crunchy almond biscotti adds a satisfying textural contrast, ideal for dipping into coffee or tea while enjoying the soft cakes.
  • Coconut-infused Milkshake: Blend coconut milk with vanilla ice cream for a creamy shake that intensifies the flavor experience, making each bite even more blissful.

Expert Tips for Perfect Portuguese Coconut Cakes

  • Room Temperature Ingredients: Ensure all ingredients are at room temperature for better incorporation and a smoother batter. This step contributes to the cake’s lightness.

  • Avoid Overmixing: When combining wet and dry ingredients, mix gently. Overmixing can lead to dense cakes; a few lumps are perfectly fine!

  • Fresh Baking Powder: Always check the freshness of your baking powder. Outdated powder can cause your Portuguese Coconut Cakes to fall flat.

  • Consistent Oven Temperature: Avoid opening the oven door during baking. This ensures a consistent temperature, crucial for fluffy, golden cakes.

  • Creative Pairings: Experiment with serving ideas! Fresh fruit, powdered sugar, or even a drizzle of coconut syrup can elevate your cake’s tropical flavors.

Portuguese Coconut Cakes Recipe FAQs

What coconut milk should I use?
I recommend using full-fat coconut milk for the richest flavor and creaminess. If you’re looking for a dairy-free option, almond milk works beautifully, providing a lighter consistency without losing the tropical vibe.

How should I store leftover Portuguese Coconut Cakes?
You can store your cakes in an airtight container at room temperature for up to 3 days—this keeps them moist and delectable. If you want to extend freshness, refrigerate them for up to a week. Remember to bring them to room temperature before serving!

Can I freeze Portuguese Coconut Cakes?
Absolutely! For freezing, individually wrap the cakes in plastic wrap or foil, then place them in a freezer-safe bag. They can last in the freezer for up to a month. When you’re ready to enjoy them, simply thaw at room temperature or pop them in a preheated oven at 350°F (175°C) for 5-10 minutes to warm up!

Why are my cakes dense instead of fluffy?
If your Portuguese Coconut Cakes end up dense, it’s likely due to overmixing the batter. When combining the dry and wet ingredients, mix just until everything is incorporated—it’s okay to see a few lumps. Additionally, ensure your baking powder is fresh, as expired ingredients can lead to flat cakes.

Are there dietary considerations for pets or allergies?
While these cakes are a delightful treat for humans, they should not be given to pets, especially those with allergies to coconut or eggs. For those with dietary restrictions, you can substitute eggs with flax eggs for a vegan option and use gluten-free flour to cater to gluten sensitivities.

Can I add other flavors or ingredients to the cakes?
Very! Feel free to get creative! Adding citrus zest, such as lemon or orange, can provide a refreshing twist. If you want to increase flavor complexity, consider mixing in some chopped nuts or chocolate chips for an exciting texture variation. Enjoy experimenting!

Portuguese Coconut Cakes

Heavenly Portuguese Coconut Cakes for a Tropical Delight

Delight in these Portuguese Coconut Cakes, light desserts perfect for any occasion.
Prep Time 15 minutes
Cook Time 25 minutes
Cooling Time 10 minutes
Total Time 50 minutes
Servings: 12 cakes
Course: Dessert
Cuisine: Portuguese
Calories: 150

Ingredients
  

For the Batter
  • 1 cup Coconut Milk Substitute with almond milk for a dairy-free option.
  • 1 cup Shredded Coconut Use unsweetened for less sweetness or fine coconut for a smoother texture.
  • 2 large Eggs Flax eggs can be used as a vegan alternative.
  • 3/4 cup Sugar Brown sugar can add a hint of caramel flavor.
  • 1 cup Flour Whole wheat flour can serve as a healthier alternative.
  • 1 tbsp Baking Powder Ensure it is fresh for best results.

Equipment

  • Muffin Tin
  • Mixing Bowl
  • Whisk
  • Spatula
  • toothpick

Method
 

Step-by-Step Instructions
  1. Preheat your oven to 350°F (175°C) and prepare a muffin tin with liners or grease it.
  2. In a mixing bowl, combine coconut milk, shredded coconut, eggs, and sugar, mixing until well combined.
  3. In a separate bowl, whisk together the flour and baking powder, breaking up lumps for a smooth batter.
  4. Gradually add dry mixture to wet ingredients, gently folding until combined with small flecks of flour visible.
  5. Carefully fill each muffin cup about 2/3 full with the batter.
  6. Bake for 25 minutes, checking for a golden brown top and ensuring a toothpick comes out clean.
  7. Let the cakes cool for 5-10 minutes before transferring to a wire rack to cool completely.

Nutrition

Serving: 1cakeCalories: 150kcalCarbohydrates: 24gProtein: 2gFat: 6gSaturated Fat: 5gCholesterol: 30mgSodium: 100mgPotassium: 100mgFiber: 1gSugar: 10gVitamin A: 100IUCalcium: 30mgIron: 0.5mg

Notes

These coconut cakes are perfect for sharing and can be enjoyed warm or at room temperature.

Tried this recipe?

Let us know how it was!

Crispy Air Fryer Sweet Potatoes: Healthy Flavor in Every Bite

As I bit into a perfectly golden cube of sweet potato, the satisfying crunch of the exterior gave way to its creamy, tender interior. It struck me just how versatile and beloved air fryer sweet potatoes are, making them the ideal side dish for any meal. In under 30 minutes, this healthy recipe transforms simple sweet potatoes into crispy delights that appeal to both the health-conscious and those craving comfort food. With the potential to customize flavors with your favorite seasonings, these air fryer sweet potatoes will quickly become a go-to option in your kitchen. Ready to elevate your side dishes? Let’s dive in!

Why are Air Fryer Sweet Potatoes a Must-Try?

Irresistible Crunch: Each bite features a crispy exterior that creates the perfect contrast with the soft and creamy interior. You won’t believe how satisfying they are!

Quick and Easy: In just 30 minutes, you can whip up this healthy side dish, saving you time without sacrificing flavor.

Versatile Serving Options: Pair them with salty dips, toss in salads, or serve alongside grilled meats. The options are endless!

Health Benefits: Packed with vitamins A and C, these sweet potatoes are not just delicious but also a nutritious addition to your meal, similar to the delightful Air Fryer Chicken Drumsticks you might enjoy alongside.

Customizable Flavor: Explore various seasonings by trying out your favorite spices like garlic powder or curry. Each iteration brings something new to the table!

Air Fryer Sweet Potatoes Ingredients

Discover the perfect balance of flavor and nutrition!

For the Sweet Potatoes
Sweet Potatoes – The star of the show, choose large, firm orange-fleshed varieties for the best flavor and texture.

For the Seasoning
Olive Oil – Adds richness and helps achieve that irresistible crispiness; you can substitute with avocado oil if preferred.
Salt – Enhances the flavor profile; sea salt or kosher salt works beautifully.
Black Pepper – Adds subtle heat, and freshly ground is always recommended for maximum flavor.
Paprika – Provides a smoky flavor and vibrant color; consider adding garlic powder or cayenne for an extra kick.

Step‑by‑Step Instructions for Crispy Air Fryer Sweet Potatoes

Step 1: Prep Sweet Potatoes
Start by washing 2-3 medium sweet potatoes thoroughly under running water. Peel them for a smoother texture before cutting them into 1-inch cubes. Aim for uniformity in size to ensure even cooking, making your air fryer sweet potatoes perfectly crispy and tender throughout.

Step 2: Season
In a mixing bowl, toss the sweet potato cubes with a couple of tablespoons of olive oil, followed by a generous sprinkle of salt, freshly ground black pepper, and paprika. Stir well until each cube is evenly coated, creating a delightful flavor base that will enhance the overall taste of your air fryer sweet potatoes.

Step 3: Preheat Air Fryer
Set your air fryer to 400°F (200°C) and let it preheat for about 5 minutes. This step is crucial for achieving that delicious, golden crisp on the outside of your sweet potatoes, ensuring they cook evenly and develop the perfect texture.

Step 4: Cook
Once the air fryer is preheated, place the seasoned sweet potatoes into the basket in a single layer. Avoid overcrowding to allow hot air to circulate freely. Cook them for 15-20 minutes, shaking the basket halfway through for even cooking and to encourage a crispy texture on all sides.

Step 5: Check Doneness
At the 15-minute mark, check your air fryer sweet potatoes for tenderness and golden crispiness. You can pierce a piece with a fork. If they’re tender with a crispy exterior, they’re ready to go. If you prefer a bit more crunch, allow them to cook for an additional 2-3 minutes, checking regularly.

Step 6: Serve
Once perfectly cooked, carefully remove the sweet potatoes from the air fryer and let them cool for a few minutes. Serve them warm, either by themselves or alongside your favorite dips. These crispy air fryer sweet potatoes are delicious on their own or as a vibrant addition to salads and main dishes.

Expert Tips for Air Fryer Sweet Potatoes

Choose Wisely: Select firm, blemish-free sweet potatoes for the best flavor and texture. Soft or damaged ones may result in mushy air fryer sweet potatoes.

Uniform Cuts: Ensure your sweet potato cubes are cut to the same size for even cooking. This prevents some pieces from burning while others are undercooked.

Don’t Overcrowd: Place the sweet potatoes in a single layer in the air fryer basket. Overcrowding can trap steam and hinder that crispy finish we all love.

Season to Taste: Feel free to get creative with spices! Experiment with garlic powder, chili powder, or fresh herbs for unique flavor profiles beyond just paprika.

Reheat for Crispiness: If you have leftovers, store them in an airtight container. Reheat in the air fryer for about 5-7 minutes to restore their delightful crispiness.

Make Ahead Options

These Crispy Air Fryer Sweet Potatoes are perfect for meal prep, allowing you to enjoy healthy, flavorful sides without the last-minute rush! You can peel and cut the sweet potatoes into 1-inch cubes up to 24 hours in advance. Just toss them with olive oil, salt, black pepper, and paprika, then store them in an airtight container in the refrigerator to maintain freshness. When you’re ready to cook, simply preheat your air fryer, place the seasoned cubes in the basket, and cook as directed. This ensures you have crispy, delicious sweet potatoes with minimal effort on busy weeknights, making them an ideal make-ahead option!

Air Fryer Sweet Potatoes Variations

Feel free to unleash your culinary creativity and tailor these crispy delights to your taste!

  • Dairy-Free: Swap out any cheese toppings with nutritional yeast for a cheesy flavor without dairy.

  • Spice It Up: Add some heat by tossing in a pinch of cayenne pepper or red pepper flakes. A little spice will enhance the sweetness beautifully!

  • Herbaceous Delight: Finish off with fresh herbs like rosemary or thyme after cooking for a burst of fresh flavor that complements the sweet potatoes.

  • Savory Twist: Combine sweet potatoes with garlic powder and Italian seasoning for a Mediterranean-inspired twist. The aroma will make your kitchen feel like an Italian trattoria!

  • Sweet Touch: Drizzle honey or maple syrup toward the end of cooking for a sweet glaze; it creates a delightful contrast with the savory spices.

  • Zesty Citrus: Squeeze fresh lemon or lime juice over the cooked sweet potatoes before serving. The citrus will brighten the flavors and add a refreshing zing.

  • Crunch Factor: Toss in some chopped nuts or seeds, like pecans or sesame seeds, after cooking for an added crunch. It makes the dish more exciting and adds texture!

  • Root Veggie Medley: Include other root vegetables such as carrots or parsnips for a colorful, nutritious variation that can elevate your dish’s visual appeal and flavors.

For more ways to delight your palate, why not pair these with some delectable options like Cheesy French Potatoes or try them alongside a comforting dish like Sweet Hawaiian Crockpot Chicken? The possibilities are endless!

What to Serve with Crispy Air Fryer Sweet Potatoes?

Imagine a delightful array of flavors and textures that can elevate your crispy air fryer sweet potatoes to a full meal experience!

  • Creamy Yogurt Dip: This tangy companion adds a cooling element, making each bite of sweet potato even more enjoyable. The contrast of flavors is simply divine.

  • Savory Quinoa Salad: A hearty quinoa salad packed with fresh herbs and veggies creates a delightful textural contrast. It’s a light, nutritious pairing that complements the sweetness of the potatoes.

  • Grilled Chicken Skewers: Juicy, marinated chicken skewers provide a savory meat option that balances the sweetness of the air fryer sweet potatoes perfectly. A match made in flavor heaven!

  • Spicy Aioli: This zesty dip injects heat and creaminess, enhancing the flavor of the crispy sweet potatoes. Pairing these with aioli is a guaranteed crowd-pleaser at any gathering.

  • Oven-Roasted Broccoli: With its crunchy texture and slightly charred taste, oven-roasted broccoli adds color and nutrition to your plate. The bitterness of the greens complements the sweetness wonderfully.

  • Apple Cider Vinaigrette Salad: A fresh salad with crisp greens and a tangy apple cider vinaigrette harmonizes well with the air fryer sweet potatoes. It adds a refreshing contrast to the rich flavors of the dish.

These pairings not only enhance your meal but turn a wholesome side into a delightful feast bursting with flavors!

How to Store and Freeze Air Fryer Sweet Potatoes

Fridge: Store leftover air fryer sweet potatoes in an airtight container in the fridge for up to 3-5 days to maintain freshness.

Freezer: For longer storage, freeze air fryer sweet potatoes in a single layer on a baking sheet. Once frozen, transfer them to an airtight freezer bag for up to 3 months.

Reheating: To enjoy leftovers, reheat in the air fryer at 350°F (175°C) for about 5-7 minutes, helping to restore their crispy texture.

Avoid Moisture: Be sure to cool completely before storing to prevent moisture buildup, which can make the air fryer sweet potatoes soggy.

Air Fryer Sweet Potatoes Recipe FAQs

How do I choose the best sweet potatoes?
Absolutely! When selecting sweet potatoes, look for large, firm, orange-fleshed varieties. Ensure they are free of blemishes or dark spots all over. These characteristics indicate better flavor and texture, which is crucial for making the perfect air fryer sweet potatoes.

What’s the best way to store leftover sweet potatoes?
Very simple! Store any leftover air fryer sweet potatoes in an airtight container in the refrigerator for up to 3-5 days. This helps to keep them fresh and ready for a quick snack or meal addition later in the week.

Can I freeze air fryer sweet potatoes?
Yes, you can! To freeze air fryer sweet potatoes, lay them in a single layer on a baking sheet and place them in the freezer until completely frozen. Then, transfer them to an airtight freezer bag or container where they can last for up to 3 months. When you’re ready to enjoy them, simply reheat in the air fryer!

What should I do if my sweet potatoes are not crispy enough?
No worries! If your sweet potatoes aren’t getting that desired crispiness, there are a few solutions. Make sure your air fryer isn’t overcrowded—this allows for better air circulation. If they still aren’t crispy after the recommended cooking time, increase the temperature by 10-15°F (5-10°C) and cook for an additional 2-3 minutes, checking regularly.

Are air fryer sweet potatoes suitable for those with dietary restrictions?
Yes, indeed! Air fryer sweet potatoes are a fantastic vegetarian option, and they’re gluten-free. However, if you’re concerned about allergies, ensure the seasoning you use is free from allergens. They are also dog-friendly in moderation, so you can share a tiny bit with your furry friend, as long as they are simply cooked without additives!

How can I customize the flavors of my sweet potatoes?
The more the merrier! You can easily change up the flavor of your air fryer sweet potatoes by adding different spices. Try out garlic powder, chili powder, or even fresh herbs like rosemary or thyme for a unique twist. Feel free to experiment until you find your favorite combination!

Air Fryer Sweet Potatoes

Crispy Air Fryer Sweet Potatoes: Healthy Flavor in Every Bite

These Air Fryer Sweet Potatoes offer a crispy exterior and creamy interior, making them a versatile and healthy side dish.
Prep Time 10 minutes
Cook Time 20 minutes
Total Time 30 minutes
Servings: 4 servings
Course: Dinner
Cuisine: American
Calories: 180

Ingredients
  

For the Sweet Potatoes
  • 2-3 medium Sweet Potatoes Choose large, firm orange-fleshed varieties for the best flavor and texture.
For the Seasoning
  • 2 tablespoons Olive Oil Can substitute with avocado oil.
  • 1 teaspoon Salt Sea salt or kosher salt works beautifully.
  • 1 teaspoon Black Pepper Freshly ground is recommended for maximum flavor.
  • 1 teaspoon Paprika Consider adding garlic powder or cayenne for an extra kick.

Equipment

  • Air fryer

Method
 

Step-by-Step Instructions for Crispy Air Fryer Sweet Potatoes
  1. Start by washing 2-3 medium sweet potatoes thoroughly under running water. Peel them for a smoother texture before cutting them into 1-inch cubes.
  2. In a mixing bowl, toss the sweet potato cubes with a couple of tablespoons of olive oil, followed by a generous sprinkle of salt, black pepper, and paprika. Stir well until each cube is evenly coated.
  3. Set your air fryer to 400°F (200°C) and let it preheat for about 5 minutes.
  4. Once the air fryer is preheated, place the seasoned sweet potatoes into the basket in a single layer. Cook them for 15-20 minutes, shaking the basket halfway through.
  5. At the 15-minute mark, check your sweet potatoes for tenderness and golden crispiness. If you prefer a bit more crunch, allow them to cook for an additional 2-3 minutes.
  6. Once perfectly cooked, carefully remove the sweet potatoes from the air fryer and let them cool for a few minutes. Serve them warm.

Nutrition

Serving: 1cupCalories: 180kcalCarbohydrates: 41gProtein: 2gFat: 0.5gMonounsaturated Fat: 0.5gSodium: 300mgPotassium: 500mgFiber: 6gSugar: 7gVitamin A: 184IUVitamin C: 30mgCalcium: 4mgIron: 4mg

Notes

Ensure sweet potatoes are cut uniformly and do not overcrowd the basket. Use spices creatively to enhance flavors. Store leftovers in an airtight container.

Tried this recipe?

Let us know how it was!

Delicious Homemade Banana Split Cupcakes You’ll Love!

As I stood in my kitchen, the sweet aroma of ripe bananas wafting through the air, I couldn’t help but smile at the thought of my Homemade Banana Split Cupcakes. These delightful treats are a playful twist on a beloved classic, combining the essence of a banana split into a fluffy cupcake form. Perfect for a quick bake when friends drop by or just to satisfy your sweet tooth, this recipe is a glorious ode to nostalgia. With minimal fuss and maximum flavor, you’ll find yourself whisking up these vegetarian desserts in no time. Imagine the joy on your loved ones’ faces as they bite into the moist banana cake, topped with creamy frosting, a drizzle of chocolate, and a cherry on top. Are you ready to dive into this delightful journey of baking?

Why are Banana Split Cupcakes a Must-Try?

Delightful Twist: These Homemade Banana Split Cupcakes capture the essence of the classic dessert in a fun and portable form. Minimal Effort: With easy-to-follow steps, anyone from novice bakers to seasoned chefs can whip these up quickly. Nostalgic Flavors: The combination of ripe bananas, creamy frosting, and chocolate delivers a flavor explosion that takes you back to childhood. Crowd Pleaser: Perfect for birthday parties or family gatherings, everyone will love these sweet treats. Plus, if you’re looking to elevate your dessert game, you might also enjoy my recipe for Honey Butter Brioche. Get ready for smiles all around!

Homemade Banana Split Cupcakes Ingredients

• Get ready to bake deliciousness!

For the Cupcakes

  • All-Purpose Flour – Provides structure; substitute with a gluten-free flour blend if desired.
  • Baking Powder – Acts as a leavening agent; make sure it’s fresh for the best results.
  • Salt – Enhances the sweetness of the cupcakes.
  • Unsalted Butter (melted) – Adds richness and moisture; use coconut oil for a dairy-free option.
  • Granulated Sugar – Sweetens and helps the cupcakes rise; brown sugar can bring a delicious depth of flavor.
  • Large Eggs – Binds ingredients and adds moisture; flax eggs make a great vegan substitute.
  • Vanilla Extract – Imparts wonderful flavor; opt for pure for the best taste.
  • Mashed Ripe Bananas – The key flavor component that keeps the cupcakes moist; frozen and thawed bananas work beautifully.
  • Chocolate Chips – Elevates the chocolate flavor; choose dark or semi-sweet for richness.
  • Chopped Walnuts or Pecans – Adds delightful crunch and a nutty flavor; omit for a nut-free version.

For Topping

  • Maraschino Cherries – Perfect for topping the cupcakes, adding a pop of color and sweetness.
  • Whipped Cream or Buttercream Frosting – Choose based on desired richness; both make stunning toppings for these Homemade Banana Split Cupcakes.

Step‑by‑Step Instructions for Homemade Banana Split Cupcakes

Step 1: Preheat the Oven and Prepare the Muffin Tin
Preheat your oven to 350°F (175°C) and line a muffin tin with colorful cupcake liners. This bright touch sets the perfect stage for your Homemade Banana Split Cupcakes. Make sure to check that your oven is fully heated before proceeding to ensure even baking for those delicious cupcakes.

Step 2: Combine the Dry Ingredients
In a medium mixing bowl, whisk together the all-purpose flour, baking powder, and salt thoroughly. This blend of dry ingredients forms the base of your cupcakes. Be sure to set this mixture aside as you prepare the wet ingredients, keeping your workspace organized and efficient.

Step 3: Mix the Wet Ingredients
In a separate large bowl, combine the melted unsalted butter and granulated sugar, stirring until well-blended. Add the large eggs one at a time, mixing each in completely, followed by the vanilla extract. This step creates a creamy, flavorful base for your cupcakes that perfectly balances the sweetness of the bananas.

Step 4: Incorporate the Mashed Bananas
Gently fold the mashed ripe bananas into the wet mixture until smooth and creamy. The sweetness and moisture from the bananas ensure each Homemade Banana Split Cupcake is rich and delicious. Take a moment to enjoy the enticing aroma as the bananas meld into the batter.

Step 5: Combine Dry and Wet Ingredients
Gradually add the dry ingredients to the banana mixture, mixing gently until just combined. Be cautious about overmixing, as this can lead to dense cupcakes. You want a light and fluffy batter that will rise beautifully in the oven, so keep it simple and smooth.

Step 6: Prepare for Baking
Spoon the batter into the prepared cupcake liners, filling each about two-thirds full. This allows room for the cupcakes to rise without overflowing. As you work, you’ll start to see the colorful liners fill up with the promise of delightful sweetness, all set for the oven.

Step 7: Bake the Cupcakes
Place the muffin tin in the preheated oven and bake for 18-20 minutes. You’ll know the cupcakes are done when a toothpick inserted into the center comes out clean. Enjoy the sweet aroma wafting through your kitchen as you wait for your Homemade Banana Split Cupcakes to bake to perfection.

Step 8: Cool the Cupcakes
Once baked, remove the muffin tin from the oven and let the cupcakes cool in the pan for about 5 minutes. Then, transfer them to a wire rack to cool completely. This cooling process is crucial for ensuring your cupcakes are moist and fluffy before you frost them.

Step 9: Frost and Decorate
Once the cupcakes are completely cooled, generously frost each one with your choice of whipped cream or buttercream frosting. Drizzle with melted chocolate sauce, sprinkle with chopped walnuts or pecans for an added crunch, and top with a maraschino cherry for that classic banana split finish. Each cupcake now embodies the delightful spirit of a traditional banana split!

Make Ahead Options

These Homemade Banana Split Cupcakes are a fantastic option for busy home cooks looking to save time! You can prepare the cupcake batter up to 24 hours in advance; simply refrigerate it in an airtight container to maintain freshness. For an even easier setup, bake the cupcakes ahead of time and store them, unfrosted, in the refrigerator for up to 3 days. To keep them moist, wrap each cupcake individually in plastic wrap. When you’re ready to serve, frost them with your choice of whipped cream or buttercream, drizzle melted chocolate, sprinkle with nuts, and top with a cherry. This way, you can offer delicious, freshly styled cupcakes without the last-minute rush!

How to Store and Freeze Homemade Banana Split Cupcakes

Fridge: Store frosted cupcakes in an airtight container for up to 3 days. Allow them to come to room temperature before serving for the best taste and texture.

Freezer: Freeze unfrosted cupcakes in a single layer using a freezer-safe container or wrap individually in plastic wrap. They will keep well for up to 2 months.

Reheating: To enjoy frozen cupcakes, thaw them in the fridge overnight and frost them before serving. For added warmth, briefly microwave unfrosted cupcakes for about 10-15 seconds.

Wrapping: If you plan to freeze your Homemade Banana Split Cupcakes, consider using wax paper to wrap them individually, which helps maintain their moisture and flavor.

Homemade Banana Split Cupcakes Variations

Feel free to get creative with these fun twists on your Homemade Banana Split Cupcakes to make them uniquely yours!

  • Dairy-Free: Replace melted butter with coconut oil and use dairy-free frosting to cater to lactose sensitivities. You’ll still enjoy all the scrumptious flavors without sacrificing richness.

  • Gluten-Free: Swap all-purpose flour with a gluten-free flour blend. This small change makes it accessible for friends with dietary restrictions while keeping the delightful banana flavor intact.

  • Brown Sugar: Use brown sugar instead of granulated sugar for deeper caramel notes in the cupcakes. The subtle richness adds extra warmth to each bite, making them even more comforting.

  • Caramel Drizzle: Instead of chocolate sauce, drizzle with caramel for a sweet twist. This change elevates the cupcake with a luscious, buttery flavor reminiscent of classic desserts.

  • Nut-Free: Omit chopped walnuts or pecans for a nut-free version. This way, everyone can enjoy these delightful treats safely, perfect for parties or school events.

  • Fruity Toppings: Swap out the maraschino cherries for fresh berries, like strawberries or blueberries, for a refreshing and fruity touch. This adds a new and vibrant flavor that complements the banana.

  • Spicy Kick: Add a pinch of cinnamon or nutmeg to the batter for a warm spice note. This delightful addition can elevate the flavor profile, creating a cozy baking experience.

  • Banana Bread Version: Transform this cupcake recipe into banana bread by pouring the batter into a loaf pan instead of muffin tins. It’ll take slightly longer to bake, but the results are equally delicious. If you’re ever in the mood for another indulgent treat, don’t miss out on my Honey Butter Brioche; it’s another great way to treat yourself!

What to Serve with Homemade Banana Split Cupcakes

Create a delightful spread that complements these whimsical cupcakes, making every bite a memorable experience.

  • Creamy Vanilla Ice Cream: The classic pairing brings a creamy texture that balances the cupcakes’ moistness. Adding a scoop on the side elevates the dessert to a true treat!

  • Fresh Fruit Salad: A mix of ripe bananas, strawberries, and blueberries adds freshness and vibrancy. The natural sweetness enhances the flavors of your cupcakes while keeping the dessert feeling light.

  • Chocolate Milkshake: Sipping on a rich chocolate milkshake adds an extra layer of indulgence. It’s a nostalgic pairing that brings childhood memories and makes dessert even more fun.

  • Whipped Cream: Lighten your cupcake experience with a dollop of fresh whipped cream. It’s a wonderful way to add creaminess without overwhelming the flavors of the banana.

  • Chocolate Dipped Strawberries: These elegant bites add a pop of color and a delicious chocolatey contrast. They create a visually appealing dessert table that boasts variety.

  • Hot Fudge Sauce: Drizzle some warm fudge over the cupcakes for an extra dose of richness. The combination of warm fudge and chilled frosting is irresistibly decadent.

  • Nutty Granola: Sprinkle some crunchy nutty granola on top of your cupcakes or serve it on the side for a delightful crunch. Its earthy flavors complement the sweetness of the bananas beautifully.

  • Sparkling Water with Lime: For a refreshing drink option, bubbly water with a squeeze of lime cuts through the sweetness while keeping the palate refreshed.

  • Caramel Sauce: Drizzle caramel over frosting or serve it on the side for dipping. The sweet, buttery flavor creates a unique twist that harmonizes wonderfully with the banana base.

Expert Tips for Homemade Banana Split Cupcakes

  • Measure Flour Correctly: Always spoon flour into the measuring cup and level it off for accurate measurements. This will help ensure your Homemade Banana Split Cupcakes turn out perfectly moist.
  • Mind the Mixing: Avoid overmixing your batter to ensure light and fluffy cupcakes. Gentle folding is key to preserving the cupcake’s airy texture.
  • Banana Consistency: If using frozen bananas, be sure to thaw and drain excess liquid before mashing. This maintains the right batter consistency for your cupcakes.
  • Cooling Matters: Allow your cupcakes to cool completely before frosting. Frosting warm cupcakes can result in melting and a messy presentation.
  • Customize Toppings: Feeling adventurous? Feel free to switch the chocolate drizzle to caramel or add different nuts or fruit toppings to suit your personal taste!

Homemade Banana Split Cupcakes Recipe FAQs

How do I choose ripe bananas?
Absolutely! The best bananas for baking are those that are very ripe, with plenty of brown spots. These bananas are sweeter and more flavorful, which enhances your Homemade Banana Split Cupcakes. If you have bananas that are just starting to turn yellow, let them ripen a few days in a warm spot until they’re perfect for mashing.

How should I store the cupcakes?
Frosted Homemade Banana Split Cupcakes can be stored in an airtight container in the refrigerator for up to 3 days. For the best taste and texture, let them come to room temperature before serving. If you have un-frosted cupcakes, they can sit at room temperature for about a day before they should be refrigerated.

Can I freeze the cupcakes?
Yes, you can! To freeze your Homemade Banana Split Cupcakes, place the un-frosted cupcakes in a single layer in a freezer-safe container, or individually wrap them in plastic wrap. They’ll stay fresh for up to 2 months. When you’re ready to enjoy them, just thaw in the fridge overnight, and then frost before serving for a delicious treat!

What if my cupcakes come out dense?
If your cupcakes end up dense, it could be due to overmixing the batter or flour measurement mistakes. When mixing the wet and dry ingredients, pour in the dry mix gradually and fold gently until just combined. Always remember to spoon and level your flour (instead of scooping) for accurate measurements, as this can drastically affect texture!

Are these cupcakes suitable for those with nut allergies?
You can indeed make these Homemade Banana Split Cupcakes nut-free! Simply omit the chopped walnuts or pecans from the recipe. If decorating with toppings like frosting, ensure they are also nut-free. This way, everyone can enjoy these delightful treats, no matter their dietary restrictions!

Homemade Banana Split Cupcakes

Delicious Homemade Banana Split Cupcakes You’ll Love!

Enjoy these delightful Homemade Banana Split Cupcakes that capture the essence of a classic dessert in a fun and portable form.
Prep Time 30 minutes
Cook Time 20 minutes
Cooling Time 5 minutes
Total Time 55 minutes
Servings: 12 cupcakes
Course: Dessert
Cuisine: American
Calories: 200

Ingredients
  

Cupcake Ingredients
  • 1 1/2 cups All-Purpose Flour Substitute with a gluten-free flour blend if desired.
  • 2 teaspoons Baking Powder Make sure it’s fresh for the best results.
  • 1/2 teaspoon Salt Enhances the sweetness of the cupcakes.
  • 1/2 cup Unsalted Butter (melted) Use coconut oil for a dairy-free option.
  • 1 cup Granulated Sugar Brown sugar can bring a delicious depth of flavor.
  • 2 large Large Eggs Flax eggs make a great vegan substitute.
  • 1 teaspoon Vanilla Extract Opt for pure for the best taste.
  • 1 cup Mashed Ripe Bananas Frozen and thawed bananas work beautifully.
  • 1/2 cup Chocolate Chips Choose dark or semi-sweet for richness.
  • 1/2 cup Chopped Walnuts or Pecans Omit for a nut-free version.
Topping Ingredients
  • 12 pieces Maraschino Cherries Perfect for topping the cupcakes.
  • 1 cup Whipped Cream or Buttercream Frosting Choose based on desired richness.

Equipment

  • Oven
  • Muffin Tin
  • Mixing bowls
  • Whisk
  • Spatula

Method
 

Baking Instructions
  1. Preheat your oven to 350°F (175°C) and line a muffin tin with colorful cupcake liners.
  2. In a medium mixing bowl, whisk together the all-purpose flour, baking powder, and salt thoroughly.
  3. In a separate large bowl, combine the melted unsalted butter and granulated sugar, stirring until well-blended.
  4. Gently fold the mashed ripe bananas into the wet mixture until smooth and creamy.
  5. Gradually add the dry ingredients to the banana mixture, mixing gently until just combined.
  6. Spoon the batter into the prepared cupcake liners, filling each about two-thirds full.
  7. Place the muffin tin in the preheated oven and bake for 18-20 minutes.
  8. Once baked, remove the muffin tin from the oven and let the cupcakes cool in the pan for about 5 minutes.
  9. Once cooled, frost each cupcake with whipped cream or buttercream frosting, drizzle with melted chocolate, sprinkle with nuts, and top with a maraschino cherry.

Nutrition

Serving: 1cupcakeCalories: 200kcalCarbohydrates: 30gProtein: 3gFat: 9gSaturated Fat: 5gPolyunsaturated Fat: 1gMonounsaturated Fat: 3gCholesterol: 35mgSodium: 150mgPotassium: 150mgFiber: 1gSugar: 15gVitamin A: 200IUVitamin C: 3mgCalcium: 20mgIron: 0.5mg

Notes

Store frosted cupcakes in an airtight container for up to 3 days. Freeze unfrosted cupcakes in a single layer for up to 2 months.

Tried this recipe?

Let us know how it was!

Crispy Sesame Shrimp Toast: A Delicious Air-Fried Treat

As I stood in my kitchen last weekend, the enticing aroma of garlic and sesame seeds wafted through the air, instantly transporting me to the vibrant street markets of Hong Kong. This was the moment I perfected my Air-Fried Sesame Shrimp Toast, a dish that’s become a favorite in my household. With its delightful crunch and savory shrimp filling, it’s not just a snack; it’s a comforting reminder of family gatherings and shared laughter. The beauty of this recipe lies in its simplicity—you’re just a few easy steps away from a crispy, healthier version of this classic treat. Plus, it’s a fantastic crowd-pleaser, and you can whip it up in no time! So, who’s ready to dive into this delicious journey? Let’s get cooking!

Why is Sesame Shrimp Toast a Must-Try?

Irresistible Flavor: The combination of sesame, shrimp, and spices creates a mouthwatering experience that you’ll crave again and again.

Crispy Perfection: Air frying ensures a crunchy exterior while keeping the filling moist, making each bite a delight.

Quick & Easy: With simple ingredients and steps, you can have this snack ready in no time, perfect for busy evenings!

Versatile Snack Option: Serve it with spicy mayo or your favorite dip to elevate the flavor; perhaps try it alongside Garlic Butter Shrimp for an irresistible seafood spread.

Crowd-Pleasing Appeal: Whether for a party or just a cozy night in, this dish is sure to impress family and friends alike.

Dive into a world of flavor with this sesame shrimp toast — it’s bound to become a staple in your home!

Sesame Shrimp Toast Ingredients

For the Shrimp Filling
1 pound peeled deveined shrimp – A protein-rich base ingredient; fresh or frozen works well.
½ teaspoon salt – Enhances the natural flavor of the shrimp; adjust according to personal taste.
Dash white pepper – Adds a hint of mild heat; can swap for black pepper if desired.
1 teaspoon sugar – Balances the savory notes; omit if you prefer a less sweet flavor.
1 clove garlic – Infuses aromatic depth; mince finely to enhance the flavor.
1 stalk scallion (green part only, minced) – Adds freshness and a mild onion note; chives can be a great substitute.
1 tablespoon sesame seeds – Brings nuttiness and texture; optional for sesame allergies.
1 egg white – Acts as a binding agent; a flax egg can replace it for a vegan option.
1 tablespoon corn starch – Creates a crispy texture; can be swapped with all-purpose flour.

For the Bread Base
8 pieces white bread – Forms the crunchy base; gluten-free bread works well for gluten-free options.
Oil (liquid or spray) – Use for brushing or spraying to ensure crispiness when air frying.

For the Spicy Mayo Dip
½ cup Kewpie mayo – A creamy base for the dip; regular mayo can also be used.
1 tablespoon sriracha sauce – Provides a kick of heat; adjust according to your spice tolerance.
2 teaspoons sugar – Sweetens the mayo; feel free to omit for a less sweet sauce.
¼ teaspoon sesame oil – Boosts flavor; optional if allergic to sesame.
2 teaspoons lemon juice – Brightens the dip’s flavor; can be substituted with lime juice.
Pinch of salt – Enhances the overall flavor; a small but important touch.

Indulge in this delightful Sesame Shrimp Toast bursting with savory flavors, and enjoy the crispy goodness with each bite!

Step‑by‑Step Instructions for Sesame Shrimp Toast

Step 1: Prepare the Shrimp
Start by patting 1 pound of peeled and deveined shrimp dry with a paper towel. Using a food processor or a sharp knife, mince the shrimp until it forms a smooth paste, ensuring there are no large chunks left. This process will take about 2-3 minutes, and you should achieve a consistent texture that perfectly blends into your filling.

Step 2: Make the Filling
In a large mixing bowl, combine the shrimp paste with ½ teaspoon of salt, a dash of white pepper, 1 teaspoon of sugar, and 1 clove of minced garlic. Next, add the minced scallion, 1 tablespoon of sesame seeds, 1 egg white, and 1 tablespoon of corn starch. Mix thoroughly for about 3-4 minutes until all ingredients are well incorporated, creating a cohesive filling for your Sesame Shrimp Toast.

Step 3: Assemble the Sandwiches
Trim the crusts off 8 slices of white bread to ensure a cleaner presentation. Spread about a quarter of the shrimp mixture evenly between two slices of bread, pressing gently to adhere. Seal the edges using a butter knife to prevent the filling from spilling out, and repeat this process with the remaining bread and filling until complete, creating delightful little sandwiches.

Step 4: Air Fry the Toast
Preheat your air fryer to 375°F to ensure that your Sesame Shrimp Toast turns out crispy and evenly cooked. Lightly brush or spray the assembled sandwiches with oil to promote browning. Arrange the shrimp sandwiches in the air fryer basket in a single layer, making sure not to overcrowd. Air fry for 6 minutes, flip them carefully, then air fry for an additional 6 minutes until they are golden brown and crispy.

Step 5: Serve
Once your Sesame Shrimp Toast is perfectly air-fried, carefully remove them from the fryer and let them cool for a minute. Enjoy these delightful treats hot, paired with spicy mayo or your favorite dipping sauce for an extra punch of flavor. Revel in the savory goodness that each crunchy bite brings!

What to Serve with Air-Fried Sesame Shrimp Toast

Elevate your dining experience with complementary flavors and textures that make every bite memorable.

  • Fresh Cucumber Salad: A light and refreshing side that cuts through the richness of the shrimp toast, adding a crisp, clean bite.
  • Garlic Butter Rice: The buttery flavors and subtle garlic notes harmonize beautifully with the savory shrimp, creating a comforting pairing.
  • Sweet Chili Sauce: This sweet and tangy dipping sauce contrasts perfectly with the crunch of the toast, taking it to the next level.
  • Miso Soup: A warm, umami-rich soup that complements the shrimp toast’s flavors, offering a cozy dining experience.
  • Spicy Mayo: This zesty condiment adds a creamy kick that enhances every crunchy bite of sesame shrimp toast.
  • Mango Salsa: The fruity freshness and mild spice of the salsa bring brightness and a tropical twist, perfect for a vibrant touch.
  • Pickled Vegetables: These tangy crunchies add an exciting flavor contrast, making each mouthful of shrimp toast even more delightful.
  • Iced Green Tea: A refreshing drink that soothes the palate while balancing the rich, comforting flavors of the meal.
  • Chocolate Mousse: End on a sweet note with this light and airy dessert that beautifully balances the savory start of your meal.

Sesame Shrimp Toast Variations & Substitutions

Feel free to personalize your sesame shrimp toast with these delightful twists that cater to different tastes and dietary needs!

  • Seafood Swap: Replace shrimp with crab or fish for a new flavor dimension. Both options maintain the delicious essence while offering unique tastes.

  • Veggie Boost: Stir in finely chopped vegetables like bell peppers or carrots into the shrimp mixture. This adds both crunch and nutrition, making your toast even more colorful and vibrant!

  • Herb Infusion: Incorporate fresh herbs like cilantro or basil to the filling for an aromatic twist. Their bright flavors will elevate your toast to new culinary heights!

  • Gluten-Free Option: Use gluten-free bread to accommodate dietary restrictions while still enjoying this tasty treat. It ensures everyone can relish in the delightful crunch!

  • Spicy Heat: Add minced jalapeños or a pinch of cayenne pepper to the shrimp mixture for a fiery kick. It’s perfect for those who like a bit more heat in their snacks.

  • Flavored Dipping Sauce: Ditch the spicy mayo and try a tangy teriyaki or sweet chili sauce instead. It adds a fun, flavorful twist to each bite!

  • Nut-Free Adaptation: Omit sesame seeds if allergies are a concern. Your toast will still turn out deliciously crispy without them!

These variations are perfect for making this dish fit your tastes or dietary needs, ensuring every bite is an adventure! Feeling creative? Pair your sesame shrimp toast with some succulent Honey Garlic Shrimp or dive into a bowl of Garlic Butter Shrimp for an irresistible seafood spread. Enjoy customizing your culinary experience!

Expert Tips for Sesame Shrimp Toast

Dry the Shrimp Well: Ensure your shrimp are patted dry before mincing to achieve a smoother paste that binds better.

Measure Ingredients Accurately: Use precise measurements, especially for the cornstarch and egg white, to ensure the right texture in your sesame shrimp toast.

Avoid Overcrowding: In the air fryer, avoid placing too many sandwiches at once to ensure they cook evenly and achieve the desired crispiness.

Adjust Cooking Time: Keep an eye on your toast as air fryer models differ; adjust the cooking time as needed for that perfect golden-brown finish.

Experiment with Dips: While spicy mayo is fantastic, don’t hesitate to try other dips like teriyaki or sweet chili sauce to elevate your sesame shrimp toast experience!

These tips will help you master the art of making perfectly crispy and delicious sesame shrimp toast!

Make Ahead Options

These Air-Fried Sesame Shrimp Toast are perfect for meal prep enthusiasts! You can make the shrimp filling up to 24 hours in advance; just store it in an airtight container in the refrigerator to maintain its freshness. Additionally, you can assemble the shrimp sandwiches (without oil) and keep them covered in the fridge for up to 3 days. When you’re ready to enjoy your shrimp toast, simply brush or spray the assembled sandwiches with oil and air fry them straight from the refrigerator, adjusting the cooking time as needed for optimal crispiness. This method ensures you have a delicious, restaurant-quality snack ready in no time!

How to Store and Freeze Sesame Shrimp Toast

Fridge: Store any leftover Siamese Shrimp Toast in an airtight container in the refrigerator for up to 1 day. Reheat in the air fryer for about 3-4 minutes to regain its crispy texture.

Freezer: If you want to enjoy these delightful snacks later, freeze the assembled sandwiches un-cooked for up to 2 weeks. Place parchment paper between them to prevent sticking.

Reheating: When ready to enjoy, simply air fry the frozen sesame shrimp toast at 375°F for about 12-15 minutes until cooked through and golden brown.

Room Temperature: If served at a gathering, keep the toast at room temperature for no more than 2 hours to ensure freshness and safety.

Sesame Shrimp Toast Recipe FAQs

How do I choose the right shrimp for this recipe?
Absolutely! When selecting shrimp, look for fresh, firm shrimp with a mild scent of the ocean. If you’re using frozen shrimp, ensure they are fully thawed before mincing. The best shrimp for this recipe is peeled and deveined, ideally medium to large size. Avoid shrimp with dark spots or an overly fishy smell, as these can be signs of spoilage.

How should I store leftover sesame shrimp toast?
Very easy! Store any leftover sesame shrimp toast in an airtight container in the refrigerator for up to 1 day. To reheat and regain that crispy texture, pop them back into the air fryer at 375°F for about 3-4 minutes. This method ensures they stay delicious and crunchy, just like when they were fresh out of the fryer!

Can I freeze sesame shrimp toast?
Absolutely! You can freeze the assembled, uncooked sandwiches for up to 2 weeks. Place parchment paper between each sandwich to prevent them from sticking together. When you’re ready to enjoy, air fry them from frozen at 375°F for about 12-15 minutes, flipping halfway through, until they’re golden brown and crispy!

What should I do if the shrimp paste is too watery?
If you find that your shrimp paste is too watery, don’t worry! You can easily fix it by adding an extra tablespoon of corn starch. This will help to bind the mixture better and create that desired crispy texture when air-fried. Be sure to mix it in thoroughly until you achieve a thick paste.

Is this recipe suitable for people with allergies to shellfish?
It’s important to be cautious! Since the main ingredient is shrimp, this recipe is not suitable for those with shellfish allergies. However, you can substitute the shrimp with finely chopped fish like tilapia or another mild-tasting seafood, ensuring to adjust cooking times accordingly. Always check your substitutions for any allergy concerns, especially with the dipping sauce ingredients.

Can I make this recipe vegan?
Yes, making a vegan version of sesame shrimp toast is not only possible but delicious too! Substitute the shrimp with a mix of mashed chickpeas or silken tofu for the filling, and replace the egg white with a flax egg (1 tablespoon ground flaxseed mixed with 2.5 tablespoons water, let it sit until it thickens). This way, you can enjoy a flavorful and crispy treat that everyone will love!

Sesame Shrimp Toast

Crispy Sesame Shrimp Toast: A Delicious Air-Fried Treat

This Crispy Sesame Shrimp Toast is a must-try snack featuring savory shrimp, sesame seeds, and a crispy texture.
Prep Time 15 minutes
Cook Time 12 minutes
Total Time 27 minutes
Servings: 8 slices
Course: Appetizer
Cuisine: Asian
Calories: 150

Ingredients
  

For the Shrimp Filling
  • 1 pound peeled deveined shrimp fresh or frozen works well
  • ½ teaspoon salt adjust according to personal taste
  • Dash white pepper can swap for black pepper if desired
  • 1 teaspoon sugar omit if you prefer a less sweet flavor
  • 1 clove garlic minced finely to enhance flavor
  • 1 stalk scallion (green part only, minced) chives can be a great substitute
  • 1 tablespoon sesame seeds optional for sesame allergies
  • 1 tablespoon corn starch can be swapped with all-purpose flour
For the Bread Base
  • 8 pieces white bread gluten-free bread works well for gluten-free options
  • Oil (liquid or spray) for brushing or spraying to ensure crispiness
For the Spicy Mayo Dip
  • ½ cup Kewpie mayo regular mayo can also be used
  • 1 tablespoon sriracha sauce adjust according to your spice tolerance
  • 2 teaspoons sugar feel free to omit for a less sweet sauce
  • ¼ teaspoon sesame oil optional if allergic to sesame
  • 2 teaspoons lemon juice can be substituted with lime juice
  • Pinch salt a small but important touch

Equipment

  • Air fryer
  • Food processor
  • Mixing Bowl
  • Butter knife
  • Measuring spoons
  • paper towels

Method
 

Instructions
  1. Pat 1 pound of peeled and deveined shrimp dry. Mince until a smooth paste forms, about 2-3 minutes.
  2. Combine the shrimp paste with ½ teaspoon of salt, a dash of white pepper, 1 teaspoon of sugar, and 1 clove of minced garlic. Add minced scallion, 1 tablespoon of sesame seeds, 1 egg white, and 1 tablespoon of corn starch. Mix thoroughly for 3-4 minutes.
  3. Trim the crusts off 8 slices of white bread. Spread shrimp mixture evenly between two slices, pressing gently. Seal edges with a butter knife and repeat until complete.
  4. Preheat air fryer to 375°F. Brush or spray sandwiches with oil. Arrange in the air fryer basket in a single layer. Air fry for 6 minutes, flip, then cook for another 6 minutes.
  5. Remove from fryer and let cool for a minute. Serve hot with spicy mayo or favorite dipping sauce.

Nutrition

Serving: 1sliceCalories: 150kcalCarbohydrates: 15gProtein: 10gFat: 5gSaturated Fat: 1gPolyunsaturated Fat: 2gMonounsaturated Fat: 2gCholesterol: 50mgSodium: 300mgPotassium: 100mgFiber: 1gSugar: 1gVitamin A: 200IUVitamin C: 1mgCalcium: 20mgIron: 1mg

Notes

Ensure shrimp are dried well before mincing and avoid overcrowding in the air fryer for optimal crispiness. Adjust cooking time based on air fryer model.

Tried this recipe?

Let us know how it was!

Grinder Pasta Salad: A Flavorful Twist for Summer Fun

Sitting on my porch last summer, I watched my kids devour their plates of vibrant, colorful pasta salad, each bite met with giggles and mmm’s. That’s when I knew I had struck gold with this Grinder Pasta Salad—an Italian-American classic transformed into a delightful dish that’s perfect for picnics and family gatherings. With a tantalizing mix of hearty deli meats, creamy provolone cheese, and crisp veggies, this recipe is not only incredibly customizable to suit any palate but also a life-saver for those busy weekdays. Best of all, it’s make-ahead friendly, letting you serve a kid-approved meal without the stress. Ready to take your summer gatherings to the next level? Let’s dive in!

Why Choose Grinder Pasta Salad?

Customization is at the heart of this recipe, allowing you to tailor it with your favorite meats, cheeses, and veggies. Kid-Friendly and colorful, it’s a guaranteed hit with younger audiences at any gathering. Make-Ahead convenience means less stress for you, as flavors meld beautifully in the fridge. Plus, this pasta salad serves wonderfully as both a main dish or a side. And if you’re looking for more ideas, you can pair it with Tuna Macaroni Salad or serve it alongside Steak Fajita Salad for a complete meal.

Grinder Pasta Salad Ingredients

Get ready to whip up this delightful dish!

For the Pasta

  • Rotini Pasta – Provides structure and holds dressing well; substitute with any short pasta like penne or farfalle.

For the Dressing

  • Mayonnaise – Acts as the creamy base for the dressing; swap with Greek yogurt for a tangier flavor boost.
  • Red Wine Vinegar – Adds a tangy zing to the dressing; use apple cider vinegar if that’s what you have on hand.
  • Banana Pepper Juice – Contributes necessary acidity and flavor; pickle juice is a great alternative.
  • Garlic Powder – Enhances flavor without overpowering; fresh garlic can be used for a bolder taste.
  • Oregano – Infuses Italian herb notes; feel free to substitute with Italian seasoning if preferred.

For the Salad

  • Provolone Cheese – Adds a creamy, savory touch; mozzarella works well as a substitute or you can omit for a dairy-free version.
  • Turkey and Salami – Main sources of protein in the salad; ham, grilled chicken, or tuna are excellent substitutions to mix it up.
  • Red Onion – Offers a crisp texture and sharp bite; green onions can be used for a milder taste.
  • Cherry Tomatoes – Provide sweetness and freshness; diced bell peppers add a nice crunch if preferred.
  • Banana Pepper Rings – Add a tang and extra texture; these are optional if you don’t have any on hand.

Step‑by‑Step Instructions for Grinder Pasta Salad

Step 1: Cook the Pasta
Bring a large pot of salted water to a rolling boil. Add the rotini pasta and cook for 8 to 10 minutes or until al dente, stirring occasionally. Once the pasta is ready, drain it in a colander and rinse under cold water until cooled to stop the cooking process. This step ensures a firm and chewy pasta for your delicious Grinder Pasta Salad.

Step 2: Make the Dressing
In a medium mixing bowl, combine mayonnaise, red wine vinegar, banana pepper juice, garlic powder, and oregano. Whisk these ingredients together until the mixture is smooth and well blended. The dressing should be creamy with a balanced tang, making it the perfect complement to the rich flavors of the Grinder Pasta Salad.

Step 3: Prepare the Ingredients
While the pasta is cooling, get your ingredients ready. Chop the provolone cheese and deli meats (turkey and salami) into bite-sized pieces. Slice the red onion thinly, halve the cherry tomatoes, and chop the banana pepper rings (if using). Set all these colorful ingredients aside, as they will add texture and flavor to your pasta salad.

Step 4: Combine the Pasta with Ingredients
In a large mixing bowl, combine the cooled rotini pasta with the chopped meats, cheeses, red onion, cherry tomatoes, and banana pepper rings. Gently fold the ingredients together, ensuring the pasta is well mixed with the other components, creating a hearty and vibrant base for your Grinder Pasta Salad.

Step 5: Add the Dressing
Drizzle the prepared dressing over the combined pasta salad ingredients. Using a spatula or large spoon, toss everything together until the pasta and veggies are evenly coated with the creamy dressing. This step infuses all those delicious flavors into the Grinder Pasta Salad, ensuring each bite is packed with taste.

Step 6: Serve or Chill
You can serve the Grinder Pasta Salad immediately for a fresh meal, or for the best flavor, cover the bowl with plastic wrap and refrigerate for at least an hour. Chilling helps the ingredients meld together, enhancing the overall flavor profile. After chilling, give it a quick toss before serving to refresh the ingredients.

Expert Tips for Grinder Pasta Salad

  • Chill Time Matters: Allow the salad to sit in the refrigerator for at least an hour. This lets the flavors meld beautifully, making each bite delightful.

  • Customize Wisely: Don’t be afraid to mix and match meats and veggies! Just be sure to keep a balance between flavors—too many ingredients can overwhelm the salad.

  • Pasta Preparation: Make sure to cool the rotini pasta completely before mixing. This prevents wilting your fresh veggies and helps maintain the salad’s crispness.

  • Dressing Adjustment: Taste and tweak the dressing as you go! Feeling adventurous? Add a splash of hot sauce for a zesty kick; just keep the balance of acidity in mind for your Grinder Pasta Salad.

  • Proper Storage: Store any leftovers in an airtight container in the refrigerator. Enjoy the flavors over the next three days, but it’s best served fresh!

What to Serve with Grinder Pasta Salad?

Boost your summer gathering with delightful side dishes that perfectly complement this vibrant pasta salad.

  • Grilled Chicken Breasts: Juicy and tender, grilled chicken adds a protein-packed element to your meal, balancing the lightness of the salad.

  • Air Fryer Bacon-Wrapped Hot Dogs: A fun twist on a classic, these crispy treats bring an irresistible crunch that kids will adore.

  • Garlic Breadsticks: Soft and buttery, these breadsticks provide a comforting contrast to the tangy flavors of the pasta salad.

  • Fresh Fruit Salad: A colorful mix of seasonal fruits offers a refreshing sweetness that cleanses the palate between bites.

  • Caprese Skewers: Cherry tomatoes, fresh basil, and mozzarella drizzled with balsamic glaze offer a burst of flavor and visual appeal, reinforcing the Italian roots of the dish.

  • Sparkling Lemonade: Refreshing and fizzy, this drink enhances the bright flavors of the salad, making it a perfect complement for warm days.

  • Chocolate Chip Cookies: End your meal on a sweet note, as the gooey texture of homemade cookies provides a comforting finish after the savory dishes.

Explore these options to create a well-rounded dining experience that your guests won’t forget!

Grinder Pasta Salad: Customization Ideas

Feel free to let your creativity shine and customize this pasta salad to suit your family’s taste buds or dietary needs!

  • Dairy-Free: Substitute provolone cheese with dairy-free mozzarella or omit the cheese altogether for a lighter dish.
  • Protein Swap: Use grilled chicken, ham, or even tuna for a different protein profile; each option adds its own unique flavor to the salad.
  • Veggie Boost: Add fresh diced cucumbers or bell peppers for extra crunch and color; they contribute a refreshing twist that kids will love.
  • Heat Factor: For a spicy kick, mix in crushed red pepper flakes or a splash of hot sauce; it introduces a delightful zing that contrasts with the creaminess.
  • Herbful Twist: Swap oregano with fresh basil or parsley, which offers a vibrant, aromatic freshness that enhances the entire salad experience.
  • Pasta Variety: If rotini isn’t available, try penne or farfalle; each shape provides a different texture that can change the salad’s appeal.
  • Pickled Zest: Incorporate chopped olives or capers for a salty punch; they’ll pack a flavor explosion with every bite.

Looking for more fresh recipes? You might enjoy a flavorful Strawberry Spinach Salad or the delightful Mushroom Pasta Delightful as great complements to your summer meals.

Make Ahead Options

These Grinder Pasta Salad is perfect for busy weeknights, allowing you to prep in advance for stress-free meal planning! You can cook the rotini pasta and prepare the creamy dressing up to 24 hours ahead. Simply store the pasta in an airtight container in the refrigerator and keep the dressing separate to maintain its quality. Additionally, you can chop all the veggies and meats 3 days in advance, storing them in the fridge as well. When you’re ready to serve, just combine everything in a large bowl, drizzle with the dressing, and toss well for a fresh, vibrant dish. This make-ahead strategy ensures your Grinder Pasta Salad is just as delicious when it’s time to enjoy!

How to Store and Freeze Grinder Pasta Salad

Fridge: Keep your delicious Grinder Pasta Salad in an airtight container for up to 3 days. The flavors will continue to meld, enhancing the taste over time.

Freezer: While this salad is best enjoyed fresh, you can freeze leftovers for up to 1 month. To prevent texture changes, consider freezing the meats and dressing separately.

Reheating: Thaw overnight in the fridge if frozen. Serve cold or at room temperature for the best flavor. Avoid reheating in the microwave as it may alter the texture of the pasta and fresh ingredients.

Meal Prep: This salad is perfect for make-ahead meals! Prepare it a day in advance for a quick, kid-friendly dinner that requires no last-minute cooking.

Grinder Pasta Salad Recipe FAQs

What type of pasta is best for Grinder Pasta Salad?
Absolutely! Rotini pasta works wonderfully because its spiral shape holds the dressing and other ingredients nicely. However, you can easily swap it out for any short pasta, such as penne or farfalle, if you prefer.

How should I store leftover Grinder Pasta Salad?
To keep your delicious Grinder Pasta Salad fresh, store it in an airtight container in the refrigerator for up to 3 days. It’s best to consume it within this timeframe to enjoy the vibrant flavors. Just give it a quick toss before serving to redistribute any dressing that may have settled.

Can I freeze Grinder Pasta Salad?
While this salad is best enjoyed fresh, you can freeze leftovers if necessary. To do this, pack the salad in an airtight container and separate any meats or creamy dressing into another container. This way, you can freeze them for up to 1 month, preventing texture changes. When ready to enjoy, thaw the components in the fridge overnight and serve cold or at room temperature.

What can I do if my Grinder Pasta Salad seems too dry?
Very! If your salad feels a bit dry, don’t fret! You can simply add more dressing to it. Make a little extra dressing using the original ingredients—just adjust to taste and mix gently. Sometimes, a splash of pickle juice or extra mayonnaise can also bring that creamy consistency right back!

Are there any substitutions for ingredients in Grinder Pasta Salad?
You bet! Feel free to customize based on your preferences or what you have on hand. For example, turkey and salami can be substituted with ham, grilled chicken, or even canned tuna. You can also switch up the cheese—provolone for mozzarella, or skip it altogether if you need a dairy-free option. Just remember, balancing flavors is key!

Is Grinder Pasta Salad suitable for kids?
Absolutely! This recipe is incredibly kid-friendly, packed with colorful and familiar ingredients that appeal to younger audiences. With the customizable nature, you can easily adjust ingredients based on your kids’ preferences, ensuring they find something they love in each yummy bite.

Grinder Pasta Salad

Grinder Pasta Salad: A Flavorful Twist for Summer Fun

Grinder Pasta Salad is a delightful Italian-American dish perfect for summer gatherings.
Prep Time 15 minutes
Cook Time 10 minutes
Chill Time 1 hour
Total Time 1 hour 25 minutes
Servings: 6 servings
Course: Salad
Cuisine: Italian-American
Calories: 450

Ingredients
  

For the Pasta
  • 16 oz Rotini Pasta Can substitute with any short pasta like penne or farfalle.
For the Dressing
  • 1 cup Mayonnaise Can swap with Greek yogurt.
  • 3 Tbsp Red Wine Vinegar Apple cider vinegar can be used as a substitute.
  • 2 Tbsp Banana Pepper Juice Pickle juice is a great alternative.
  • 1 tsp Garlic Powder Fresh garlic can be used for a bolder taste.
  • 1 tsp Oregano Substitute with Italian seasoning if preferred.
For the Salad
  • 8 oz Provolone Cheese Mozzarella works well as a substitute.
  • 6 oz Turkey Grilled chicken or tuna are excellent substitutions.
  • 6 oz Salami Ham can be used as a substitute.
  • 1 Red Onion Green onions can be used for a milder taste.
  • 1 cup Cherry Tomatoes Diced bell peppers can be used for crunch.
  • 1 cup Banana Pepper Rings Optional.

Equipment

  • large pot
  • colander
  • Mixing Bowl
  • Whisk
  • Spatula

Method
 

Step-by-Step Instructions
  1. Bring a large pot of salted water to a rolling boil. Add the rotini pasta and cook for 8 to 10 minutes or until al dente. Drain and rinse under cold water.
  2. In a medium mixing bowl, combine mayonnaise, red wine vinegar, banana pepper juice, garlic powder, and oregano. Whisk together until smooth.
  3. Chop the provolone cheese and deli meats into bite-sized pieces. Slice the red onion thinly and halve the cherry tomatoes.
  4. In a large mixing bowl, combine the cooled rotini pasta with the chopped meats, cheeses, red onion, cherry tomatoes, and banana pepper rings. Gently fold together.
  5. Drizzle the dressing over the combined ingredients and toss everything together until well coated.
  6. Serve immediately or cover and refrigerate for at least an hour to meld flavors before serving.

Nutrition

Serving: 1servingCalories: 450kcalCarbohydrates: 45gProtein: 20gFat: 25gSaturated Fat: 5gPolyunsaturated Fat: 1gMonounsaturated Fat: 3gCholesterol: 70mgSodium: 700mgPotassium: 300mgFiber: 3gSugar: 4gVitamin A: 500IUVitamin C: 10mgCalcium: 200mgIron: 2mg

Notes

Chill the salad for at least an hour for the best flavor. Customize with your favorite ingredients but maintain a balance for optimal taste.

Tried this recipe?

Let us know how it was!

Bacon Ranch Pasta Salad: A Creamy Summer Side Delight

The vibrant colors and enticing aroma of a summer BBQ often ignite memories of laughter and good food shared under the sun. As I gathered with friends last weekend, I realized that no gathering feels complete without a refreshing dish that’s both easy to prepare and utterly satisfying. Enter my Bacon Ranch Pasta Salad, an effortlessly creamy side that combines crispy bacon, sweet peas, and juicy tomatoes with tender pasta. Ready in under 20 minutes, this BBQ-friendly delight not only pleases the palate but also lightens the cooking load, allowing you to soak up those warm summer rays. Best of all, it can be made ahead, letting the flavors meld into perfection! Curious about how to whip this up and impress your guests? Let’s dive in!

Why is Bacon Ranch Pasta Salad a Must-Try?

Quick and Easy: This Bacon Ranch Pasta Salad can be whipped up in under 20 minutes, making it perfect for busy summer days.

Creamy Delight: With a rich, smooth dressing that envelops each bite, this dish delivers a mouthful of flavor that complements any BBQ feast.

Colorful and Inviting: Vibrant cherry tomatoes and sweet peas add both color and crunch, elevating your serving platter to eye-catching perfection.

Versatile Serving: Whether paired with grilled chicken or served alongside classic hot dogs, this pasta salad adapts effortlessly to your summer spread.

Make-Ahead Friendly: Prepare it in advance and let it chill in the fridge, allowing the flavors to meld beautifully—simple yet effective for stress-free entertaining!

Looking for other quick sides to complement your BBQ? Try this classic Tuna Macaroni Salad or a refreshing Strawberry Spinach Salad for a complete summer experience!

Bacon Ranch Pasta Salad Ingredients

For the Pasta
Rotini Pasta (12 ounces) – Provides structure; feel free to substitute with any small pasta shape, like penne or fusilli.

For the Dressing
Mayonnaise (1 cup) – Acts as the creamy base; Greek yogurt can make for a healthier alternative.
Dry Ranch Seasoning Mix (3 tablespoons) – Infuses the dish with savory flavors; using a homemade ranch mix gives a fresher taste.
Garlic Powder (1/2 teaspoon) – Enhances flavor depth; fresh minced garlic can provide a more robust profile.
Black Pepper (1/4 teaspoon) – Adds warmth; adjust according to your taste preferences.
Milk (1/2 cup) – Thin out the dressing; buttermilk adds a nice tanginess.

For the Salad
Bacon (8 slices) – Adds crunch and smoky flavor; turkey bacon or a vegetarian option can lighten it up.
Cherry/Grape Tomatoes (1 cup, halved) – Introduces freshness and color; swap with diced bell peppers for a different taste.
Frozen Peas (1 cup, thawed) – Adds sweetness and vibrant color; fresh peas can replace them if available.
Shredded Cheddar Cheese (1 cup) – Provides creaminess; any sharp cheese works well to enhance flavor.

This quick and delicious Bacon Ranch Pasta Salad is sure to become your go-to summer side!

Step‑by‑Step Instructions for Bacon Ranch Pasta Salad

Step 1: Cook the Pasta
Begin by boiling a large pot of salted water over high heat. Once it reaches a rolling boil, add 12 ounces of rotini pasta and cook according to the package instructions until al dente, which usually takes about 8-10 minutes. Drain the pasta in a colander and rinse it under cold water to halt the cooking process. This will keep your Bacon Ranch Pasta Salad nice and cool.

Step 2: Prepare the Bacon
While the pasta is cooking, place 8 slices of bacon in a large skillet over medium-high heat. Cook until the bacon is crispy and golden brown, about 6-8 minutes, flipping as needed for even cooking. Once done, transfer the bacon to a plate lined with paper towels to absorb excess grease. After it cools, crumble the bacon into bite-sized pieces for your salad.

Step 3: Mix the Dressing
In a spacious mixing bowl, combine 1 cup of mayonnaise, 3 tablespoons of dry ranch seasoning mix, ½ teaspoon of garlic powder, ¼ teaspoon of black pepper, and ½ cup of milk. Whisk the mixture vigorously until it becomes smooth and creamy, ensuring all ingredients are well incorporated. This dressing will be the savory backbone of your Bacon Ranch Pasta Salad.

Step 4: Combine Ingredients
Once the pasta has cooled, add it to the dressing along with the crumbled bacon, 1 cup of halved cherry or grape tomatoes, 1 cup of thawed frozen peas, and 1 cup of shredded cheddar cheese. Gently stir everything together until the ingredients are well combined and the pasta is generously coated in the creamy ranch dressing.

Step 5: Chill the Salad
Transfer your combined Bacon Ranch Pasta Salad into an airtight container or a serving bowl covered with plastic wrap. Refrigerate for at least 1 hour, allowing the flavors to meld beautifully and chill the dish. This waiting time is key for a refreshing and flavorful summer side that your guests will adore.

Step 6: Serve and Enjoy
Once chilled, give the salad a gentle stir before serving, and taste to adjust seasoning if necessary. This Bacon Ranch Pasta Salad pairs perfectly with your favorite grilled meats or can be enjoyed on its own. Serve it chilled and watch it disappear at your summer BBQ!

Expert Tips for Bacon Ranch Pasta Salad

  • Flavor Fusion: Allow the salad to chill for at least one hour; the flavors deepen significantly, making the Bacon Ranch Pasta Salad truly irresistible.
  • Gentle Mixing: Stir ingredients gently when combining to avoid breaking the pasta and ensure a beautiful presentation.
  • Perfect Bacon: Use crispy bacon for the best texture; chewy bacon can lead to a less enjoyable eating experience.
  • Fresh Alternatives: Consider using fresh herbs or vegetables like parsley or bell peppers to elevate the flavor profile of your Bacon Ranch Pasta Salad.
  • Make-ahead Magic: This salad can be made a day in advance, just be sure to keep it tightly covered in the fridge to maintain freshness.

Make Ahead Options

Bacon Ranch Pasta Salad is a fantastic option for busy home cooks looking to save time without sacrificing flavor! You can prepare the salad up to 24 hours in advance, allowing the flavors to blend beautifully. To prep ahead, cook the pasta and crumble the bacon, then make the dressing and store everything separately in airtight containers in the refrigerator. When you’re ready to serve, simply combine all the components, and give it a gentle stir to maintain quality. This not only saves you a significant amount of time on the day of your gathering but ensures that your Bacon Ranch Pasta Salad is just as delicious just after you mix it together!

Storage Tips for Bacon Ranch Pasta Salad

  • Room Temperature: Bacon Ranch Pasta Salad is best served cold. Avoid leaving it out for more than 2 hours to ensure food safety.
  • Fridge: Store the pasta salad in an airtight container in the refrigerator for up to 3 days. For optimal flavor, consume within the first 48 hours.
  • Freezer: This dish is not recommended for freezing due to the mayonnaise-based dressing and the texture changes in the pasta and vegetables.
  • Reheating: If you choose to enjoy leftovers, allow the salad to sit at room temperature for a few minutes before serving; no reheating is necessary as it’s best served chilled.

Bacon Ranch Pasta Salad Variations

Feel free to personalize your Bacon Ranch Pasta Salad with these fun and delicious ideas that will enhance your dining experience!

  • Turkey Bacon: Swap out traditional bacon for turkey bacon to create a lighter version. It still retains that smoky flavor while reducing fat.

  • Greek Yogurt: Use Greek yogurt instead of mayonnaise for a tangy kick and a boost of protein. This swap not only lightens the dish up but adds creaminess.

  • Fresh Herbs: Toss in a handful of fresh herbs, like parsley or chives, to elevate the garden-fresh flavor of your salad. The bright notes of fresh herbs can complement the creamy dressing beautifully.

  • Veggie Boost: Introduce additional vegetables such as diced cucumbers or bell peppers for extra crunch. These vibrant additions can add both texture and a burst of color to your dish.

  • Spicy Kick: For those who love heat, add a pinch of red pepper flakes or a dash of hot sauce to the dressing. This spicy twist can take your salad from mild to bold!

  • Grilled Chicken: Transform this dish into a full meal by adding grilled chicken pieces. It turns a side into a hearty main course that’s perfect for summer nights.

  • Cheese Variations: Experiment with different cheeses, such as crumbled feta or pepper jack, to give your salad a unique flavor profile. Each variety brings its own charm to the table.

Looking for other quick side options for your BBQ? I recommend this delightful Mushroom Pasta Delightful for a creamy bite or a vibrant Steak Fajita Salad for something fresh and filling!

What to Serve with Bacon Ranch Pasta Salad

Picture a sunny backyard BBQ filled with laughter, friends, and an array of delicious dishes that complement one another.

  • Grilled Chicken: The smoky flavor of grilled chicken pairs beautifully with the creamy texture of the pasta salad, enhancing each bite.
  • Corn on the Cob: Sweet, buttery corn adds a juicy contrast, perfectly balancing the rich flavors of the Bacon Ranch Pasta Salad. A bite of tender corn followed by the creamy pasta is pure summer bliss!
  • Burgers: Whether beef, turkey, or veggie, juicy burgers are an ultimate BBQ staple that harmonizes well with the cool creaminess of the pasta salad. Each mouthful of burger followed by a spoonful of salad is a classic warm-weather delight.
  • Caprese Skewers: These handheld bites of fresh mozzarella, basil, and cherry tomatoes introduce a refreshing burst of flavor, making for a delightful contrast to the creamy salad.
  • Potato Chips: For a satisfying crunch, serve some seasoned potato chips on the side. Their salty crispness offers a fun texture that complements the softness of the pasta.
  • Lemonade: A glass of refreshing lemonade will enhance the summer vibe while cutting through the richness of the salad, making each bite even more enjoyable.
  • Watermelon Salad: The juicy sweetness of a watermelon salad with mint adds a refreshing counterpoint, cleansing the palate and enhancing your BBQ experience!
  • Chocolate Chip Cookies: To finish off your meal on a sweet note, classic chocolate chip cookies make a nostalgic ending to your BBQ. Warm desserts always invite a smile!

Bacon Ranch Pasta Salad Recipe FAQs

What type of pasta is best for Bacon Ranch Pasta Salad?
Absolutely! Rotini pasta is ideal due to its grooves that hold onto the creamy dressing effectively. However, you can also substitute it with other small pasta shapes, such as penne or fusilli, if you prefer. Just ensure they’re cooked al dente for that perfect bite!

How should I store Bacon Ranch Pasta Salad?
To keep your Bacon Ranch Pasta Salad fresh, store it in an airtight container in the refrigerator. It will last for up to 3 days, but I recommend enjoying it within the first 48 hours for the best flavor and texture. Enjoy it chilled for the ultimate summer experience!

Can I freeze Bacon Ranch Pasta Salad?
Unfortunately, freezing is not recommended for Bacon Ranch Pasta Salad. The mayonnaise-based dressing and the texture of the pasta and veggies can change in the freezing process, leading to mushiness upon thawing. It’s best enjoyed fresh or kept in the fridge for a few days.

What should I do if my pasta salad seems dry after refrigeration?
Very often, bacon ranch pasta salads can absorb moisture as they sit. If you find yours a bit dry after chilling, just stir in a splash of milk or additional mayo to loosen it up, and freshen up that creamy goodness! Remember, you want each bite to be luscious.

Is Bacon Ranch Pasta Salad suitable for dietary restrictions?
Absolutely! You can easily make this dish fit dietary needs by swapping the mayo with Greek yogurt for a lighter version. If you’re looking for a vegetarian option, consider using turkey bacon or omitting meat altogether, adding more veggies like diced cucumbers or bell peppers instead.

How do I ensure my bacon is crispy in the pasta salad?
To achieve perfectly crispy bacon, cook the slices in a skillet over medium-high heat until they reach a golden brown color, which usually takes about 6-8 minutes. Be sure to drain them on paper towels to absorb any excess grease before crumbling them into your salad!

Bacon Ranch Pasta Salad

Bacon Ranch Pasta Salad: A Creamy Summer Side Delight

This Bacon Ranch Pasta Salad is a vibrant, creamy side that combines crispy bacon, sweet peas, and juicy tomatoes, perfect for summer BBQs.
Prep Time 20 minutes
Cook Time 10 minutes
Chill Time 1 hour
Total Time 1 hour 30 minutes
Servings: 8 servings
Course: Salad
Cuisine: American
Calories: 350

Ingredients
  

For the Pasta
  • 12 ounces Rotini Pasta Feel free to substitute with any small pasta shape, like penne or fusilli.
For the Dressing
  • 1 cup Mayonnaise Greek yogurt can make for a healthier alternative.
  • 3 tablespoons Dry Ranch Seasoning Mix Using a homemade ranch mix gives a fresher taste.
  • 1/2 teaspoon Garlic Powder Fresh minced garlic can provide a more robust profile.
  • 1/4 teaspoon Black Pepper Adjust according to your taste preferences.
  • 1/2 cup Milk Buttermilk adds a nice tanginess.
For the Salad
  • 8 slices Bacon Turkey bacon or a vegetarian option can lighten it up.
  • 1 cup Cherry/Grape Tomatoes Halved; swap with diced bell peppers for a different taste.
  • 1 cup Frozen Peas Thawed; fresh peas can replace them if available.
  • 1 cup Shredded Cheddar Cheese Any sharp cheese works well to enhance flavor.

Equipment

  • large pot
  • colander
  • large skillet
  • Mixing Bowl

Method
 

Step-by-Step Instructions for Bacon Ranch Pasta Salad
  1. Begin by boiling a large pot of salted water over high heat. Once it reaches a rolling boil, add 12 ounces of rotini pasta and cook according to the package instructions until al dente, usually about 8-10 minutes. Drain the pasta in a colander and rinse it under cold water to halt the cooking process.
  2. While the pasta is cooking, place 8 slices of bacon in a large skillet over medium-high heat. Cook until the bacon is crispy and golden brown, about 6-8 minutes, flipping as needed. Transfer the bacon to a plate lined with paper towels, then crumble the bacon into bite-sized pieces.
  3. In a mixing bowl, combine 1 cup of mayonnaise, 3 tablespoons of dry ranch seasoning mix, ½ teaspoon of garlic powder, ¼ teaspoon of black pepper, and ½ cup of milk. Whisk until smooth and creamy.
  4. Once the pasta has cooled, add it to the dressing along with the crumbled bacon, 1 cup of halved cherry tomatoes, 1 cup of thawed peas, and 1 cup of shredded cheddar cheese. Stir until everything is well combined.
  5. Transfer the combined salad into an airtight container or a bowl covered with plastic wrap. Refrigerate for at least 1 hour to allow the flavors to meld.
  6. Once chilled, gently stir the salad before serving, and adjust seasoning if necessary. Serve chilled and enjoy!

Nutrition

Serving: 1cupCalories: 350kcalCarbohydrates: 35gProtein: 12gFat: 22gSaturated Fat: 6gPolyunsaturated Fat: 2gMonounsaturated Fat: 8gCholesterol: 40mgSodium: 600mgPotassium: 300mgFiber: 3gSugar: 2gVitamin A: 600IUVitamin C: 10mgCalcium: 150mgIron: 1mg

Notes

This Bacon Ranch Pasta Salad is a colorful, make-ahead dish that's perfect for outdoor gatherings, combining flavors and textures that complement a summer BBQ.

Tried this recipe?

Let us know how it was!

Zesty Ranch Taco Pasta Salad That’s Perfect for Any Gathering

As I mixed together the ingredients for my latest culinary adventure, a colorful vision emerged—a Creamy Ranch Taco Pasta Salad that promised to brighten up any gathering. With each swirl of ranch dressing and a sprinkle of taco seasoning, the rotini pasta transformed into a refreshing and vibrant dish perfect for warm-weather picnics and potlucks. The beauty of this recipe lies in its simplicity: not only is it quick to whip up, but it’s also fully customizable, inviting you to tailor it to your taste buds. Packed with crisp veggies and a delightful crunch, this pasta salad is made to please both family and friends alike. Ready to dive into the ultimate flavor experience? Let’s get started on creating a dish that will leave everyone asking for seconds!

Why is Ranch Taco Pasta Salad a Must-Try?

Vibrant Colors: The mix of cherry tomatoes, bell peppers, and rad onions creates a feast for the eyes, ensuring your dish stands out at any event.

Endless Customization: Each ingredient is easily swapped! Try adding some avocado for richness or replace the beans with chickpeas to suit your preferences.

Quick and Easy: With just a few simple steps, and minimal cooking required, this salad can be ready in under 30 minutes—perfect for those last-minute gatherings.

Crowd-Pleasing Taste: The creamy ranch paired with zesty taco seasoning delivers a flavor explosion that both kids and adults will adore!

Perfect for Any Occasion: Whether you’re heading to a picnic or hosting a backyard BBQ, this pasta salad effortlessly fits in at any setting. Plus, for another delightful salad option, check out my Strawberry Spinach Salad!

Ranch Taco Pasta Salad Ingredients

For the Pasta
Rotini Pasta – A sturdy base that holds all the flavors; swap for gluten-free pasta if needed.

For the Creamy Mix
Ranch Dressing – Adds a rich creaminess; consider using homemade for an extra kick.
Taco Seasoning – Brings the zesty flavor reminiscent of taco night; homemade versions can elevate the dish.

For the Vegetables
Cherry Tomatoes – Adds a pop of sweetness; feel free to use diced regular tomatoes if you like.
Green Bell Pepper – Brings crunch and nutrition; try yellow or orange bell peppers for a sweeter touch.
Red Bell Pepper – Provides vibrant color and a touch of sweetness; omit if you prefer a milder profile.
Red Onion – Contributes a sharp flavor twist; green onions can replace for a subtler taste.

For Texture and Flavor
Black Beans – Introduces protein and hearty texture; substitute with chickpeas for a different legume option.
Corn – Offers sweetness and crunch; use fresh corn when in season for the best flavor.
Chopped Cilantro (Optional) – Enhances freshness; parsley can be swapped for those not fond of cilantro.
Tortilla Strips or Doritos (Optional) – Provides a delightful crunch; crushed corn chips work in a pinch.

Dive into making this Ranch Taco Pasta Salad, and don’t hesitate to make it your own!

Step‑by‑Step Instructions for Ranch Taco Pasta Salad

Step 1: Prepare the Dressing
In a small mixing bowl, combine ranch dressing and taco seasoning until thoroughly blended. Take a moment to admire the creamy texture and vibrant color of the dressing you’ve just created. Set the bowl aside to allow the flavors to meld while you work on the pasta and veggies.

Step 2: Cook the Pasta
Bring a large pot of water to a rolling boil over high heat. Add the rotini pasta and cook according to package instructions, usually about 8-10 minutes, until al dente. Once cooked, drain the pasta in a colander and rinse under cold water to cool it down and stop the cooking process.

Step 3: Combine Pasta and Dressing
Transfer the cooled rotini pasta into a large mixing bowl. Pour the creamy ranch and taco dressing over the pasta, ensuring every twist of pasta is coated in that flavorful mixture. Use tongs or a spatula to gently toss the ingredients together, creating a delicious base for your Ranch Taco Pasta Salad.

Step 4: Add the Veggies
To the pasta mixture, add chopped cherry tomatoes, diced green and red bell peppers, and red onion. Also, include black beans and corn for texture and flavor. Gently fold the ingredients together, ensuring even distribution of the vibrant vegetables throughout the pasta. The colors should be stunning at this point!

Step 5: Chill the Salad
Cover the mixing bowl with plastic wrap or a lid and place it in the refrigerator for at least 30 minutes. This chilling time allows the flavors to deepen and meld beautifully. As you wait, picture the delightful presentation of your Ranch Taco Pasta Salad when you serve it.

Step 6: Garnish and Serve
Just before serving, remove the salad from the refrigerator. If desired, sprinkle the top with freshly chopped cilantro and crispy tortilla strips or crushed Doritos for that perfect crunch. Toss lightly to integrate any additional toppings, and your vibrant Ranch Taco Pasta Salad is ready to impress family and friends at your next gathering!

How to Store and Freeze Ranch Taco Pasta Salad

Fridge: Store your Ranch Taco Pasta Salad in an airtight container for up to 3 days. This keeps the flavors fresh and prevents it from drying out.

Freezer: While it’s best enjoyed fresh, you can freeze leftovers for up to 1 month. Ensure it’s in a well-sealed, freezer-safe container to maintain quality.

Reheating: If you’ve frozen the salad, thaw it in the fridge overnight before enjoying. Avoid reheating, as the creamy ranch dressing can separate and change texture.

Serving Tip: After chilling, give the salad a quick stir and, if desired, add a splash more ranch dressing for extra creaminess before serving.

Make Ahead Options

These Creamy Ranch Taco Pasta Salad preparations are perfect for busy cooks looking to save time! You can fully prepare the salad up to 24 hours in advance, as the flavors deepen when the ingredients mingle in the refrigerator. To do this, simply mix the cooled rotini pasta with the ranch dressing and taco seasoning, then add the cherry tomatoes, bell peppers, red onion, black beans, and corn. Store it in an airtight container, and to maintain quality, avoid adding crispy toppings like tortilla strips or Doritos until just before serving. When you’re ready to impress your guests, simply garnish with your choice of toppings and serve the delicious Ranch Taco Pasta Salad chilled!

What to Serve with Ranch Taco Pasta Salad

Elevate your meal experience with delightful sides and drinks that perfectly complement this vibrant salad.

  • Grilled Chicken Skewers: Tender and juicy, these skewers bring a smoky flavor that harmonizes beautifully with the cool creaminess of the pasta salad.

  • Corn on the Cob: Sweet and buttery, corn on the cob adds a seasonal pop of flavor and a fun, shared experience as you enjoy them together.

  • Lemon Garlic Shrimp: Light and zesty, this seafood dish enhances the freshness of your pasta salad while offering a contrast in texture.

  • Avocado Salad: Creamy avocado chunks with a pinch of salt and lemon create a refreshing side that pairs well with the zesty notes of the salad, bringing smoothness to every bite.

  • Chilled White Sangria: Fruity and refreshing, this drink complements the earthy flavors of the taco seasoning while keeping the vibe festive and light.

  • Vegetable Platter: A colorful assortment of fresh veggies provides crunch and freshness; pair it with a tangy dipping sauce to keep things exciting.

  • Chocolate Chip Cookies: For a sweet finish, these classic cookies offer heartwarming comfort and embody the joy of homemade treats, rounding off your meal perfectly.

Expert Tips for Ranch Taco Pasta Salad

  • Cool the Pasta: Allow the rotini to cool completely after cooking to prevent the dressing from becoming watery and soggy.

  • Chill Time Matters: Refrigerate the pasta salad for at least 30 minutes before serving; this helps the flavors meld together beautifully.

  • Customize Wisely: Feel free to swap ingredients like beans or peppers but be mindful of flavor balance; avoid overwhelming the ranch dressing with too many strong flavors.

  • Freshness Counts: Use fresh vegetables whenever possible, as they not only enhance flavor but also add to the colorful presentation of your Ranch Taco Pasta Salad.

  • Garnish for Crunch: Don’t skip the tortilla strips or crushed Doritos on top; they add a delightful crunch and elevate the dish’s texture and appeal.

Variations & Substitutions for Ranch Taco Pasta Salad

Feel free to play with flavors and textures in this creamy delight to make it truly yours!

  • Gluten-Free: Swap rotini pasta for gluten-free pasta options like brown rice or quinoa pasta for a deliciously safe treat.
    Switching it up enhances the dish while ensuring it fits various dietary needs.

  • Homemade Dressing: Use homemade ranch dressing for a fresher flavor, allowing you to control the ingredients and spices.
    This personal touch can elevate the entire dish, making it truly unique.

  • Spicy Kick: Stir in diced jalapeños or a splash of hot sauce to introduce a thrilling heat to your salad.
    The combination of spice with creamy ranch creates an exciting burst of flavor!

  • Richer Texture: Add diced avocado for a creamy richness that enhances the salad’s texture without compromising on flavor.
    A little avocado goes a long way in making each bite indulgently smooth.

  • Different Beans: Substitute black beans with chickpeas or white beans for a different legume option that pairs beautifully.
    Experimenting with beans not only changes the taste but also introduces various textures.

  • Cheesy Flavor: Grate some cheddar or pepper jack cheese on top for an added savory touch that complements the ranch dressing perfectly.
    It’s a delightful twist that cheese lovers won’t want to miss!

  • Seasonal Veggies: Rotate in seasonal vegetables like zucchini, or snap peas for a fresh take that changes with the seasons.
    This variety adds not just flavor, but vibrant colors that can brighten up the dish!

  • Crunchy Toppers: Swap crispy tortilla strips for crushed pretzels or nuts for a different kind of crunch and additional flavor.
    This tiny change can take the culinary experience to a whole new level of delight!

If you’d like to explore more delightful recipes, try my tasty Tuna Macaroni Salad, or whip up a creamy Mushroom Pasta Delightful$ that everyone will love!

Ranch Taco Pasta Salad Recipe FAQs

What kind of pasta should I use for Ranch Taco Pasta Salad?
Rotini pasta is ideal because its spirals hold the dressing and other ingredients well. If you prefer a gluten-free option, feel free to swap it with gluten-free pasta, which works just as beautifully!

How long can I store leftovers of Ranch Taco Pasta Salad?
You can store the leftovers in an airtight container in the refrigerator for up to 3 days. Just be sure to keep it covered to maintain freshness and prevent it from drying out.

Can I freeze Ranch Taco Pasta Salad?
While it’s best enjoyed fresh, you can freeze leftovers for up to 1 month. Make sure to use a well-sealed, freezer-safe container to prevent freezer burn. When you’re ready to enjoy it, thaw it in the fridge overnight. Just a heads-up: avoid reheating, as the creamy ranch dressing may separate and alter in texture.

What if I have someone in my family with food allergies?
You can easily adapt this recipe to accommodate various dietary needs! For instance, swap out black beans for chickpeas if there’s a legume allergy. If dairy is the issue, consider using a dairy-free ranch dressing, and always check labels for potential allergens based on what’s being used.

How can I prevent my pasta from becoming soggy?
The key is to allow the rotini to cool completely before mixing it with the dressing. Additionally, chill the salad for at least 30 minutes; this time helps the flavors meld together while maintaining the pasta’s firmness.

Can I customize the veggies in the salad?
Absolutely! This salad is all about personalization. Feel free to replace bell peppers with cucumber or add in some diced avocado for creaminess. Just make sure to balance the flavors and textures so that the creamy ranch dressing shines through!

Ranch Taco Pasta Salad

Zesty Ranch Taco Pasta Salad That's Perfect for Any Gathering

A vibrant Ranch Taco Pasta Salad packed with flavor, perfect for any gathering or picnic.
Prep Time 15 minutes
Cook Time 10 minutes
Chill Time 30 minutes
Total Time 55 minutes
Servings: 6 servings
Course: Salad
Cuisine: American
Calories: 320

Ingredients
  

For the Pasta
  • 8 oz Rotini Pasta swap for gluten-free pasta if needed
For the Creamy Mix
  • 1 cup Ranch Dressing consider using homemade for an extra kick
  • 2 tbsp Taco Seasoning homemade versions can elevate the dish
For the Vegetables
  • 1 cup Cherry Tomatoes feel free to use diced regular tomatoes if you like
  • 1 cup Green Bell Pepper try yellow or orange bell peppers for a sweeter touch
  • 1 cup Red Bell Pepper omit if you prefer a milder profile
  • 1/2 cup Red Onion green onions can replace for a subtler taste
For Texture and Flavor
  • 1 can Black Beans substitute with chickpeas for a different legume option
  • 1 cup Corn use fresh corn when in season for the best flavor
  • 1/4 cup Chopped Cilantro enhances freshness; parsley can be swapped
  • 1 cup Tortilla Strips or Doritos provides a delightful crunch

Equipment

  • large pot
  • Mixing Bowl
  • colander
  • Whisk

Method
 

Instructions
  1. In a small mixing bowl, combine ranch dressing and taco seasoning until thoroughly blended. Set aside to allow flavors to meld.
  2. Bring a large pot of water to a rolling boil. Add the rotini pasta and cook according to package instructions, about 8-10 minutes, until al dente. Drain and rinse under cold water.
  3. Transfer cooled rotini into a large mixing bowl. Pour the ranch and taco dressing over the pasta and toss gently.
  4. Add chopped cherry tomatoes, green and red bell peppers, and red onion to the pasta. Include black beans and corn, and fold gently.
  5. Cover and refrigerate for at least 30 minutes to allow flavors to deepen.
  6. Before serving, optionally sprinkle with cilantro and tortilla strips or crushed Doritos, then toss lightly.

Nutrition

Serving: 1cupCalories: 320kcalCarbohydrates: 45gProtein: 12gFat: 10gSaturated Fat: 1.5gPolyunsaturated Fat: 2gMonounsaturated Fat: 1.5gCholesterol: 5mgSodium: 500mgPotassium: 400mgFiber: 8gSugar: 3gVitamin A: 20IUVitamin C: 25mgCalcium: 60mgIron: 2mg

Notes

Use fresh vegetables whenever possible for the best flavor and presentation. Allow rotini to cool completely after cooking to avoid watery dressing.

Tried this recipe?

Let us know how it was!