Mini Lemon Meringue Tarts: Zesty Delights to Impress!

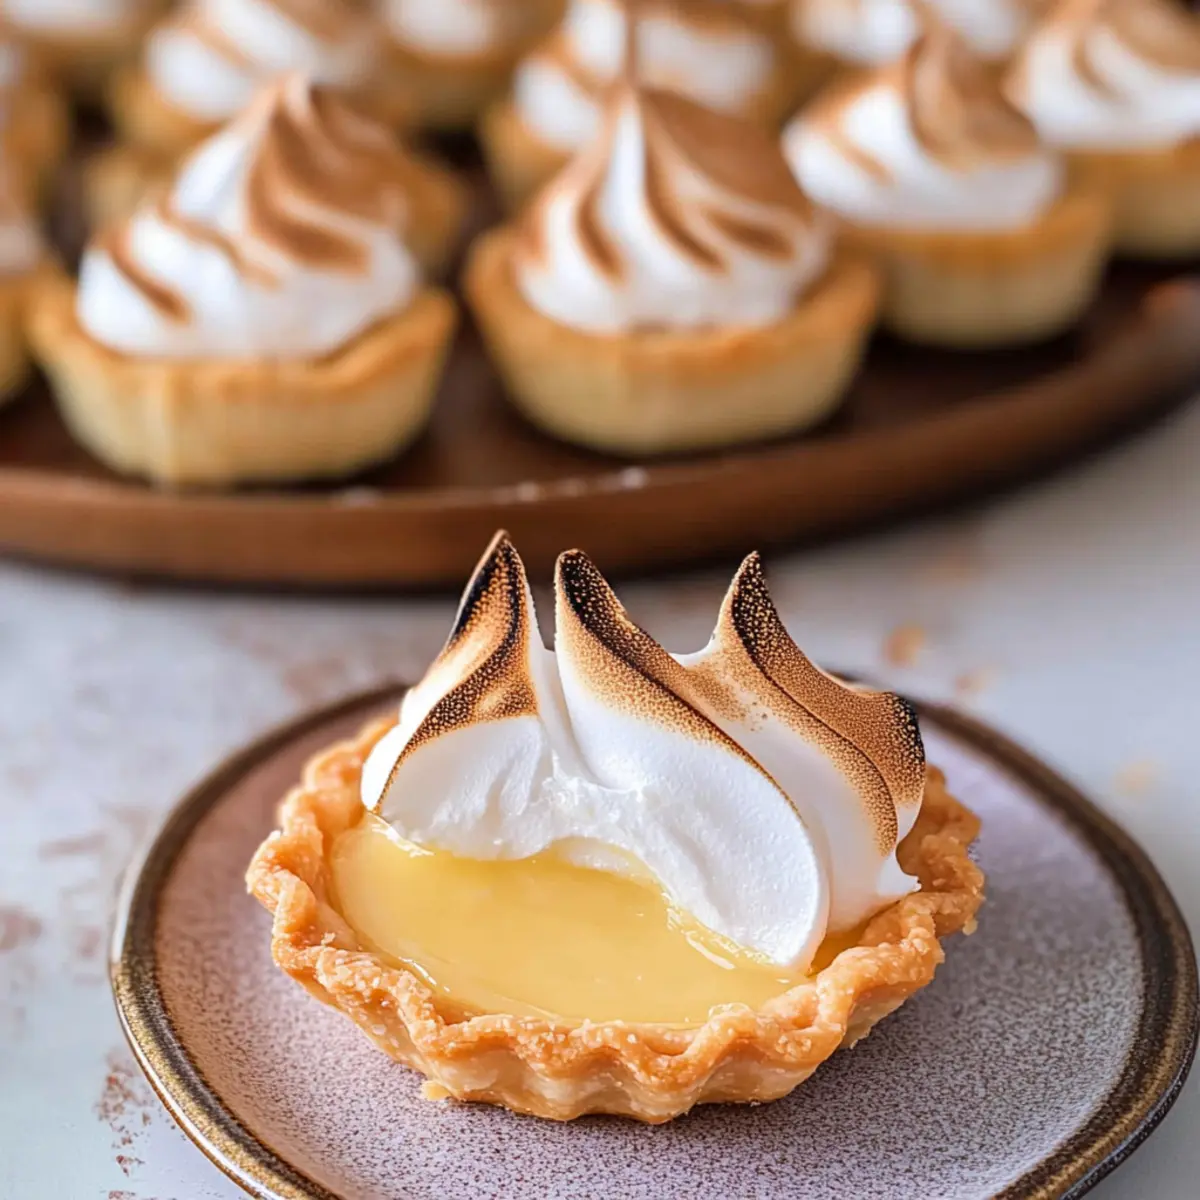
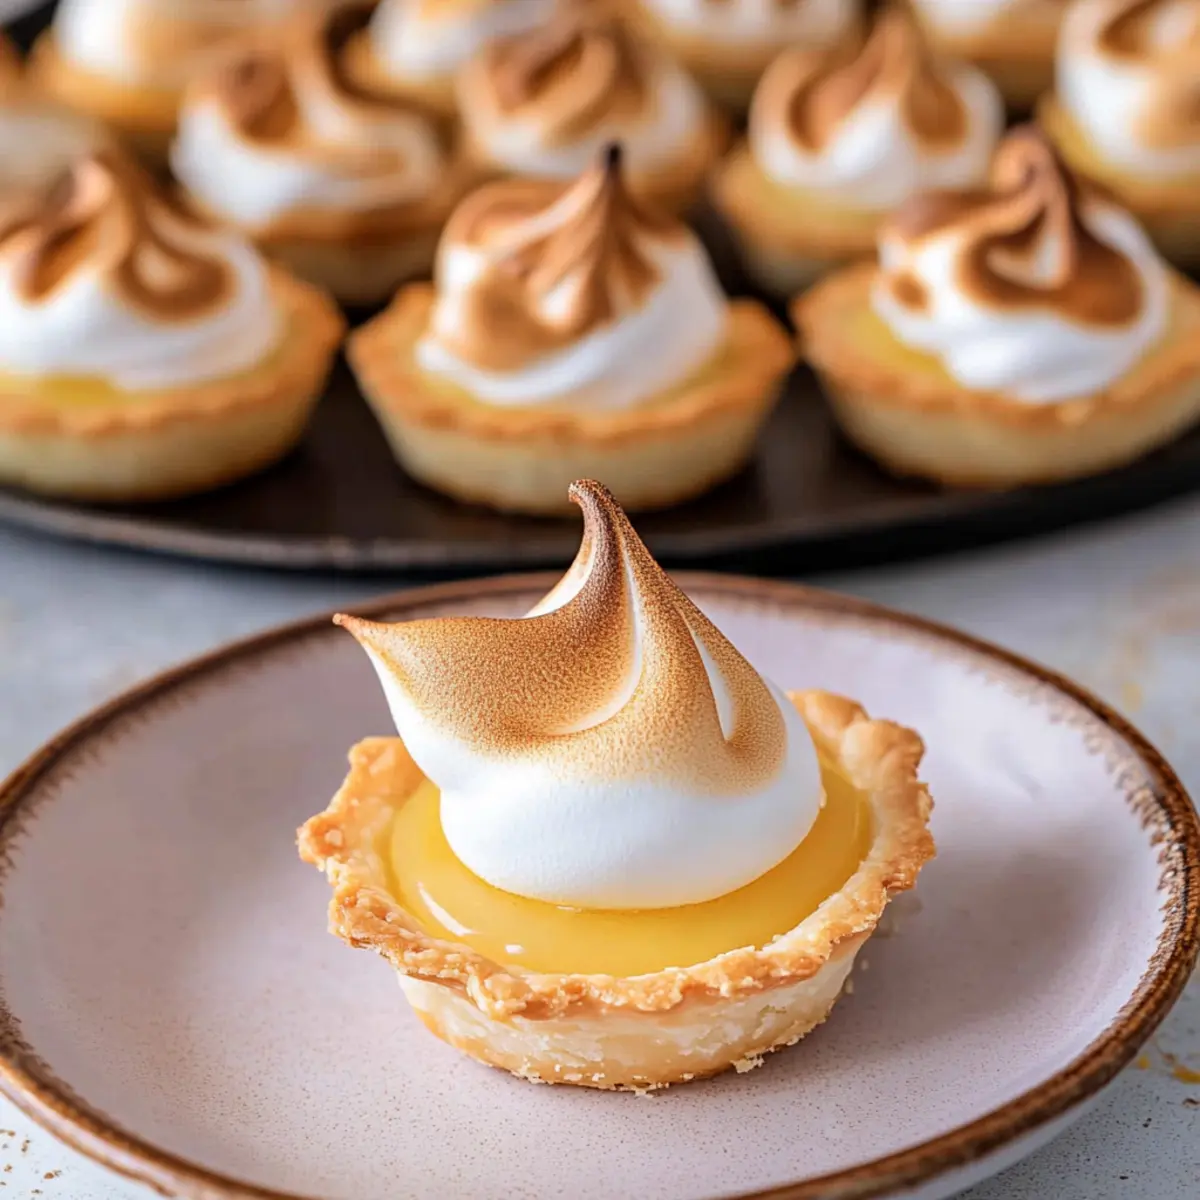
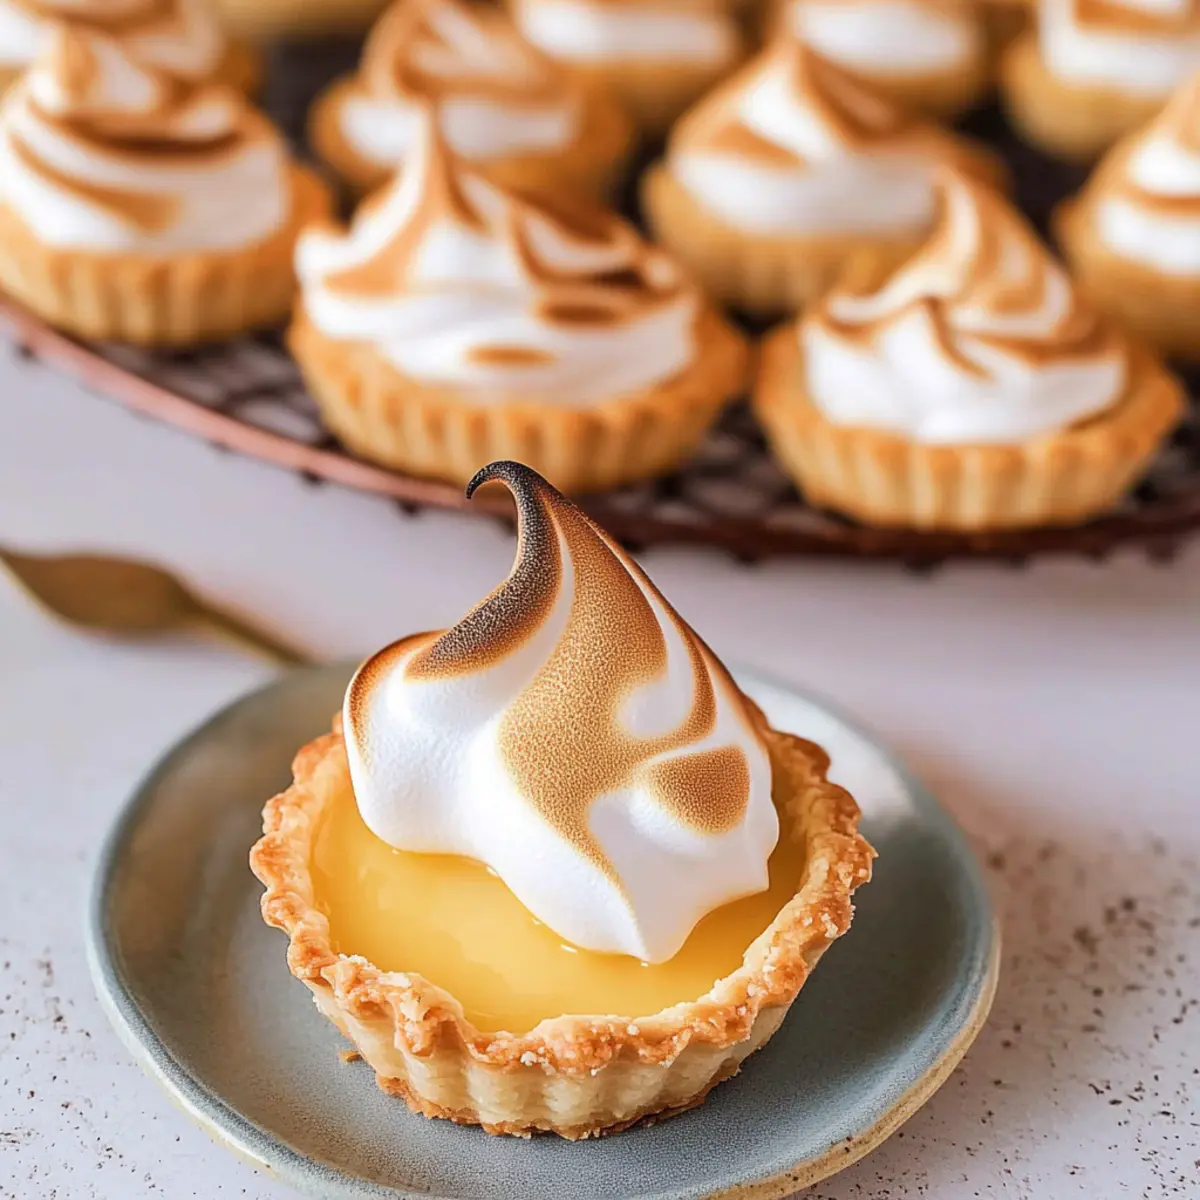
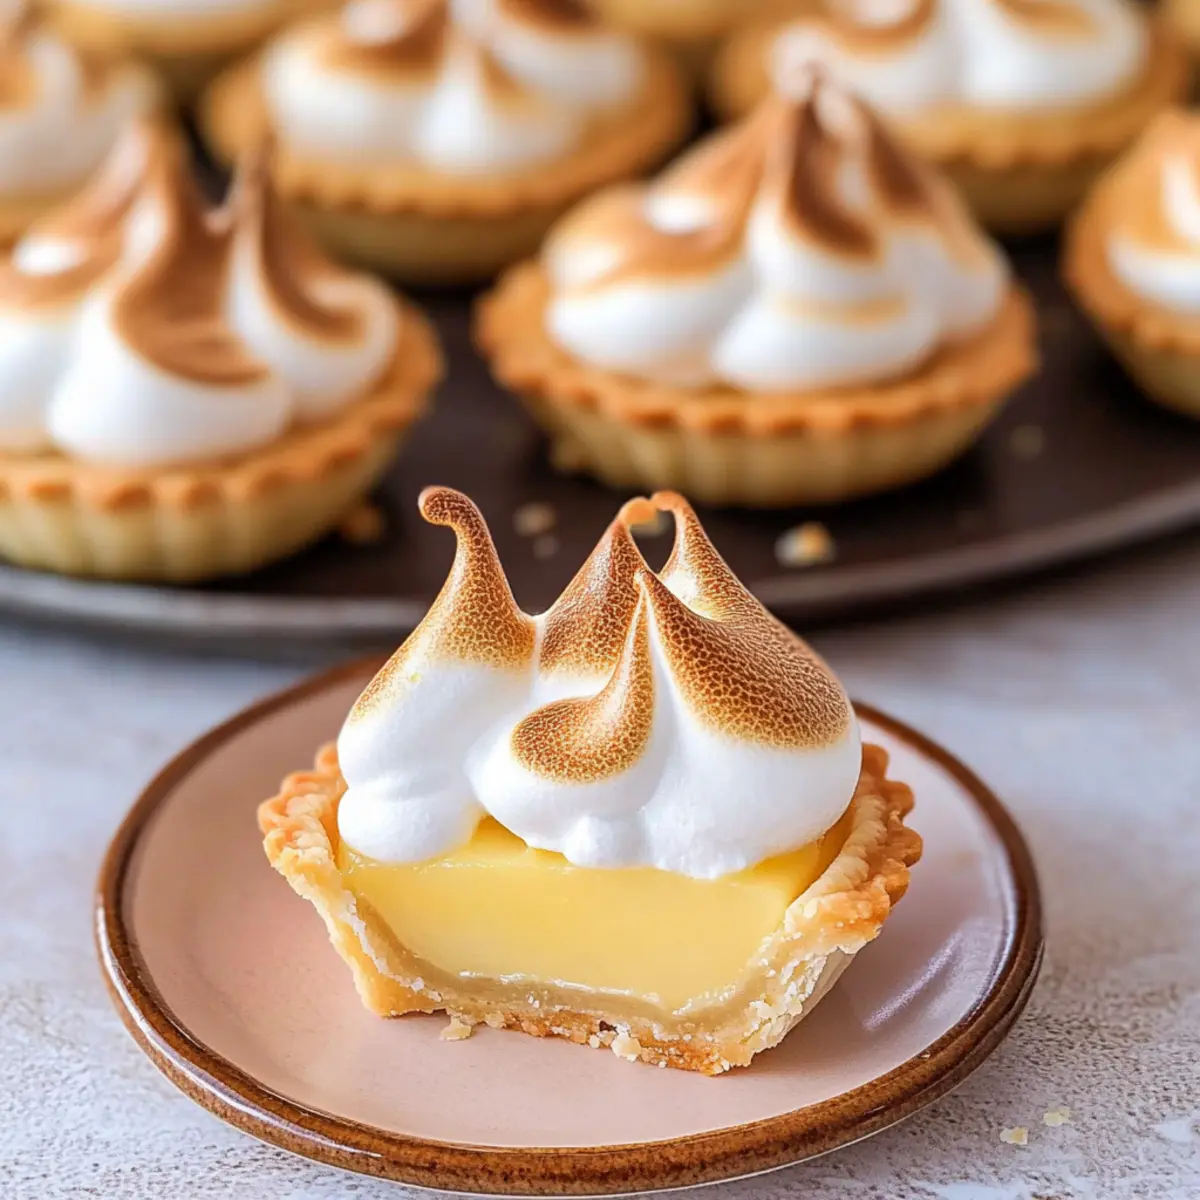
As I stood by the kitchen counter, the smell of zesty lemons filled the air—a nostalgic reminder of my grandmother’s sunny garden. Her love for baking passed down the fondness for these Mini Lemon Meringue Tarts, and every little bite packs a charming blend of tangy lemon curd nestled within a flaky pastry shell, all topped with a cloud of sweet, toasted meringue. What I adore most about this recipe is how impressively simple it is, making it the perfect crowd-pleaser for gatherings or quiet evenings when you crave a touch of elegance. With these tarts, you’ll not only dazzle your guests but elevate your dessert repertoire without spending hours in the kitchen. Are you ready to bring a slice of sunshine into your home?

Why You’ll Love These Tarts

Delightful for any occasion: These Mini Lemon Meringue Tarts are not only a feast for the eyes but also perfect for tea parties or holiday gatherings. Simple preparation means you can whip them together effortlessly, even after a long day. Crowd-pleasing flavors shine through, with a tangy lemon curd that complements the light, toasted meringue beautifully. Versatility at its best: feel free to swap in lime for a refreshing twist! Nostalgic and comforting, each bite transports you to sunny gardens filled with sweet memories. If you enjoy other citrus delights, be sure to check out my Lemon Garlic Shrimp or Grilled Lemon Herb for more culinary inspiration!

Mini Lemon Meringue Tarts Ingredients

• Get ready to create something zesty!

For the Pastry

  • Unsalted Butter – Adds richness and a flaky texture to the pastry; margarine is a good dairy-free substitute.
  • Superfine Sugar – Sweetens the pastry perfectly; granulated sugar works if you’re in a pinch.
  • Extra-Large Eggs – Provide essential structure and moisture; weigh eggs if unsure, or use large eggs instead.
  • Vanilla Extract – Enhances the flavor of the pastry; opt for quality extract for best results.
  • Salt – Balances the sweetness; no substitutions necessary.
  • Cake Flour – Contributes to a tender crust; all-purpose flour can be used with minor adjustments.

For the Lemon Curd Filling

  • Condensed Milk – Creates a creamy base for the lemon curd; no substitutions recommended.
  • Fresh Lemons (Juice and Zest) – Deliver the essential tart flavor; avoid bottled juice for maximum freshness.

For the Meringue Topping

  • Egg Whites – Responsible for the meringue’s lightness; ensure no yolk sneaks in for the best results.
  • Superfine Sugar (for Meringue) – Stabilizes and sweetens the meringue nicely; granulated sugar can be used if needed.

Dive into this recipe and experience the joy of creating delightful Mini Lemon Meringue Tarts that will impress everyone at your next gathering!

Step‑by‑Step Instructions for Mini Lemon Meringue Tarts

Step 1: Prepare the Pastry
Begin by creaming ½ cup of unsalted butter with ¼ cup of superfine sugar in a food processor until the mixture is smooth and homogenous. Add in one whole extra-large egg, one yolk, and a teaspoon of vanilla extract, pulsing to combine these ingredients thoroughly. Sift together 1¼ cups of cake flour and a pinch of salt before adding them to the mix; pulse until a dough forms. Wrap the dough in plastic wrap and chill it for about one hour.

Step 2: Form and Bake Tarts
Preheat your oven to 140°C (290°F) while you grease six mini tart tins. Roll out the chilled dough on a lightly floured surface until it’s about ¼ inch thick. Cut out circles that fit into the tart tins, carefully pressing the dough into each one. Blind bake the shells by placing parchment paper and rice weights inside each tart, baking them for 15 minutes until they turn lightly golden.

Step 3: Make Lemon Curd Filling
In a medium bowl, whisk together one can of condensed milk, three egg yolks, the juice and zest of two fresh lemons until well combined. Once your tart shells have cooled slightly, fill each one with the lemon curd mixture, making sure to fill them almost to the top. Place the filled tarts back in the oven at 160°C (320°F) for 10-15 minutes, or until the filling is just set, then allow them to cool in the tins before transferring to a wire rack.

Step 4: Prepare Meringue
In a heatproof bowl, combine three egg whites and ¾ cup of superfine sugar. Place the bowl over a pot of simmering water, whisking the mixture until the sugar has completely melted and the egg whites are warm to touch. Remove from heat and beat the mixture with an electric mixer for about 10 minutes until you reach stiff peaks.

Step 5: Assemble and Toast the Tarts
Now it’s time to finish your Mini Lemon Meringue Tarts! Pipe the fluffy meringue onto the cooled tarts, creating beautiful peaks for an elegant look. Using a kitchen torch, carefully toast the meringue until it becomes a lovely golden brown, giving it a delightful crisp texture. Allow the tarts to cool for a few minutes before serving to ensure the meringue holds its shape.

Step 6: Serve and Enjoy
Once your Mini Lemon Meringue Tarts have cooled, they are ready to be served! These charming desserts are perfect for any occasion, and their eye-catching presentation is sure to impress your guests. Store any leftovers in an airtight container in the fridge, but be aware that they are best enjoyed fresh for maximum flavor and texture.

Storage Tips for Mini Lemon Meringue Tarts

  • Room Temperature: These tarts are best enjoyed fresh, ideally within a few hours of assembly to maintain their crispy textures and flavors.
  • Fridge: Store any leftovers in an airtight container in the refrigerator for up to 1-2 days. Keep the meringue separate to avoid it becoming soggy.
  • Freezer: While not recommended for long-term freezing, you can freeze the baked tart shells for up to 1 month. Assemble the tarts with lemon curd and meringue after thawing for the best results.
  • Reheating: If you prefer warmth, reheat the assembled tarts in a low oven (about 150°C/300°F) for 10 minutes. This will slightly crisp the meringue but should be done carefully to prevent sogginess.

Mini Lemon Meringue Tarts Variations

Feel free to explore these delightful twists to make your Mini Lemon Meringue Tarts even more exciting!

  • Citrus Swap: Replace lemon with lime or orange for a fresh twist. The tartness will be beautifully vibrant and refreshing.

  • Berry Boost: Fold in a swirl of raspberry or blueberry puree into the lemon curd for a colorful and flavorful surprise.

  • Nutty Crust: Add crushed almonds or walnuts to the pastry dough for a deliciously crunchy texture and a nutty flavor.

  • Coconut Cream: Mix shredded coconut into the meringue for a tropical flair that complements the lemon beautifully.

  • Chocolate Drizzle: For an indulgent twist, drizzle melted dark chocolate over the finished tarts for a rich contrast to the tart lemon.

  • Herb Infusion: Try adding a hint of fresh basil or mint into the lemon curd for a surprising aromatic depth that will intrigue your guests.

  • Larger Pie Version: Scale this recipe up to create a stunning lemon meringue pie; just adjust baking time to ensure even cooking.

  • Flavorful Meringue: Add a touch of almond extract to the meringue for a delightful nutty fragrance that elevates the overall flavor profile.

If you’re looking to turn your culinary creativity up a notch, don’t miss out on trying these fun variations! Check out my zesty Lemon Garlic Shrimp for more citrus-inspired dishes or add some zing with my savory Grilled Lemon Herb. Enjoy your baking adventure!

What to Serve with Mini Lemon Meringue Tarts

Elevate your dessert experience with delightful pairings that complement the zesty and airy sweetness of these charming tarts.

  • Berry Compote: A vibrant, tart contrast that enhances the lemon flavor while adding a burst of freshness with every bite.

  • Whipped Cream: Light and fluffy, it brings a sumptuous creaminess that balances the tanginess of the filling beautifully.

  • Fresh Berries: Strawberries or blueberries add a juicy, sweet touch, creating an appealing color contrast and a refreshing bite alongside the tarts.

  • Tea Selection: A fragrant herbal tea, like chamomile or mint, provides a soothing balance that enhances the bright lemony notes.

  • Sparkling Wine: A fruity Prosecco or Champagne makes for an elegant pairing, enhancing the festive feel and refreshing the palate.

  • Chocolate Drizzle: A rich chocolate drizzle adds a touch of decadence, creating a delightful visual contrast and introducing a new flavor layer.

  • Ice Cream: Lemon sorbet or vanilla ice cream can be a cooling contrast, accentuating the tart’s flavors while providing a creamy texture that melts in your mouth.

  • Coconut Macaroons: Their chewy sweetness and tropical flair beautifully pair with the tart’s brightness, making for a harmonious dessert spread.

  • Coffee or Espresso: The bold flavors of a freshly brewed cup serve as a lovely backdrop, allowing the tarts to shine even brighter with every sip.

Expert Tips for Mini Lemon Meringue Tarts

  • Clean Tools: Always ensure your meringue tools are spotless and free from any grease—wipe them with lemon juice for best results.
  • Perfectly Baked Shells: Keep an eye on the pastry during blind baking; a light golden color is ideal, as they will further bake with the filling.
  • Meringue Success: If the meringue doesn’t thicken, confirm there’s no egg yolk or fatty residue on your utensils, or it won’t reach stiff peaks.
  • Taste Enhancement: To really elevate your lemon flavor, consider adding a pinch of lemon zest to the meringue before piping it onto the tarts.
  • Storage Strategy: To retain freshness, assemble the Mini Lemon Meringue Tarts just before serving. Store components separately to maintain texture.

Make Ahead Options

These Mini Lemon Meringue Tarts are perfect for busy home cooks looking to save time without sacrificing flavor! You can prepare the pastry shells up to 24 hours ahead; simply bake them, allow them to cool, and store them in an airtight container to retain their flakiness. Additionally, the lemon curd filling can be made up to 3 days in advance—just refrigerate it in an airtight jar to keep it fresh. When you’re ready to serve, fill the pre-baked tart shells with the lemon curd, whip the meringue and toast it, giving you restaurant-quality results with minimal last-minute effort. This prep-ahead strategy not only saves you time but ensures that your tarts are just as delicious as when freshly made!

Mini Lemon Meringue Tarts Recipe FAQs

What should I look for when selecting lemons for the filling?
When selecting lemons, look for ones that are bright yellow and firm, avoiding any with dark spots or wrinkles. Fresh lemons will not only yield more juice but also provide a vibrant flavor that is essential for your Mini Lemon Meringue Tarts.

How should I store leftover Mini Lemon Meringue Tarts?
Store any leftovers in an airtight container in the fridge for up to 1-2 days. Be aware that the meringue may lose its texture over time. For the best results, keep the components (pastry shells, lemon curd, and meringue) separate until you’re ready to serve.

Can I freeze Mini Lemon Meringue Tarts?
While it’s not ideal to freeze assembled tarts due to the texture of the meringue, you can freeze the baked tart shells for up to 1 month. To do this, cool the shells completely, then wrap them tightly in plastic wrap and place them in a freezer-safe bag. When you’re ready to use, thaw the shells in the fridge overnight and fill them with fresh lemon curd and meringue before serving.

What if my meringue doesn’t seem to thicken properly?
If your meringue fails to thicken, double-check that there are no traces of egg yolk or fat on your mixing bowl and utensils, as these can prevent stiff peaks from forming. Clean your tools with lemon juice to ensure they’re grease-free. If necessary, try whipping the mixture longer until you see stiff peaks forming.

Are Mini Lemon Meringue Tarts suitable for people with food allergies?
These tarts contain eggs and dairy, which can be allergens. If you’re catering to guests with specific dietary restrictions, consider adapting the recipe accordingly—using dairy-free margarine instead of butter, or substituting with egg alternatives for the meringue. Always consult with guests about their allergies before serving.

Can I prepare the components of the Mini Lemon Meringue Tarts ahead of time?
Absolutely! You can make the pastry crust and lemon curd in advance and store them separately in the fridge for a day or two. Assemble the tarts just before serving to maintain the texture of the meringue and pastry shell for an impressive dessert presentation.

Mini Lemon Meringue Tarts

Mini Lemon Meringue Tarts: Zesty Delights to Impress!

Mini Lemon Meringue Tarts are a delightful dessert that combines tangy lemon curd with a flaky pastry shell, topped with sweet meringue.
Prep Time 1 hour
Cook Time 30 minutes
Chilling Time 1 hour
Total Time 2 hours 30 minutes
Servings: 6 tarts
Course: Dessert
Cuisine: American
Calories: 200

Ingredients
  

Pastry
  • ½ cup Unsalted Butter Margarine can be used as a dairy-free substitute.
  • ¼ cup Superfine Sugar Granulated sugar works in a pinch.
  • 2 large Extra-Large Eggs Use large eggs if unsure.
  • 1 teaspoon Vanilla Extract Opt for quality extract for best results.
  • 1 pinch Salt No substitutions necessary.
  • cups Cake Flour All-purpose flour can be adjusted.
Lemon Curd Filling
  • 1 can Condensed Milk No substitutions recommended.
  • 2 whole Fresh Lemons (Juice and Zest) Avoid bottled juice for maximum freshness.
Meringue Topping
  • 3 large Egg Whites Ensure no yolk is present.
  • ¾ cup Superfine Sugar (for Meringue) Granulated sugar can be used if needed.

Equipment

  • Food processor
  • Mini Tart Tins
  • Electric Mixer
  • Parchment paper

Method
 

Prepare the Pastry
  1. Cream unsalted butter with superfine sugar in a food processor until smooth. Add eggs and vanilla, pulse to combine.
  2. Sift together cake flour and salt, then pulse into the mixture until a dough forms. Chill for 1 hour.
Form and Bake Tarts
  1. Preheat the oven to 140°C (290°F) and grease mini tart tins.
  2. Roll out the dough to ¼ inch thick, cut circles to fit the tart tins, and blind bake for 15 minutes.
Make Lemon Curd Filling
  1. Whisk together condensed milk, egg yolks, lemon juice, and zest until combined.
  2. Fill cooled tart shells with lemon curd and bake at 160°C (320°F) for 10-15 minutes.
Prepare Meringue
  1. Combine egg whites and superfine sugar in a heatproof bowl over simmering water, whisk until sugar melts.
  2. Beat until stiff peaks form using an electric mixer.
Assemble and Toast the Tarts
  1. Pipe meringue onto cooled tarts, creating peaks, and toast lightly with a kitchen torch.
Serve and Enjoy
  1. Cool tarts for a few minutes before serving.

Nutrition

Serving: 1tartCalories: 200kcalCarbohydrates: 24gProtein: 3gFat: 10gSaturated Fat: 6gPolyunsaturated Fat: 1gMonounsaturated Fat: 3gCholesterol: 50mgSodium: 100mgPotassium: 80mgFiber: 1gSugar: 14gVitamin A: 300IUVitamin C: 10mgCalcium: 30mgIron: 1mg

Notes

These Mini Lemon Meringue Tarts are perfect for gatherings and should be enjoyed fresh for the best flavor and texture.

Tried this recipe?

Let us know how it was!

Delicious Thai Curry Pizza: A Flavorful Twist You’ll Love

Have you ever found yourself torn between ordering takeout and whipping up something special at home? Enter my delightful Thai Curry Pizza, a dish that beautifully melds the comforting familiarity of pizza with the bold, tantalizing flavors of Thai cuisine. This recipe is not only a breeze to prepare, but it also allows for an array of customizable toppings to suit every palate—making it the perfect crowd-pleaser for family gatherings. With a creamy yellow curry sauce, fresh vegetables, and melty mozzarella resting on a crispy crust, this Thai Curry Pizza is sure to revolutionize your pizza nights. Who needs fast food when homemade magic is just a few ingredients away? Ready to dive into this culinary adventure?

Why is Thai Curry Pizza a must-try?

Uniquely Flavorful: This Thai Curry Pizza brings an unexpected twist to your pizza night with its vibrant yellow curry sauce and fresh veggies.

Customizable: Tailor this dish to your taste by swapping in seasonal vegetables or adding proteins like tofu or shrimp for a heartier option.

Quick and Simple: With just a few ingredients and easy instructions, you can whip up a delicious meal, just like my Spicy Thai Basil or Coconut Curry Soup.

Perfect for Sharing: Impress family and friends alike — everyone loves pizza! Your next gathering or cozy dinner will be a hit with this unique dish.

A Fusion of Cultures: Combining Thai and Italian cuisines offers a delightful fusion experience that keeps your taste buds excited.

Discover a new family favorite with ease; your busy schedule doesn’t have to compromise on flavor!

Thai Curry Pizza Ingredients

For the Sauce
Coconut Milk – Provides a creamy base for the sauce; you can substitute with any non-dairy milk for a vegan option.
Yellow Thai Curry Paste – Adds depth of flavor and spiciness; feel free to adjust the amount based on your spice tolerance.

For the Crust
Artisan Pizza Dough (or 1 – 11 inch pizza crust) – Forms the base; prepare homemade or use store-bought for convenience.

For the Toppings
Red Bell Peppers – Adds sweetness and crunch; you can use any color bell pepper for different flavors.
Carrots – Offers sweetness and texture; cut into thin ribbons for even cooking.
Red Onion – Introduces sharpness and depth; shallots or green onions can be used as alternatives.
Mozzarella Cheese – Melts beautifully and balances flavors; vegan cheese can be substituted for a dairy-free option.
Cilantro – Fresh garnish that brightens the dish; omit or replace with parsley if cilantro isn’t your favorite.
Green Onions – Adds an extra layer of flavor and crunch; can be omitted if preferred.

Get ready to create a flavor-filled Thai Curry Pizza that will be the talk of your next gathering!

Step‑by‑Step Instructions for Thai Curry Pizza

Step 1: Preheat the Oven
Begin your Thai Curry Pizza adventure by preheating your oven to 475°F (245°C). If you’re using a pizza stone, place it in the oven now so it heats up evenly. For a baking sheet, line it with parchment paper to prevent sticking. This critical step ensures a crispy crust as your pizza bakes.

Step 2: Prepare the Curry Sauce
In a small mixing bowl, combine one cup of coconut milk with three tablespoons of yellow Thai curry paste. Using a whisk, blend the mixture until it reaches a smooth, creamy consistency. This delightful curry sauce will serve as the base layer for your pizza, infusing it with incredible flavor and a rich golden hue.

Step 3: Roll Out the Dough
On a well-floured surface, take your artisan pizza dough and roll it out into an approximate 11-inch circle, aiming for an even thickness. Once rolled, transfer the dough carefully to your prepped pizza stone or baking sheet. The dough should feel supple and ready to hold the luscious toppings, setting the stage for your flavorful Thai Curry Pizza.

Step 4: Spread the Curry Sauce
Now it’s time to spread that aromatic curry sauce evenly over the rolled-out pizza dough. Use a ladle or the back of a spoon to achieve a nice layer, leaving a small border for the crust. The golden curry will create a beautiful canvas that melds wonderfully with the fresh vegetables and cheese to come.

Step 5: Add Your Fresh Vegetables
Begin layering your sliced red bell peppers, thinly cut carrots, and red onion over the sauce. Arrange the veggies generously, ensuring even coverage for optimal flavor in every bite. This burst of color not only enhances the dish visually but also infuses your Thai Curry Pizza with crunchy, sweet goodness.

Step 6: Sprinkle with Cheese
Finish off your pizza by evenly distributing shredded mozzarella cheese over the colorful toppings. The cheese will melt into a glorious, gooey layer that holds everything together while adding richness. If you’re opting for a vegan version, substitute with your favorite plant-based cheese to maintain creaminess without dairy.

Step 7: Bake the Pizza
Carefully slide your assembled Thai Curry Pizza into the preheated oven. Bake for 9 to 11 minutes, or until the crust turns golden brown and the cheese is bubbling with a delightful melt. Keep a close eye during this final phase—your kitchen will soon fill with irresistible aromas!

Step 8: Cool and Garnish
Once baked, remove the pizza from the oven and allow it to cool for a few minutes. This cooling period helps the cheese set slightly, making slicing easier. Finally, sprinkle fresh cilantro and chopped green onions on top for a burst of freshness and flavor, elevating your Thai Curry Pizza to perfection.

How to Store and Freeze Thai Curry Pizza

Fridge: Store leftover Thai Curry Pizza in an airtight container for up to 4 days. Make sure to separate slices with parchment paper to maintain crispness.

Freezer: For longer storage, wrap the pizza securely in plastic wrap and then foil, or use a freezer-safe container. It will keep for up to 3 months.

Reheating: When ready to enjoy, thaw in the fridge overnight if frozen. Reheat in the oven at 350°F (175°C) for 10-15 minutes to restore its scrumptious texture.

Component Storage: You can also prep your curry sauce and veggies ahead of time. Store them in the fridge for up to 1 day before assembling and baking your pizza.

Expert Tips for Thai Curry Pizza

  • Preheat Properly: Ensure your oven is fully preheated to 475°F for a perfectly crispy crust. Don’t skip this step—it makes a world of difference!

  • Sauce Balance: Adjust the amount of yellow Thai curry paste based on your spice preference. Start with less; you can always add more for a kick!

  • Toppings Distribution: Avoid overloading the pizza with too many toppings; this can lead to soggy crust. Keep it simple for the best Thai Curry Pizza experience.

  • Dough Thickness: Roll your pizza dough to a uniform thickness. Uneven dough can result in some parts being undercooked while others are burnt.

  • Storage Made Easy: Store any leftovers in an airtight container for up to four days, ensuring your crust remains crispy and delicious for the next meal!

What to Serve with Thai Curry Pizza

Bring your dinner table to life with delightful accompaniments that elevate your Thai Curry Pizza experience.

  • Cucumber Salad: A refreshing mix of crisp cucumbers, herbs, and a tangy dressing that brightens the meal.

  • Peanut Sauce Dip: Rich and creamy, this savory sauce pairs beautifully with the curry flavors while adding a nutty richness.

  • Mango Sticky Rice: Enjoy the contrast of warm, sweet coconut sticky rice topped with ripe mango slices for a delightful dessert experience.

  • Thai Spring Rolls: Crisp, fresh, and filled with crunchy veggies, these rolls are a light and perfect starter.

  • Szechuan Green Beans: Their spicy kick complements the pizza, balancing flavors with a satisfying crunch.

  • Thai Iced Tea: Creamy and sweet, this iconic drink washes down the spicy notes of your Thai Curry Pizza, creating a fragrant harmony.

Thai Curry Pizza Variations & Substitutions

Feel free to explore these delightful twists on the Thai Curry Pizza for a truly personalized experience!

  • Vegan Option: Substitute coconut milk and mozzarella with a non-dairy milk and a vegan cheese alternative for an entirely plant-based pizza.

  • Protein Boost: Add cooked chicken, shrimp, or marinated tofu to create a heartier meal. These ingredients not only enhance flavor but also increase the protein content.

  • Seasonal Veggies: Swap in fresh seasonal vegetables like zucchini, spinach, or bell peppers for a new flavor profile. The freshness will keep the dish exciting throughout the year.

  • Cheese Variety: Experiment with crumbled feta or tangy goat cheese to add unique flavors. Each cheese option provides a different taste sensation that complements the curry beautifully.

  • Heat Levels: For a fiery kick, incorporate sliced jalapeños or a sprinkle of red pepper flakes. Adjust the spice level according to your taste preferences for a personalized experience.

  • Herbal Infusion: Replace cilantro with fresh basil or mint for a completely different aromatic experience. Each herb will impart distinct yet harmonious flavors to the pizza.

  • Gluten-Free Crust: Use a gluten-free pizza crust to make this recipe suitable for gluten-sensitive family members. There are many great options available that don’t compromise on taste.

Each of these variations opens up a world of culinary creativity, just as my Pizza Burgers Flavor and Thai Chicken Meatball recipes do! Allow your taste buds to lead the way, and enjoy crafting your perfect Thai Curry Pizza!

Make Ahead Options

Preparing Thai Curry Pizza ahead of time is a fantastic way to save time and embrace stress-free cooking on busy weeknights! You can make the curry sauce and prep the vegetables (sliced bell peppers, carrots, and onions) up to 24 hours in advance. Simply store the sauce in an airtight container in the refrigerator to keep it fresh and flavorful. The pizza dough can also be prepared ahead and stored in the fridge if you’re making it from scratch—just let it rest for at least 30 minutes before rolling it out. When you’re ready to enjoy, roll out the dough, spread the sauce, add the veggies, sprinkle with cheese, and bake for 9-11 minutes. This way, your Thai Curry Pizza will be just as delicious with minimal effort!

Thai Curry Pizza Recipe FAQs

How do I choose ripe vegetables for my Thai Curry Pizza?
Absolutely! When selecting vegetables, look for vibrant colors and firm textures. For example, choose red bell peppers without blemishes or dark spots. Carrots should be crisp and bright, while onions should feel heavy and have no soft spots. Fresh vegetables will enhance the flavor and presentation of your pizza.

How should I store leftover Thai Curry Pizza?
Very simple! Store any leftover pizza in an airtight container. It can last in the refrigerator for up to 4 days. To keep the crust crispy, consider placing parchment paper between slices. This helps maintain texture until your next pizza craving strikes!

Can I freeze Thai Curry Pizza?
Yes, you can! For freezing, wrap the pizza tightly in plastic wrap and then in foil, or place it in a freezer-safe container. This will protect it from freezer burn. You can freeze it for up to 3 months. When you’re ready to enjoy, thaw it in the fridge overnight and reheat it in the oven for the best results.

What should I do if my pizza dough is unevenly baked?
If you find your crust is unevenly baked, it’s often due to varying thickness when rolling out. To prevent this, ensure you roll your dough out to an even thickness of about ¼ inch. If you still run into issues, rotate your pizza halfway through baking to promote even cooking.

Are there any dietary considerations I should be aware of with this Thai Curry Pizza?
Yes! If you have dietary restrictions, you can easily customize this recipe. For a vegan option, swap out the mozzarella for dairy-free cheese and make sure your yellow Thai curry paste is free from fish sauce. Always check labels for allergens if serving to guests, especially those with nut or gluten sensitivities.

Thai Curry Pizza

Delicious Thai Curry Pizza: A Flavorful Twist You’ll Love

Thai Curry Pizza combines the comfort of pizza with bold Thai flavors, featuring creamy yellow curry and fresh toppings.
Prep Time 15 minutes
Cook Time 11 minutes
Cooling Time 5 minutes
Total Time 31 minutes
Servings: 4 slices
Course: Dinner
Cuisine: Italian, Thai
Calories: 320

Ingredients
  

For the Sauce
  • 1 cup Coconut Milk can substitute with any non-dairy milk for a vegan option
  • 3 tablespoons Yellow Thai Curry Paste adjust based on spice tolerance
For the Crust
  • 1 11 inch Artisan Pizza Dough or use a store-bought crust
For the Toppings
  • 1 cup Red Bell Peppers can use any color bell pepper
  • 1 cup Carrots cut into thin ribbons
  • 1 cup Red Onion shallots or green onions can be alternatives
  • 1 cup Mozzarella Cheese can substitute with vegan cheese
  • 0.25 cup Cilantro omit or replace with parsley if desired
  • 0.5 cup Green Onions can be omitted if preferred

Equipment

  • Oven
  • Mixing Bowl
  • Whisk
  • Rolling Pin
  • pizza stone
  • Baking Sheet

Method
 

Step-by-Step Instructions
  1. Preheat your oven to 475°F (245°C) and prepare the pizza stone or baking sheet.
  2. Combine one cup of coconut milk with three tablespoons of yellow Thai curry paste in a mixing bowl. Whisk until smooth.
  3. Roll out the artisan pizza dough into an approximate 11-inch circle on a floured surface.
  4. Spread the curry sauce evenly over the rolled-out dough, leaving a small border for the crust.
  5. Layer the sliced red bell peppers, thinly cut carrots, and red onion over the sauce evenly.
  6. Sprinkle shredded mozzarella cheese over the topped pizza evenly.
  7. Bake in the preheated oven for 9 to 11 minutes until the crust is golden brown and the cheese is bubbling.
  8. Allow the pizza to cool for a few minutes before garnishing with fresh cilantro and chopped green onions.

Nutrition

Serving: 1sliceCalories: 320kcalCarbohydrates: 35gProtein: 12gFat: 15gSaturated Fat: 8gPolyunsaturated Fat: 1gMonounsaturated Fat: 6gCholesterol: 25mgSodium: 350mgPotassium: 400mgFiber: 2gSugar: 3gVitamin A: 15IUVitamin C: 30mgCalcium: 20mgIron: 10mg

Notes

Ensure to adjust the curry paste for preferred spice levels and store leftovers in an airtight container for up to 4 days.

Tried this recipe?

Let us know how it was!

Deliciously Easy Crockpot Christmas Crack for Sweet Moments

The aroma of melting chocolate wafted through my kitchen, instantly lifting my spirits as the holiday season approached. If you’re searching for an easy holiday candy that will impress without the fuss, look no further than my Crockpot Christmas Crack. This delectable treat marries the irresistible combination of sweet and salty, all prepared effortlessly in your slow cooker with just five simple ingredients. Not only is it a crowd-pleaser at holiday parties, but it also makes for a thoughtful make-ahead gift, ready to spread joy in decorative tins. Imagine delighting friends and family with this chocolatey goodness that combines the creamy richness of milk and white chocolate with crunchy salted peanuts. Ready to indulge your sweet tooth? Let’s dive into this simple yet addictive recipe that will become a staple in your holiday repertoire!

Why is this Crockpot Christmas Crack a must-try?

Irresistible, Sweet & Salty Flavor: This recipe combines rich chocolate with the crunch of salted peanuts, creating a delightful balance that will keep your taste buds dancing.

Effortless Preparation: With just five ingredients and the magic of your slow cooker, you can whip up this treat in no time—perfect for busy holiday schedules!

Make-Ahead & Gift-Worthy: Perfect for gifting, simply package your Crockpot Christmas Crack in decorative tins and spread holiday cheer to friends and family.

Customizable Deliciousness: Feel free to switch out peanuts for almonds or add dried fruits for a fruity twist, making it uniquely yours.

Stress-Free Cleanup: Cooking in a crockpot means fewer dishes, so you can focus on enjoying the festivities!

For a delicious alternative treat, check out my Sweet Hawaiian Crockpot recipe—it’s just as easy and satisfying!

Crockpot Christmas Crack Ingredients

Making this delightful Crockpot Christmas Crack is as easy as gathering a few simple ingredients!

For the Chocolate Base

  • White Chocolate Almond Bark – Provides a sweet base; look for variations labeled as vanilla candy coating for a lovely twist.
  • Semi-Sweet Chocolate Chips – Adds richness and depth of flavor to balance the sweetness of the almond bark.
  • Chocolate Bar or Chocolate Bark – Enhances the chocolate flavor; choose your favorite variety for a personal touch.

For the Crunch

  • Salted Dry Roasted Peanuts – The key ingredient for that perfect sweet and salty bite; feel free to use unsalted peanuts for a healthier option.

For the Finishing Touch

  • Sprinkles (optional) – Add a pop of color and fun to your festive candy; they make great decorations for gifting.

Step‑by‑Step Instructions for Crockpot Christmas Crack

Step 1: Prepare the Crockpot
Start by greasing your crockpot with a non-stick spray or lining it with parchment paper to ensure easy cleanup. This simple prep step will save you time and effort later on. Set your crockpot aside while you gather the other ingredients for your Crockpot Christmas Crack.

Step 2: Layer the White Chocolate
Place the white chocolate almond bark at the bottom of your prepared crockpot. This will serve as the sweet base for your holiday treat. Break the bark into smaller pieces if necessary, allowing it to melt evenly as it heats.

Step 3: Add Chocolate and Peanuts
Next, sprinkle the semi-sweet chocolate chips and pieces of chocolate bar over the white chocolate layer. Then, add the salted dry roasted peanuts on top. The combination of chocolates and peanuts will create a delightful balance of flavors in your Crockpot Christmas Crack.

Step 4: Cook on Low
Cover the crockpot with its lid and set it to cook on low for 1 hour. Resist the temptation to stir during this time; allowing the chocolates to melt undisturbed will create a smoother, creamier texture. You’ll know it’s ready when the chocolates appear melted and glossy.

Step 5: Stir to Combine
After 1 hour, carefully remove the lid and stir the mixture gently with a spatula until all the chocolates have melted and thoroughly coated the peanuts. If you notice any chunks of unmelted chocolate, cover and cook for an additional 10 to 15 minutes, then check again.

Step 6: Scoop Clusters onto Sheets
Using a cookie scoop or a tablespoon, carefully drop clusters of the chocolate-peanut mixture onto parchment-lined baking sheets. The clusters should be about 1-inch apart to allow for some spreading. This step gives your Crockpot Christmas Crack its signature look.

Step 7: Add Sprinkles (Optional)
While the chocolate is still warm and soft, feel free to sprinkle colorful decorations on top of each cluster for a festive touch. This adds an extra layer of fun to your candy, making it perfect for holiday gifting or gatherings.

Step 8: Cool and Store
Allow the clusters to cool completely at room temperature until they firm up. Once set, transfer your delicious Crockpot Christmas Crack to an airtight container. Store it at room temperature for 2-3 weeks, or refrigerate for longer freshness. Enjoy the seasonal goodness!

Make Ahead Options

These Crockpot Christmas Crack clusters are perfect for meal prep enthusiasts looking to save time during the bustling holiday season! You can prepare the chocolate mixture and layer it in the crockpot up to 24 hours in advance—simply cover it and refrigerate until you’re ready to cook. When it’s time to finish, just follow the cooking instructions without needing to start from scratch! To maintain quality, avoid stirring during the first hour of cooking, which helps achieve that silky-smooth texture. Once your clusters are cooled and set, store them in an airtight container where they’ll stay fresh for 2-3 weeks, making this treat a convenient, stress-free addition to your holiday festivities!

What to Serve with Crockpot Christmas Crack

Elevate your holiday gatherings by pairing delightful flavors that complement the sweet and salty crunch of this irresistible candy.

  • Festive Fruit Platter: Fresh fruits like strawberries and apples offer a refreshing contrast, balancing the rich chocolate experience while adding a pop of color to your table.

  • Cheese Board: A selection of sharp cheeses can create a lovely contrast to the sweetness of the Crockpot Christmas Crack, enhancing the overall flavor profile of your dessert spread.

  • Hot Cocoa Bar: Warm cups of hot cocoa topped with whipped cream create a cozy atmosphere, perfect for savoring alongside your chocolatey treat on chilly evenings.

  • Salted Caramel Sauce: Drizzle this luscious sauce over the Christmas Crack or serve it alongside as a dip, deepening the indulgence with its sweet and salty harmony.

  • Christmas Sugar Cookies: These buttery delights are a holiday classic and pair wonderfully with the crunchy textures and flavors of the candy, adding a cheerful spirit to dessert time.

  • Spiced Apple Cider: Offering warmth and spice, a cup of this festive drink complements the flavors of chocolate while enhancing the overall holiday experience.

  • Peppermint Hot Chocolate: Enhance the Christmas vibe further by serving this sweet, minty take on a classic drink, which perfectly echoes the festive spirit of your Crockpot Christmas Crack.

  • Chocolate-Covered Pretzels: The salty crunch of these treats reflects the savory elements of your Christmas Crack while offering another layer of chocolatey goodness to enjoy.

  • Ice Cream Sundae Bar: Turn dessert into an interactive experience by setting up a sundae station with vanilla ice cream, allowing guests to create decadent bowls to accompany their candy.

Creating magical holiday moments is easy with these delightful pairings that ensure your Crockpot Christmas Crack shines brightly at any occasion!

How to Store and Freeze Crockpot Christmas Crack

Room Temperature: Store your Crockpot Christmas Crack in an airtight container at room temperature for up to 2-3 weeks, keeping it fresh for your holiday indulgence.

Fridge: For extended freshness, you can refrigerate the candy, where it will stay good for up to a month—just be sure it’s in a sealed container to maintain its delightful texture.

Freezer: If you’re looking to save some for later, freeze the clusters in a single layer, then transfer them to a freezer-safe bag. They can last for up to 3 months.

Reheating: If your frozen Crockpot Christmas Crack gets too hard, allow it to thaw in the fridge overnight before enjoying, so it’s just right for your sweet cravings!

Expert Tips for Crockpot Christmas Crack

  • No Stirring Initially: Avoid stirring for the first hour! This ensures the chocolate melts evenly and achieves a smooth texture in your Crockpot Christmas Crack.

  • Chill if Necessary: If the mixture turns out too soft, simply pop it in the refrigerator for about 30 minutes to firm up before scooping.

  • Healthy Substitution: For a healthier twist, consider using unsalted peanuts instead of salted ones. This can help balance the sweetness while still providing that satisfying crunch.

  • Slow Melting Magic: Patience is key! Resist the urge to crank up the heat. Melting chocolate slowly prevents burning and maintains the creamy consistency you’ll desire in your candy.

  • Customize Your Crunch: Don’t hesitate to mix things up! Swap out peanuts for other nuts like almonds or pecans, or toss in dried fruits for an extra layer of flavor in your Crockpot Christmas Crack.

Crockpot Christmas Crack Variations

Feel free to customize this delightful recipe to suit your taste buds, and let your creativity shine!

  • Nutty Variations: Swap peanuts with almonds or pecans for a different flavor profile. Each nut brings a unique crunch and taste that elevates every bite.

  • Fruity Twist: Add dried cranberries or cherries for a tart contrast that beautifully complements the richness of chocolate. The mix of fruity flavors will add a refreshing zing to your treat.

  • Flavored Chocolates: Try using mint or orange chocolate for a fragrant twist on this classic. The infused aromas will transport your taste buds to a festive wonderland.

  • Gluten-Free Delight: If you’re avoiding gluten, just ensure all chocolate and ingredients are gluten-free for a safe, yet indulgent treat everyone can enjoy.

  • Heat Things Up: Incorporate a sprinkle of cayenne pepper or chili powder in your chocolate mix for a surprising kick. This unexpected heat adds a fabulous depth of flavor that contrasts perfectly with the sweetness.

  • Vegan Option: Substitute the chocolate components with dairy-free chocolate chips and use nuts or pumpkin seeds instead of peanuts for a delicious vegan holiday treat.

  • Festive Sprinkles: Elevate your presentation with holiday-themed sprinkles. These colorful additions will make your clusters eye-catching and festive—perfect for gifting.

For an alternative treat idea, consider my Sweet Hawaiian Crockpot recipe, which offers a satisfying savory twist for your holiday gatherings!

Crockpot Christmas Crack Recipe FAQs

Is it important to use specific chocolate for the Crockpot Christmas Crack?
Absolutely! Using high-quality white chocolate almond bark and semi-sweet chocolate chips will enhance the flavor and texture of your Crockpot Christmas Crack. Look for almond bark labeled as vanilla candy coating for a sweeter base. If you prefer to use a chocolate bar, choose one that you love to eat, as it will significantly impact the final taste.

How should I store Crockpot Christmas Crack to keep it fresh?
For best results, store your Crockpot Christmas Crack in an airtight container at room temperature for 2-3 weeks. If you’d like to keep it fresh even longer, refrigerate it in a sealed container, where it can stay good for up to a month. Remember to let it reach room temperature before enjoying for the best texture!

Can I freeze Crockpot Christmas Crack?
Yes, you can freeze it! To do so, place the clusters in a single layer on a baking sheet and freeze them until solid. Then, transfer the hardened clusters into a freezer-safe bag, making sure to remove as much air as possible. They can last for up to 3 months in the freezer. To enjoy, thaw in the refrigerator overnight—simple and effective!

What if my Crockpot Christmas Crack didn’t set properly?
If your mix is too soft or gooey, don’t worry! Just pop the clusters into the refrigerator for about 30 minutes to firm up. Additionally, ensure you didn’t rush the melting process by using high heat as that might affect the texture. Patience with the low setting on your crockpot is key!

Are there any dietary considerations with Crockpot Christmas Crack?
Certainly! For those with nut allergies, you can avoid peanuts and substitute them with your favorite seeds, like pumpkin or sunflower seeds, to keep the crunch without the allergens. Also, using unsalted peanuts will make the treat a bit healthier without compromising on flavor.

What types of variations can I make with this recipe?
The beauty of Crockpot Christmas Crack lies in its versatility! Feel free to skip the peanuts entirely or swap them for almonds or pecans. You can even mix in dried fruits, such as cranberries or cherries, for a burst of tartness. For an exciting twist, try using flavored chocolates like mint or orange for unique seasonal flavors.

Crockpot Christmas Crack

Deliciously Easy Crockpot Christmas Crack for Sweet Moments

Discover the joy of making Crockpot Christmas Crack, an effortless blend of sweet and salty flavors perfect for the holiday season.
Prep Time 15 minutes
Cook Time 1 hour
Cooling Time 30 minutes
Total Time 1 hour 45 minutes
Servings: 12 clusters
Course: Dessert
Cuisine: American
Calories: 150

Ingredients
  

Chocolate Base
  • 1 lb White Chocolate Almond Bark Look for variations labeled as vanilla candy coating for a lovely twist.
  • 1 cup Semi-Sweet Chocolate Chips Adds richness and depth of flavor.
  • 4 oz Chocolate Bar or Chocolate Bark Choose your favorite variety for a personal touch.
Crunch Ingredients
  • 2 cups Salted Dry Roasted Peanuts Feel free to use unsalted peanuts for a healthier option.
Finishing Touch
  • to taste Sprinkles Add a pop of color and fun for gifting.

Equipment

  • Crockpot
  • Baking Sheets
  • Parchment paper
  • Cookie Scoop

Method
 

Preparation
  1. Grease your crockpot with non-stick spray or line it with parchment paper to ensure easy cleanup.
  2. Place the white chocolate almond bark at the bottom of your prepared crockpot.
  3. Next, sprinkle semi-sweet chocolate chips and pieces of chocolate bar over the white chocolate layer.
  4. Then, add the salted dry roasted peanuts on top for balance.
  5. Cover and cook on low for 1 hour without stirring.
  6. After 1 hour, remove the lid and stir gently until melted and coated.
  7. Scoop clusters onto parchment-lined baking sheets, about 1-inch apart.
  8. While still warm, add sprinkles on top of each cluster.
  9. Let cool completely at room temperature before transferring to an airtight container.

Nutrition

Serving: 1clusterCalories: 150kcalCarbohydrates: 15gProtein: 3gFat: 9gSaturated Fat: 4gPolyunsaturated Fat: 2gMonounsaturated Fat: 2gSodium: 120mgPotassium: 90mgFiber: 1gSugar: 10gCalcium: 2mgIron: 2mg

Notes

Store at room temperature for 2-3 weeks, in the fridge for up to a month, or freeze for later use.

Tried this recipe?

Let us know how it was!

Little Debbie Christmas Cake Balls – No-Bake Festive Delight

As I sift through my favorite holiday memories, the smell of sweet vanilla and chocolate always pulls me back. This festive season, I can’t resist making Little Debbie Christmas Cake Balls, the ultimate no-bake dessert that brings a touch of nostalgia to every gathering. These scrumptious little treats combine a delightful crunch with a creamy, melt-in-your-mouth filling that’s sure to win over both friends and family. Not only are they incredibly easy to whip up, but they also make for a show-stopping centerpiece at holiday parties or cookie exchanges. And did I mention they’re perfect for busy bakers? With just a few simple ingredients, you’ll have these festive gems ready in no time! So, who’s ready to indulge in a little holiday nostalgia with me?

Why Make Little Debbie Cake Balls?

Ease of Preparation: No-bake means you can whip these up without heating the oven, making them perfect for busy days during the holidays!
Nostalgic Flavor: Reminiscent of childhood, these cake balls evoke fond memories with every bite, delighting all generations.
Versatile Decoration: Customize with your favorite sprinkles or colored drizzles; the possibilities are endless!
Perfect for Sharing: Great for parties, cookie exchanges, or simply to brighten up your dessert table. Check out my easy Strawberry Cheesecake Bars and Sriracha Glazed Meatballs for more festive ideas!
Make-Ahead Delight: Prep in advance to save time; these can be made several days ahead and stored.

Little Debbie Christmas Cake Balls Ingredients

• A delightful treat for the holidays!

For the Cake Balls
Vanilla Little Debbie Christmas Tree Cakes – The sweet base that provides nostalgic flavor; feel free to use any cupcake or cake mix if needed.
Cream Cheese – This binds the mixture and adds moisture, but mascarpone works beautifully as a substitute for a richer taste.

For the Coating
White Candy Melts – Creates a smooth chocolate-like shell, but you can swap it with white chocolate for extra decadence.
Red Candy Melts (optional) – Perfect for adding a festive touch; use any leftover melting chocolate for creative decorations.

For the Decoration
Red and Green Colored Sanding Sugar – Adds a fun, festive look; any holiday-themed sprinkles make a terrific alternative.

Step‑by‑Step Instructions for Little Debbie Christmas Cake Balls

Step 1: Prepare Baking Sheet
Begin by lining a baking sheet with waxed paper. This will serve as a non-stick surface for your Little Debbie Christmas Cake Balls after dipping. Make sure the paper is smooth and fully covers the sheet for easy removal later.

Step 2: Mix Ingredients
In a large mixing bowl, crumble the Vanilla Little Debbie Christmas Tree Cakes into fine pieces. Add softened cream cheese and mix thoroughly with a hand mixer or spatula until the mixture is well combined and smooth, resembling a sticky dough. This should take about 2-3 minutes.

Step 3: Form Balls
Using a small cookie scoop, portion the cake mixture and roll it into 1-inch balls with your hands. Arrange them on the prepared baking sheet, leaving some space between each ball for easy handling. If the mixture is too soft, consider placing the formed balls in the freezer for about 15 minutes to firm up.

Step 4: Melt Coating
Take the white candy melts and place them in a microwave-safe bowl. Microwave in 30-second intervals, stirring in between, until the melts are completely smooth and melted, which should take about 1-2 minutes. If the consistency appears too thick, add a small amount of shortening to achieve a silky texture.

Step 5: Coat Cake Balls
Once the candy coating is ready, dip each cake ball into the melted coating using a fork or a toothpick. Allow the excess coating to drip off by gently tapping the fork against the bowl. Place each coated ball back onto the lined sheet, maintaining their shape and shiny exterior.

Step 6: Decorate
While the coating is still wet, immediately sprinkle the coated Little Debbie Christmas Cake Balls with red and green sanding sugar or drizzle with melted red candy for an extra festive touch. This adds both color and a fun crunch to your holiday treats.

Step 7: Chill
Finally, refrigerate the cake balls for at least 1 hour, or until they are firm to the touch. This chilling time allows the coating to set perfectly, creating that delightful crunch when you take a bite. Once firm, your Little Debbie Christmas Cake Balls are ready to serve!

How to Store and Freeze Little Debbie Christmas Cake Balls

Fridge: Store your Little Debbie Christmas Cake Balls in an airtight container in the refrigerator for up to 1 week to keep them fresh and flavorful.

Freezer: For longer storage, freeze the cake balls by placing them in a single layer on a baking sheet until solid, then transfer to a freezer-safe container for up to 3 months.

Reheating: When you’re ready to enjoy, simply thaw in the fridge overnight; there’s no need to heat these no-bake treats!

Make-Ahead: These cake balls can be made several days in advance, making them a fantastic option for busy holiday preparations.

What to Serve with Little Debbie Christmas Cake Balls?

Embrace the joy of the season by creating a delicious spread around these delightful treats that everyone will love.

  • Festive Fruit Platter: A colorful assortment of seasonal fruits like cranberries, oranges, and apples offers a refreshing contrast to the rich sweetness of the cake balls. This pairing provides a bright and zesty pop that balances the dessert’s flavors beautifully.

  • Spiced Hot Chocolate: Rich, creamy hot chocolate infused with cinnamon and a hint of nutmeg creates a cozy, warming beverage perfect for sipping alongside these treats. It adds a nostalgic touch, reminding us of chilly winter nights spent indoors.

  • Holiday Cheeseboard: A selection of cheeses, crackers, and festive nuts enhances the dessert experience with diverse textures and savory bites. The creaminess of soft cheeses pairs well with the sweetness of the cake balls, creating a delightful taste duo.

  • Peppermint Bark: This crunchy, chocolatey treat brings peppermint’s refreshing zing, perfectly complementing the soft and creamy interior of the cake balls. It’s a classic holiday favorite that adds an extra touch of festivity.

  • Buttery Sugar Cookies: Soft, melt-in-your-mouth sugar cookies with a sprinkle of holiday-themed decorations serve as a sweet counterpart. The buttery flavor echoes through the table, enhancing the festive spirit.

  • Gingerbread Latte: A warm, spiced gingerbread latte makes for an indulgent drink pairing. The comforting spices found in the latte enhance the nostalgic flavors of the cake balls.

  • Vanilla Bean Ice Cream: A scoop of rich vanilla ice cream brings a creamy cold element that melts into the sweetness, offering a heavenly contrast. Imagine the delightful mingling of flavors with every bite!

  • Mulled Wine: A fragrant glass of mulled wine, warm with spices like cloves and star anise, creates an inviting atmosphere while perfectly complementing the rich chocolate coating of the cake balls.

  • Chocolate-Covered Pretzels: The combination of sweet and salty in chocolate-covered pretzels provides a crunchy texture that balances the softness of the cake balls, making for an irresistible snack mix.

  • Caramel Sauce: A drizzle of warm caramel sauce adds an extra layer of sweetness, inviting you to enjoy these cake balls as a decadent treat fit for any celebration.

Little Debbie Christmas Cake Balls Variations

Feel free to let your creativity shine as you make these delightful cake balls your own!

  • Chocolate Cake Balls: Swap vanilla Little Debbie Cakes for chocolate ones to intensify that chocolaty flavor.

  • Creamy Twist: Substitute cream cheese with mascarpone for an even silkier, richer taste. The difference is subtle but oh-so-enjoyable!

  • Colored Melts Variety: Try out different colors of candy melts to match any holiday theme, making these treats perfect for all celebrations.

  • Nutty Crunch: Add chopped walnuts or almonds to the mixture for a delightful crunch. This little twist brings in texture that beautifully contrasts the creamy filling.

  • Peppermint Surprise: Mix in crushed peppermint candies for a refreshing burst of flavor. The cool mint will dance on your taste buds, making these cake balls truly festive.

  • Extra Dekor: Drizzle some melted dark chocolate over the coated balls for a stunning presentation. It not only looks pretty but adds a delightful flavor layer, reminiscent of a classic truffle.

  • Mini Treats: Roll the mixture into smaller balls for bite-sized delights, perfect for sharing at a party or wrapping them as gifts. These tiny treats pack all the flavor in half the size!

For more festive dessert ideas, check out my delicious Cookies Cream Cheesecake or indulge in some scrumptious Buttermilk Pancakes that can easily grace any holiday brunch table. Happy baking!

Make Ahead Options

These Little Debbie Christmas Cake Balls are perfect for busy home cooks looking to simplify their holiday preparations! You can prepare the cake ball mixture and form the balls up to 24 hours in advance, just be sure to refrigerate them until you’re ready to coat. For the best results, store the uncoated cake balls in an airtight container. When you’re ready to serve, simply melt your candy melts, coat the chilled balls, and decorate them for that festive touch! This way, you’ll have a delightful dessert ready for any occasion, allowing you to enjoy the holiday festivities with ease and joy.

Helpful Tricks for Little Debbie Christmas Cake Balls

  • Chilling Time Matters: Refrigerating the cake balls for at least an hour helps them firm up, ensuring a delightful crunch with each bite.
  • Smooth Dipping: For an even coating, make sure the candy melts are fully melted and smooth; add shortening if needed for the best consistency.
  • Portion Control: Use a cookie scoop to maintain uniform size and even baking, which makes presentation look professional and appealing.

Little Debbie Christmas Cake Balls Recipe FAQs

What type of vanilla Little Debbie cakes should I use?
For this recipe, I recommend using Vanilla Little Debbie Christmas Tree Cakes as they provide the perfect nostalgic flavor. However, if you can’t find them, any similar moist cupcake or cake mix will also work beautifully!

How should I store Little Debbie Christmas Cake Balls?
To keep your Little Debbie Christmas Cake Balls fresh, place them in an airtight container and store them in the refrigerator for up to 1 week. If you want to prepare ahead, make sure to label the container with the date, so you know when to enjoy them!

Can I freeze Little Debbie Christmas Cake Balls?
Absolutely! To freeze them, place the cake balls in a single layer on a baking sheet and freeze until they are solid. Then, transfer them to a freezer-safe container or a resealable bag, where they will last for up to 3 months. When you’re ready to enjoy, simply thaw them in the fridge overnight before serving.

What if my candy melts are too thick?
If your candy melts don’t melt smoothly, don’t worry! Simply add a small amount of vegetable shortening or coconut oil to the melted mixture, stirring until you reach a silky, pourable consistency. This will ensure a smooth coating when dipping your cake balls.

Are these Little Debbie Christmas Cake Balls safe for pets?
No, it’s important to keep these treats away from pets, as chocolate and many sugary ingredients can be harmful to them. Be sure to store the cake balls securely out of their reach and enjoy them yourself!

What can I do if my cake balls fall apart during coating?
If your cake balls are too soft and tend to fall apart during the coating process, pop them in the freezer for about 15 minutes before dipping. This will firm them up and make them easier to handle. Remember, a little patience goes a long way in ensuring a perfect finish!

Little Debbie Christmas Cake Balls

Little Debbie Christmas Cake Balls – No-Bake Festive Delight

Enjoy nostalgic Little Debbie Christmas Cake Balls, perfect no-bake treats for holiday gatherings that combine vanilla and chocolate flavors.
Prep Time 20 minutes
Chilling Time 1 hour
Total Time 1 hour 20 minutes
Servings: 12 cake balls
Course: Dessert
Cuisine: American
Calories: 120

Ingredients
  

For the Cake Balls
  • 1 box Vanilla Little Debbie Christmas Tree Cakes The sweet base that provides nostalgic flavor; feel free to use any cupcake or cake mix if needed.
  • 8 oz Cream Cheese This binds the mixture and adds moisture; mascarpone works beautifully as a substitute.
For the Coating
  • 12 oz White Candy Melts Creates a smooth chocolate-like shell; can swap with white chocolate for extra decadence.
  • 4 oz Red Candy Melts Optional for adding a festive touch; use any leftover melting chocolate for decorations.
For the Decoration
  • 1 cup Red and Green Colored Sanding Sugar Adds a fun, festive look; any holiday-themed sprinkles make a terrific alternative.

Equipment

  • large mixing bowl
  • Cookie Scoop
  • Microwave-safe bowl
  • Baking Sheet

Method
 

Step-by-Step Instructions for Little Debbie Christmas Cake Balls
  1. Begin by lining a baking sheet with waxed paper for a non-stick surface for your cake balls.
  2. In a large bowl, crumble the Vanilla Little Debbie Christmas Tree Cakes into fine pieces and mix with softened cream cheese until smooth.
  3. Using a small cookie scoop, portion the mixture and roll it into 1-inch balls, placing them on the prepared sheet.
  4. Melt the white candy melts in a microwave-safe bowl for 1-2 minutes until smooth, adding shortening if needed.
  5. Dip each cake ball into the melted coating using a fork, allowing excess to drip off before placing back on the sheet.
  6. Sprinkle coated balls with red and green sanding sugar or drizzle with melted red candy.
  7. Refrigerate for at least 1 hour until firm, allowing the coating to set perfectly.

Nutrition

Serving: 1cake ballCalories: 120kcalCarbohydrates: 16gProtein: 2gFat: 6gSaturated Fat: 4gMonounsaturated Fat: 2gCholesterol: 15mgSodium: 80mgPotassium: 50mgSugar: 10gVitamin A: 300IUCalcium: 40mgIron: 0.5mg

Notes

These cake balls can be made several days in advance for busy holiday preparations. Store in an airtight container in the refrigerator for up to 1 week or freeze for up to 3 months.

Tried this recipe?

Let us know how it was!

Easy Saltine Cracker Toffee: Sweet & Salty Holiday Bliss

As the aroma of caramelized sugar wafts through my kitchen, I can’t help but feel the warm embrace of the holiday season. This 4-Ingredient Christmas Crack, or Saltine Cracker Toffee, is an unexpected delight that marries the sweet and salty in a way that truly captivates the heart. It’s a quick and easy recipe that comes together without any fuss, making it perfect for busy home chefs looking to whip up a festive treat. Plus, this no-bake dessert is perfect for sharing; everyone loves the crunchy saltines enveloped in buttery toffee and topped with silky dark chocolate. Whether it’s for a cheerful holiday gathering or just a little indulgence for yourself, this Christmas Crack will undoubtedly become a festive favorite. Are you ready to make a batch and watch it disappear?

Why is Saltine Cracker Toffee a Must-Try?

Easy to Prepare: With just 4 ingredients, this recipe is a breeze for anyone who loves homemade treats.

Sweet and Salty: The perfect balance of flavors creates a deliciously addictive snack that will tantalize your taste buds.

No-Bake Delight: An excellent option for those busy holiday seasons, this quick treat requires minimal effort and time.

Crowd Pleaser: Everyone loves it! Serve at parties, or package it as thoughtful gifts—you’re guaranteed smiles all around.

Customizable Fun: Feel free to experiment with toppings or swap chocolate types to create your unique twist on this classic!

Saltine Cracker Toffee Ingredients

• Prepare to make this festive treat with just 4 simple ingredients!

For the Toffee Mixture

  • Dark Brown Sugar – Provides a rich caramel flavor as it melts and thickens.
  • Butter – Adds creaminess and depth; using real butter elevates the taste.

For the Topping

  • Chocolate Chips – Creates a luscious layer that beautifully complements the salty base.
  • Saltine Crackers – The crunchy foundation of this delightful treat; feel free to swap for graham crackers for a twist!

Step‑by‑Step Instructions for Saltine Cracker Toffee

Step 1: Preheat Oven
Begin by preheating your oven to 400°F (200°C). This will ensure that your Saltine Cracker Toffee bakes evenly and achieves the perfect golden hue. While the oven warms up, gather your ingredients and equipment, including a 9×13-inch baking pan, aluminum foil, and a saucepan.

Step 2: Prepare Pan
Line the 9×13-inch pan with aluminum foil, making sure to leave enough overhang to help lift out the finished dessert later. This easy step will prevent sticking and make cleanup a breeze. Smooth out the foil to avoid wrinkles, ensuring a neat finish for your Saltine Cracker Toffee.

Step 3: Layer Crackers
Lay a single, even layer of saltine crackers across the bottom of the prepared pan. The crackers should cover the entire surface without overlapping. This base will provide a delicious crunch and salty counterpoint to the sweet toffee that follows, making it the perfect start for your treat.

Step 4: Cook Mixture
In a medium saucepan, combine 1 cup of butter and 1 cup of dark brown sugar over medium heat. Stir continuously as the mixture comes to a rolling boil. Keep an eye on it, boiling for about 3 minutes until it thickens and takes on a shiny, caramel-like color, resembling melted magic in your pot.

Step 5: Pour Mixture
Remove the saucepan from heat and carefully pour the hot butter and sugar mixture over the layer of saltine crackers. Use a spatula to spread the toffee evenly across the crackers, ensuring every piece is generously covered. You’ll see the edges bubble slightly as the warmth of the toffee begins to work its magic.

Step 6: Bake
Place the pan in the preheated oven and bake for about 7 minutes. Watch closely as the mixture bubbles and turns lightly golden. The aroma that fills the kitchen will be irresistible, hinting at the delightful creation that is coming together in your oven.

Step 7: Add Chocolate
Once baked, remove the pan from the oven and immediately sprinkle a generous layer of chocolate chips over the hot toffee. Allow the heat to melt the chocolate for about 5 minutes, then use a spatula to gently spread it into an even layer. This silky chocolate topping will perfectly complement the buttery toffee and salty crackers.

Step 8: Cool and Serve
If desired, sprinkle chopped nuts or a pinch of sea salt on top for added flair. Allow your Saltine Cracker Toffee to cool at room temperature for about 30 minutes, then transfer it to the refrigerator for an additional hour to set fully. Once cooled, simply break it into pieces and savor the delightful combination of sweet and salty flavors.

Storage Tips for Saltine Cracker Toffee

Room Temperature: Store your Saltine Cracker Toffee in an airtight container at room temperature for up to 1 week for optimal taste and texture.

Fridge: If you prefer, refrigerate the toffee for longer freshness. It can last up to 2 weeks when stored in an airtight container, but allow it to return to room temperature before serving for the best flavor.

Freezer: For longer storage, wrap the toffee tightly in plastic wrap and then place it in a freezer-safe container. It can be frozen for up to 3 months. Thaw in the fridge before enjoying.

Reheating: There’s no need to reheat; simply serve it chilled or at room temperature. For a delicious twist, you can briefly microwave individual pieces to warm and soften the chocolate layer!

Expert Tips for Saltine Cracker Toffee

  • Patience Pays Off: Allow your butter and sugar mixture to boil for the full 3 minutes. Rushing this step can result in a grainy texture instead of the desired smooth toffee.

  • Thorough Coating: Ensure every cracker is generously covered with the toffee mixture. If some crackers are left bare, they won’t reach the delightful sweet-salty balance that defines Saltine Cracker Toffee.

  • Perfectly Melting Chocolate: For the best chocolate layer, let the chocolate chips sit on the hot toffee for a few minutes before spreading. This gentle melting ensures an even, glossy finish.

  • Cooling Technique: Allow the toffee to cool completely in the refrigerator after baking. This helps it set properly and makes breaking it into pieces easier.

  • Customize Wisely: If experimenting with substitutions, be mindful of the flavor balance. Certain nuts or flavored chocolates can enhance your Saltine Cracker Toffee but may alter its classic taste.

Saltine Cracker Toffee Variations

Feel free to explore the delightful possibilities and personalize your Christmas Crack with these fun variations!

  • Dairy-Free: Replace butter with coconut oil for a dairy-free version that still has a rich flavor.

  • Nutty Twist: Add chopped pecans or walnuts on top of the melted chocolate for an irresistible crunch. The nutty flavors pair beautifully with the sweet toffee.

  • Spicy Kick: Sprinkle a dash of cayenne pepper or chili powder on the melted chocolate for a surprising heat contrast. This unique twist will awaken your taste buds!

  • Sugar-Free: Swap the brown sugar for a sugar substitute like erythritol to make a low-calorie version. It allows you to indulge without the sugar rush!

  • Minty Fresh: Mix in crushed peppermint candies on top of the melted chocolate for a festive holiday flavor that’s simply refreshing.

  • Flavorful Layers: Use flavored chocolate chips, like orange or raspberry, for a fruity twist that adds depth to this classic treat.

  • Caramel Drizzle: Drizzle melted caramel over the chocolate layer for a double dose of sweet indulgence. It’s an extra treat that everyone will love.

  • Crunchy Pretzel Base: Swap saltines for pretzels to create a deliciously crunchy base that adds a salty twist to the sweetness. The combination of flavors will leave your guests craving more.

Feel free to mix and match ideas to create your own sweet masterpiece! And if you’re looking for more inspiration, check out how to make Dark Chocolate Bourbon Pecan Tart or try a batch of Almond Joy Bark for some delightful sweetness this holiday season.

Make Ahead Options

These festive Saltine Cracker Toffee treats are perfect for meal prep! You can prepare the toffee mixture and layer the saltine crackers up to 24 hours in advance, storing them covered at room temperature. Just make sure to keep them away from moisture to prevent sogginess. When you’re ready to enjoy, simply bake them as instructed and top with the melted chocolate. For those aiming to save even more time, the finished Saltine Cracker Toffee can be stored in an airtight container in the refrigerator for up to 3 days. This makes it an ideal option for busy home cooks who want to impress without the last-minute rush—just as delicious as when freshly made!

What to Serve with 4-Ingredient Christmas Crack?

As you dive into this sweet and salty delight, why not create a full festive experience with complementary dishes that will take your holiday gathering to the next level?

  • Creamy Hot Chocolate: Rich and velvety, this drink warms the soul and pairs beautifully with the buttery toffee flavors.

  • Crunchy Snow Pea Salad: Tossed with a zesty lemon vinaigrette, this refreshing salad offers a crisp contrast to the sweet treat.

  • Chilled Eggnog: The creamy, spiced flavors of eggnog elevate the festive mood and enhance the indulgence of your Christmas Crack.

  • Festive Cheese Platter: A selection of sharp cheeses with apples and nuts provides a savory balance between the sweet and salty toffee.

  • Mini Gingerbread Cookies: These spiced treats bring a nostalgic holiday flavor that complements the sweet and salty notes in your Saltine Cracker Toffee.

  • Sparkling Cider: A bubbly, non-alcoholic option that adds a festive touch and refreshes the palate between bites of your decadent toffee.

  • Chocolate Dipped Fruits: These treats introduce a fruity freshness, enhancing the delightful duo of sweet chocolate and salty toffee.

  • Nutty Biscotti: Perfect for dipping into your coffee or tea, these cookies offer a crunchy texture that plays nicely with the melt-in-your-mouth toffee.

  • Cinnamon Sugar Puff Pastry Twists: These flaky delights bring warmth and spice to your dessert table, creating a cozy contrast to the toffee’s flavors.

Saltine Cracker Toffee Recipe FAQs

How do I choose the right saltine crackers?
Absolutely! Select a box of saltine crackers that looks fresh and has no visible signs of damage. Look for crackers that are crispy and intact without any dark spots or stale texture. If you’re in a pinch, you can also try using graham crackers or pretzels for a delightful twist.

How should I store leftover Saltine Cracker Toffee?
Storing your Saltine Cracker Toffee is easy! Keep it in an airtight container, at room temperature, where it will stay fresh for up to one week. If you want it to last longer, refrigerate it for up to 2 weeks. Just remember to let it come back to room temperature before serving to regain its delightful crunch.

Can I freeze Saltine Cracker Toffee?
Yes, you can! For longer storage, wrap the cooled toffee tightly in plastic wrap, then place it in a freezer-safe container or a heavy-duty freezer bag. It can be frozen for up to 3 months. When you’re ready to enjoy it, simply thaw it in the fridge overnight before indulging. This will keep the flavors intact and the texture delightful.

What should I do if my toffee doesn’t set properly?
If your toffee isn’t setting, don’t worry! It might need additional cooling time in the refrigerator. Try leaving it in the fridge for an extra hour. If the texture remains gooey, it may not have boiled long enough before baking. Be sure to stir continuously and allow it to reach that rolling boil for about 3 minutes to promote proper caramelization in future attempts.

Are there any dietary considerations with this recipe?
Very! Since this recipe contains butter and chocolate, it’s not suitable for vegan diets. However, you can substitute with vegan margarine and dairy-free chocolate for a plant-based version. If allergies are a concern, be sure to check the packaging for potential allergens, such as gluten in the saltines or nuts in any toppings you choose to add.

How can I make my Saltine Cracker Toffee even more flavorful?
The more the merrier! You can tweak this classic recipe by adding a sprinkle of sea salt on top after adding the chocolate or incorporating chopped nuts like pecans or walnuts for a crunchy texture. Experimenting with different types of chocolate, such as dark, milk, or white, can also offer a unique flavor profile for your Saltine Cracker Toffee!

Feel free to dive into these tips and trick next time you whip up this holiday favorite!

Saltine Cracker Toffee

Easy Saltine Cracker Toffee: Sweet & Salty Holiday Bliss

This Saltine Cracker Toffee is a quick and delightful dessert that combines sweet and salty flavors for the perfect holiday treat.
Prep Time 10 minutes
Cook Time 7 minutes
Cooling Time 1 hour 30 minutes
Total Time 1 hour 47 minutes
Servings: 12 pieces
Course: Dessert
Cuisine: American
Calories: 180

Ingredients
  

For the Toffee Mixture
  • 1 cup Butter Real butter gives the best flavor.
  • 1 cup Dark Brown Sugar Provides a rich caramel flavor.
For the Topping
  • 1 cup Chocolate Chips Use dark or semi-sweet as preferred.
  • 1 package Saltine Crackers Swap for graham crackers for a twist!

Equipment

  • 9x13 inch baking pan
  • Aluminum Foil
  • Saucepan

Method
 

Step-by-Step Instructions
  1. Preheat your oven to 400°F (200°C).
  2. Line the 9x13-inch pan with aluminum foil.
  3. Lay a single, even layer of saltine crackers across the bottom of the prepared pan.
  4. In a medium saucepan, combine butter and dark brown sugar over medium heat. Stir until mixture comes to a rolling boil.
  5. Remove from heat and pour the hot mixture over the saltine crackers.
  6. Bake for about 7 minutes until lightly golden.
  7. Sprinkle chocolate chips over the hot toffee and let them melt for about 5 minutes.
  8. Allow to cool at room temperature for about 30 minutes, then refrigerate for 1 hour to set.

Nutrition

Serving: 1pieceCalories: 180kcalCarbohydrates: 22gProtein: 1gFat: 9gSaturated Fat: 5gMonounsaturated Fat: 4gCholesterol: 20mgSodium: 100mgPotassium: 20mgSugar: 15gVitamin A: 300IUCalcium: 20mgIron: 0.5mg

Notes

Experiment with toppings or swap chocolate types for a unique twist.

Tried this recipe?

Let us know how it was!

Delicious Turkish Cauliflower Breakfast Hash for a Healthy Start

As I took a delicious whiff of spices wafting through my kitchen, I couldn’t help but smile at the cozy scene unfolding: a vibrant Turkish Cauliflower Breakfast Hash sizzling away in the skillet. This hearty dish combines crispy bacon, tender cauliflower, and perfectly cooked eggs, all wrapped in a unique blend of Turkish spices—perfect for kick-starting your day. This recipe isn’t just a low-carb delight; it’s a versatile breakfast that’s deceptively simple for busy mornings yet indulgent enough for those leisurely brunches with friends. Think it can’t get any better? Wait until you see just how quickly it comes together! Curious to dive into this morning masterpiece? Let’s get cooking!

Why is This Hash a Must-Try?

Flavorful Fusion: The Turkish Cauliflower Breakfast Hash brings together crispy bacon, veggies, and spices for a mouthwatering experience.
Low-Carb Option: Perfect for those on a keto diet, this dish satisfies without the carbs.
Quick to Prepare: It’s ready in no time, making it ideal for busy weekdays or relaxed weekends.
Versatile Base: Swap ingredients easily—try different cheeses or proteins like smoked salmon! If you love breakfast hashes, consider also checking out my delicious Overnight Croissant Breakfast.
Impressive Presentation: With a beautiful blend of colors and textures, it’s sure to wow your guests.
Comfort Food Appeal: This hearty meal combines comfort and nutrition, perfect for any occasion. Enjoy the delightful experience this recipe offers!

Turkish Cauliflower Breakfast Hash Ingredients

For the Spice Mix

  • Cumin – Adds warmth and depth; substitute with coriander for a milder flavor.
  • Black Ground Pepper – Enhances overall flavor; freshly ground offers the best taste.
  • Paprika – Provides sweetness and color; use smoked paprika for a deeper flavor.
  • Cayenne – Adds a hint of heat; omit if you prefer no spice.
  • Oregano – Contributes earthiness; Italian seasoning can be used as a substitute.
  • Dried Cilantro – Gives a fresh note; fresh cilantro is a suitable alternative.
  • Sumac – Offers a tangy flavor; lemon zest can be used for a similar effect.
  • Kosher Salt – Enhances flavors; adjust to taste based on dietary preferences.

For the Hash

  • Bacon (5 slices, cut into pieces) – Introduces savory richness and crispness; turkey bacon or a vegetarian alternative can be used.
  • Chopped Onion (⅓ cup) – Adds sweetness and depth; shallots can be substituted.
  • Chopped Red Pepper (⅓ cup) – Provides sweetness and color; any bell pepper works.
  • Cauliflower Florets (2 cups) – The base of the dish, adding volume; broccoli or zucchini can be substituted.
  • Water (3 tbsp) – Assists in cooking and steaming the vegetables.
  • Shredded Cheddar Cheese (¾ cup) – Adds creaminess and flavor; use a vegan cheese alternative for a dairy-free version.
  • Large Eggs (4) – Provides protein and a rich texture; use egg substitutes if desired.
  • Fresh Parsley (for garnish) – Adds freshness and color; other herbs can substitute as garnishes.

This Turkish Cauliflower Breakfast Hash is not only wholesome and nourishing but also ready to tantalize your taste buds!

Step‑by‑Step Instructions for Turkish Cauliflower Breakfast Hash

Step 1: Prepare the Spice Mix
In a small bowl, combine cumin, black pepper, paprika, cayenne, oregano, dried cilantro, sumac, and kosher salt to create a fragrant spice mix. Stir well to ensure even distribution and set aside. This enticing blend will infuse your Turkish Cauliflower Breakfast Hash with aromatic depth and flavor.

Step 2: Cook the Bacon
Preheat a large skillet over medium heat and add the chopped bacon pieces. Cook for about 5–7 minutes, stirring occasionally, until the bacon turns crispy and golden brown. Once done, carefully remove the bacon from the skillet, draining excess fat while leaving a little in the pan for flavor.

Step 3: Sauté Vegetables
In the same skillet with the leftover bacon fat, add the chopped onion, red pepper, and cauliflower florets. Sauté these vibrant vegetables for approximately 5 minutes until the onion is translucent and the cauliflower becomes slightly tender. Stir frequently to ensure even cooking and to prevent sticking.

Step 4: Season Cauliflower
Sprinkle 2 teaspoons of your prepared spice mix over the sautéed vegetables, stirring to coat them evenly. Add 2 tablespoons of water to help with steaming, then cover the skillet. Let the mixture cook for an additional 5 minutes, checking occasionally and adding more water as needed until the cauliflower is softened but not mushy.

Step 5: Cook the Eggs
Make four wells in the fragrant mixture of vegetables, then crack a large egg into each well. Sprinkle the shredded cheddar cheese on top, allowing it to melt as the eggs cook. Cover the skillet once again, and cook for about 5–8 minutes, or until the eggs reach your desired level of doneness.

Step 6: Garnish and Serve
Remove the skillet from heat and sprinkle fresh parsley over the top for a burst of color and freshness. Serve your delightful Turkish Cauliflower Breakfast Hash hot, either on its own or alongside avocado slices for an extra creamy touch.

What to Serve with Turkish Cauliflower Breakfast Hash

Elevate your breakfast game with delightful sides that perfectly complement this hearty dish and bring extra joy to your morning.

  • Avocado Slices: The creamy richness of avocado balances the flavors of the hash, adding a buttery texture that enhances each bite.

  • Fresh Salad: A crisp salad with mixed greens and a tangy vinaigrette brightens the meal, introducing a fresh crunch amid the savory hash.

  • Greek Yogurt: A dollop of cool Greek yogurt offers a creamy contrast, enhancing the dish’s flavors while adding a protein-packed element.

  • Roasted Tomatoes: Juicy roasted tomatoes bring a burst of sweetness and a hint of acidity, elevating the hash to new flavor heights.

  • Citrusy Fruit Salad: A vibrant fruit salad adds brightness and freshness, perfect for cleansing the palate after that hearty hash.

  • Herbed Feta: Crumbled herbed feta sprinkled on top offers a delightful salty kick, further enhancing the Turkish flavors in the dish.

  • Turkish Tea or Coffee: Pair with a warm cup of Turkish tea or strong coffee for the ultimate authentic experience that warms the soul.

Turkish Cauliflower Breakfast Hash: Customize Your Way!

Feel free to get creative and make this dish truly yours with these fun and easy variations!

  • Bacon Swap: Substitute bacon with smoked salmon or diced ham for a completely different taste experience. Each brings unique flavor nuances that can elevate your breakfast moment.
  • Green Boost: Toss in a handful of fresh spinach or kale while sautéing; they’ll add vibrant color and nutritional benefits, making your dish even heartier.
  • Cheese Surprise: Experiment with different cheeses; feta brings a delightful tang, while goat cheese adds creaminess. Just imagine the delightful contrast in every bite!
  • Add Heat: If you crave a kick, add some crushed red pepper flakes or sliced jalapeños. A little heat can enhance those lovely Turkish spices beautifully.
  • Herbal Twist: Fresh herbs like dill or mint can replace parsley for a refreshing twist that brightens up the flavors wonderfully.
  • Veggie Delight: Mix in some mushrooms or zucchini for added textures and flavors. These little additions can create an entirely new depth, making your hash even more satisfying.
  • Egg Variations: Swap out eggs for egg whites or try a chickpea scramble for a vegan alternative that still packs a punch. You can savor the comfort without sacrificing your dietary goals.

Feel inspired? Don’t forget to check out my scrumptious Overnight Croissant Breakfast for another creative breakfast option!

  • Sweet Twist: Craving something sweet? Serve your hash with a side of sautéed apples or a dollop of tzatziki for a sweet-savory combination.

Get ready to savor every customized bite of your Turkish Cauliflower Breakfast Hash!

Expert Tips for Turkish Cauliflower Breakfast Hash

  • Perfectly Softened Cauliflower: Make sure to steam the cauliflower until tender but not mushy—check frequently while cooking to achieve the ideal texture.
  • Egg Cooking Methods: For runny yolks, cover the pan and cook just until the whites are set; if you prefer firmer yolks, leave it on for a couple of extra minutes.
  • Prevent Sticking: Using a non-stick skillet will help the cheese melt without sticking—crucial for a beautiful presentation of your Turkish Cauliflower Breakfast Hash.
  • Bacon Alternatives: If you’re cooking for a vegetarian crowd, consider using tofu or tempeh; both will add a different but delicious savory element.
  • Freshness Matters: Garnish with fresh parsley or cilantro right before serving to enhance flavor and add visual appeal—fresh herbs can elevate any dish!
  • Adjustable Seasoning: Don’t hesitate to tweak the spice blend to suit your palate; every kitchen has its own unique preferences, so taste as you go!

How to Store and Freeze Turkish Cauliflower Breakfast Hash

Fridge: Store leftovers in an airtight container in the refrigerator for up to 3 days; reheat in the microwave or on the stovetop until warmed through.

Freezer: For long-term storage, freeze the hash in airtight containers for up to 3 months; thaw overnight in the fridge before reheating.

Reheating: When reheating, add a splash of water to maintain moisture, especially after freezing, and heat until the eggs are piping hot.

Make-Ahead Tip: You can prepare the Turkish Cauliflower Breakfast Hash a day in advance and refrigerate it; just reheat and add fresh garnishes before serving.

Make Ahead Options

Preparing the Turkish Cauliflower Breakfast Hash in advance is a wonderful strategy for busy mornings! You can chop the vegetables and cook the bacon up to 3 days ahead of time, storing them in airtight containers in the refrigerator. This not only saves you time but also ensures that the flavors meld beautifully. When you’re ready to serve, all you have to do is sauté the prepped veggies in a skillet, crack the eggs into the mixture, and sprinkle with cheese—cooking them to your preference. By following these steps, you’ll enjoy a delicious meal with minimal effort, all while keeping it just as delightful as if it were freshly made!

Turkish Cauliflower Breakfast Hash Recipe FAQs

How do I select the best cauliflower for this recipe?
Absolutely! When choosing cauliflower, look for firm, white heads without dark spots or blemishes. The florets should be compact and fresh-looking. A good cauliflower should feel heavy for its size, which indicates freshness.

How should I store leftovers of the Turkish Cauliflower Breakfast Hash?
Very! Store any leftovers in an airtight container in the refrigerator for up to 3 days. Make sure to let it cool to room temperature before sealing it, to avoid moisture buildup. You can reheat it in the microwave or on the stovetop until it’s heated through but remember to stir gently to maintain the texture.

Can I freeze the Turkish Cauliflower Breakfast Hash?
Absolutely! To freeze, allow the hash to cool completely. Then, portion it into airtight containers, leaving some space at the top for expansion. It can be stored in the freezer for up to 3 months. To reheat, thaw it overnight in the fridge and add a splash of water while reheating to avoid any dryness.

What if my cauliflower is too crunchy when cooking?
No worries! If your cauliflower isn’t tender after the initial cooking time, simply add a bit more water and cover the skillet to steam it further. Keep an eye on it, giving it an extra few minutes, and stir occasionally to ensure even cooking. You want it soft but not mushy!

Are there any dietary considerations for this dish?
Definitely! If you’re cooking for someone with food allergies, be mindful of substitutions. The dish contains bacon; turkey bacon or a vegetarian alternative can be used for a lighter option. Also, if you are avoiding dairy, consider using a vegan cheese substitute so everyone can enjoy this delicious Turkish Cauliflower Breakfast Hash. Enjoy and feel free to get creative with ingredients!

Turkish Cauliflower Breakfast Hash

Delicious Turkish Cauliflower Breakfast Hash for a Healthy Start

This Turkish Cauliflower Breakfast Hash combines crispy bacon, tender cauliflower, and spices for a nutritious start to your day.
Prep Time 15 minutes
Cook Time 20 minutes
Total Time 35 minutes
Servings: 4 servings
Course: Breakfast
Cuisine: Turkish
Calories: 300

Ingredients
  

For the Spice Mix
  • 1 tsp Cumin Can be substituted with coriander
  • 1 tsp Black Ground Pepper Freshly ground for best taste
  • 1 tsp Paprika Use smoked for deeper flavor
  • 1/4 tsp Cayenne Omit if no heat is desired
  • 1 tsp Oregano Italian seasoning can be a substitute
  • 1 tsp Dried Cilantro Fresh cilantro is an alternative
  • 1 tsp Sumac Lemon zest can substitute
  • 1/2 tsp Kosher Salt Adjust to taste
For the Hash
  • 5 slices Bacon Cut into pieces, turkey bacon can be used
  • 1/3 cup Chopped Onion Shallots can be substituted
  • 1/3 cup Chopped Red Pepper Any bell pepper works
  • 2 cups Cauliflower Florets Broccoli or zucchini can be substituted
  • 3 tbsp Water For cooking and steaming
  • 3/4 cup Shredded Cheddar Cheese Use vegan cheese for dairy-free option
  • 4 Large Eggs Egg substitutes can be used if desired
  • Fresh Parsley For garnish

Equipment

  • Skillet

Method
 

Step-by-Step Instructions
  1. In a small bowl, combine cumin, black pepper, paprika, cayenne, oregano, dried cilantro, sumac, and kosher salt to create a fragrant spice mix. Stir well to ensure even distribution and set aside.
  2. Preheat a large skillet over medium heat and add the chopped bacon pieces. Cook for about 5–7 minutes, stirring occasionally, until the bacon turns crispy and golden brown. Carefully remove the bacon from the skillet, draining excess fat while leaving a little in the pan.
  3. In the same skillet with the leftover bacon fat, add the chopped onion, red pepper, and cauliflower florets. Sauté these vibrant vegetables for approximately 5 minutes until the onion is translucent and the cauliflower becomes slightly tender.
  4. Sprinkle 2 teaspoons of your prepared spice mix over the sautéed vegetables, stirring to coat them evenly. Add 2 tablespoons of water to help with steaming, then cover the skillet. Cook for an additional 5 minutes, checking occasionally and adding more water as needed.
  5. Make four wells in the mixture, crack a large egg into each well, and sprinkle the shredded cheddar cheese on top. Cover the skillet and cook for about 5–8 minutes, or until the eggs reach your desired doneness.
  6. Remove the skillet from heat and sprinkle fresh parsley over the top. Serve hot, either on its own or with avocado slices.

Nutrition

Serving: 1servingCalories: 300kcalCarbohydrates: 15gProtein: 20gFat: 22gSaturated Fat: 8gPolyunsaturated Fat: 3gMonounsaturated Fat: 10gCholesterol: 200mgSodium: 600mgPotassium: 500mgFiber: 4gSugar: 4gVitamin A: 500IUVitamin C: 60mgCalcium: 300mgIron: 2mg

Notes

Store leftovers in an airtight container in the refrigerator for up to 3 days, or freeze for up to 3 months.

Tried this recipe?

Let us know how it was!

Irresistibly Gooey Caramel Ritz Christmas Cookies Recipe

As I unwrapped the first round of buttery Ritz crackers, their crisp sound mingled with the sweet aroma of caramel wafting from the stove, and I couldn’t help but smile. These Caramel Ritz Christmas Cookies are my secret weapon for the holiday season—a quick and easy dessert that pairs perfectly with festive gatherings! With gooey dulce de leche nestled between those iconic crackers and a decadent layer of chocolate, they’re not just a treat; they’re a little piece of joy that brings everyone together. Plus, you can whip them up in no time, making them an effortless crowd-pleaser that even fits a gluten-free lifestyle with simple substitutions. So, are you ready to dive into a holiday baking adventure that will have your loved ones reaching for seconds? Let’s get started!

Why are these cookies a holiday favorite?

Quick and Easy: With just a few simple ingredients and minimal prep time, you’ll have delicious treats ready to impress your friends and family.

Irresistible Flavor Combination: The blend of sweet dulce de leche and rich chocolate enveloped in buttery crackers creates a bite that’s both satisfying and memorable.

Versatile Variations: Whether you switch to milk chocolate for a sweeter taste or introduce a nutty crunch, there’s a delightful twist for everyone.

Perfect for Festive Occasions: These cookies capture the essence of holiday cheer and are a hit at parties, leaving guests clamoring for the recipe.

Gluten-Free Friendly: Easily substitute the Ritz with gluten-free options and still enjoy the flavor explosion in every bite! For more fun cookie alternatives, check out these Chocolate Cranberry Cookies and get baking!

Caramel Ritz Christmas Cookies Ingredients

For the Cookies

  • Ritz Crackers – These are the foundation of our cookies; opt for gluten-free crackers to ensure everyone can enjoy these treats.
  • Dulce de Leche – This sweet, gooey filling adds the perfect texture; creamy peanut butter makes a delicious alternative if you’re looking for a twist.
  • Dark Chocolate Chips – Ideal for coating the cookies with rich flavor; feel free to swap for milk chocolate or white chocolate for a sweeter touch.
  • Dark Chocolate Melting Wafers – Enhances the smoothness of the chocolate; you can use complementary milk or white chocolate if desired.
  • Sea Salt – A pinch elevates the sweet and salty balance brilliantly; omit if you prefer a purely sweet cookie.

For the Decor

  • Optional Toppings – Crush some nuts or drizzle extra melted chocolate for a delightful presentation and added flavor.

Now that you have the essentials, let’s dive into creating these unforgettable Caramel Ritz Christmas Cookies that will be the highlight of your holiday festivities!

Step‑by‑Step Instructions for Caramel Ritz Christmas Cookies

Step 1: Preheat and Prepare
Begin your baking adventure by preheating your oven to 200°F (93°C). While the oven warms up, line a baking sheet with parchment paper to prevent the cookies from sticking. This simple preparation sets the stage for your delicious Caramel Ritz Christmas Cookies, ensuring a smooth process as you assemble the sandwiched treats.

Step 2: Assemble the Cookies
Take a Ritz cracker and spoon a generous dollop of dulce de leche onto it, creating a delightful center. Top it with another Ritz cracker to form a sandwich, pressing gently to secure the filling. Repeat this process until you’ve created a delightful stack of dulce de leche-filled Ritz sandwiches, ready for a sweet chocolate coating that will elevate your holiday treat.

Step 3: Melt the Chocolate
In a microwave-safe bowl, combine dark chocolate chips and chocolate melting wafers. Heat the mixture in 30-second intervals, stirring well after each round, until it becomes smooth and creamy. This step ensures your chocolate coating is perfectly silky for dunking your assembled caramel-filled Ritz sandwiches, creating a mouthwatering outer layer that your family will love.

Step 4: Coat the Cookies
Carefully dip each assembled cookie into the melted chocolate, ensuring every side is fully coated. Allow any excess chocolate to drip back into the bowl, using a fork to help with the process. Once coated, place each chocolate-dipped cookie on the prepared baking sheet, creating an irresistible lineup of your Caramel Ritz Christmas Cookies, waiting to set.

Step 5: Cool and Set
If desired, sprinkle a tiny pinch of sea salt over the warm chocolate coating to enhance the sweet and salty flavors. Transfer the baking sheet to the refrigerator for about 30 minutes, allowing the chocolate to firm up nicely. This cooling period will transform your cookies into a deliciously decadent treat, perfect for sharing and enjoying during the festive season.

Make Ahead Options

These Caramel Ritz Christmas Cookies are perfect for preparing ahead of time, taking away the holiday stress! You can assemble the Ritz cracker sandwiches with dulce de leche up to 24 hours in advance; simply store them in an airtight container in the refrigerator to keep them fresh. If you’re feeling extra organized, you can melt the chocolate and prepare the cookies for coating up to 3 days ahead—just store the chocolate in a sealed container, then reheat gently before dipping. When you’re ready to serve, coat the assembled cookies in the melted chocolate and refrigerate for about 30 minutes to let them set. This method ensures your cookies maintain their quality and flavor, ensuring they’re just as delicious when it’s time to enjoy them!

What to Serve with Caramel Ritz Christmas Cookies

Indulge your senses with complementary flavors and textures that elevate your festive gathering experience.

  • Hot Chocolate: A rich, creamy cup of hot cocoa enhances the chocolatey sweetness of the cookies, creating a cozy vibe.

  • Peppermint Tea: The refreshing mint notes contrast beautifully with the caramel and chocolate, providing a delightful cleanse after each sweet bite.

  • Ice Cream: A scoop of vanilla ice cream offers a luscious creaminess that pairs fabulously with the cookies’ textures, bringing a festive dessert component to the table.

  • Christmas Fruit Salad: Bright, juicy fruits add a refreshing balance to the cookies’ richness, making each bite feel light and joyful.

  • Spiced Eggnog: This creamy, spiced drink beautifully mirrors the cookies’ festive flair, perfect for holiday cocktail hour.

  • Nutty Snack Mix: A crunchy mix of nuts and pretzels alongside the cookies provides a satisfying contrast and a perfect nibble between bites of sweetness.

  • Gingerbread Cake: The warm spices of gingerbread harmonize with the cookies’ caramel notes, crafting a nostalgic dessert table.

  • Bourbon Hot Cider: The warm, spiced apple flavors of this drink complement the sweet and salty cookies, making for a heartwarming pairing.

Enjoy these delightful options alongside your Caramel Ritz Christmas Cookies, and watch everyone come back for seconds!

How to Store and Freeze Caramel Ritz Christmas Cookies

Room Temperature: Keep cookies in an airtight container at room temperature for up to 3 days to maintain freshness and flavor.

Fridge: For longer storage, refrigerate cookies in an airtight container for up to a week; this also helps to keep the chocolate coating firm and delicious.

Freezer: You can freeze your Caramel Ritz Christmas Cookies for up to 3 months. Place them in a single layer on a baking sheet to freeze initially, then transfer to an airtight container.

Thawing: Thaw frozen cookies at room temperature before serving; this allows them to regain their delectable gooey texture while still delivering that delightful crunch!

Expert Tips for Caramel Ritz Christmas Cookies

  • Stir Chocolate Often: To prevent overheating and seizing, stir melted chocolate at 30-second intervals. If it seizes, adding vegetable oil can help restore the smooth texture.

  • Use a Fork: When coating your cookies, use a fork for an even dip. This method lets excess chocolate drip off, ensuring a perfect layer every time.

  • Chill to Set: Speed up the setting of the chocolate by refrigerating your cookies after coating. This helps achieve that satisfying, firm consistency without waiting ages.

  • Mix and Match: Don’t hesitate to try different chocolate types. Having fun with flavors by swapping for milk or white chocolate can transform your Caramel Ritz Christmas Cookies into new favorites.

  • Adapt for Taste: Feel free to play around with toppings! Adding crushed nuts, or a spicy cayenne twist, can customize the cookies and make them even more appealing to your guests.

Caramel Ritz Christmas Cookies Variations

Feel free to let your creativity flow as you customize your Caramel Ritz Christmas Cookies with these delightful variations.

  • Milk Chocolate: Swap out dark chocolate for a sweeter, creamier flavor that appeals to all ages.
  • Nutty Addition: Roll the cookies in crushed nuts before the chocolate coating for an extra crunch. Slivered almonds or pecans add delightful texture and flavor!
  • Spicy Touch: A pinch of cayenne pepper in the chocolate can give your cookies a surprising kick, perfect for those who love a hint of heat.
  • Tropical Flavor: Sprinkle shredded coconut on top for a fun, chewy twist that transports your taste buds to a sunny paradise.
  • Decorative Drizzle: Melt some additional chocolate and drizzle over cooled cookies for a beautiful presentation that makes them even more irresistible.
  • Gluten-Free Option: Use gluten-free Ritz crackers to ensure everyone can indulge in these sweet treats without worry, while still enjoying the same signature flavor.
  • Caramel Swirl: Add a layer of caramel sauce on top after coating with chocolate for a beautiful and delicious finish. This extra caramel takes the gooey goodness up a notch!
  • Minty Freshness: Combine crushed peppermint candies into the chocolate or sprinkle them on top for a festive flavor twist during the holiday season.

These variations not only enhance the cookies but also help achieve that perfect pinch of personality for your dessert table. Each twist promises to bring joy to your holiday gatherings—want more cookie inspiration? Check out these Chocolate Cranberry Cookies for another festive delight today!

Caramel Ritz Christmas Cookies Recipe FAQs

What’s the best way to ensure my Ritz crackers are fresh for these cookies?
Absolutely! For the best flavor and texture, look for Ritz crackers that are crisp and free from any dark spots or visible damage. When selecting, check the expiration date on the package to ensure freshness, and if they seem stale, consider storing them in a sealed container with a slice of bread overnight to regain some of their crunch.

How should I store my Caramel Ritz Christmas Cookies to keep them fresh?
To keep your cookies at their best, store them in an airtight container at room temperature for up to 3 days. For longer-lasting freshness, refrigerate them in a sealed container for up to a week. This keeps the chocolate from becoming too soft and helps maintain the gooeyness of the dulce de leche.

Can I freeze Caramel Ritz Christmas Cookies? If so, how?
Yes, you can freeze these delightful cookies! Place your cookies in a single layer on a baking sheet and freeze them for about 1-2 hours until firm. After that, transfer them into an airtight container or freezer-safe bag, separating layers with parchment paper if needed. They can last up to 3 months in the freezer! To enjoy, simply thaw them at room temperature before serving.

What should I do if my chocolate coating seizes up?
Very! If you find your melted chocolate has become thick or grainy while heating, don’t worry. Simply add a teaspoon of vegetable oil to the chocolate and stir it in. This will help regain the smooth texture needed for dipping. Make sure you melt the chocolate in 30-second intervals and stir in between to prevent this in the first place!

Can these cookies accommodate dietary restrictions, like gluten sensitivity?
Yes, indeed! Just swap the traditional Ritz crackers for gluten-free ones, and you’ll have a delicious treat that everyone can enjoy. Additionally, if anyone has nut allergies, you can easily omit any nut toppings or switches to peanut butter and use sunbutter as an alternative. Always check packaging for any hidden allergens, and feel free to modify the recipe to cater to your guests’ needs!

Caramel Ritz Christmas Cookies

Irresistibly Gooey Caramel Ritz Christmas Cookies Recipe

These Caramel Ritz Christmas Cookies are a quick and easy dessert perfect for holiday gatherings.
Prep Time 15 minutes
Cook Time 30 minutes
Cooling Time 30 minutes
Total Time 1 hour 15 minutes
Servings: 24 cookies
Course: Dessert
Cuisine: American
Calories: 150

Ingredients
  

For the Cookies
  • 1 box Ritz Crackers opt for gluten-free for dietary needs
  • 1 can Dulce de Leche or creamy peanut butter as an alternative
  • 1 cup Dark Chocolate Chips can be substituted with milk or white chocolate
  • 1 package Dark Chocolate Melting Wafers milk or white chocolate can be used instead
  • 1 teaspoon Sea Salt omit if desired
For the Decor
  • Optional Toppings crushed nuts or extra melted chocolate

Equipment

  • Oven
  • Baking Sheet
  • Parchment paper
  • Microwave-safe bowl
  • Fork

Method
 

Step-by-Step Instructions
  1. Preheat your oven to 200°F (93°C) and line a baking sheet with parchment paper.
  2. Assemble the cookies by placing a dollop of dulce de leche on a Ritz cracker and topping it with another cracker to form a sandwich.
  3. Melt dark chocolate chips and melting wafers together in a microwave-safe bowl, stirring every 30 seconds until smooth.
  4. Dip each cookie into the melted chocolate, covering fully before placing on the baking sheet.
  5. Sprinkle with sea salt if desired, then refrigerate for about 30 minutes until the chocolate sets.

Nutrition

Serving: 1cookieCalories: 150kcalCarbohydrates: 20gProtein: 1gFat: 7gSaturated Fat: 4gPolyunsaturated Fat: 0.5gMonounsaturated Fat: 2gSodium: 150mgPotassium: 70mgSugar: 10gCalcium: 2mgIron: 2mg

Notes

These cookies are quick and easy to make and perfect for holiday gatherings. They can be adapted with various toppings and chocolate types to suit different preferences.

Tried this recipe?

Let us know how it was!

Decadent Spiced Gingerbread Brownies for a Cozy Holiday Treat

As the aroma of ginger, cinnamon, and cloves fills my kitchen, I’m reminded that the holidays are all about cozy indulgence. This year, I decided to combine two of my favorite treats into one: Decadent Spiced Gingerbread Brownies. It’s the perfect dessert for those who crave the rich, fudgy goodness of brownies but also want to embrace the festive spirit. These brownies not only whisk together warm spices that evoke childhood memories but also offer a satisfyingly chewy texture that’s sure to impress. Whether you’re hosting a gathering or simply want to elevate your snack game, this easy recipe is a crowd-pleaser that will fill your home with holiday cheer. Ready to see how these delightful treats come to life? Let’s dive into the deliciousness!

Why Are Gingerbread Brownies Irresistible?

Bold, Unique Flavors: The fusion of classic chocolate brownies with festive gingerbread spices creates a taste unlike any other dessert.

Easy to Make: This recipe is simple enough for even novice bakers to enjoy crafting their own holiday treats, just like my Fudgy Brownies Indulge.

Perfect for Occasions: Whether for holiday gatherings or cozy nights in, these brownies offer a crowd-pleasing dessert that everyone will love.

Amazing Texture: Experience a delightful fudgy center combined with the unique chew of crystallized ginger for a tantalizing treat.

Versatile Variation Ideas: Customize your brownies by swapping in your favorite nuts or experimenting with different spices, making them your own—just like the Patriotic Star Brownies you can try!

Gingerbread Brownie Ingredients

• Let’s gather everything you need for these Gingerbread Brownies!

For the Batter

  • Unsalted Butter – Provides essential fat for a fudgy texture and carries flavors. Substitution: Margarine or coconut oil may be used, but it may alter the flavor and texture slightly.
  • Granulated Sugar – Contributes sweetness and structure for a tender crumb and shiny top.
  • Dark Brown Sugar – Adds deeper caramel-like sweetness and moisture for a chewy brownie.
  • Large Eggs – Binds the mixture and adds richness; improves texture and rise.
  • Vanilla Extract – Enhances overall flavor profile by complementing chocolate and spices.
  • All-Purpose Flour – Provides structure without weighing down the brownies.
  • Unsweetened Cocoa Powder – Delivers deep chocolate flavor.

For the Spices and Enhancements

  • Ground Ginger, Ground Cinnamon, Ground Cloves, Ground Nutmeg – Provide classic gingerbread warmth and spice.
  • Salt – Balances sweetness and enhances flavors.
  • Baking Powder – Offers slight lift to avoid overly dense brownies.
  • Molasses – Imparts gingerbread character and richness, contributing to the moist texture.

For the Chocolatey Goodness

  • Semisweet Chocolate Chips – Create pockets of melted chocolate for indulgence.
  • Chopped Crystallized Ginger – Adds a sweet-spicy kick and chewy texture to enhance the ginger experience.

Step‑by‑Step Instructions for Decadent Spiced Gingerbread Brownies

Step 1: Preheat and Prepare
Begin by preheating your oven to 350°F (175°C). While it’s heating up, take a 9×13-inch baking dish, grease it lightly with butter or cooking spray, and line the bottom with parchment paper. This ensures that your Decadent Spiced Gingerbread Brownies come out seamlessly after baking, making the cooling and slicing process easier.

Step 2: Melt the Butter
In a medium saucepan over medium heat, melt 1 cup of unsalted butter, stirring occasionally until it’s completely liquid. Once melted, remove the saucepan from the heat and mix in both granulated and dark brown sugars until the mixture is smooth and glossy. This step creates the rich base for your brownies that adds a lovely sweetness and depth.

Step 3: Add Eggs and Vanilla
Whisk in 3 large eggs one at a time, ensuring that each is well incorporated before adding the next. Follow up by stirring in 1 teaspoon of vanilla extract. The vigorous mixing helps to combine these ingredients into a rich batter, enhancing the flavor profile of your Decadent Spiced Gingerbread Brownies.

Step 4: Combine Dry Ingredients
In a separate bowl, sift together 1 cup of all-purpose flour, ½ cup of unsweetened cocoa powder, and the spices including 2 teaspoons of ground ginger, 1 teaspoon of ground cinnamon, ½ teaspoon of ground cloves, and a pinch of salt. This ensures an even distribution of flavors and prevents lumps, setting the stage for a perfectly spiced brownie mixture.

Step 5: Mix Wet and Dry Ingredients
Gradually fold the dry ingredients into the wet mixture, stirring until just combined. Be careful not to overmix; this maintains the fudgy texture of your Decadent Spiced Gingerbread Brownies. The batter should be thick and slightly shiny, indicating it’s ready for the next step.

Step 6: Incorporate Molasses and Extras
Fold in ½ cup of molasses, 1 cup of semisweet chocolate chips, and ⅓ cup of chopped crystallized ginger until everything is evenly distributed. The molasses adds that signature gingerbread richness, while the chocolate chips and ginger provide delightful bursts of flavor and texture throughout your brownie batch.

Step 7: Pour and Smooth
Pour the brownie batter into the prepared baking dish, using a spatula to spread it evenly and smooth the top. This step is vital for ensuring your Decadent Spiced Gingerbread Brownies bake uniformly, so take a moment to get it just right before moving on to the oven.

Step 8: Bake to Perfection
Place the baking dish in your preheated oven and bake for 30–35 minutes. Keep an eye on them; they’re done when a toothpick inserted into the center comes out with a few moist crumbs. This will ensure your brownies are fudgy and not overcooked, allowing the irresistible gingerbread flavors to shine through.

Step 9: Cool and Slice
Once baked, remove the brownies from the oven and let them cool completely in the pan on a wire rack—this can take about 30 minutes. Once fully cooled, use the parchment paper to lift the brownies out of the pan, then slice them into squares. Your Decadent Spiced Gingerbread Brownies are now ready to be enjoyed!

Expert Tips for Decadent Spiced Gingerbread Brownies

Avoid Overbaking: Check for doneness around the 30-minute mark to keep the brownies fudgy. A toothpick should come out with a few moist crumbs.

Sift for Success: Always sift dry ingredients together to prevent lumps and ensure an even distribution of spices, enhancing the flavors in your gingerbread brownies.

Mix Gently: After combining wet and dry ingredients, mix just until incorporated. Overmixing can lead to dense brownies instead of that desired fudgy texture.

Chill Before Cutting: Allow brownies to cool completely before slicing. This helps achieve clean cuts and improves their chewiness, making them even more delectable!

Customize Flavors: Experiment with additional spices or nuts to tailor your decadent spiced gingerbread brownies to your taste, creating your own unique twist on this festive treat.

What to Serve with Decadent Spiced Gingerbread Brownies?

Treat your friends and family to an unforgettable dessert experience by pairing these delightful brownies with complementary dishes that enhance their rich flavors.

  • Vanilla Ice Cream: The creamy, cold texture brings a lovely contrast to the warm, fudgy brownies, making each bite truly divine.

  • Whipped Cream: Light and fluffy, a dollop of whipped cream adds a touch of sweetness and elegance, enhancing the gingerbread spices.

  • Fresh Berries: Juicy raspberries or strawberries offer a refreshing pop of acidity that balances the richness of the brownies beautifully.

  • Hot Chocolate: An indulgent mug of hot chocolate elevates dessert time to a cozy gathering, perfect for cold winter evenings.

  • Ginger Ale: This fizzy drink pairs surprisingly well, as its ginger kick echoes the brownie flavor while offering a refreshing lift.

  • Coffee: A cup of freshly brewed coffee introduces warm notes that perfectly complement the spiced gingerbread. Enjoying these together will elevate your taste experience to new heights!

Make Ahead Options

These Decadent Spiced Gingerbread Brownies are perfect for meal prep enthusiasts! You can prepare the brownie batter up to 24 hours in advance. Simply follow the instructions until you’ve mixed in the chocolate chips and crystallized ginger, then cover the bowl tightly and refrigerate it. This allows the flavors to meld beautifully, ensuring they’ll be just as delicious when baked. When you’re ready to bake, pour the batter into the prepared dish and bake as directed. Additionally, the fully cooled brownies can be stored in an airtight container at room temperature for up to 3 days or in the refrigerator for up to 2 weeks, maintaining their fudgy texture and rich taste!

How to Store and Freeze Decadent Spiced Gingerbread Brownies

Room Temperature: Store brownies in an airtight container at room temperature for up to 1 week. This keeps them fresh and fudgy, perfect for snacking any time.

Fridge: If you prefer, refrigerate the brownies for up to 2 weeks. Just be sure to wrap them tightly to prevent them from drying out.

Freezer: To freeze, wrap individual brownies in plastic wrap and place them in a freezer-safe bag for up to 3 months. Thaw at room temperature before enjoying.

Reheating: For a warm treat, microwave frozen brownies for 20-30 seconds, or until heated through, allowing the chocolate chips to melt for added decadence.

Variations & Substitutions for Decadent Spiced Gingerbread Brownies

Feel free to get creative with these brownies by adding your own flair or accommodating dietary needs!

  • Nutty Crunch: Substitute crystallized ginger with your favorite nuts for added crunch and texture.

  • Dairy-Free: Use coconut oil and almond milk instead of butter and eggs for a delicious dairy-free option. The subtle coconut flavor blends perfectly with the spices, making every bite tempting.

  • Gluten-Free: Swap out all-purpose flour for a 1:1 gluten-free flour blend. Your brownies will still be fudgy and delightful!

  • Extra Spicy: Boost the ginger kick by adding more ground ginger or experimenting with a hint of cayenne pepper for a surprising warmth.

  • Less Sweet: Reduce the granulated sugar and dark brown sugar by 1/4 cup for a less sweet brownie that highlights the rich chocolate and spice.

  • Bourbon Infusion: Stir in a tablespoon of bourbon or dark rum to elevate the flavor profile and add an exciting twist to your holiday treat.

  • Chocolate Lovers: Load in extra chocolate chips or chunks for those who want a truly indulgent chocolate experience. More is always merrier when it comes to chocolate!

  • Festive Swaps: For a fun holiday twist, include crushed peppermint candies or chopped nuts on top before baking, creating a beautifully festive presentation.

Feel inspired to share your version with family and friends, or make a batch of these delightful brownies to team with other sweet holiday treats like my Fudgy Brownies Indulge or even the colorful Patriotic Star Brownies. Happy baking!

Decadent Spiced Gingerbread Brownies Recipe FAQs

How do I choose the right spices for my brownie mix?
Absolutely! For the best flavor, opt for fresh ground spices to enhance your Decadent Spiced Gingerbread Brownies. Look for vibrant colors and strong aromas. If your spices have lost potency or have been sitting in your pantry for over a year, consider replacing them for a more impactful flavor.

What’s the best way to store my brownies for freshness?
Very! To keep your brownies fresh, store them in an airtight container at room temperature for up to 1 week. If you’d like them to last longer, you can refrigerate them for up to 2 weeks; just ensure they are tightly wrapped to prevent drying out.

Can I freeze my brownies? If so, how?
Certainly! Freezing is a fantastic way to preserve your Decadent Spiced Gingerbread Brownies. Wrap each brownie individually in plastic wrap, then place them in a freezer-safe bag. They can be frozen for up to 3 months. When you’re ready to enjoy, simply thaw them at room temperature for a scrumptious treat!

What should I do if my brownies turn out too dry?
Oh no! If your brownies come out dry, it’s often due to overbaking. Always check for doneness at the 30-minute mark and aim for moist crumbs on your toothpick. In the future, consider adding a bit more chocolate chips or adjusting your baking time for a fudgier texture.

Are there any dietary considerations I should be aware of before serving these brownies?
Absolutely! When serving Decadent Spiced Gingerbread Brownies to guests, be aware of any allergies. The recipe contains common allergens like eggs and wheat. For a gluten-free version, you can substitute all-purpose flour with a gluten-free blend. Also, keep in mind the crystallized ginger—some may find it spicy or have a sensitivity to ginger. Always communicate ingredient changes, and enjoy the festive baking!

Decadent Spiced Gingerbread Brownies

Decadent Spiced Gingerbread Brownies for a Cozy Holiday Treat

These Decadent Spiced Gingerbread Brownies combine rich chocolate and warm spices for a perfect festive dessert.
Prep Time 15 minutes
Cook Time 35 minutes
Cooling Time 30 minutes
Total Time 1 hour 20 minutes
Servings: 12 slices
Course: Dessert
Cuisine: American
Calories: 220

Ingredients
  

For the Batter
  • 1 cup Unsalted Butter Substitution: Margarine or coconut oil may be used, but it may alter the flavor and texture slightly.
  • 1 cup Granulated Sugar
  • 1 cup Dark Brown Sugar
  • 3 large Large Eggs
  • 1 teaspoon Vanilla Extract
  • 1 cup All-Purpose Flour
  • ½ cup Unsweetened Cocoa Powder
For the Spices and Enhancements
  • 2 teaspoons Ground Ginger
  • 1 teaspoon Ground Cinnamon
  • ½ teaspoon Ground Cloves
  • 1 pinch Salt
  • 1 teaspoon Baking Powder
  • ½ cup Molasses
For the Chocolatey Goodness
  • 1 cup Semisweet Chocolate Chips
  • cup Chopped Crystallized Ginger

Equipment

  • 9x13-inch baking dish
  • Medium saucepan
  • Mixing Bowl
  • Whisk
  • Spatula

Method
 

Step-by-Step Instructions
  1. Preheat your oven to 350°F (175°C), grease a 9×13-inch baking dish, and line with parchment paper.
  2. Melt 1 cup of unsalted butter in a medium saucepan over medium heat, stirring until liquid.
  3. Whisk in 3 large eggs one at a time and stir in 1 teaspoon of vanilla extract.
  4. Sift together 1 cup of all-purpose flour, ½ cup of cocoa powder, 2 teaspoons ground ginger, 1 teaspoon ground cinnamon, ½ teaspoon ground cloves, and a pinch of salt.
  5. Gradually fold the dry ingredients into the wet mixture until just combined.
  6. Fold in ½ cup of molasses, 1 cup of chocolate chips, and ⅓ cup of chopped crystallized ginger.
  7. Pour the batter into the prepared baking dish and smooth the top with a spatula.
  8. Bake for 30–35 minutes or until a toothpick comes out with a few moist crumbs.
  9. Let the brownies cool completely in the pan before lifting them out and slicing.

Nutrition

Serving: 1sliceCalories: 220kcalCarbohydrates: 30gProtein: 3gFat: 10gSaturated Fat: 6gPolyunsaturated Fat: 1gMonounsaturated Fat: 3gCholesterol: 40mgSodium: 150mgPotassium: 120mgFiber: 2gSugar: 18gVitamin A: 300IUCalcium: 20mgIron: 1.5mg

Notes

Customize flavors with additional spices or nuts to create a unique twist on these festive brownies.

Tried this recipe?

Let us know how it was!

Crispy Fried Pickle Fritters: Your New Favorite Snack

“Can you hear that crunch? That satisfying sound of golden perfection is about to fill your kitchen with the aroma of my Crispy Southern Fried Pickle Fritters. Inspired by the latest TikTok sensation, I’ve crafted these fritters to take the beloved dill pickle to new heights—with an exquisitely seasoned cornmeal batter that truly elevates each bite. Whether you’re hosting a casual gathering or just looking to spice up your snack game, these fritters are the quick, crowd-pleasing treat that everyone will rave about. Paired with your favorite dipping sauce, they bring a delightful zing that’s hard to resist. Are you ready to turn your kitchen into a Southern-style fry fest?”

Why Are These Fritters Irresistible?

Crunchy and Flavorful: The crispy exterior paired with the juicy dill pickle interior creates a taste and texture experience that’s simply unmatched.

Crowd-Pleasing: Perfect as an appetizer or snack, these fritters will steal the show at any gathering, transforming even the simplest occasion into something special.

Quick and Easy: Need a last-minute snack? This recipe comes together swiftly, allowing you to indulge without the fuss.

Versatile Dipping: Pair them with ranch, spicy mayo, or even a garlic aioli—it’s your choice! The options are endless, just like with Zucchini Leek Fritters or a classic Macaroni Salad Pickles that often accompany Southern dishes.

Elevated Comfort Food: Transform the everyday pickle into a gourmet treat with a few simple ingredients—it’s comfort food with a twist!

Fried Pickle Fritter Ingredients

• These ingredients come together for the ultimate snack experience!

For the Batter

  • Self-Rising Cornmeal – Provides a fluffy texture; if you can’t find it, mix plain cornmeal with baking powder and salt.
  • All-Purpose Flour – Adds strength to the fritters; you could swap it for extra cornmeal for a gluten-free alternative.
  • Salt – Enhances the overall flavor; feel free to adjust based on your taste preferences.
  • Black Pepper – Offers a touch of mild heat; increase for more spice if desired.
  • Garlic Powder – Imparts a savory note; you can use granulated garlic in a pinch.
  • Sweet Onion – Balances the tartness of pickles; Vidalia onions are a great choice for their sweetness.
  • Dill Pickles – The star of the show; choose your favorite brand for a tangy burst of flavor—Claussen is highly recommended.
  • Egg – Serves as a binder to hold everything together.
  • Buttermilk – Adds moisture and richness; substitute with regular milk if needed, just adjust the liquid amount.

For Frying

  • Vegetable Oil – Essential for achieving that crispy finish; ensure it’s heated to the right temperature before frying.

Step‑by‑Step Instructions for Fried Pickle Fritters

Step 1: Prepare the Dry Ingredients
In a large mixing bowl, whisk together the self-rising cornmeal, all-purpose flour, salt, black pepper, and garlic powder until well combined. This dry mixture will create the flavorful batter for your Fried Pickle Fritters. Make sure there are no lumps, and you can already enjoy the savory aroma filling the air.

Step 2: Incorporate the Pickles and Onions
Add the chopped dill pickles and diced sweet onion to the dry ingredients, gently tossing to coat them evenly with the mixture. The pickles should be well distributed throughout the batter, ensuring that every fritter has that delightful burst of tanginess. This step elevates the flavor profile before you incorporate the wet ingredients.

Step 3: Mix the Wet Ingredients
In a separate bowl, beat the egg and combine it with the buttermilk until smooth. This mixture will serve as the binding agent for your fritters. Pour this liquid gradually into the pickle mixture and stir until just combined. Be careful not to overmix; a few lumps are perfectly fine for a light texture in your Fried Pickle Fritters.

Step 4: Heat the Oil
Heat about two inches of vegetable oil in a large skillet over medium heat. Use a thermometer to check the oil temperature, aiming for around 350°F. When the oil sizzles gently, it’s ready for frying. This step is crucial for achieving that golden-brown, crispy exterior that makes these fritters so irresistible.

Step 5: Fry the Fritters
Using a spoon, drop heaping tablespoons of the fritter batter into the hot oil, being careful not to overcrowd the skillet. Fry each fritter for about 4-5 minutes on one side until they turn golden brown. Flip them using a spatula, then gently flatten each fritter and fry for an additional 4-5 minutes on the other side, ensuring they are evenly cooked.

Step 6: Drain and Serve
Once the Fried Pickle Fritters are cooked to a perfect golden-brown, remove them from the oil and drain them on paper towels to absorb excess oil. Serve them hot for the best crunch, and pair with ranch dressing or your favorite dipping sauce for a delightful snack that everyone will love.

Make Ahead Options

These Fried Pickle Fritters are perfect for meal prep enthusiasts! You can prepare the batter up to 24 hours in advance—just mix together the dry ingredients (self-rising cornmeal, all-purpose flour, salt, pepper, and garlic powder) and store them in an airtight container. Chopped dill pickles and sweet onion can also be prepared ahead and stored in the fridge for easy access. When you’re ready to fry, simply mix the wet ingredients (egg and buttermilk) into the prepped dry mixture and fry them up! This way, you’ll have delicious, crispy fritters ready in no time, saving you precious minutes on busy weeknights while ensuring they taste just as delightful.

Fried Pickle Fritters Variations & Substitutions

Feel free to get creative with your Fried Pickle Fritters and customize them to your taste—you’ll be amazed at the delicious possibilities!

  • Sweet Pickles: Swap out dill pickles for sweet ones for a delightful twist with a sweet and tangy flavor profile.
  • Spicy Addition: Add diced jalapeños or a few squirts of hot sauce to the batter for a spicy kick that ignites your taste buds.
  • Herb-Infused: Experiment with fresh herbs like dill or parsley to infuse extra layers of flavor into your fritters.
  • Cheesy Option: Mix in shredded cheddar or pepper jack cheese for a melty, cheesy delight that takes these fritters to a whole new level.
  • Add Veggies: Incorporate finely chopped spinach or zucchini to the batter for a veggie-packed version that is equally tasty.
  • Texture Twist: Try a panko breadcrumb coating for an extra crispy finish that will have everyone reaching for more.
  • Gluten-Free Switch: Substitute the all-purpose flour with a gluten-free flour blend to make these fritters suitable for a gluten-sensitive crowd.
  • Sourdough Starter: For a unique tang and texture, add a tablespoon of sourdough starter to the batter for a fermentative flair.

With these variations, your Fried Pickle Fritters will never get boring! Each twist adds something new, creating a fun way to enjoy these crispy snacks every time. Don’t forget to try pairing them with other deliciousness like our Zucchini Leek Fritters or refreshing Macaroni Salad Pickles as you navigate your culinary adventures!

Expert Tips for Crispy Fried Pickle Fritters

  • Oil Temperature Check: Always use a thermometer to confirm the oil reaches 350°F. Cooking at the right temperature ensures a crispy exterior without sogginess.

  • Mix with Care: Avoid overmixing the batter after adding wet ingredients. Keep it slightly lumpy to achieve the light texture that makes your Fried Pickle Fritters irresistible.

  • Test a Fritter: Fry a small test fritter first to determine cooking time and adjust as needed. This helps you perfect the timing for larger batches and avoid undercooked or burnt fritters.

  • Use Fresh Ingredients: Fresh dill pickles and sweet onions enhance the flavor profile. Opt for high-quality ingredients to elevate your fritters from good to gourmet.

  • Keep it Warm: If making multiple batches, hold the cooked fritters on a baking sheet in a warm oven (about 200°F) until all are fried for serving. This keeps them crispy longer!

How to Store and Freeze Fried Pickle Fritters

Fridge: Store leftover Fried Pickle Fritters in an airtight container in the fridge for up to 2 days. Reheat in the oven at 350°F for about 10 minutes to regain crispiness.

Freezer: For longer storage, freeze fritters in a single layer on a baking sheet until solid, then transfer to an airtight freezer bag. They can be frozen for up to 2 months.

Reheating: When ready to enjoy, reheat frozen fritters directly from the freezer in the oven at 375°F for 15-20 minutes, ensuring they are heated through and crispy.

Serving: Always serve fried fritters hot for the best flavor and texture. Pair with your favorite dipping sauce for a tasty experience!

What to Serve With Crispy Southern Fried Pickle Fritters

These delightful fritters bring a burst of tang and crunch, making your snack time feel like a special occasion.

  • Creamy Ranch Dip: The cool, tangy ranch dressing complements the zesty flavor of the fritters perfectly, making each bite even more enjoyable. A classic pairing that never disappoints!

  • Spicy Mayo: For those who love a kick, a drizzle of spicy mayo adds a creamy texture and a bit of heat. The combination of flavors enhances the fritters while elevating your taste buds.

  • Coleslaw: This crunchy, tangy side balances the hearty fritters beautifully. The freshness of coleslaw provides a refreshing contrast to the warm, fried goodness.

  • Sweet Cornbread: The light sweetness of cornbread pairs wonderfully with the savory fritters, creating a satisfying southern feast. Serve warm for a cozy comfort food experience.

  • Pickled Vegetables: Serve these fritters alongside a tangy medley of pickled vegetables to echo their flavor profile while adding an extra crunch. The acidity cuts through the richness of the fritters.

  • Beer or Cider: A cold, crisp beer or refreshing hard cider can make for a perfect sipping companion. The drink’s bubbles and flavors contrast deliciously with the fritters’ crispy texture.

Satisfy your craving for an unforgettable appetizer and watch friends and family come back for seconds!

Crispy Southern Fried Pickle Fritters Recipe FAQs

How do I choose the best dill pickles for these fritters?
Absolutely! For the tastiest fritters, opt for crunchy, whole dill pickles, as they provide that satisfying tang when biting into the fritter. I recommend brands like Claussen, noted for their fresh, crunchy texture, which really enhances the flavor. If you prefer a spicier bite, consider pickles with added jalapeños or chili flakes.

How should I store leftover fried pickle fritters?
Leftover Fried Pickle Fritters can be stored in an airtight container in the fridge for up to 2 days. To regain their crispiness, reheat them in the oven at 350°F for about 10 minutes. This allows the fritters to re-crisp while keeping the inside tender and tasty.

Can I freeze fried pickle fritters?
Yes! To freeze, lay the fritters in a single layer on a baking sheet and place them in the freezer until solid. Once frozen, transfer them to an airtight freezer bag, and they will stay fresh for up to 2 months. When you’re ready to enjoy them, reheat from frozen at 375°F for 15-20 minutes, and they’ll be crispy once again.

What if my fritters are soggy after frying?
Very! If you find your fritters are soggy, it’s usually due to the oil not being hot enough. Always use a thermometer to ensure the oil reaches 350°F before frying. If they are already cooked, you can pop them in the oven for a few minutes at 375°F to crisp them up before serving.

Are these fritters suitable for people with gluten allergies?
Since this recipe uses self-rising cornmeal and all-purpose flour, it’s not gluten-free as it stands. However, you can make a gluten-free version by replacing the all-purpose flour with more cornmeal. Just be cautious about cross-contamination if you’re cooking for someone with a severe gluten allergy.

How can I customize the spices and flavor in my fritters?
You can absolutely customize the flavor! For a hint of spice, feel free to add diced jalapeños or switch out the garlic powder for onion powder. Enjoy blending fresh herbs like dill or parsley into your batter to enhance the freshness and elevate the taste even further!

Fried Pickle Fritters

Crispy Fried Pickle Fritters: Your New Favorite Snack

Enjoy these Fried Pickle Fritters with a crispy texture and tangy flavor, perfect for snacking.
Prep Time 10 minutes
Cook Time 20 minutes
Total Time 30 minutes
Servings: 4 fritters
Course: Appetizer
Cuisine: Southern
Calories: 150

Ingredients
  

For the Batter
  • 1 cup Self-Rising Cornmeal Provides a fluffy texture
  • 1 cup All-Purpose Flour Adds strength to the fritters
  • 1 teaspoon Salt Enhances the overall flavor
  • 1 teaspoon Black Pepper Offers a touch of mild heat
  • 1 teaspoon Garlic Powder Imparts a savory note
  • 1 small Sweet Onion Balances the tartness of pickles
  • 1 cup Dill Pickles The star of the show
  • 1 large Egg Serves as a binder
  • 1 cup Buttermilk Adds moisture and richness
For Frying
  • 2 cups Vegetable Oil Essential for achieving that crispy finish

Equipment

  • large mixing bowl
  • Skillet
  • thermometer

Method
 

Ingredients Preparation
  1. In a large mixing bowl, whisk together the self-rising cornmeal, all-purpose flour, salt, black pepper, and garlic powder until well combined.
  2. Add the chopped dill pickles and diced sweet onion to the dry ingredients, gently tossing to coat them evenly.
  3. In a separate bowl, beat the egg and combine it with the buttermilk until smooth, then pour this into the pickle mixture and stir until just combined.
  4. Heat about two inches of vegetable oil in a large skillet over medium heat, aiming for around 350°F.
  5. Drop heaping tablespoons of the fritter batter into the hot oil, frying each fritter for about 4-5 minutes until golden brown.
  6. Once cooked, remove fritters from oil and drain on paper towels to absorb excess oil. Serve hot.

Nutrition

Serving: 1fritterCalories: 150kcalCarbohydrates: 15gProtein: 3gFat: 8gSaturated Fat: 1gCholesterol: 35mgSodium: 300mgPotassium: 100mgFiber: 1gSugar: 1gVitamin A: 200IUVitamin C: 2mgCalcium: 50mgIron: 1mg

Notes

Serve with ranch dressing or your favorite dipping sauce for a delightful snack.

Tried this recipe?

Let us know how it was!

Decadent Spiced Gingerbread Brownies for a Cozy Holiday Treat

As the aroma of ginger, cinnamon, and cloves fills my kitchen, I’m reminded that the holidays are all about cozy indulgence. This year, I decided to combine two of my favorite treats into one: Decadent Spiced Gingerbread Brownies. It’s the perfect dessert for those who crave the rich, fudgy goodness of brownies but also want to embrace the festive spirit. These brownies not only whisk together warm spices that evoke childhood memories but also offer a satisfyingly chewy texture that’s sure to impress. Whether you’re hosting a gathering or simply want to elevate your snack game, this easy recipe is a crowd-pleaser that will fill your home with holiday cheer. Ready to see how these delightful treats come to life? Let’s dive into the deliciousness!

Why Are Gingerbread Brownies Irresistible?

Bold, Unique Flavors: The fusion of classic chocolate brownies with festive gingerbread spices creates a taste unlike any other dessert.

Easy to Make: This recipe is simple enough for even novice bakers to enjoy crafting their own holiday treats, just like my Fudgy Brownies Indulge.

Perfect for Occasions: Whether for holiday gatherings or cozy nights in, these brownies offer a crowd-pleasing dessert that everyone will love.

Amazing Texture: Experience a delightful fudgy center combined with the unique chew of crystallized ginger for a tantalizing treat.

Versatile Variation Ideas: Customize your brownies by swapping in your favorite nuts or experimenting with different spices, making them your own—just like the Patriotic Star Brownies you can try!

Gingerbread Brownie Ingredients

• Let’s gather everything you need for these Gingerbread Brownies!

For the Batter

  • Unsalted Butter – Provides essential fat for a fudgy texture and carries flavors. Substitution: Margarine or coconut oil may be used, but it may alter the flavor and texture slightly.
  • Granulated Sugar – Contributes sweetness and structure for a tender crumb and shiny top.
  • Dark Brown Sugar – Adds deeper caramel-like sweetness and moisture for a chewy brownie.
  • Large Eggs – Binds the mixture and adds richness; improves texture and rise.
  • Vanilla Extract – Enhances overall flavor profile by complementing chocolate and spices.
  • All-Purpose Flour – Provides structure without weighing down the brownies.
  • Unsweetened Cocoa Powder – Delivers deep chocolate flavor.

For the Spices and Enhancements

  • Ground Ginger, Ground Cinnamon, Ground Cloves, Ground Nutmeg – Provide classic gingerbread warmth and spice.
  • Salt – Balances sweetness and enhances flavors.
  • Baking Powder – Offers slight lift to avoid overly dense brownies.
  • Molasses – Imparts gingerbread character and richness, contributing to the moist texture.

For the Chocolatey Goodness

  • Semisweet Chocolate Chips – Create pockets of melted chocolate for indulgence.
  • Chopped Crystallized Ginger – Adds a sweet-spicy kick and chewy texture to enhance the ginger experience.

Step‑by‑Step Instructions for Decadent Spiced Gingerbread Brownies

Step 1: Preheat and Prepare
Begin by preheating your oven to 350°F (175°C). While it’s heating up, take a 9×13-inch baking dish, grease it lightly with butter or cooking spray, and line the bottom with parchment paper. This ensures that your Decadent Spiced Gingerbread Brownies come out seamlessly after baking, making the cooling and slicing process easier.

Step 2: Melt the Butter
In a medium saucepan over medium heat, melt 1 cup of unsalted butter, stirring occasionally until it’s completely liquid. Once melted, remove the saucepan from the heat and mix in both granulated and dark brown sugars until the mixture is smooth and glossy. This step creates the rich base for your brownies that adds a lovely sweetness and depth.

Step 3: Add Eggs and Vanilla
Whisk in 3 large eggs one at a time, ensuring that each is well incorporated before adding the next. Follow up by stirring in 1 teaspoon of vanilla extract. The vigorous mixing helps to combine these ingredients into a rich batter, enhancing the flavor profile of your Decadent Spiced Gingerbread Brownies.

Step 4: Combine Dry Ingredients
In a separate bowl, sift together 1 cup of all-purpose flour, ½ cup of unsweetened cocoa powder, and the spices including 2 teaspoons of ground ginger, 1 teaspoon of ground cinnamon, ½ teaspoon of ground cloves, and a pinch of salt. This ensures an even distribution of flavors and prevents lumps, setting the stage for a perfectly spiced brownie mixture.

Step 5: Mix Wet and Dry Ingredients
Gradually fold the dry ingredients into the wet mixture, stirring until just combined. Be careful not to overmix; this maintains the fudgy texture of your Decadent Spiced Gingerbread Brownies. The batter should be thick and slightly shiny, indicating it’s ready for the next step.

Step 6: Incorporate Molasses and Extras
Fold in ½ cup of molasses, 1 cup of semisweet chocolate chips, and ⅓ cup of chopped crystallized ginger until everything is evenly distributed. The molasses adds that signature gingerbread richness, while the chocolate chips and ginger provide delightful bursts of flavor and texture throughout your brownie batch.

Step 7: Pour and Smooth
Pour the brownie batter into the prepared baking dish, using a spatula to spread it evenly and smooth the top. This step is vital for ensuring your Decadent Spiced Gingerbread Brownies bake uniformly, so take a moment to get it just right before moving on to the oven.

Step 8: Bake to Perfection
Place the baking dish in your preheated oven and bake for 30–35 minutes. Keep an eye on them; they’re done when a toothpick inserted into the center comes out with a few moist crumbs. This will ensure your brownies are fudgy and not overcooked, allowing the irresistible gingerbread flavors to shine through.

Step 9: Cool and Slice
Once baked, remove the brownies from the oven and let them cool completely in the pan on a wire rack—this can take about 30 minutes. Once fully cooled, use the parchment paper to lift the brownies out of the pan, then slice them into squares. Your Decadent Spiced Gingerbread Brownies are now ready to be enjoyed!

What to Serve with Decadent Spiced Gingerbread Brownies

Looking to create the perfect setting for your delicious gingerbread brownies? Discover delightful pairings that enhance their cozy flavors.

  • Vanilla Ice Cream: A classic pairing, the creamy coolness contrasts beautifully with the warm spices of the brownies, creating a divine experience in every bite.

  • Caramel Sauce: Drizzling a rich caramel sauce adds a touch of sweet indulgence that perfectly complements the ginger and chocolate notes.

  • Spiced Apple Cider: Sipping on warm spiced apple cider alongside the brownies amplifies their holiday charm, creating a nostalgic festive atmosphere.

  • Whipped Cream: A dollop of fluffy whipped cream on top softens the richness of the brownies, offering a light, airy texture that balances the fudgy delight.

  • Coffee or Espresso: The deep flavors of coffee enhance the chocolate and spices, making each bite more intriguing while providing a comforting caffeine boost.

  • Chocolate Sauce Drizzle: For those extra indulgent moments, a warm chocolate drizzle can elevate the dessert, creating more layers of chocolaty goodness.

  • Chopped Nuts: Add a sprinkle of walnuts or pecans for a crunchy texture contrast that complements the gooey brownie experience beautifully.

  • Holiday Fruit Salad: A fresh fruit salad with citrus and berries adds a vibrant, refreshing note, creating a well-rounded dessert experience perfect for festive gatherings.

  • Pumpkin Spice Latte: Embrace the season with a cozy pumpkin spice latte; the warm spices mirror those in the brownies, making for a delightful pairing.

Each of these accompaniments elevates your Decadent Spiced Gingerbread Brownies, enhancing their comforting flavors and creating cherished moments around the table. Enjoy!

Make Ahead Options

These Decadent Spiced Gingerbread Brownies are perfect for meal prep, allowing you to enjoy holiday baking without the last-minute rush! You can prepare the brownie batter up to 24 hours in advance; simply store it in an airtight container in the refrigerator to maintain its freshness. If you’re short on time, you can also bake the brownies 3 days ahead of serving—they keep beautifully in an airtight container at room temperature. Once you’re ready to enjoy them, simply cut them into squares and serve; they will taste just as delicious as freshly baked! For the ultimate experience, consider warming them slightly before serving to bring back that gooey texture.

Expert Tips for Decadent Spiced Gingerbread Brownies

Avoid Overbaking: Check for doneness around the 30-minute mark to keep the brownies fudgy. A toothpick should come out with a few moist crumbs.

Sift for Success: Always sift dry ingredients together to prevent lumps and ensure an even distribution of spices, enhancing the flavors in your gingerbread brownies.

Mix Gently: After combining wet and dry ingredients, mix just until incorporated. Overmixing can lead to dense brownies instead of that desired fudgy texture.

Chill Before Cutting: Allow brownies to cool completely before slicing. This helps achieve clean cuts and improves their chewiness, making them even more delectable!

Customize Flavors: Experiment with additional spices or nuts to tailor your decadent spiced gingerbread brownies to your taste, creating your own unique twist on this festive treat.

How to Store and Freeze Decadent Spiced Gingerbread Brownies

Room Temperature: Store brownies in an airtight container at room temperature for up to 1 week. This keeps them fresh and fudgy, perfect for snacking any time.

Fridge: If you prefer, refrigerate the brownies for up to 2 weeks. Just be sure to wrap them tightly to prevent them from drying out.

Freezer: To freeze, wrap individual brownies in plastic wrap and place them in a freezer-safe bag for up to 3 months. Thaw at room temperature before enjoying.

Reheating: For a warm treat, microwave frozen brownies for 20-30 seconds, or until heated through, allowing the chocolate chips to melt for added decadence.

Variations & Substitutions for Decadent Spiced Gingerbread Brownies

Feel free to customize these brownies to satisfy your unique cravings while infusing your kitchen with deliciousness!

  • Nutty Delight: Add chopped walnuts or pecans for a satisfying crunch and an extra layer of flavor. The nuttiness beautifully complements the spiced richness.

  • Dairy-Free: Substitute the butter with coconut oil and use dairy-free chocolate chips for a deliciously indulgent treat. It’s the perfect option for your vegan friends!

  • Gluten-Free: Replace all-purpose flour with a gluten-free flour blend to make these brownies suitable for those with gluten sensitivities. Enjoy the same moist texture without any compromise on flavor!

  • Sugar-Free: For a healthier version, try using a sugar substitute like erythritol or monk fruit sweetener. They’ll still be richly spiced and satisfy your sweet tooth!

  • Spicy Kick: Add a pinch of cayenne pepper or a dash of chili powder to give your brownies a surprising touch of heat—an exciting twist that will intrigue your taste buds!

  • Minty Twist: Fold in some crushed peppermint candies or mint chocolate chips for a festive holiday spin. Can’t resist mint and chocolate? This combo will make your taste buds sing!

  • Cream Cheese Swirl: Create a luscious cream cheese swirl by combining softened cream cheese with a bit of sugar and vanilla, then marble it into the brownie batter before baking. It adds a delightful creamy tang!

  • Extra Chocolate: Boost the chocolate flavor by increasing the semisweet chocolate chips by half a cup. Who doesn’t love an extra indulgence in every bite? Consider this a chocolate lover’s dream!

These variations allow you to explore different tastes and textures, creating a gingerbread brownie that’s uniquely yours! And if you want more brownie inspiration, don’t forget to check out my Fudgy Brownies Indulge or the festive delight of Patriotic Star Brownies. Enjoy your baking adventure!

Decadent Spiced Gingerbread Brownies Recipe FAQs

How do I select ripened ingredients for my brownies?
Absolutely! For the best results, use room temperature eggs for easier incorporation into the batter. If you’re using butter, ensure it’s slightly softened but not melted; this will help achieve a smooth mixture. Check your crystallized ginger—look for pieces that are firm and not overly hard or dry, with a sweet aroma.

How should I store my brownies, and how long do they last?
For optimal freshness, store your Decadent Spiced Gingerbread Brownies in an airtight container at room temperature for up to one week. If you place them in the fridge, they can last about two weeks. Just make sure to wrap them well to prevent them from drying out!

Can I freeze the gingerbread brownies?
Absolutely! Freezing is a great way to preserve these delightful brownies. To do so, simply place them in an airtight container or wrap them well in plastic wrap and then place them in a freezer bag. They can be frozen for up to three months. When you’re ready to enjoy, let them thaw at room temperature!

What are some common troubleshooting tips for brownie texture?
If you find your brownies end up too dry, be cautious not to overbake them. Start checking for doneness around 30 minutes. Use a toothpick; it should come out with a few moist crumbs for that fudgy texture. If your brownies turn out too dense, it’s often due to overmixing the batter after adding the dry ingredients. Just fold until combined, and you should be golden!

Are there any dietary restrictions I should consider when making these brownies?
Very! If you’re baking for someone with allergies, it’s essential to note that these brownies contain gluten, dairy, and eggs. You can substitute the butter with coconut oil for a dairy-free version and use gluten-free all-purpose flour to accommodate those with gluten sensitivities. However, this may slightly alter the texture. Always check the labels for chocolate chips to ensure they meet specific dietary needs!

Decadent Spiced Gingerbread Brownies

Decadent Spiced Gingerbread Brownies for a Cozy Holiday Treat

Experience the unique blend of gingerbread and brownie flavors with these Decadent Spiced Gingerbread Brownies.
Prep Time 20 minutes
Cook Time 35 minutes
Cooling Time 30 minutes
Total Time 1 hour 25 minutes
Servings: 12 squares
Course: Dessert
Cuisine: American
Calories: 250

Ingredients
  

For the Batter
  • 1 cup Unsalted Butter Substitution: Margarine or coconut oil may be used, but it may alter the flavor and texture slightly.
  • 1 cup Granulated Sugar
  • 1 cup Dark Brown Sugar
  • 2 large Large Eggs
  • 2 teaspoons Vanilla Extract
  • 1 cup All-Purpose Flour
  • 3/4 cup Unsweetened Cocoa Powder
For the Spices and Enhancements
  • 1 teaspoon Ground Ginger
  • 1 teaspoon Ground Cinnamon
  • 1/2 teaspoon Ground Cloves
  • 1/2 teaspoon Ground Nutmeg
  • 1/2 teaspoon Salt
  • 1 teaspoon Baking Powder
  • 1/2 cup Molasses
For the Chocolatey Goodness
  • 1 cup Semisweet Chocolate Chips
  • 1/2 cup Chopped Crystallized Ginger

Equipment

  • Medium saucepan
  • 9x13-inch baking dish
  • Mixing bowls
  • Whisk
  • Spatula

Method
 

Step-by-Step Instructions
  1. Preheat your oven to 350°F (175°C) and grease a 9×13-inch baking dish, lining it with parchment paper.
  2. Melt the unsalted butter in a medium saucepan over medium heat, then stir in granulated and dark brown sugar until smooth.
  3. Add large eggs one at a time, whisking vigorously after each addition. Stir in vanilla extract.
  4. Sift together all-purpose flour, cocoa powder, ground ginger, cinnamon, cloves, nutmeg, salt, and baking powder in a separate bowl.
  5. Gradually fold the dry ingredients into the wet ingredients until just combined.
  6. Fold in the molasses, chocolate chips, and chopped crystallized ginger.
  7. Pour the batter into the prepared baking dish and smooth the top.
  8. Bake for 30-35 minutes, checking with a toothpick about five minutes before the time is up.
  9. Allow brownies to cool completely in the pan on a wire rack for 20-30 minutes before cutting into squares.

Nutrition

Serving: 1squareCalories: 250kcalCarbohydrates: 35gProtein: 3gFat: 12gSaturated Fat: 7gPolyunsaturated Fat: 1gMonounsaturated Fat: 4gCholesterol: 30mgSodium: 150mgPotassium: 200mgFiber: 1gSugar: 20gVitamin A: 400IUCalcium: 30mgIron: 1.5mg

Notes

Expert tips include avoiding overbaking for fudgy texture, sifting dry ingredients for even flavor, and using quality chocolate chips.

Tried this recipe?

Let us know how it was!