Sticky-Sweet Char Siu Chicken: Your New Weeknight Hero

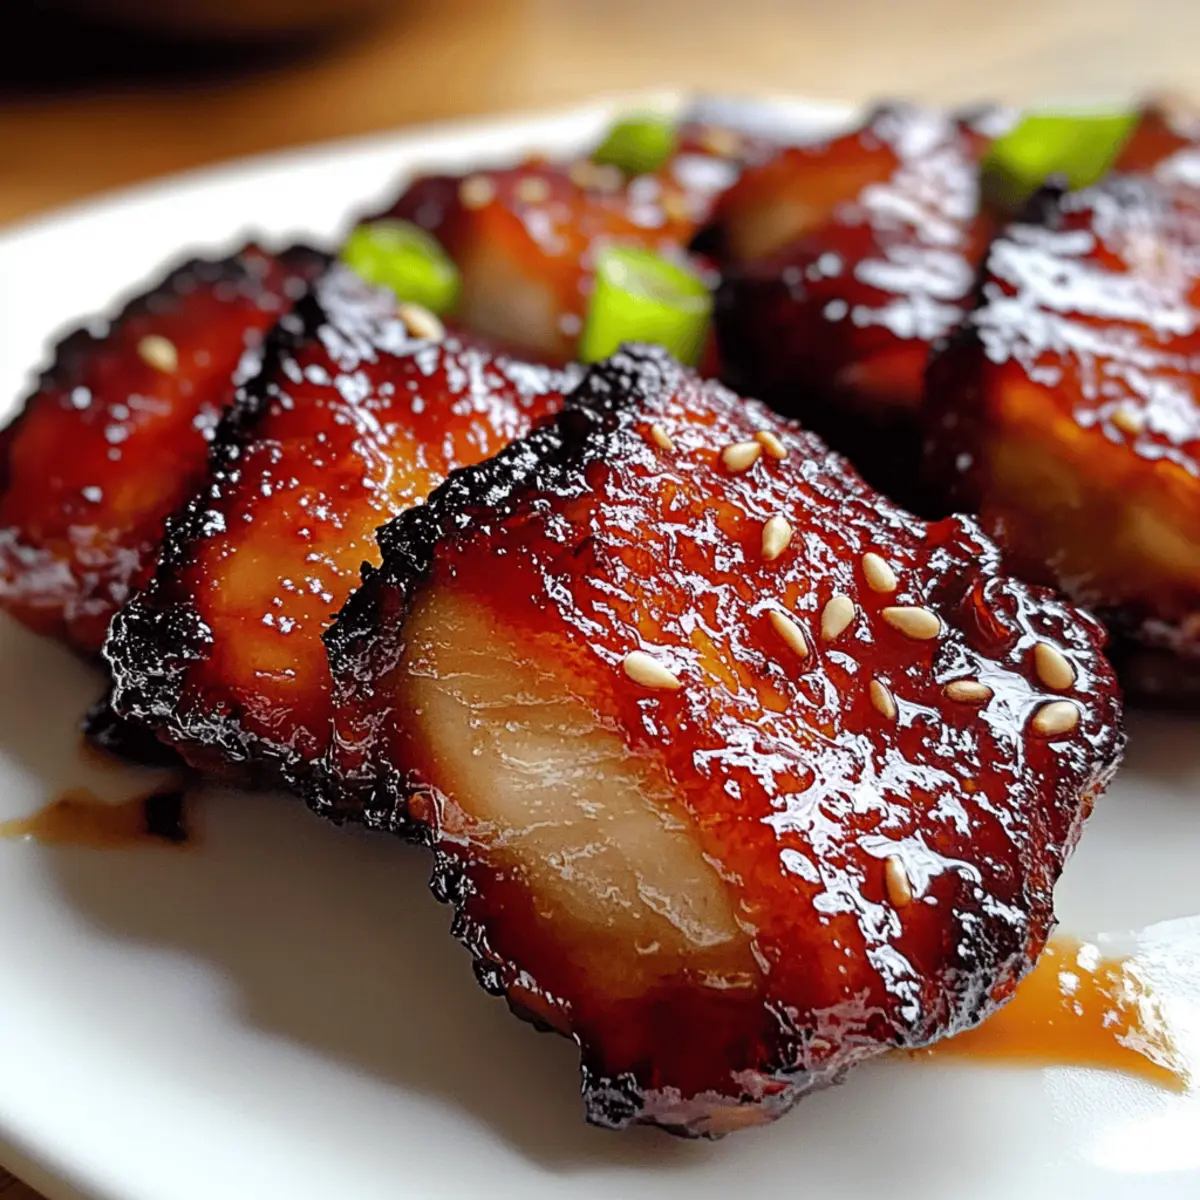
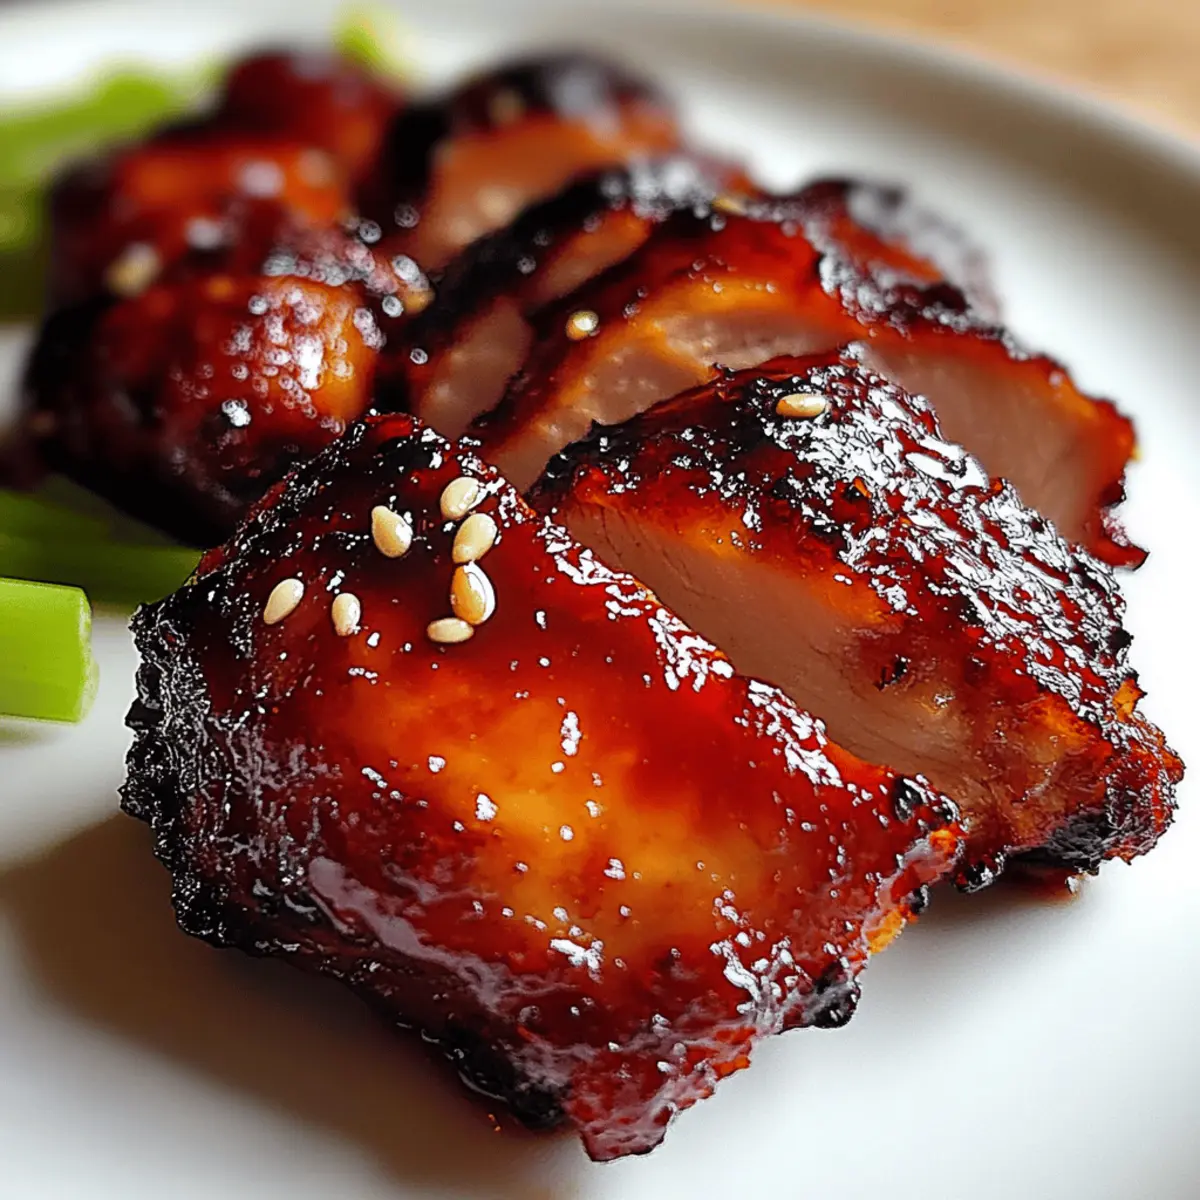
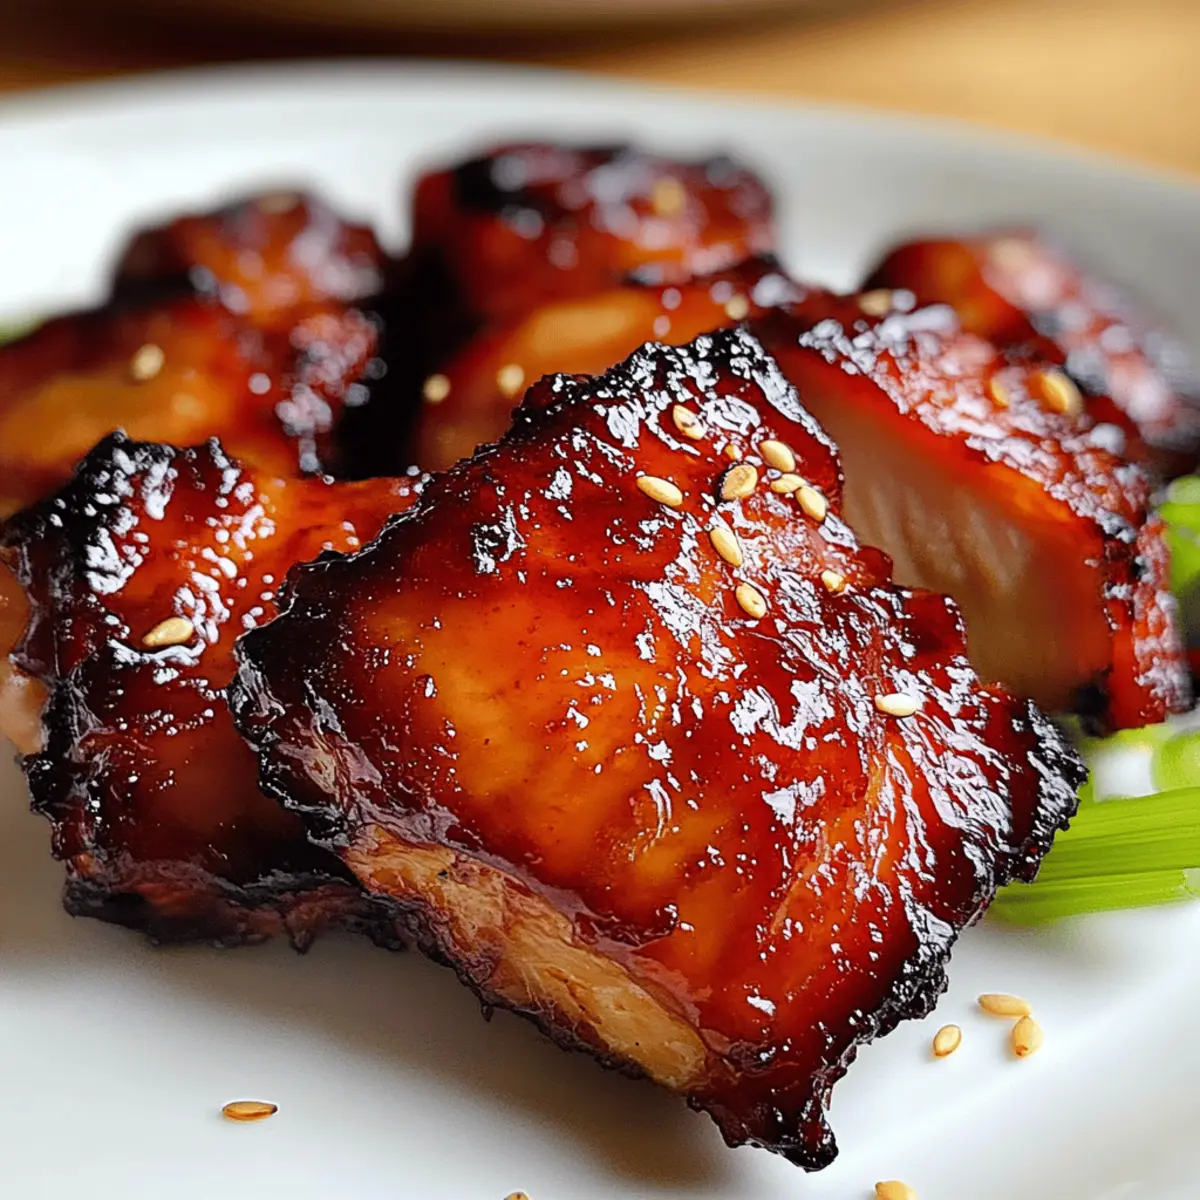
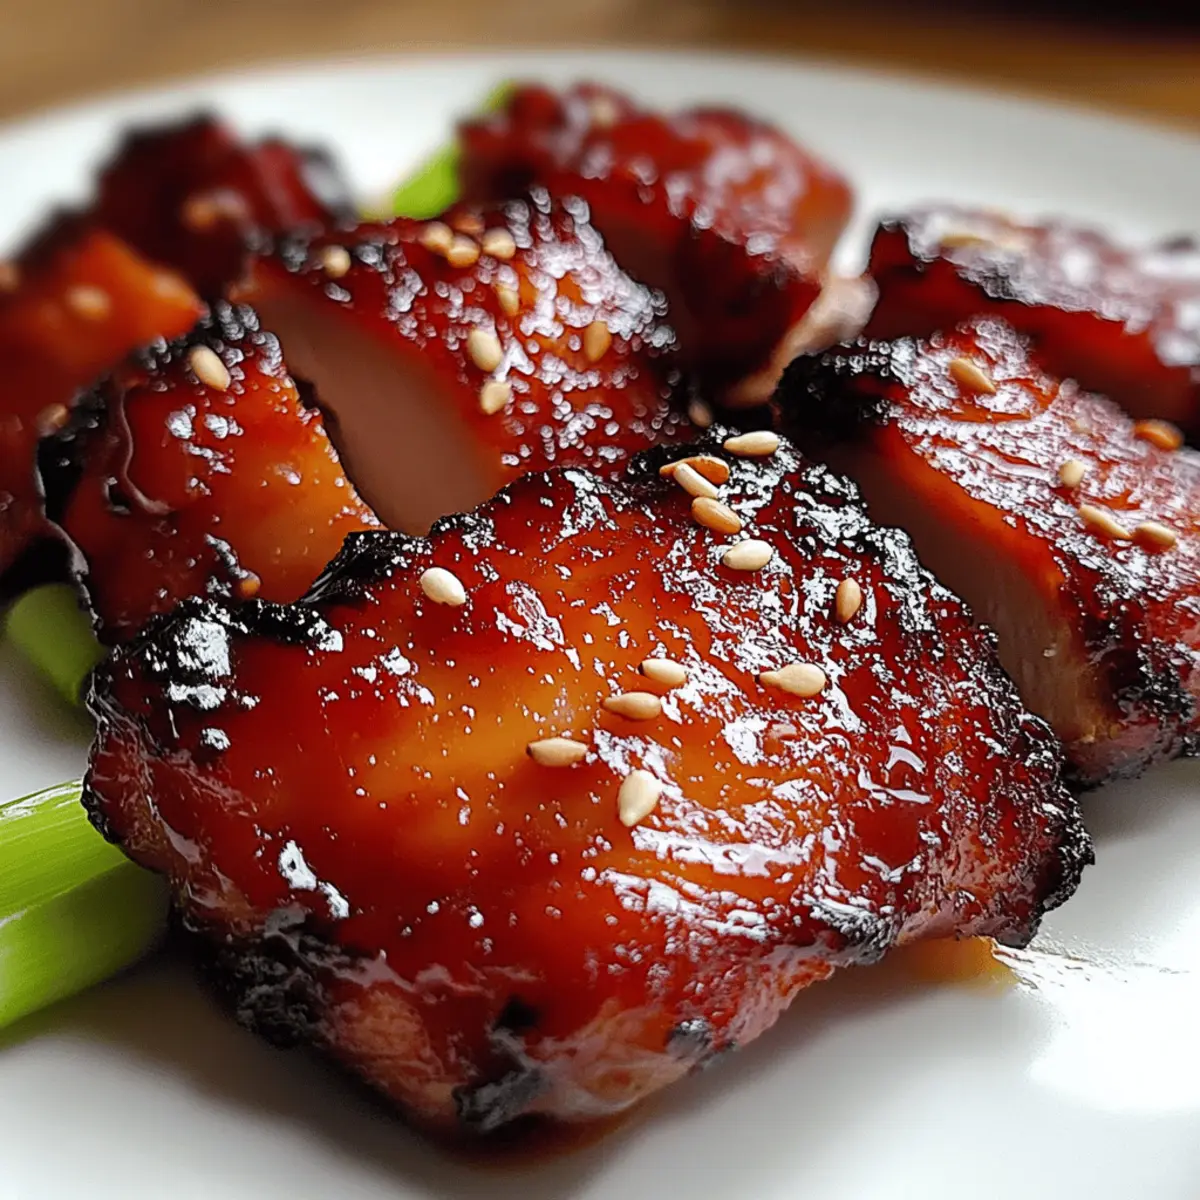
There’s something magical about the first bite of char siu chicken, its sticky-sweet glaze wrapping around tender, juicy meat. This irresistible dish brings the vibrant flavors of Cantonese barbecue straight to your dinner table, making it a standout choice for a busy weeknight. With just 10 minutes of prep, you can easily create a meal that’s both quick and satisfying—a true crowd-pleaser that will have everyone asking for seconds. Plus, the adaptability of the ingredients means you can personalize this recipe to your taste! Are you ready to dive into this delicious culinary adventure?

Why is Char Siu Chicken a must-try?

Flavorful Explosion: The sticky-sweet glaze promises a lively combination of sweet and savory that will tantalize your taste buds.

Quick and Easy: With only 10 minutes of prep, this dish transforms your weeknight dinners into a delightful culinary experience without the hassle.

Crowd-Pleasing Appeal: Perfect for family dinners or gatherings, prepare to receive compliments on this mouthwatering classic!

Versatile Ingredients: Feel free to swap chicken thighs for breasts or tofu, tailoring this recipe to your preferences.

Authentic Taste at Home: Skip the takeout and enjoy Cantonese barbecue magic right in your kitchen. Ready to impress? Pair it with some steamed rice or toss in a side of stir-fried vegetables for a complete meal! You might also love the flavors in our Jerk Chicken Burritos or our Grilled Chicken Sandwich.

Char Siu Chicken Ingredients

For the Chicken

  • Juicy Chicken Thighs – They provide tenderness and richness, making them perfect for this char siu chicken dish.
  • Garlic – Offers aromatic flavor; if you’re out of fresh, garlic powder works in a pinch.
  • Ginger – Adds warmth and depth; try using ginger powder if fresh isn’t available.

For the Marinade

  • Honey – This ingredient not only adds sweetness but also aids in achieving that lovely caramelized finish.
  • Hoisin Sauce – Essential for authentic Cantonese flavor; can be substituted with teriyaki or BBQ sauce in a pinch.
  • Soy Sauce – Provides umami and saltiness; choose a low-sodium option if preferred.
  • Warm Spices (like five-spice powder) – Enhances depth and complexity of flavor, making each bite memorable.

For Basting and Garnishing

  • Sesame Seeds – Sprinkle for a delightful crunch and nutty flavor contrast.
  • Sliced Green Onions – Adds freshness and visual appeal to the finished dish.

Step‑by‑Step Instructions for Char Siu Chicken

Step 1: Marinate the Chicken
In a medium bowl, combine honey, hoisin sauce, soy sauce, minced garlic, grated ginger, and warm spices to create a luscious marinade. Add the juicy chicken thighs, ensuring they’re well-coated in the mixture. Cover with plastic wrap and let it marinate in the refrigerator for at least 30 minutes, or up to overnight for deeper flavor infusion.

Step 2: Preheat the Oven or Grill
Preheat your oven to 400°F (200°C) or prepare your grill for medium heat. If using the oven, line a baking sheet with parchment paper to make cleanup easier. The heat will help the savory-sweet flavors of the char siu chicken to develop beautifully, caramelizing the glaze as it cooks.

Step 3: Arrange and Bake the Chicken
Once marinated, place the chicken thighs on the prepared baking sheet, spacing them evenly. Bake in the preheated oven for 25–30 minutes, or until the chicken is tender and the glaze is bubbling. Halfway through, baste the chicken with any remaining marinade to enhance the flavor and achieve that sticky-sweet finish.

Step 4: Grill or Broil for a Charred Finish
For an irresistible caramelized crust, preheat your grill or broiler after the chicken has baked. Grill the thighs, or broil for about 2 minutes per side, watching closely to prevent burning. This step gives the char siu chicken an authentic barbecue flavor and that signature charred appearance.

Step 5: Rest and Garnish
Once done, remove the chicken from the heat and let it rest for 5 minutes to allow the juices to redistribute. Slice the chicken and serve garnished with sesame seeds and sliced green onions for an added layer of flavor and a pop of color. This char siu chicken is now ready to impress everyone at your dinner table!

What to Serve with Irresistible Char Siu Chicken

Complete your delightful meal preparation with some perfect pairings that will expand the flavors of your char siu chicken experience.

  • Steamed Jasmine Rice: The fluffy texture of jasmine rice absorbs the sticky sauce beautifully, making every bite a comforting experience.

  • Stir-fried Vegetables: Crisp bell peppers, broccoli, and snap peas add color and crunch, balancing the flavors of the dish while providing a fresh element.

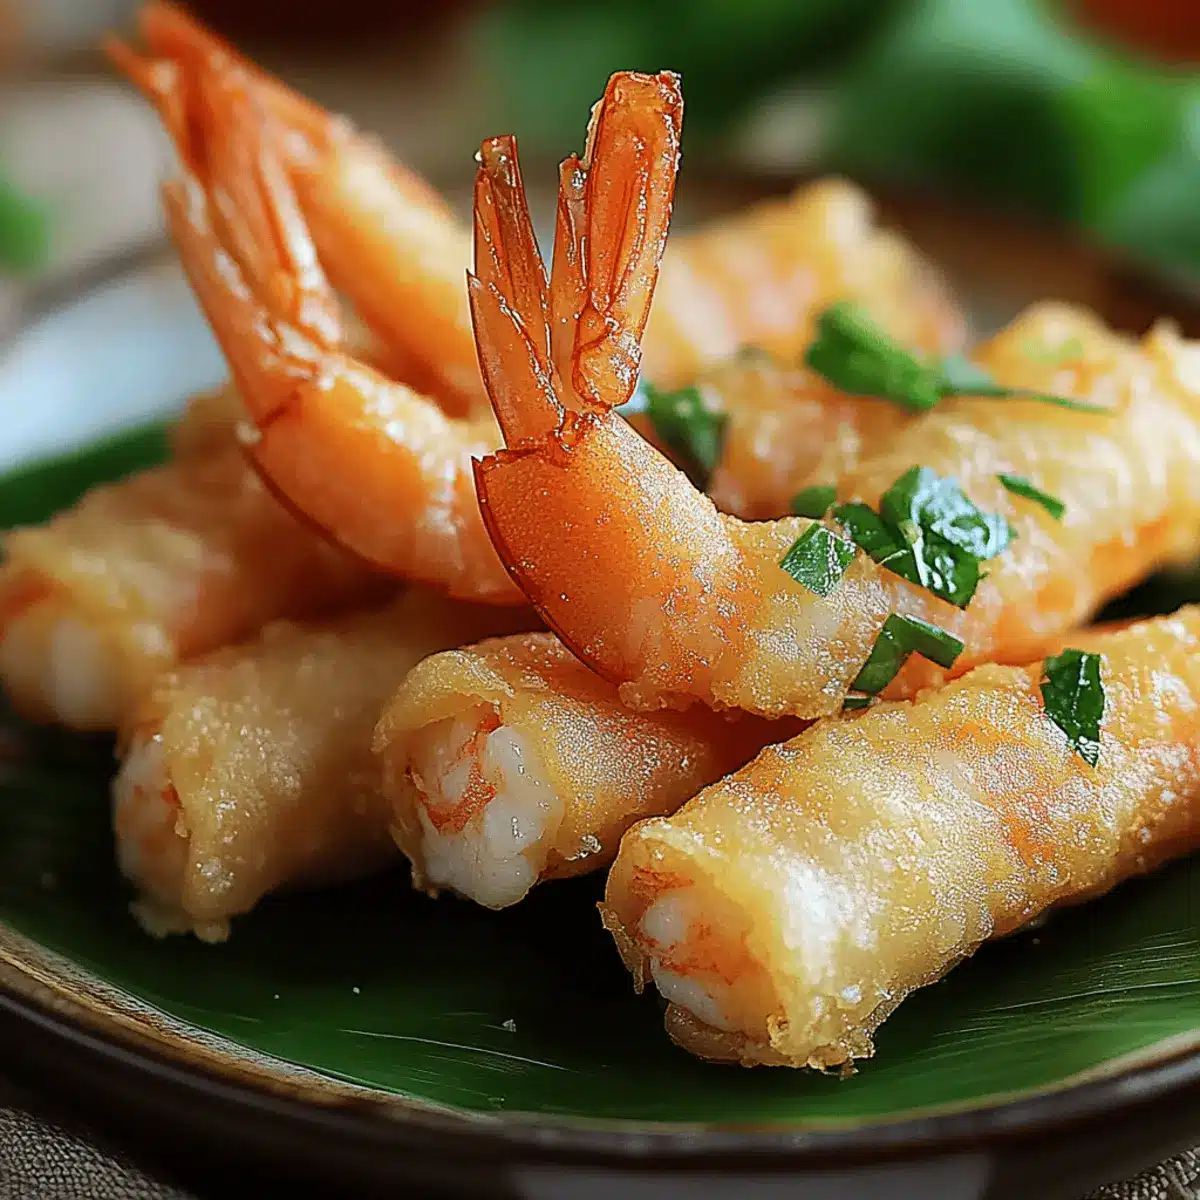
  • Crispy Egg Rolls: These golden bites offer a crunch that contrasts delightfully with the tender chicken. Plus, they hold a variety of savory fillings for added flavor.

  • Sesame Noodles: Serve these chilled or warm; their peanut sauce base complements the sweet and savory profile of char siu chicken, enhancing its deliciousness.

  • Cucumber Salad: A light, tangy cucumber salad with a hint of rice vinegar brings a refreshing foil to the meal. It’s a great way to cleanse your palate.

  • Mango Sticky Rice: A decadent dessert, the sweetness of ripe mango with sticky rice and coconut milk mirrors the char siu’s flavors, wrapping up the meal perfectly.

To wash it all down, consider pairing with green tea or a fruity white wine for a delightful and cohesive dining experience.

How to Store and Freeze Char Siu Chicken

Fridge: Store the cooked char siu chicken in an airtight container for up to 3 days. Make sure it’s completely cooled before sealing to preserve its flavorful juices.

Freezer: Wrap the chicken tightly in plastic wrap or aluminum foil, then place in a freezer bag. It can be frozen for up to 2 months, ensuring the sticky texture remains intact when reheated.

Reheating: For the best results, reheat leftover char siu chicken in a skillet on medium heat or under the broiler for a few minutes to maintain that delicious glaze and juicy texture.

Thawing: When ready to enjoy, thaw the chicken in the fridge overnight for even reheating and to keep it moist.

Make Ahead Options

Prepare your Irresistible Char Siu Chicken ahead of time to save valuable hours during busy weeknights! You can marinate the chicken for up to 24 hours in the refrigerator, ensuring it absorbs all those delicious flavors. Simply follow the marinating steps, then store the chicken in an airtight container. If you wish to prep the chicken further, you can bake it and refrigerate for up to 3 days; just reheat in a skillet or under the broiler to regain that sticky glaze. Whichever option you choose, rest assured that your char siu chicken will still be just as delicious when it’s time to serve!

Expert Tips for Char Siu Chicken

  • Marinate Wisely: Ensure the chicken thighs are well-coated in the marinade and consider marinating overnight for the best flavor infusion.

  • Keep an Eye on the Glaze: Monitor closely while grilling or broiling; the sweetness from the honey can burn quickly if left unattended.

  • Versatile Basting: Use leftover marinade for basting, but remember to set some aside before adding raw chicken to avoid cross-contamination.

  • Rest Before Slicing: Allow the cooked char siu chicken to rest for a few minutes before slicing to retain juiciness and flavor.

  • Customize Your Ingredients: Feel free to adapt the spices and sauces used based on what you have on hand, ensuring delicious results every time!

Char Siu Chicken: Delicious Variations

Feel free to tweak this char siu chicken recipe to make it your own and delight your taste buds!

  • Chicken Breasts: Swap chicken thighs for chicken breasts for a leaner option; just adjust the cooking time to avoid dryness. Lean and flavorful, they’ll still soak up all that tasty marinade beautifully.

  • Firm Tofu: For a vegetarian twist, replace the chicken with firm tofu, marinated the same way. Grilling it adds a smoky flavor, giving you that barbecue feel without the meat.

  • Spicy Kick: Add a dash of chili sauce or red pepper flakes to the marinade for a spicy version. The heat adds complexity, balancing perfectly with the sweetness of the glaze.

  • Pineapple Infusion: Incorporate crushed pineapple into your marinade for a tropical touch. This twist enhances the sweetness and adds a fruity dimension to the dish.

  • Peanut Butter Bliss: For a nutty flavor, mix a spoonful of peanut butter with the marinade. It creates a creamy texture that makes this dish even more indulgent.

  • Braised Option: Instead of baking, try braising the chicken on the stovetop for a deeply flavorful approach. Cook it in the marinade until tender, allowing the flavors to meld into each other.

  • Citrus Splash: Add fresh orange or lime juice to the marinade for a zesty lift. The citrus brightens the dish while enhancing the sweetness of the honey.

  • Sweet Potato Pairing: Try serving the char siu chicken with roasted sweet potatoes instead of rice. The natural sweetness of the potatoes complements the sticky glaze perfectly.

Explore these delightful variations to keep your meals exciting! And for more delicious chicken ideas, consider whipping up our Thai Chicken Meatball or indulge in Mexican Barbecue Chicken Tacos.

Char Siu Chicken Recipe FAQs

How do I choose the best chicken for char siu chicken?
Absolutely! For the best results, choose juicy chicken thighs, as they provide tenderness and richness that pairs beautifully with the sticky-sweet marinade. If you prefer a leaner option, chicken breasts work as well, but keep an eye on the cooking time, as they may require less time to bake, about 20-25 minutes.

What’s the best way to store leftover char siu chicken?
When storing leftover char siu chicken, allow it to cool completely, then place it in an airtight container before refrigerating. It will stay fresh for up to 3 days. Just remember, keeping it sealed helps preserve its juicy flavor and texture!

Can I freeze char siu chicken, and if so, how?
Yes, you can! Start by wrapping the cooked char siu chicken tightly in plastic wrap, then place it in a freezer bag to protect it from freezer burn. Make sure to remove as much air as possible. It can be frozen for up to 2 months. When you’re ready to enjoy it again, thaw in the fridge overnight for best results.

What should I do if the glaze burns while grilling?
Very important! If you notice the marinade is burning while grilling, lower the heat slightly or move the chicken to a cooler part of the grill. Keeping a close eye on it will help avoid that sticky-sweet glaze from turning bitter. I often recommend flipping the chicken more frequently if the glaze starts to darken too quickly.

Can I use substitutes for any ingredients in the recipe?
The more the merrier! If you’re out of hoisin sauce, feel free to swap it with teriyaki sauce or even BBQ sauce. For garlic and ginger, the powdered versions can be great alternatives if fresh isn’t accessible. Just remember, this recipe is versatile and customizable to your liking!

Is char siu chicken safe for pets or people with allergies?
If you have pets, it’s best to keep them away from char siu chicken, as garlic and onions can be harmful to dogs and cats. Additionally, if anyone dining has soy allergies, consider using coconut aminos as a soy sauce alternative, or you could create a flavorful marinade that avoids all allergens. Always check dietary needs before serving!

Char Siu Chicken

Sticky-Sweet Char Siu Chicken: Your New Weeknight Hero

Experience the magic of char siu chicken with its sticky-sweet glaze, tender meat, and vibrant Cantonese flavors, perfect for busy weeknights.
Prep Time 10 minutes
Cook Time 30 minutes
Marinating Time 30 minutes
Total Time 1 hour 10 minutes
Servings: 4 servings
Course: Chicken
Cuisine: Cantonese
Calories: 250

Ingredients
  

For the Chicken
  • 4 pieces Juicy Chicken Thighs Provides tenderness and richness.
  • 2 cloves Garlic Minced; can substitute with garlic powder.
  • 1 tablespoon Ginger Grated; try ginger powder if fresh isn’t available.
For the Marinade
  • 1/4 cup Honey Adds sweetness and caramelization.
  • 1/4 cup Hoisin Sauce For authentic Cantonese flavor.
  • 1/4 cup Soy Sauce Choose low-sodium option if preferred.
  • 1 teaspoon Warm Spices Like five-spice powder.
For Basting and Garnishing
  • 2 tablespoons Sesame Seeds For garnish.
  • 2 stalks Sliced Green Onions For garnish.

Equipment

  • Oven
  • Grill
  • Baking Sheet
  • Plastic Wrap
  • Medium Bowl

Method
 

Step-by-Step Instructions
  1. In a medium bowl, combine honey, hoisin sauce, soy sauce, minced garlic, grated ginger, and warm spices to create a marinade. Add chicken thighs and coat well. Cover and marinate in the refrigerator for at least 30 minutes.
  2. Preheat your oven to 400°F (200°C) or prepare your grill for medium heat. Line a baking sheet with parchment paper.
  3. Once marinated, place the chicken thighs on the prepared baking sheet. Bake for 25–30 minutes, basting halfway through.
  4. For a charred finish, grill or broil for about 2 minutes per side after baking.
  5. Let the chicken rest for 5 minutes before slicing. Garnish with sesame seeds and sliced green onions.

Nutrition

Serving: 1pieceCalories: 250kcalCarbohydrates: 14gProtein: 20gFat: 12gSaturated Fat: 3gPolyunsaturated Fat: 2gMonounsaturated Fat: 7gCholesterol: 85mgSodium: 600mgPotassium: 300mgFiber: 1gSugar: 8gVitamin A: 50IUVitamin C: 1mgCalcium: 20mgIron: 1mg

Notes

Customize spices and sauces based on what you have on hand. Ensure to monitor the glaze closely while grilling or broiling.

Tried this recipe?

Let us know how it was!

Indulgent Shirred Eggs: Easy Brunch Recipe to Impress

Stepping into the kitchen, I can’t help but be excited by the comforting aroma of freshly cracked eggs—a symbol of so many memorable brunches. Today, I’d love to share my delightful recipe for Shirred Eggs, a dish that’s as elegant as it is effortless. With silky textures and the rich flavors of Parmesan and chives, this creamy treat is perfect for any home chef looking to impress without stress. Not only do these shirred eggs come together in a snap, but they also allow for plenty of creative twists, accommodating various dietary preferences wonderfully. Whether you’re lingering over a lazy Sunday morning or prepping for a cozy gathering, these eggs will undoubtedly become your new go-to. Curious about how to elevate your brunch game? Let’s dive in!

Why are Shirred Eggs so Special?

Simple to Prepare: Even if you’re new to cooking, this egg dish comes together effortlessly, requiring minimal tools and techniques.

Rich and Creamy Flavor: The combo of heavy cream and Parmesan gives every bite a luxurious feel you’ll adore.

Perfectly Textured: Enjoy silky whites paired with runny yolks—a pairing that feels indulgent yet light.

Endless Variations: From dairy-free swaps to extra veggies, you can easily customize this recipe to fit your dietary needs or mood. Check out our suggestions for variations to truly make it your own!

Brunch Showstopper: Whether it’s a relaxed family breakfast or an elegant gathering, these shirred eggs will impress everyone at the table.

Shirred Eggs Ingredients

• To whip up these silky Shirred Eggs, gather the following ingredients for a brunch that’s both easy and impressive.

For the Base

  • Unsalted Butter – Adds richness and helps grease the ramekin; substitute with a dairy-free spread for a vegan version.
  • Heavy Cream – Provides a creamy texture; can be swapped with high-fat oat milk or a vegan cream alternative for dairy-free options.
  • Large Eggs – The star of the dish; opt for local, fresh eggs for optimal flavor.

For the Seasoning

  • Salt – Enhances flavor; adjust to taste for your personal preference.
  • Freshly Ground Black Pepper – Adds a mild heat; using freshly ground is preferable for maximum flavor.
  • Minced Fresh Chives – Offers a fresh, mild onion flavor; can be substituted with green onions or shallots if needed.

For the Finish

  • Grated Parmesan Cheese – Adds a savory and creamy element; this can be omitted for a dairy-free version.

Enjoy making your own spin on these delightful shirred eggs!

Step‑by‑Step Instructions for Shirred Eggs

Step 1: Preheat the Oven
Begin by preheating your oven to 375°F (190°C). This temperature will ensure that your Shirred Eggs bake evenly, giving you the perfect texture. While the oven warms up, gather your ramekins and grease them with butter to prepare for the creamy goodness that’s about to happen.

Step 2: Grease the Ramekin
Take a 6-ounce ramekin and add about a teaspoon of unsalted butter. Using a pastry brush or your fingers, coat the bottom and sides thoroughly to prevent the eggs from sticking. The shiny, buttered surface will help achieve a beautifully soft texture for your Shirred Eggs.

Step 3: Add the Cream
Pour a generous amount of heavy cream into the greased ramekin until it reaches about halfway. The cream will not only provide richness but also create a luscious base for the eggs. This step is essential for that lovely, creamy mouthfeel in your final dish.

Step 4: Crack the Eggs
Next, gently crack two large eggs on top of the cream, taking care to keep the yolks intact. Position them side by side in the ramekin, so they maintain their form while cooking. The contrast of the white and yolks will enhance the visual appeal of your Shirred Eggs.

Step 5: Season the Eggs
Sprinkle a pinch of salt and freshly ground black pepper over the eggs, followed by a sprinkle of minced chives and grated Parmesan cheese. The seasoning will elevate the flavor, bringing out the best in your Shirred Eggs. Be generous, but taste as you go to find your perfect balance.

Step 6: Bake the Dish
Place the ramekin on a baking sheet for easy handling, then transfer it to the preheated oven. Bake for about 12 to 15 minutes, keeping an eye on the eggs. You want the whites to be set while the yolks remain gloriously runny, resembling a silky custard.

Step 7: Rest Before Serving
Once baked, carefully remove the ramekin from the oven and let it rest for a couple of minutes. This pause allows the steam to settle and ensures your Shirred Eggs maintain their appealing, soft texture. While waiting, set the table and prepare your fresh toast or sides!

Step 8: Serve and Enjoy
With care, serve your delightful Shirred Eggs straight from the ramekin. Pair them with toasted bread or crispy potatoes for an elevated brunch experience. Enjoy the creamy richness and perfectly runny yolks while they’re fresh and warm!

What to Serve with Creamy Shirred Eggs

Start your brunch experience on a delicious note with tempting pairings that will elevate your creamy delight.

  • Air-Fryer Toast: Lightly crisped and warm, these toast slices are perfect for dipping into runny yolks, enhancing every bite.

  • Bacon-Wrapped Asparagus: This combo provides a savory crunch, with the salty bacon beautifully contrasting the creaminess of the eggs for a delightful flavor journey.

  • Mixed Greens Salad: A fresh, zesty salad balances the richness of Shirred Eggs while adding a crisp, healthful touch—perfect for that light brunch feel.

  • Sautéed Spinach: Tender, vibrant greens add an earthy note that complements the buttery eggs while packing in nutrients; it’s a match made in culinary heaven.

  • Creamy Potato Gratin: Indulgent and comforting, this dish offers a rich texture that rounds out your meal, ensuring no one leaves the table hungry.

  • Fresh Fruit Platter: A vibrant collection of seasonal fruits provides a refreshing and sweet contrast, cleansing the palate between bites of creamy eggs.

  • Sparkling Mimosa: This bubbly drink adds a touch of festivity to your brunch affair, with citrus notes brightening the flavors of the dish beautifully.

Expert Tips for Shirred Eggs

  • Use Fresh Eggs: Local, farm-fresh eggs provide the best flavor and texture. They will contribute to the creaminess of your shirred eggs.

  • Watch the Baking Time: Keep a close eye on the oven to prevent overcooking those delightful yolks; aim for 12-15 minutes for the perfect runny consistency.

  • Choose the Right Dish: Ramekins ensure even cooking. If using a larger dish, adjust the cooking time for perfectly set whites and runny yolks.

  • Season Generously: Don’t skimp on salt and pepper; proper seasoning elevates the overall flavor, making your shirred eggs a standout.

  • Serve Immediately: For the best experience, serve your shirred eggs fresh out of the oven. The texture and flavor are truly unbeatable when enjoyed right away!

Storage Tips for Shirred Eggs

  • Best Enjoyed Fresh: Shirred eggs are meant to be savored right after baking; they lose their luxurious texture when reheated.
  • Refrigeration: If you have leftovers, store them in an airtight container in the fridge for up to 2 hours; however, taste and quality may diminish.
  • Freezing Not Recommended: Due to the delicate nature of the eggs, freezing is not advised, as it alters their texture and flavor significantly.
  • Reheating Caution: If reheating is necessary, do so gently in the oven at a low temperature until warmed through, being careful not to overcook the yolks.

Make Ahead Options

These creamy Shirred Eggs are an excellent option for meal prep, making your brunch experience both delightful and stress-free! You can prepare the base by greasing the ramekins and adding heavy cream and seasonings up to 24 hours in advance. To maintain quality, cover the ramekins with plastic wrap and refrigerate until you’re ready to bake. When it’s time to serve, simply crack the eggs on top, season them as desired, and pop them in the oven. Bake as instructed, and you’ll enjoy perfectly runny yolks and silky whites with minimal effort, making your busy mornings a breeze!

Shirred Eggs: Delicious Variations to Try

Feel free to customize these Shirred Eggs to make them uniquely yours—let your creativity roam in the kitchen!

  • Dairy-Free: Replace butter with a vegan spread and use coconut cream for a luscious, dairy-free twist.

  • Veggie-Packed: Add sautéed spinach, bell peppers, or mushrooms for a delightful, colorful veggie boost that adds flavor and nutrition.

  • Herb Infusion: Swap out chives for fresh dill or parsley, creating entirely new flavor profiles that brighten your dish.

  • Cheese Alternatives: Try feta or goat cheese instead of Parmesan for a tangy surprise that pairs beautifully with the eggs.

  • Spicy Kick: Sprinkle in some red pepper flakes or diced jalapeños to bring a little heat to your brunch table.

  • Savory Touch: Consider layering in smoked salmon or crispy bacon before adding the eggs for an elegant touch that elevates this dish.

  • Healthy Grain: Serve alongside quinoa or brown rice for a hearty, nutritious brunch option that complements the creamy eggs wonderfully.

These variations not only enhance the flavor but also make the recipe more versatile! Pair them with sides like Air-Fryer Breakfast Potatoes or a refreshing Mimosa to round out your brunch experience. Enjoy experimenting!

Shirred Eggs Recipe FAQs

What should I look for when selecting eggs?
Absolutely! For the best flavor and texture in your Shirred Eggs, choose local, farm-fresh large eggs. Look for eggs with clean, uncracked shells and check the expiration date to ensure freshness.

What is the best way to store leftover Shirred Eggs?
Shirred eggs are best enjoyed fresh! If you have leftovers, place them in an airtight container and refrigerate for up to 2 hours. The texture may change and become less creamy, so it’s ideal to consume them soon after cooking.

Can Shirred Eggs be frozen?
No, I wouldn’t recommend freezing Shirred Eggs. Freezing alters the delicate texture of the eggs, leading to rubbery whites and grainy yolks when thawed. It’s best to enjoy them right after baking for that creamy, luxurious experience.

How can I fix overcooked Shirred Eggs?
If you’ve overcooked your Shirred Eggs and the yolks aren’t runny anymore, don’t fret! While there’s no magic fix for a runny yolk, you can always turn it into a delicious egg salad or add it to a savory dish for added protein. Just chop and mix with a little mayo, mustard, and seasonings for a tasty twist!

Are there any dietary considerations with this recipe?
Very! This recipe can easily be adapted for various dietary needs. For a dairy-free version, swap out the unsalted butter for a dairy-free spread, and replace heavy cream with coconut cream or vegan cashew cream. Just keep in mind that if you’re preparing these for anyone with food allergies, always double-check your ingredient labels!

Can I prepare Shirred Eggs ahead of time?
I wouldn’t recommend it, as Shirred Eggs are best enjoyed fresh. However, you can prep individual ramekins by greasing them and having your cream and eggs ready to go. Just pop them in the oven when you’re ready to serve for a quick and delightful brunch!

Shirred Eggs

Indulgent Shirred Eggs: Easy Brunch Recipe to Impress

Indulge in Shirred Eggs, a luxurious brunch dish with creamy textures and rich flavors, perfect for impressing guests.
Prep Time 5 minutes
Cook Time 15 minutes
Resting Time 2 minutes
Total Time 22 minutes
Servings: 2 servings
Course: Breakfast
Cuisine: American
Calories: 350

Ingredients
  

For the Base
  • 1 tablespoon Unsalted Butter Substitute with a dairy-free spread for a vegan version.
  • 1/2 cup Heavy Cream Can be substituted with high-fat oat milk or vegan cream.
  • 2 large Large Eggs Opt for local, fresh eggs.
For the Seasoning
  • 1 pinch Salt Adjust to taste.
  • 1 pinch Freshly Ground Black Pepper Preferably freshly ground.
  • 1 tablespoon Minced Fresh Chives Can substitute with green onions or shallots.
For the Finish
  • 1/4 cup Grated Parmesan Cheese Omit for a dairy-free version.

Equipment

  • Oven
  • Ramekin
  • Pastry Brush

Method
 

Step-by-Step Instructions
  1. Preheat the oven to 375°F (190°C) and grease ramekins with unsalted butter.
  2. Grease the bottom and sides of a 6-ounce ramekin with about a teaspoon of unsalted butter.
  3. Pour heavy cream into the greased ramekin until it is halfway full.
  4. Crack two large eggs on top of the cream, keeping the yolks intact.
  5. Season with salt, black pepper, minced chives, and grated Parmesan.
  6. Place the ramekin on a baking sheet and bake for 12 to 15 minutes.
  7. Let the baked ramekin rest for a couple of minutes before serving.
  8. Serve immediately with toasted bread or crispy potatoes.

Nutrition

Serving: 1servingCalories: 350kcalCarbohydrates: 3gProtein: 14gFat: 30gSaturated Fat: 15gPolyunsaturated Fat: 1gMonounsaturated Fat: 8gCholesterol: 370mgSodium: 350mgPotassium: 300mgSugar: 1gVitamin A: 500IUVitamin C: 2mgCalcium: 200mgIron: 2mg

Notes

Shirred eggs are best enjoyed fresh out of the oven for optimal texture and flavor.

Tried this recipe?

Let us know how it was!

Beef Chile Colorado: A Comforting Mexican Stew Delight

As I stood in my kitchen, the warm aroma of toasting chilies enveloped me, instantly transporting me back to vibrant family gatherings and Sunday dinners. There’s something undeniably special about crafting an Authentic Beef Chile Colorado, a hearty Mexican stew that warms not just the belly but the soul. This recipe allows you to embrace the timeless art of slow cooking, resulting in tender, succulent beef smothered in a rich, spicy red sauce that will leave your taste buds dancing. Not only is it a comforting dish perfect for chilly evenings, but it also allows for quick prep and easy leftovers that taste even better the next day. So, are you ready to dive into a bowl of this delightful stew and create your own heartwarming memories?

Why is Beef Chile Colorado a Must-Try?

Comforting, this traditional stew is a warm embrace on cold nights, making it the perfect dish for gathering friends and family. Flavor-packed, the delicate balance of spices and chilies creates a symphony of taste, allowing each bite to transport you to the heart of Mexico. Versatile, it pairs beautifully with various sides from Mexican rice to comforting tortillas. Easy to make, even novice cooks can impress with this simple, straightforward recipe. Plus, the leftovers only get better as the flavors meld, inviting you to relish every moment. Dive into this culinary journey, and you’ll be hooked!

Beef Chile Colorado Ingredients

For the Stew

  • Beef chuck – Provides the stew’s main protein source, resulting in tender chunks when simmered. Substitute with brisket or round if chuck is unavailable.
  • Kosher salt – Enhances the flavor of the beef and sauce. Use sea salt as an alternative.
  • Freshly ground black pepper – Adds essential seasoning to the meat. Pre-ground black pepper is fine, but fresh is preferred for robust flavor.
  • Flour – Coats the beef for better browning and helps thicken the sauce. Substitute with cornstarch for a gluten-free option.
  • Neutral oil – For searing the beef. Can use vegetable or canola oil; avoid olive oil for high heat.
  • Yellow onion – Adds sweetness and depth to the flavor base. Shallots can be a substitute if desired.
  • Garlic cloves – Provide aromatic flavor. Garlic powder can be used in a pinch, though fresh is optimal.
  • Guajillo chilies – Key ingredient for the rich red color and flavor profile. Substitute with California chilies but adjust for spiciness.
  • Ancho chilies – Contribute sweetness and a mild heat. Milder chipotle can be used for a smoky flavor instead.
  • Chile de arbol – Adds heat and a complexity to the sauce. Omit for milder stew or adjust according to heat preference.
  • Ground cumin – Introduces earthiness. Coriander can be used as a milder substitute.
  • Ground coriander – Complements the cumin with a citrus note. Leave out if unavailable; the balance will be slightly different.
  • Dried Mexican oregano – Enhances the stew’s flavor with its aromatic notes. Regular oregano works in a pinch; adjust amount as it can be stronger.
  • Beef broth – The base liquid for simmering the stew, affecting flavor depth. Homemade broth or low-sodium versions can be used for health considerations.
  • Fresh bay leaves – Add flavor during cooking. Do not substitute with dried as they have different intensities.

For Serving

  • Corn tortillas – Serve warm for an authentic presentation. Use flour tortillas if preferred.
  • White onion, cilantro, radishes, lime wedges – Fresh toppings that enhance the dish’s flavor and aesthetics.

With these Beef Chile Colorado ingredients, you’re on your way to crafting an authentic Mexican stew right in your kitchen!

Step‑by‑Step Instructions for https://somuchfoodblog.com/beef-chile-colorado/

Step 1: Toast the Dried Chilies
In a dry skillet over medium heat, toast the guajillo, ancho, and chile de arbol for 2-3 minutes until fragrant, stirring frequently to prevent burning. Once toasted, remove the chilies from the heat and place them into a pot with chopped yellow onion and garlic cloves. Cover with simmering water and let soak for about 10 minutes until softened.

Step 2: Blend the Sauce
Transfer the soaked chilies, onion, and garlic into a blender. Add 1 cup of the soaking liquid and blend on high until the mixture is completely smooth, creating a vibrant sauce. Season the sauce with kosher salt and freshly ground black pepper to taste, ensuring the flavors are balanced for your Beef Chile Colorado.

Step 3: Prepare the Beef
While the sauce blends, cut the beef chuck into 2-inch cubes, ensuring even bites. Season the beef generously with kosher salt and black pepper, then dust each piece lightly with flour for improved browning. This step will help thicken the stew as it cooks, adding to the rich texture of your beef chile colorado.

Step 4: Sear the Beef
In a large Dutch oven, heat a couple of tablespoons of neutral oil over medium-high heat. Once the oil is shimmering, add the seasoned beef in batches, making sure not to overcrowd the pot. Brown all sides of the beef for about 6-8 minutes until a deep golden crust forms, which adds depth to the flavor of your stew.

Step 5: Combine and Add Liquid
Once all the beef is browned, carefully remove any excess oil from the Dutch oven. Return the beef to the pot, pour in the blended chile sauce, and add enough beef broth to cover the meat. Toss in a couple of fresh bay leaves to infuse the dish with aromatic flavor. Stir everything together to combine the ingredients well.

Step 6: Simmer to Tenderness
Bring the beef chile colorado mixture to a gentle simmer, then reduce the heat to low. Cover the Dutch oven and let the stew simmer for about 2 hours, stirring occasionally. As it simmers, skim off any excess oil that rises to the surface, and ensure the beef becomes tender and develops deep, satisfying flavors.

Step 7: Serve the Dish
When the beef is fork-tender and the sauce has thickened beautifully, it’s time to serve your delicious Beef Chile Colorado. Warm corn tortillas and prepare fresh toppings like diced white onion, chopped cilantro, sliced radishes, and lime wedges. Ladle generous portions of the stew into bowls and top with your desired garnishes for an authentic experience.

Beef Chile Colorado Variations & Substitutions

Feel free to get creative with Beef Chile Colorado and customize it to your taste; the flavors invite fun twists!

  • Pork Substitute: Swap out beef for pork shoulder for a succulent, slightly sweeter alternative that pairs beautifully with the spices.

  • Vegetarian Option: Replace meat with hearty mushrooms or jackfruit, making a rich, plant-based version that still delivers on texture and flavor.

  • Gluten-Free: Use cornstarch instead of flour to ensure your stew remains gluten-free while maintaining its delightful thickness.

  • Additional Veggies: Toss in carrots or potatoes during simmering; they soak up the sauce and add extra heartiness to the stew.

  • Heat Levels: Adjust spiciness by using fewer chile de arbol or adding a touch of smoked paprika for a milder, smoky flavor.

  • Flavor Boost: Elevate your stew with a splash of apple cider vinegar just before serving for a brightness that cuts through the richness.

  • Serving Style: Instead of tortillas, serve your stew over a bed of fluffy Mexican rice or alongside savory borracho beans for a complete meal.

  • Fresh Toppings: Amp up the flavor with toppings like crumbled queso fresco or sliced avocados, bringing a creamy balance to the heat of the stew.

Make Ahead Options

Beef chile colorado is a fantastic option for meal prep, allowing you to savor rich flavors without the last-minute rush. You can prepare the sauce and even brown the beef up to 24 hours in advance. Simply toast and soak the chilies, blend the sauce, and cook the beef as directed, then refrigerate the components separately. To maintain quality, store the beef and sauce in airtight containers, which helps preserve their flavors and prevents separation. When ready to enjoy, simply reheat the beef and sauce together over low heat until warmed through, and serve with freshly warmed tortillas and toppings for a delicious, comforting meal that feels effortless!

What to Serve with Beef Chile Colorado?

Every bowl of this rich, spicy stew deserves delightful companions that brighten and elevate your meal, making your dining experience truly memorable.

  • Mexican Rice: The fluffy texture and subtle flavors of this rice complement the stew, soaking up the delicious sauce.

  • Warm Tortillas: Soft, warm tortillas are perfect for wrapping around the beef and sauce, enhancing the comforting experience with each bite.

  • Fresh Guacamole: Creamy and rich, guacamole balances the heat and spices beautifully, adding an extra layer of indulgence to your plate.

  • Pico de Gallo: This fresh salsa made with diced tomatoes, onions, and cilantro brightens up the dish with its zesty flavors, harmonizing with the stew’s warmth.

  • Refried Beans: Creamy and savory, refried beans add a hearty element on the side, amplifying the dish’s comforting nature.

  • Corn on the Cob: Sweet and crunchy corn complements the rich beef stew, adding a delightful contrast and a pop of color to your meal.

Enjoy a refreshing drink pairing such as Horchata to cleanse your palate. This sweet, creamy beverage pairs wonderfully with the bold flavors of beef chile colorado, making your meal an unforgettable celebration of taste!

How to Store and Freeze Beef Chile Colorado

Fridge: Store leftover Beef Chile Colorado in an airtight container for up to 5 days. The flavors will enhance over time, making leftovers a delight.

Freezer: For longer storage, freeze the stew in a freezer-safe container for up to 3 months. To maintain quality, ensure the container is airtight to prevent freezer burn.

Reheating: Thaw in the refrigerator overnight before reheating. Warm on the stove over medium heat, adding a splash of beef broth if the sauce thickens too much.

Serving Suggestions: Always serve with fresh toppings like cilantro, lime, and warm tortillas for an authentic experience.

Expert Tips for Beef Chile Colorado

  • Searing Matters: Always brown the beef well; this creates a flavorful crust that enhances the overall taste of the stew. Don’t rush this step!

  • Chili Toasting: Be cautious while toasting dried chilies. Just a minute or two for optimal aroma; burnt chilies can lead to bitterness in your Beef Chile Colorado.

  • Slow Simmer: The longer you simmer, the more tender the meat becomes. Ideal simmering time is about 2 hours, allowing flavors to deepen.

  • Avoid Pre-Ground Spices: Use freshly ground spices like black pepper for a robust flavor boost. Pre-ground spices can taste stale.

  • Storage Perks: Leftovers taste even better the next day! Store your Beef Chile Colorado in an airtight container in the refrigerator for up to 5 days.

Beef Chile Colorado Recipe FAQs

How do I choose the right beef for my stew?
Absolutely! I recommend using beef chuck for its tender, melt-in-your-mouth texture when slow-cooked. If chuck isn’t available, you can substitute brisket or round cuts for a similar effect. Look for meat with a good amount of marbling, as fat contributes to the stew’s richness.

What’s the best way to store leftover Beef Chile Colorado?
For sure! Store leftover Beef Chile Colorado in an airtight container in the refrigerator for up to 5 days. The flavors will deepen and meld, making leftovers even more delicious. Just make sure to let the stew cool completely before sealing it in the container, to promote freshness!

Can I freeze Beef Chile Colorado? If so, how?
Yes, you can! Freeze Beef Chile Colorado in a freezer-safe, airtight container for up to 3 months. To freeze, let the stew cool completely, then portion it into containers or freezer bags. Make sure to remove as much air as possible before sealing to avoid freezer burn. When you’re ready to enjoy it again, thaw overnight in the refrigerator and reheat on the stove over medium heat until warmed through.

What if I find my stew too spicy?
Very understandable! If your Beef Chile Colorado turns out spicier than you’d like, you can always balance the heat by adding more beef broth or a bit of cream to mellow the spices. Another option is to add a starchy vegetable, like diced potatoes or carrots, which can absorb some of the heat while also adding a lovely sweetness.

Is Beef Chile Colorado safe for pets?
Keep in mind that this hearty stew contains ingredients like onion and garlic, which can be toxic to pets. Always serve them their own treats instead! If you’re looking to make a pet-friendly meal, consider plain cooked meat or veggies without any seasoning.

https://somuchfoodblog.com/beef-chile-colorado/

Beef Chile Colorado: A Comforting Mexican Stew Delight

This Beef Chile Colorado recipe brings a comforting and flavorful Mexican stew to your kitchen, perfect for chilly evenings.
Prep Time 30 minutes
Cook Time 2 hours
Total Time 2 hours 30 minutes
Servings: 6 servings
Course: Beef
Cuisine: Mexican
Calories: 350

Ingredients
  

For the Stew
  • 2 pounds beef chuck Substitute with brisket or round if chuck is unavailable.
  • 1 teaspoon kosher salt Use sea salt as an alternative.
  • 1 teaspoon freshly ground black pepper Pre-ground black pepper is fine, but fresh is preferred for robust flavor.
  • 1/4 cup flour Substitute with cornstarch for a gluten-free option.
  • 2 tablespoons neutral oil Can use vegetable or canola oil; avoid olive oil for high heat.
  • 1 medium yellow onion Shallots can be a substitute if desired.
  • 4 cloves garlic Garlic powder can be used in a pinch, though fresh is optimal.
  • 4 pieces guajillo chilies Substitute with California chilies but adjust for spiciness.
  • 2 pieces ancho chilies Milder chipotle can be used for a smoky flavor instead.
  • 2 pieces chile de arbol Omit for milder stew or adjust according to heat preference.
  • 1 teaspoon ground cumin Coriander can be used as a milder substitute.
  • 1 teaspoon ground coriander Leave out if unavailable; the balance will be slightly different.
  • 1 tablespoon dried Mexican oregano Regular oregano works in a pinch; adjust amount as it can be stronger.
  • 4 cups beef broth Homemade broth or low-sodium versions can be used for health considerations.
  • 2 leaves fresh bay leaves Do not substitute with dried as they have different intensities.
For Serving
  • 8 pieces corn tortillas Use flour tortillas if preferred.
  • 1 cup white onion, diced
  • 1 cup cilantro, chopped
  • 1 cup radishes, sliced
  • 2 pieces lime wedges

Equipment

  • Skillet
  • blender
  • Dutch oven

Method
 

Step-by-Step Instructions
  1. In a dry skillet over medium heat, toast the guajillo, ancho, and chile de arbol for 2-3 minutes until fragrant, stirring frequently to prevent burning. Once toasted, remove the chilies from the heat and place them into a pot with chopped yellow onion and garlic cloves. Cover with simmering water and let soak for about 10 minutes until softened.
  2. Transfer the soaked chilies, onion, and garlic into a blender. Add 1 cup of the soaking liquid and blend on high until the mixture is completely smooth, creating a vibrant sauce. Season the sauce with kosher salt and freshly ground black pepper to taste, ensuring the flavors are balanced.
  3. While the sauce blends, cut the beef chuck into 2-inch cubes, and season generously with kosher salt and black pepper. Dust each piece lightly with flour for improved browning.
  4. In a large Dutch oven, heat a couple of tablespoons of neutral oil over medium-high heat. Add the seasoned beef in batches, browning all sides for about 6-8 minutes until a deep golden crust forms.
  5. Carefully remove any excess oil from the Dutch oven. Return the beef to the pot, pour in the blended chile sauce, and add enough beef broth to cover the meat. Toss in fresh bay leaves. Stir everything together to combine well.
  6. Bring the mixture to a gentle simmer, then reduce the heat to low. Cover and let simmer for about 2 hours, stirring occasionally. Skim off any excess oil that rises to the surface.
  7. When the beef is fork-tender and the sauce has thickened beautifully, serve your Beef Chile Colorado with warm corn tortillas and fresh toppings like diced onion, chopped cilantro, sliced radishes, and lime wedges.

Nutrition

Serving: 1cupCalories: 350kcalCarbohydrates: 28gProtein: 30gFat: 15gSaturated Fat: 5gPolyunsaturated Fat: 1gMonounsaturated Fat: 9gCholesterol: 100mgSodium: 600mgPotassium: 800mgFiber: 5gSugar: 2gVitamin A: 15IUVitamin C: 20mgCalcium: 6mgIron: 20mg

Notes

Leftovers taste better the next day! Store in an airtight container in the refrigerator for up to 5 days.

Tried this recipe?

Let us know how it was!

Easy and Festive Fudge Christmas Trees for Sweet Celebrations

As I stood in my kitchen, a whirlwind of holiday spirit surrounded me, filling the air with the sweet scent of nostalgia. That’s when I decided to whip up these charming 3-Ingredient Creme de Menthe Fudge Christmas Trees, a festive dessert that’s as delightful to share as it is to eat. The secret to these easy fudge creations? They’re incredibly quick to make, and their minty freshness adds a blissful twist that adults and kids alike will adore. Perfect for holiday gatherings or cookie platters, these fudge Christmas Trees not only look stunning but also offer a crowd-pleasing treat that can be made in no time. So, are you ready to spread some cheer with these deliciously festive delights?

Why are these fudge Christmas trees special?

Irresistible Treat: These delightful 3-Ingredient Creme de Menthe Fudge Christmas Trees bring holiday cheer in every bite! Quick and Easy: With just three simple ingredients, you can whip up a batch in no time, making them perfect for last-minute gatherings. Festive and Fun: The charming tree shapes are gorgeous on any holiday platter, inviting smiles all around! Minty Freshness: Dive into the unique flavor of creamy fudge combined with a refreshing minty twist. Creative Variations: Feel free to personalize with different shapes or an extra dash of peppermint extract for added zing!

Fudge Christmas Trees Ingredients

For the Fudge
Green Candy Melts – Essential for vibrant color and structure; swap with any colored melting chocolate if needed.
Sweetened Condensed Milk – The creamy binder that creates the perfect fudge texture; do not substitute!
Creme de Menthe Liquor/Syrup – Delivers that delightful minty flavor; choose syrup for a non-alcoholic option.

For the Decoration
Rainbow Nonpareils – Adds a festive sparkle; feel free to use other sprinkles for a personal touch.
Gold Star Sprinkles – Perfect for topping your trees, offering an enchanting holiday flair; substitute with other fun sprinkles as desired.

Step‑by‑Step Instructions for Fudge Christmas Trees

Step 1: Melt Candy Melts
Begin by placing the Green Candy Melts in a microwave-safe bowl. Heat in the microwave on high for 1 minute, then stir. Continue heating in 15-second intervals, stirring after each, until the melts are fully melted and smooth. This soft, glossy consistency is what you’re aiming for to create beautiful Fudge Christmas Trees.

Step 2: Mix in Condensed Milk
Once the candy melts are smooth, add the sweetened condensed milk and Creme de Menthe to the mixture. Stir vigorously until all the ingredients are completely combined and the mixture is thick and creamy. This blend will give your Fudge Christmas Trees their delightful minty flavor and luscious texture.

Step 3: Cool Fudge
Cover your bowl with a clean kitchen towel or plastic wrap and let the mixture cool at room temperature. Stir every 5 minutes until it reaches a thick, frosting-like consistency—about 20-30 minutes. This cooling process is essential to ensure that the fudge is workable for piping into the shape of cute trees.

Step 4: Pipe Trees
Prepare a piping bag fitted with a star tip. Once the fudge has cooled to the right consistency, transfer the mixture to the piping bag. On a parchment-lined baking sheet, carefully pipe the fudge into tree shapes, starting with a triangular base and tapering to a point at the top. This will create the fun Fudge Christmas Trees that are sure to impress!

Step 5: Decorate
Now comes the fun part—decorating! Gently top each fudge tree with gold star sprinkles for that festive touch, then add rainbow nonpareils for a burst of color. Take your time to create a visually appealing arrangement that will brighten up any holiday platter. Allow the trees to set at room temperature until firm before serving.

Expert Tips for Fudge Christmas Trees

  • Gentle Heating: Make sure to melt candy melts slowly; overheating can cause them to burn. Use a microwave at reduced power if necessary.
  • Consistency Check: If your fudge mixture thickens too much before piping, return it to a warm spot and stir gently. This will keep it manageable for shaping.
  • Mint Boost: For an extra minty kick, consider adding a teaspoon of peppermint extract after mixing in the other ingredients. It enhances the flavor of your fudge Christmas trees significantly!
  • Sprinkle Substitution: If you can’t find gold star sprinkles, don’t worry! Other shapes of sprinkles can be just as festive and may add a unique twist to your decorations.
  • Piping Practice: If you’re new to piping, practice on a sheet of parchment paper first to get a feel for the technique before creating your fudge trees.

Variations & Substitutions for Fudge Christmas Trees

Feel free to get creative and customize your fudge trees with these fun and flavorful twists!

  • Add Peppermint Extract: For an extra minty flavor, stir in peppermint extract to enhance the fudge’s freshness.
  • Different Shapes: Use different piping tips to create fun holiday shapes, like stars or bells, adding variety to your festive treats.
  • Colorful Melts: Swap the green candy melts for red or white versions for a playful take on holiday colors—perfect for any winter celebration.
  • Nutty Crunch: Incorporate finely chopped nuts, like almonds or walnuts, into the fudge mixture for an added texture and flavor contrast.
  • Dairy-Free Version: Use dairy-free sweetened condensed milk and plant-based candy melts for a delicious vegan alternative without sacrificing taste.
  • Spicy Kick: Mix in a sprinkle of cayenne pepper or chili powder for an unexpected warmth that balances the sweetness beautifully.
  • Chocolate Lover’s Delight: Drizzle melted chocolate over the cooled fudge trees for an extra layer of indulgence—a rich companion to the minty flavors.
  • Serving Suggestions: Pair these fudge trees with an array of holiday cookies, perhaps trying your hand at some sugar cookie shapes for an extra festive flair!

With these variations, your fudge Christmas trees will be even more delightful and perfect for sharing at any holiday gathering!

What to Serve with 3-Ingredient Festive Creme de Menthe Fudge Christmas Trees

As you gather around the festive table, envision a delightful selection that accentuates the charming sweetness of these fudge Christmas trees.

  • Creamy Mashed Potatoes: Their buttery texture creates a comforting contrast to the minty fudge – a delicious harmony of flavors on your holiday table.
  • Chocolate Peppermint Cookies: These cookies reinforce the mint theme while introducing a rich chocolatey texture that complements the creamy fudge.
  • Fruit Medley: A fresh assortment of strawberries, kiwi, and oranges adds color and brightness, balancing the sweetness of the fudge with a crisp, juicy finish.
  • Hot Chocolate Bar: Set up a cozy hot chocolate station with whipped cream and chocolate shavings. The warm drink pairs perfectly with the rich fudge, inviting everyone to indulge.
  • Hazelnut Coffee: The nutty notes in hazelnut coffee elevate the minty flavors of the fudge while providing a warm, inviting aroma, perfect for holiday gatherings.
  • Mini Cheesecakes: Whether flavored with peppermint or classic vanilla, these little cakes add a creamy layer that contrasts beautifully with the fudge’s sweetness and texture.
  • Caramel Apple Slices: Sweet, tart, and utterly delightful, these refreshing slices topped with caramel bring a crunchy bite alongside the smooth fudge.
  • Christmas Punch: A festive, fruity punch can tie all the desserts together and provide a refreshing counterpoint to the rich flavors of the fudge trees.
  • Gingerbread Men: Classic gingerbread cookies offer a spiced crunch that perfectly complements the fudge’s smoothness and adds a fun holiday touch.
  • Pecan Pie: The nutty richness of pecan pie serves as a traditional dessert option that harmonizes the minty taste of the fudge while adding a holiday classic to the mix.

Storage Tips for Fudge Christmas Trees

  • Room Temperature: Store your Fudge Christmas Trees in an airtight container at room temperature for up to 2 weeks, ensuring they remain soft and fresh.
  • Fridge: If you prefer a firmer texture, you can store the fudge in the fridge for up to 3 weeks, but remember to let it sit at room temperature for a few minutes before serving.
  • Freezer: For longer storage, freeze the fudge Christmas trees in a single layer, then transfer them to a freezer-safe container for up to 3 months to prevent freezer burn.
  • Reheating: When you’re ready to enjoy them, simply let the frozen fudge thaw in the fridge overnight or at room temperature for a couple of hours before indulging in their minty sweetness.

Make Ahead Options

These delightful Fudge Christmas Trees are perfect for busy home cooks looking to save time during the holiday rush! You can prepare the fudge base up to 24 hours in advance; just follow the melting and mixing steps, then allow the mixture to cool as instructed. Once cooled, cover the bowl tightly and refrigerate. When you’re ready to assemble, simply pipe the fudge into tree shapes and decorate with sprinkles right before serving. This method ensures your fudge remains just as delicious and visually appealing, making your holiday preparations stress-free and enjoyable. Plus, they add a festive touch to any holiday gathering with minimal effort!

Fudge Christmas Trees Recipe FAQs

What kind of green candy melts should I use?
Absolutely! Green candy melts are essential for the vibrant color and structure of your fudge Christmas trees. If you can’t find them, feel free to substitute with any other colored melting chocolate. Just keep in mind that the color might change, but the deliciousness will remain!

How should I store the fudge Christmas trees?
You can definitely store your fudge Christmas trees in an airtight container at room temperature for up to 2 weeks. If you’d like to enjoy them a bit longer, consider refrigerating them for up to 3 weeks. Just remember to let them sit at room temperature for a few minutes before serving to enjoy that perfect soft texture.

Can I freeze fudge Christmas trees?
Yes, indeed! To freeze your fudge Christmas trees, first place them in a single layer on a baking sheet. Once they are frozen solid, transfer them to a freezer-safe container or zip-top bag, ensuring they are well-wrapped to prevent freezer burn. They can be stored in the freezer for up to 3 months. When you’re ready to enjoy, allow them to thaw in the fridge overnight or at room temperature for a couple of hours. Yum!

What to do if my fudge mixture is too thick?
Don’t worry, this can happen! If your fudge mixture becomes too thick to pipe, simply return it to a warm spot in your kitchen and stir it gently to soften. By giving it a little warmth, it should become workable again, allowing you to create those delightful tree shapes without a fuss!

Are there any dietary considerations for these fudge Christmas trees?
Very! If you’re looking for a non-alcoholic version, simply replace the Creme de Menthe liquor with the syrup. Additionally, those with allergies to dairy should note that the recipe uses sweetened condensed milk, which is necessary for achieving the fudge’s creamy texture. You can explore dairy alternatives, but the fudge’s consistency may be affected.

Can I use different decorations on my fudge Christmas trees?
Of course! The more the merrier when it comes to decorations! If you can’t find gold star sprinkles, other fun sprinkles or even crushed candy canes can provide a delightful touch. Customize your fudge trees to align with your festive spirit and creative flair!

Fudge Christmas Trees

Easy and Festive Fudge Christmas Trees for Sweet Celebrations

Delight in these 3-Ingredient Fudge Christmas Trees that combine minty freshness with festive flair for sweet celebrations.
Prep Time 10 minutes
Cook Time 1 minute
Cooling Time 30 minutes
Total Time 41 minutes
Servings: 12 trees
Course: Dessert
Cuisine: American
Calories: 150

Ingredients
  

Fudge Ingredients
  • 2 cups Green Candy Melts Essential for vibrant color and structure; swap with any colored melting chocolate if needed.
  • 1 can Sweetened Condensed Milk The creamy binder that creates the perfect fudge texture; do not substitute!
  • 1/2 cup Creme de Menthe Liquor/Syrup Delivers that delightful minty flavor; choose syrup for a non-alcoholic option.
Decoration Ingredients
  • 1/2 cup Rainbow Nonpareils Adds a festive sparkle; feel free to use other sprinkles for a personal touch.
  • 1/4 cup Gold Star Sprinkles Perfect for topping your trees, offering an enchanting holiday flair.

Equipment

  • Microwave-safe bowl
  • piping bag
  • star tip
  • Parchment paper

Method
 

Preparation Steps
  1. Begin by placing the Green Candy Melts in a microwave-safe bowl. Heat in the microwave on high for 1 minute, then stir. Continue heating in 15-second intervals, stirring after each, until the melts are fully melted and smooth.
  2. Once the candy melts are smooth, add the sweetened condensed milk and Creme de Menthe to the mixture. Stir vigorously until all the ingredients are completely combined and thick and creamy.
  3. Cover your bowl with a clean kitchen towel or plastic wrap and let the mixture cool at room temperature. Stir every 5 minutes until it reaches a thick, frosting-like consistency—about 20-30 minutes.
  4. Prepare a piping bag fitted with a star tip. Once the fudge has cooled to the right consistency, transfer the mixture to the piping bag. On a parchment-lined baking sheet, carefully pipe the fudge into tree shapes.
  5. Gently top each fudge tree with gold star sprinkles, then add rainbow nonpareils. Allow the trees to set at room temperature until firm before serving.

Nutrition

Serving: 1treeCalories: 150kcalCarbohydrates: 20gProtein: 1gFat: 7gSaturated Fat: 4gMonounsaturated Fat: 2gCholesterol: 5mgSodium: 80mgPotassium: 30mgSugar: 18gVitamin A: 200IUVitamin C: 1mgCalcium: 50mgIron: 0.5mg

Notes

Store fudge in an airtight container; lasts up to 2 weeks at room temperature, 3 weeks in the fridge, or freeze for up to 3 months.

Tried this recipe?

Let us know how it was!

Buddy the Elf Cookies: No-Bake Holiday Bliss for Everyone

As I stood in my kitchen, the festive spirit ignited by the scent of melting chocolate, I recalled the cherished moments spent watching “Elf” with family. That’s when I knew it was time to whip up a batch of Buddy the Elf Cookies! These no-bake Christmas cookies are not only a delightful treat that brings whimsical joy to the season, but their quick prep time makes them a lifesaver amidst the holiday chaos. Packed with crunchy chow mein noodles, mini marshmallows, and colorful M&Ms, they’ll captivate both the young and the young at heart. Perfect for cookie exchanges or a cozy night in, this easy dessert recipe transforms any gathering into a festive celebration. Want to add a little holiday magic to your next get-together? Let’s dive into these charming treats!

Why Are Buddy the Elf Cookies a Must-Try?

Whimsical, Festive Appeal: Inspired by the beloved holiday movie, these cookies bring joy to the table.
No-Bake Simplicity: Perfect for those busy holiday moments, just mix and scoop—no oven needed!
Unique Texture: The crunchy chow mein noodles paired with chewy marshmallows create a delightful bite.
Customizable Fun: Add your favorite toppings, like colored sprinkles or alternative cereals, for a personal touch.
Crowd-Pleasing Treat: They’re a guaranteed hit at cookie exchanges or festive gatherings, charming both kids and adults alike. Check out these delightful Chocolate Cranberry Cookies to complement your holiday spread!

Buddy the Elf Cookies Ingredients

• Get ready to create this festive treat!

For the Cookie Mixture

  • Chow Mein Noodles – Provides a unique crunchy texture; no suitable substitute is recommended, but other crispy cereals could be used.
  • White Chocolate – Acts as the binding agent, adding delicious sweetness; prefer white baking chocolate over chips to avoid seizing.
  • Mini Marshmallows – Adds delightful chewiness and sweetness; larger marshmallows can be chopped and used as a substitute.
  • Maple Syrup – Introduces extra sweetness and a hint of flavor; feel free to reduce the amount based on personal taste preferences.
  • Chocolate Syrup/Hot Fudge Sauce – Enhances flavor and visual appeal; choose store-bought or homemade options.
  • Milk Chocolate (Melted) – Provides a rich flavor; dark chocolate can be substituted for a deeper taste.
  • Mini Red and Green M&Ms – Brings color and sweetness; feel free to mix in any color or type of M&Ms you like.
  • Chocolate Pop Tart – Adds novelty and texture; can be omitted or swapped for chopped chocolate granola bars.

For the Toppings

  • Sprinkles – Customize with festive colors and add crunch; choose your favorite variety for an extra fun touch!
  • Additional Drizzle (Optional) – Consider using caramel or colored candy melts for a decorative finish; it enhances both flavor and presentation.

With these ingredients, you’ll create the irresistible Buddy the Elf Cookies that embody the spirit of the holiday season!

Step‑by‑Step Instructions for Buddy the Elf Cookies

Step 1: Prepare the Baking Sheet
Begin by lining a cookie sheet with parchment paper, which will prevent the Buddy the Elf Cookies from sticking. Set this aside, as it will be essential for the next steps. Make sure the surface is smooth, allowing for easy removal once the cookies set.

Step 2: Combine the Noodles
In a sizable mixing bowl, pour in the chow mein noodles and ensure they are evenly spread out. This unique ingredient will provide the delightful crunch that defines our Buddy the Elf Cookies. Gently cascade the noodles while you prepare the chocolate mixture to keep them nice and crisp.

Step 3: Melt the White Chocolate
Using a double boiler, melt the white chocolate over low heat, carefully stirring occasionally to avoid burning. Once the chocolate is silky and smooth, remove it from heat. This sweet base will bind all the ingredients and bring delightful flavor to your cookies.

Step 4: Mix in Marshmallows
Once the white chocolate is melted, mix in half of the mini marshmallows, stirring until they are fully coated. The heat will soften them just enough, creating a gooey texture that blends beautifully with the chocolate. You want a smooth, creamy mixture ready to pour over the chow mein noodles.

Step 5: Combine Chocolate and Noodles
Pour the melted chocolate and marshmallow mixture over the chow mein noodles. Use a spatula to gently fold the noodles in, ensuring they are evenly coated with the delightful chocolate mixture. Here, the sweet aroma will fill your kitchen as deliciousness takes shape.

Step 6: Form the Cookies
Once combined, drop spoonfuls of the mixture onto the prepared baking sheet. Shape the mixture into haystack cookie forms, allowing each mound to stand independently. Ensure there’s enough space between each cookie for them to set and not stick together.

Step 7: Melt the Milk Chocolate
Now, melt the milk chocolate in the microwave, heating it in 30-second increments and stirring until fully melted. This rich chocolate will add a delightful drizzle to your Buddy the Elf Cookies, enhancing their visual appeal and flavor profile.

Step 8: Drizzle Over Cookies
With the melted milk chocolate ready, drizzle it generously over each cookie. Then, follow up by adding maple syrup and chocolate syrup for extra sweetness. This step not only elevates the taste but makes your cookies festive and visually enticing.

Step 9: Add Final Touches
Sprinkle the remaining mini marshmallows, M&Ms, and Pop Tart pieces over the cookies while the chocolate is still warm. This colorful topping will add festive flair and texture, making each Buddy the Elf Cookie a delightful treat that embodies holiday cheer.

Step 10: Let Set and Serve
Allow the cookies to sit at room temperature until the chocolate firms up, typically around 30 minutes. Once set, they can be served immediately or stored in an airtight container. Get ready to share these whimsical Buddy the Elf Cookies with family and friends—joy awaits!

Buddy the Elf Cookies Variations & Substitutions

Feel free to get creative and make these Buddy the Elf Cookies your own with some fun twists!

  • Dairy-Free: Swap white chocolate for dairy-free chocolate or coconut oil-based chocolate to make these cookies suitable for a dairy-free diet. You won’t miss the creaminess!

  • Gluten-Free: Use gluten-free chow mein noodles or crispy rice cereal for a delightful twist that everyone can enjoy. Your guests may never know they’re gluten-free!

  • Mix Up the Candy: Experiment with different candies like holiday-themed sprinkles or even gummy bears instead of Mini M&Ms for a unique flavor profile. Each batch can be a new adventure!

  • Add Nuts: For an extra crunch, toss in some finely chopped nuts, like pecans or walnuts, to add richness and a lovely texture. Just be sure to check for allergies.

  • Chocolate Lovers: Drizzle on additional chocolate sauces, like caramel or dark chocolate, for an even richer treat. It’s a sweet surprise that elevates the festive flair!

  • Pop Tart Twist: Try using a different flavor of Pop Tart, like s’mores or strawberry, instead of chocolate for a fruity kick. It adds a new layer of fun!

  • Fruity Flavor Boost: Incorporate dried fruits, like cranberries or raisins, to introduce a chewy taste that balances the sweetness wonderfully. It’s a nod to holiday flavors!

For more easy magic in the kitchen, don’t forget to check out these delightful Honey Glazed Carrots or satisfy your sweet tooth with these tasty Chocolate Cranberry Cookies!

What to Serve with Buddy the Elf Cookies?

Celebrate the season with delightful pairings that enhance the spirit of these whimsical no-bake treats!

  • Hot Cocoa: Rich and creamy, a classic pairing that complements the sweetness of the cookies, making each bite feel like a warm hug.
  • Peppermint Bark: The cool minty flavor balances the sweetness, adding a festive flair and perfect crunch to your dessert table.
  • Mini Gingerbread Men: Their spiced flavors contrast beautifully, offering a traditional holiday taste that everyone loves.
  • Fruit Salad: A refreshing mix of seasonal fruits can brighten up the dessert table, balancing the sugar with vibrant colors and flavors.
  • Eggnog: Creamy and spiced, this delightful drink will make your festive gathering even cozier and brings visions of holiday cheer.
  • Holiday Punch: A fruity, bubbly punch adds festivity while being a fun, non-alcoholic option that everyone can enjoy.
  • Sugar Cookies: A classic favorite that echoes the cookie theme, perfect for a mix-and-match dessert spread at holiday parties.
  • Vanilla Ice Cream: Serve alongside the cookies for a delightful contrast, where the creaminess melts into the crunchy sweetness.
  • Chewy Caramel Brownies: Decadent and rich, they provide a different texture and flavor profile, making them a charming addition to your dessert lineup.

How to Store and Freeze Buddy the Elf Cookies

Room Temperature: Keep the cookies in an airtight container for up to one week to maintain their freshness and crunchy texture.

Fridge: For slightly longer storage, you can refrigerate them for up to two weeks. Make sure they are in a well-sealed container to avoid absorbing odors.

Freezer: Buddy the Elf Cookies freeze well! Store them in a freezer-safe container or bag for up to three months. Thaw at room temperature when you’re ready to enjoy.

Reheating: If you like them warm, gently microwave a cookie for 10-15 seconds to slightly soften the chocolate and enhance flavor without compromising texture.

Make Ahead Options

These Buddy the Elf Cookies are perfect for busy home cooks looking to save time during the holiday season! You can prepare the chocolate and chow mein mixture up to 24 hours in advance. Simply follow the recipe until the cookies are formed, then cover them with plastic wrap and refrigerate. To maintain their delightful texture, wait to add the toppings and drizzle until you’re ready to serve. When you’re set to impress, simply drizzle on the melted milk chocolate, and sprinkle the remaining marshmallows, M&Ms, and Pop Tart pieces just before enjoying. This way, you’ll have whimsical, no-bake cookies that are just as delicious with minimal last-minute effort!

Expert Tips for Buddy the Elf Cookies

  • Chocolate Choice: Use white baking chocolate instead of chips to prevent burning. Incorporate a bit of oil or shortening if the chocolate gets too thick during melting.

  • Marshmallow Magic: For a chewier texture, mix in larger chopped marshmallows along with mini ones. Avoid overmixing to keep the chewiness intact.

  • Setting Time: Allow the Buddy the Elf Cookies to cool completely at room temperature to ensure the chocolate firms up nicely. This prevents sticky fingers when serving!

  • Creative Variations: Don’t hesitate to substitute chow mein noodles with crispy rice cereal for a different texture or experiment with toppings like colored sprinkles or caramel drizzle for added fun.

  • Cookie Shape: Shape the cookies into varying sizes; larger ones can be great for sharing, while smaller bits make perfect festive snacks for gatherings.

Buddy the Elf Cookies Recipe FAQs

What type of chow mein noodles should I use?
Absolutely! For this recipe, I recommend using traditional chow mein noodles for their unique crunchy texture. While other crispy cereals can work as substitutes, they might alter the overall crunch that makes these Buddy the Elf Cookies so delightful. I often use brands without added seasoning to keep the sweetness in focus.

How should I store Buddy the Elf Cookies?
To keep them fresh, store your Buddy the Elf Cookies in an airtight container at room temperature for up to one week. If you can’t eat them all right away, you can refrigerate them for up to two weeks. Just ensure they’re well-sealed to keep out any unwanted odors!

Can I freeze Buddy the Elf Cookies?
Yes, indeed! You can freeze Buddy the Elf Cookies for up to three months. Place them in a single layer in a freezer-safe container or bag, separating layers with parchment paper to prevent sticking. When you’re ready to enjoy them, simply thaw them at room temperature, and they’ll be just as delightful!

What if my chocolate seizes while melting?
If your white chocolate seizes, don’t worry! Simply add a small amount of vegetable oil or shortening. Start by mixing in a teaspoon at a time until the chocolate regains a smooth consistency. Make sure to melt it over low heat and stir frequently to avoid burning or getting lumps.

Are Buddy the Elf Cookies safe for pets or those with common allergies?
While these cookies are fun for humans, it’s important to keep them away from pets, especially chocolate, which can be toxic to dogs. If you’re preparing these for a gathering, you might consider making a nut-free or gluten-free version using safe alternatives. Always check the chocolate and ingredients for allergies, especially with the M&Ms and other toppings.

What variations can I try with this recipe?
Very! You can easily customize Buddy the Elf Cookies. Swap out the chow mein noodles for crispy rice cereal if you prefer a lighter texture. Use colored candy melts or caramel sauce for a different flavor profile. If you’re feeling adventurous, mix in chopped nuts or dried fruits for an extra crunch and a holiday flair!

Buddy the Elf Cookies

Buddy the Elf Cookies: No-Bake Holiday Bliss for Everyone

Buddy the Elf Cookies are whimsical no-bake treats packed with chocolate, marshmallows, and M&Ms, perfect for holiday celebrations.
Prep Time 15 minutes
Setting Time 30 minutes
Total Time 45 minutes
Servings: 24 cookies
Course: Dessert
Cuisine: American
Calories: 150

Ingredients
  

For the Cookie Mixture
  • 3 cups chow mein noodles Provides a unique crunchy texture; no suitable substitute is recommended.
  • 12 oz white chocolate Acts as the binding agent; prefer white baking chocolate over chips to avoid seizing.
  • 2 cups mini marshmallows Adds delightful chewiness and sweetness.
  • 1/2 cup maple syrup Introduces extra sweetness.
  • 1/4 cup chocolate syrup Enhances flavor and visual appeal.
  • 1 cup milk chocolate Melted, provides a rich flavor.
  • 1 cup mini M&Ms Brings color and sweetness.
  • 1 piece chocolate Pop Tart Adds novelty and texture; can be omitted.
For the Toppings
  • 1/2 cup sprinkles Customize with festive colors.
  • additional drizzle (optional) Consider using caramel or colored candy melts.

Equipment

  • Mixing Bowl
  • Spatula
  • cookie sheet
  • Parchment paper
  • Double boiler
  • Microwave

Method
 

Step-by-Step Instructions
  1. Prepare the baking sheet by lining it with parchment paper.
  2. In a mixing bowl, pour in the chow mein noodles and ensure they are evenly spread out.
  3. Melt the white chocolate over low heat using a double boiler.
  4. Mix in half of the mini marshmallows once the white chocolate is melted.
  5. Pour the melted chocolate and marshmallow mixture over the chow mein noodles and fold gently.
  6. Drop spoonfuls of the mixture onto the prepared baking sheet, shaping into haystack forms.
  7. Melt the milk chocolate in the microwave, stirring until fully melted.
  8. Drizzle the melted milk chocolate over each cookie, followed by maple syrup and chocolate syrup.
  9. Add remaining mini marshmallows, M&Ms, and Pop Tart pieces over the cookies while the chocolate is still warm.
  10. Allow the cookies to sit at room temperature until the chocolate firms up.

Nutrition

Serving: 1cookieCalories: 150kcalCarbohydrates: 20gProtein: 1gFat: 7gSaturated Fat: 4gMonounsaturated Fat: 2gCholesterol: 5mgSodium: 50mgPotassium: 30mgSugar: 12gCalcium: 2mgIron: 1mg

Notes

Use white baking chocolate instead of chips to prevent burning. For chewiness, mix in larger chopped marshmallows.

Tried this recipe?

Let us know how it was!

Hearty Olive Garden Zuppa Toscana Soup Copycat You’ll Love

The first spoonful of this Olive Garden Zuppa Toscana Soup Copycat is like a cozy embrace on a chilly day. With tender russet potatoes swimming in a creamy broth, flavorful Italian sausage, and vibrant kale, this soup quickly became a go-to comfort food in my kitchen. It’s not just easy to prepare—you can customize it to your tastes, from adding crispy bacon bits for extra indulgence to swapping in ground turkey for a lighter twist. This recipe encapsulates all the heartiness and warmth of the original dish, but with a personal touch that makes it even more special. So, whether you’re huddling under a blanket or hosting a dinner party, this creamy soup is sure to satisfy your cravings. Ready to dive into this delightful bowl of goodness?

Why Is This Soup So Irresistible?

Comforting Flavors: The marriage of Italian sausage, creamy broth, and tender potatoes delivers a flavor-packed experience.

Customizable Delight: You can easily tailor this recipe to your preferences—add crispy bacon for extra richness or substitute cauliflower for a lower-carb option!

Quick to Prepare: In just a few simple steps, you’ll have a hearty meal ready, making it perfect for busy weeknights or impromptu gatherings.

Crowd-Pleasing Appeal: This soup’s inviting aroma and satisfying flavors will have everyone asking for seconds—just like the Chicken Mushroom Soup you love!

Versatile Serving: Pair this delicious creation with crusty bread for dipping, and you’ve got a meal that feels like a warm hug on a cold day.

Olive Garden Zuppa Toscana Soup Copycat Ingredients

Get ready to whip up this creamy comfort food favorite with these essential ingredients!

For the Soup Base

  • Mild Italian Sausage – Provides savory flavor and protein; you can also substitute with ground turkey along with Italian herbs.
  • Olive Oil – Used for sautéing the vegetables; other oils can work if needed.
  • Yellow Onion – Adds aromatic depth; shallots can be used if you prefer a milder taste.
  • Garlic – Infuses the soup with delicious, robust flavor; garlic powder is an easy alternative when you’re in a pinch.

For the Vegetables

  • Russet Potatoes – The heart of this soup; slice them into ¼ inch thick rounds for even cooking.
  • Kale – Packs in nutrition and texture; remember to massage it for better softness and flavor.

For the Broth

  • Low Sodium Chicken Broth – The savory base for your soup; feel free to swap for vegetable broth to cater to a vegetarian diet.
  • Kosher Salt and Pepper – Essential seasonings; adjust to your taste preference.

For the Creaminess

  • Heavy Cream – Adds that luxurious richness; dairy-free alternatives can be used for a lighter option.
  • Parmigiano Reggiano – For topping and amplifying the soup’s flavor; while optional, it’s highly recommended for that authentic touch.

Indulge in this Olive Garden Zuppa Toscana Soup Copycat and savor every spoonful!

Step‑by‑Step Instructions for Olive Garden Zuppa Toscana Soup Copycat

Step 1: Sauté Sausage
In a large pot over medium heat, add the mild Italian sausage, breaking it apart with a spatula. Cook for about 6-8 minutes until browned and cooked through. Once fully cooked, drain excess fat, and then set the sausage aside on a paper towel-lined plate to keep it crisp.

Step 2: Cook Aromatics
Lower the heat to medium and pour in a drizzle of olive oil. Add the chopped yellow onion and minced garlic, sautéing for about 3-4 minutes until the onion is translucent and fragrant. This aromatic base will enhance the flavors of your Olive Garden Zuppa Toscana soup copycat.

Step 3: Add Potatoes and Broth
Stir in the sliced russet potatoes along with the cooked sausage back into the pot. Pour in the low sodium chicken broth, and add the kale, kosher salt, and freshly ground pepper. Mix well and bring the soup to a low boil, allowing the flavors to meld and the potatoes to start cooking.

Step 4: Simmer
Once boiling, cover the pot with a lid and reduce the heat to a simmer for 6-8 minutes. Keep an eye on the potatoes; they should become fork-tender and soft but not mushy. This simmering will create a rich, heartfelt base for your creamy soup.

Step 5: Finish with Cream
After the potatoes are tender, turn off the heat and carefully stir in the heavy cream. This step will add that luscious, creamy texture that makes the Olive Garden Zuppa Toscana soup copycat so comforting. Be sure to taste and adjust seasoning with additional salt and pepper if needed.

Step 6: Serve
Ladle the soup into bowls, and generously top each serving with freshly grated Parmigiano Reggiano for an extra flavor boost. Serve immediately and enjoy this hearty Olive Garden Zuppa Toscana soup copycat alongside crusty bread for the perfect meal!

Expert Tips for Olive Garden Zuppa Toscana Soup Copycat

  • Kale Preparation: Always massage the kale before adding it to the soup. This enhances its texture and flavor, ensuring a pleasant bite in every spoonful.

  • Potato Consistency: Be cautious not to overboil the potatoes; check for fork-tenderness around the 6-minute mark to keep them firm yet soft.

  • Thickening the Soup: For a richer, thicker soup, consider mashing some of the potatoes back into the broth or using a potato ricer to create a creamier base.

  • Seasoning Adjustments: Tasting is crucial! Always adjust the kosher salt and pepper to your liking after adding the heavy cream for that perfect balance in flavor.

  • Bacon Addition: If you like extra richness, feel free to add crispy bacon bits to your Olive Garden Zuppa Toscana soup copycat for an indulgent twist.

Olive Garden Zuppa Toscana Soup Copycat Variations

Feel free to put your own spin on this comforting soup—there are so many fun ways to customize it!

  • Bacon Bonus: Add crispy bacon bits for a smoky, savory kick that elevates the soup’s richness.
    With each bite, you’ll experience that delicious crunch, adding texture to the creamy base.

  • Cauliflower Substitution: Swap out the russet potatoes for cauliflower to make a lower-carb option.
    This substitution still provides a hearty texture but brings a lighter touch to your meal.

  • Plant-Based Twist: Replace the Italian sausage with a plant-based alternative for a vegetarian or vegan-friendly version.
    Your taste buds will delight in the flavorful seasonings that give this soup its beloved taste.

  • Herb Infusion: Enhance the flavor by adding fresh herbs like thyme or rosemary during the simmering process.
    This addition will bring an aromatic freshness that beautifully balances the soup’s richness.

  • Spicy Kick: Introduce a pinch of red pepper flakes for a surprise heat that warms the soul.
    This small adjustment can transform your comforting bowl into a delightful spicy experience.

  • Lentil Power: Add cooked lentils for extra protein and texture, making this soup even more filling.
    The hearty lentils will complement the creamy broth wonderfully, providing a lovely bite.

  • Cream Alternatives: Use coconut milk or cashew cream in place of heavy cream for a dairy-free option.
    These alternatives will still give you a creamy consistency while catering to lactose-sensitive diners.

  • Vegetable Medley: Consider tossing in extra veggies like carrots or bell peppers for added color and nutrition.
    This vibrant mix can make your bowl of soup not only tastier but also visually appealing.

For an extra comforting experience, serve this delightful soup alongside some crusty bread or try pairing it with rich soups like Creamy Seafood Bisque or Old Fashioned Vegetable Beef Soup. Enjoy experimenting with these variations!

Storage Tips for Olive Garden Zuppa Toscana Soup Copycat

  • Fridge: Store the soup in airtight containers for up to 3 days. Make sure it’s cooled to room temperature before sealing to maintain freshness.

  • Freezer: Freezing is not recommended due to potential texture changes after thawing. The creamy consistency may separate and alter the soup’s quality.

  • Reheating: When ready to enjoy leftovers, reheat gently on the stove over low heat, stirring occasionally. If the consistency thickens, add a splash of additional broth or cream to return it to its delicious state.

  • Serving Fresh: For best flavor and texture, savor your Olive Garden Zuppa Toscana soup copycat fresh, making it an ideal dish for meal prep!

Make Ahead Options

These Olive Garden Zuppa Toscana Soup Copycat components are perfect for meal prep, saving you time on busy weeknights! You can sauté the sausage and cook the aromatics—onion and garlic—up to 24 hours in advance, allowing the flavors to meld beautifully. Store these in an airtight container in the fridge until you are ready to finish the soup. The sliced russet potatoes and kale can be prepped a few hours ahead; chop and refrigerate them to maintain freshness (note that the kale should be massaged before storing). When ready to serve, simply combine the prepared ingredients with chicken broth and finish with heavy cream, which still ensures delightful, restaurant-quality results with minimal effort!

What to Serve with Olive Garden Zuppa Toscana Soup Copycat

A warm, inviting bowl of this creamy soup is simply begging for the perfect companions to complete your cozy meal.

  • Crusty Bread: The ultimate dipping partner! A thick slice of sourdough or crusty baguette enhances the creamy texture of the soup, soaking up every luscious drop.

  • Garlic Knots: Soft, buttery knots with a garlicky aroma make for a delightful side dish, providing a fun and flavorful contrast to the soup.

  • Italian Salad: A refreshing mix of greens, olives, and cherry tomatoes, dressed in balsamic vinaigrette, adds brightness and balance, complementing the richness of the soup beautifully.

  • Parmesan Crisps: These crunchy delights provide a wonderful texture contrast while echoing the savory flavor of the cheese sprinkled atop the soup.

  • White Wine: A chilled glass of Pinot Grigio or Sauvignon Blanc adds a touch of elegance and zesty acidity that balances the heartiness of your Zuppa Toscana.

  • Fresh Fruit Platter: A mix of seasonal fruits like grapes, pears, or berries offers a sweet, refreshing palate cleanser amidst the savory warmth of the soup.

Olive Garden Zuppa Toscana Soup Copycat Recipe FAQs

What kind of kale should I use for this soup?
I recommend using fresh, curly kale for the best flavor and texture. Look for vibrant, deep green leaves without any dark spots or wilting. If you can only find flat-leaf kale, it will work too, but be sure to massage it thoroughly to soften the texture before adding it to the soup.

How should I store leftover Zuppa Toscana?
Store your Olive Garden Zuppa Toscana soup copycat in airtight containers in the refrigerator for up to 3 days. It’s best to let it cool to room temperature before sealing it to keep it fresh. When you’re ready to enjoy it again, simply reheat it gently on the stove over low heat, stirring frequently.

Can I freeze this soup for later?
Freezing is not recommended for this recipe as the cream can separate or become grainy upon thawing. Instead, focus on enjoying it fresh or refrigerating leftovers. If you do decide to freeze it, omit the cream beforehand and add it during reheating to maintain better texture.

What can I do if my soup is too thick?
If your soup turns out thicker than you’d like, don’t worry! Just add a bit of low-sodium chicken broth or water while gently reheating until you reach your desired consistency. Stir well to incorporate, and adjust the seasoning if needed.

Are there any dietary considerations I should be aware of?
Absolutely! This Olive Garden Zuppa Toscana soup copycat contains heavy cream and sausage, which may not suit those with dairy or meat allergies. For a dairy-free version, consider using almond or coconut milk instead of cream, and swap the sausage for a plant-based alternative. Always check ingredient labels for allergens and adjust according to dietary needs.

How ripe should my potatoes be for the best flavor?
When selecting russet potatoes, look for ones that are firm and free from blemishes, soft spots, or sprouts. Avoid any with excessive dark spots as they can affect the soup’s flavor and texture. Fresh potatoes will yield the best results, giving you that heartwarming taste in every bowl.

Olive Garden Zuppa Toscana Soup Copycat

Hearty Olive Garden Zuppa Toscana Soup Copycat You’ll Love

Enjoy this Olive Garden Zuppa Toscana Soup Copycat, a comforting blend of russet potatoes, Italian sausage, and kale in a creamy broth.
Prep Time 15 minutes
Cook Time 30 minutes
Total Time 45 minutes
Servings: 4 servings
Course: Dinner
Cuisine: Italian
Calories: 380

Ingredients
  

For the Soup Base
  • 1 lb Mild Italian Sausage or ground turkey
  • 2 tbsp Olive Oil for sautéing
  • 1 medium Yellow Onion chopped
  • 3 cloves Garlic minced
For the Vegetables
  • 3 medium Russet Potatoes sliced into ¼ inch rounds
  • 2 cups Kale massaged
For the Broth
  • 6 cups Low Sodium Chicken Broth or vegetable broth
  • 1 tbsp Kosher Salt to taste
  • 1 tsp Pepper freshly ground, to taste
For the Creaminess
  • 1 cup Heavy Cream can be replaced with dairy-free alternatives
  • ½ cup Parmigiano Reggiano for topping, optional

Equipment

  • large pot

Method
 

Cooking Instructions
  1. In a large pot over medium heat, add the mild Italian sausage, breaking it apart with a spatula. Cook for about 6-8 minutes until browned and cooked through.
  2. Lower the heat and pour in olive oil. Add the chopped onion and minced garlic, sauté for about 3-4 minutes until translucent and fragrant.
  3. Stir in the sliced potatoes and cooked sausage. Pour in the chicken broth, add kale, salt, and pepper. Mix well and bring to a low boil.
  4. Cover the pot and reduce heat to simmer for 6-8 minutes until potatoes are fork-tender.
  5. Turn off the heat and stir in the heavy cream. Adjust seasoning with salt and pepper if needed.
  6. Ladle soup into bowls, topping with freshly grated Parmigiano Reggiano. Serve with crusty bread.

Nutrition

Serving: 1bowlCalories: 380kcalCarbohydrates: 30gProtein: 15gFat: 25gSaturated Fat: 12gPolyunsaturated Fat: 2gMonounsaturated Fat: 8gCholesterol: 80mgSodium: 700mgPotassium: 800mgFiber: 4gSugar: 3gVitamin A: 1000IUVitamin C: 25mgCalcium: 200mgIron: 2mg

Notes

Massage the kale for better texture. Adjust salt and pepper after adding cream. Can add crispy bacon for extra richness.

Tried this recipe?

Let us know how it was!

Hearty Pumpkin Beef Bolognese for Cozy Weeknight Dinners

As I stirred the pot, the rich aroma of spices filled my kitchen, instantly transporting me to cozy fall evenings. Today, I’m thrilled to share my delightful Pumpkin Beef Bolognese, a comforting twist on the classic meat sauce that will leave you craving more. Not only is this hearty dish incredibly easy to whip up in just one pan, but it also packs a surprising punch of wholesome pumpkin flavor that melts perfectly into the sauce. Whether you’re looking to impress guests or simply tired of fast food, this recipe is here to rescue your weeknight meals with warmth and satisfaction. Ready to dive into this culinary adventure? Let’s cook!

Why is Pumpkin Beef Bolognese so special?

Comforting Fusion: This hearty dish blends classic Italian flavors with a seasonal twist, making it perfect for cozy dinners.
Surprisingly Simple: With just one pan and straightforward steps, this recipe simplifies your cooking while maximizing flavor.
Wholesome Ingredients: Rich in protein and fiber, it satisfies your hunger without resorting to fast food.
Perfectly Versatile: Feel free to mix up the meat or toss in extra veggies, making it adaptable to your taste or dietary needs. After you’ve perfected this recipe, you might also enjoy our Ground Beef Potato Taco Bowl for another comforting twist or the Pumpkin Cream Cold Brew Coffee for a delightful drink pairing!
Impressive and Flavorful: Serve to impress dinner guests or brighten up family meals with rich flavors that everyone will love.

Pumpkin Beef Bolognese Ingredients

For the Pasta
Pasta – Choose any type you love as the comforting base of your dish.

For the Sauce
Olive Oil – Adds rich flavor and helps sauté the vegetables perfectly.
Shallots – Offers a milder onion taste; onion can be a good substitute.
Garlic Cloves – Infuses the sauce with a warm, aromatic essence.
Celery Stalk – Delivers a nice crunch and subtle depth of flavor.
Diced Pumpkin – Provides a sweet, earthy taste; opt for hokkaido or red kuri squash for the best results.
Fennel Bulb – Introduces a unique brightness, elevating the flavor profile of your sauce.
Ground Beef – The hearty main protein; swap for ground pork or chicken if desired.
Dried Thyme, Sage, Marjoram, Smoked Paprika, Chili Flakes – For a delightful blend of aromatic and spicy notes; feel free to use Italian herbs for a simpler option.
Salt & Black Pepper – Essential for enhancing flavor; adjust to personal preference.
Beef Broth – Delivers moisture and deep flavor; chicken or vegetable broth works great too.
Bay Leaf – Enhances the simmering sauce with additional depth.
Purēed Tomatoes & Tomato Paste – Form the rich sauce base that ties all the flavors together.

For the Garnish
Fresh Thyme – Adds a pop of color and fresh flavor on top.
Chili Flakes – Sprinkle for an extra kick!
Whipped Ricotta (optional) – Mix ricotta with olive oil, parmesan, and seasoning for a creamy topping that elevates the dish.

This Pumpkin Beef Bolognese is a delightful take on comforting pasta dishes, blending together hearty ingredients that are sure to warm your soul. Enjoy whipping this up for your next cozy night in!

Step‑by‑Step Instructions for Pumpkin Beef Bolognese

Step 1: Sauté the Aromatics
Start by heating 2 tablespoons of olive oil in a large heavy-based saucepan or Dutch oven over medium-low heat. Once the oil is shimmering, add 1 chopped shallot, 2 minced garlic cloves, and 1 sliced celery stalk. Sauté these aromatics for about 5 minutes, stirring occasionally, until they soften and become fragrant, creating a flavorful base for your Pumpkin Beef Bolognese.

Step 2: Add the Pumpkin and Fennel
Next, incorporate 2 cups of diced pumpkin into the pan, stirring well to combine with the sautéed vegetables. Allow the pumpkin to cook for approximately 5 minutes, which will help it begin to soften. Then, add 1 chopped fennel bulb, continuing to cook for an additional 3 minutes. The mixture should smell sweet and earthy, becoming a vibrant medley of colors and flavors.

Step 3: Brown the Ground Beef
Increase the heat to high and introduce 1 pound of ground beef into the mixture. Use a wooden spoon to break it apart and stir it well, cooking for about 10 minutes until the meat is browned and no longer pink. The beef should develop a nice crust, melding perfectly with the pumpkin and veggie base, enriching the overall depth of the Pumpkin Beef Bolognese.

Step 4: Season and Add Broth
Once the beef is browned, add in 1 teaspoon of dried thyme, 1 teaspoon of sage, 1 teaspoon of marjoram, 1 teaspoon of smoked paprika, and a pinch of chili flakes. Season with salt and black pepper to taste. Pour in 1 cup of beef broth, and toss in 1 bay leaf. Stir everything together well, bringing the mixture to a simmer for about 10 minutes. This will help the flavors meld beautifully.

Step 5: Stir in the Tomato Base
After simmering, stir in 1 can (15 oz) of puréed tomatoes and 2 tablespoons of tomato paste. Ensure it’s all fully combined, then cover the saucepan and let it simmer for another 10 minutes on low heat. During this time, the pumpkin should become perfectly tender, creating a rich and luscious sauce for your Pumpkin Beef Bolognese.

Step 6: Cook the Pasta
While the sauce simmers, bring a pot of salted water to a boil. Cook your choice of pasta according to package instructions until al dente, usually about 8-10 minutes. Once cooked, drain the pasta, reserving a little bit of the pasta water, which can help achieve the desired consistency in the sauce if needed.

Step 7: Combine and Serve
Finally, combine the cooked pasta with the Pumpkin Beef Bolognese sauce in the saucepan. Toss everything together gently, allowing the pasta to soak up the flavorful sauce. If needed, add a splash of reserved pasta water to loosen the sauce. Serve hot, topped with a dollop of whipped ricotta and a sprinkle of fresh thyme and chili flakes for an extra burst of flavor.

How to Store and Freeze Pumpkin Beef Bolognese

Room Temperature: Do not leave Pumpkin Beef Bolognese out for more than 2 hours to prevent bacterial growth.

Fridge: Store in an airtight container for up to 3 days. Reheat gently on the stovetop for best results.

Freezer: Freeze portions in airtight containers for up to 3 months. Thaw in the fridge overnight before reheating.

Reheating: Reheat on low heat, adding a splash of broth or water if necessary to restore creaminess in the sauce.

Pumpkin Beef Bolognese Variations & Substitutions

Feel free to make this dish your own by trying out these fun and tasty variations!

  • Ground Beef Alternative: Swap ground beef for ground pork or turkey for a lighter twist that still packs a punch.

  • Pumpkin Purée: Use pumpkin purée instead of diced pumpkin for an ultra-smooth and creamy sauce that oozes comfort.

  • Red Wine Boost: Pour in a splash of red wine with the broth to add depth and richness to your sauce. It’s a simple way to elevate the flavors!

  • Extra Veggies: Mix in chopped carrots or spinach for a nutritious boost, adding vibrant colors and textures to your meal.

  • Broth Variations: Use chicken or vegetable broth in place of beef broth for a different flavor profile while keeping it deliciously hearty.

  • Herb Mix: Experiment with fresh herbs like basil or parsley instead of dried herbs to brighten your sauce with fresh, aromatic notes.

  • Spice Measurements: If you love heat, add more chili flakes or a dash of hot sauce for an extra kick that will light up your taste buds!

  • Creamy Finish: For an even more luxurious touch, stir in a splash of heavy cream or coconut milk after simmering for a beautiful creaminess.

By customizing the Pumpkin Beef Bolognese, you can also explore recipes like our Sweet Potato Beef Skillet for more comfort food ideas, or the Chili Beef Flavor Explosion for a zesty change. Enjoy cooking!

Expert Tips for Pumpkin Beef Bolognese

  • Choose the Right Pumpkin: Opt for hokkaido or red kuri squash for the best flavor and texture in your Pumpkin Beef Bolognese.

  • Mind the Heat: Use medium-low heat for sautéing aromatics to prevent browning too quickly, ensuring a deeper flavor.

  • Brown the Beef Evenly: Stir constantly when adding the ground beef to achieve a lovely golden crust and avoid steaming instead of browning.

  • Adjusting Consistency: If your sauce is too thick, mix in a bit of reserved pasta water to achieve the perfect coating consistency.

  • Season Gradually: Taste and adjust seasoning after adding the broth and tomato base; this ensures your Pumpkin Beef Bolognese is perfectly seasoned.

  • Let It Rest: Allowing the sauce to sit for a few minutes off heat before combining with pasta will enhance the flavors even more!

What to Serve with Pumpkin Beef Bolognese

Looking for the perfect accompaniments to elevate your cozy meal? Let’s enhance your dining experience!

  • Garlic Bread: The buttery crunch of garlic bread makes a perfect vehicle for the rich sauce, creating a delightful textural contrast.
  • Crisp Green Salad: A refreshing salad adds a bright note, balancing the hearty bolognese with crisp greens and tangy dressing. Pair it with sliced cucumbers and cherry tomatoes for an extra punch.
  • Roasted Seasonal Vegetables: The sweetness of roasted carrots, brussels sprouts, or squash complements the pumpkin’s flavor, adding depth and health to your table.
  • Savory Cheese Platter: Create a cheese board with aged parmesan and creamy burrata; their richness enhances the overall meal and encourages leisurely conversation.
  • Red Wine: A glass of Cabernet Sauvignon or Chianti mingles beautifully with the bolognese flavors, providing a warm, deep complement to every bite.
  • Whipped Ricotta Flatbread: Soft, freshly baked flatbreads topped with whipped ricotta and a drizzle of honey make for an indulgent yet light pairing that contrasts beautifully with the bolognese.
  • Chocolate Tiramisu: End your meal on a sweet note with a slice of creamy tiramisu, bringing an elegant finish to this hearty dish.

Make Ahead Options

These Pumpkin Beef Bolognese are perfect for meal prep enthusiasts! You can chop the veggies, including the shallots, celery, and pumpkin, up to 24 hours in advance and store them in the refrigerator to save time during busy weeknights. Additionally, you can brown the ground beef and combine it with the sautéed vegetables, then refrigerate the mixture for up to 3 days before finishing the recipe. When you’re ready to serve, simply reheat the mixture in a saucepan, add in the broth, tomatoes, and seasonings, and let it simmer until heated through. This way, you’ll enjoy a comforting, home-cooked meal just as delicious as if you made it fresh!

Pumpkin Beef Bolognese Recipe FAQs

How do I choose the right pumpkin for this recipe?
Absolutely! For the best flavor and texture in your Pumpkin Beef Bolognese, I recommend using hokkaido or red kuri squash. These varieties are not only sweet and earthy, but they also hold up well during cooking, ensuring they meld beautifully into the sauce. When selecting a pumpkin, look for one that feels firm and heavy for its size, with vibrant color and no dark spots.

How should I store leftover Pumpkin Beef Bolognese?
For sure! You can store your Pumpkin Beef Bolognese in an airtight container in the fridge for up to 3 days. Make sure to let it cool before sealing it up to prevent condensation. When you’re ready to enjoy it again, simply reheat gently on the stovetop, stirring occasionally to maintain its delightful creaminess.

Can I freeze Pumpkin Beef Bolognese? If so, how?
Yes, you can! To freeze your Pumpkin Beef Bolognese, divide it into portion-sized servings and store them in airtight containers or freezer bags. Be sure to label them with the date! It will keep well for up to 3 months. When you want to enjoy it again, thaw it overnight in the fridge, and then reheat it on low heat, adding a splash of broth or water if needed to restore the sauce’s creamy texture.

What if my sauce is too thick?
No worries! If you find your Pumpkin Beef Bolognese sauce is thicker than you’d like, you can easily adjust it. After combining the pasta with the sauce, add a splash of reserved pasta water little by little until you reach your desired consistency. The starchy water will help create a silky and smooth sauce that perfectly coats the pasta.

Are there any dietary considerations for this recipe?
Very much so! If you’re cooking for those with dietary restrictions, you can easily adapt this recipe. For a lighter option, swap the ground beef with ground turkey or chicken. Alternatively, for those following a vegetarian or vegan diet, you could replace the meat with lentils or mushrooms for a protein-rich option. Just be sure to use vegetable broth in place of beef broth to keep it plant-based.

Pumpkin Beef Bolognese

Hearty Pumpkin Beef Bolognese for Cozy Weeknight Dinners

A comforting twist on classic meat sauce featuring pumpkin flavor, perfect for cozy weeknight dinners.
Prep Time 10 minutes
Cook Time 40 minutes
Total Time 50 minutes
Servings: 4 servings
Course: Beef
Cuisine: Italian
Calories: 520

Ingredients
  

For the Pasta
  • 8 oz Pasta Choose any type you love
For the Sauce
  • 2 tbsp Olive Oil Adds rich flavor
  • 1 medium Shallot Chopped
  • 2 cloves Garlic Minced
  • 1 stalk Celery Sliced
  • 2 cups Diced Pumpkin Opt for hokkaido or red kuri squash
  • 1 bulb Fennel Chopped
  • 1 lb Ground Beef Main protein; swap for ground pork or chicken if desired
  • 1 tsp Dried Thyme
  • 1 tsp Sage
  • 1 tsp Marjoram
  • 1 tsp Smoked Paprika
  • 1 pinch Chili Flakes
  • 1 tsp Salt Adjust to taste
  • 1 tsp Black Pepper Adjust to taste
  • 1 cup Beef Broth Can substitute with chicken or vegetable broth
  • 1 leaf Bay Leaf
  • 1 15 oz can Purēed Tomatoes Base of the sauce
  • 2 tbsp Tomato Paste Enhances sauce richness
For the Garnish
  • 1 tbsp Fresh Thyme For garnish
  • 1 tsp Chili Flakes For garnish
  • 1 Whipped Ricotta Optional topping

Equipment

  • large heavy-based saucepan
  • Dutch oven
  • pot for boiling pasta

Method
 

Step‑by‑Step Instructions
  1. Start by heating 2 tablespoons of olive oil in a large heavy-based saucepan over medium-low heat. Add 1 chopped shallot, 2 minced garlic cloves, and 1 sliced celery stalk. Sauté for about 5 minutes.
  2. Incorporate 2 cups of diced pumpkin, stirring well. Cook for approximately 5 minutes, then add 1 chopped fennel bulb and cook for an additional 3 minutes.
  3. Increase the heat to high and introduce 1 pound of ground beef. Cook for about 10 minutes until browned.
  4. Add 1 teaspoon of dried thyme, 1 teaspoon of sage, 1 teaspoon of marjoram, 1 teaspoon of smoked paprika, a pinch of chili flakes, salt, and black pepper to taste. Pour in 1 cup of beef broth and toss in 1 bay leaf.
  5. Stir everything together and bring to a simmer for about 10 minutes.
  6. Stir in 1 can of puréed tomatoes and 2 tablespoons of tomato paste. Cover and let it simmer for another 10 minutes.
  7. While the sauce simmers, cook your choice of pasta according to package instructions.
  8. Combine the cooked pasta with the Pumpkin Beef Bolognese sauce, tossing gently. Serve with a dollop of whipped ricotta and a sprinkle of fresh thyme and chili flakes.

Nutrition

Serving: 1servingCalories: 520kcalCarbohydrates: 45gProtein: 30gFat: 20gSaturated Fat: 7gPolyunsaturated Fat: 1gMonounsaturated Fat: 10gCholesterol: 70mgSodium: 800mgPotassium: 800mgFiber: 6gSugar: 5gVitamin A: 5000IUVitamin C: 15mgCalcium: 50mgIron: 3mg

Notes

Allow sauce to rest before combining with pasta for enhanced flavor. Adjust seasonings and sauce consistency as needed.

Tried this recipe?

Let us know how it was!

Creamy Indian Butter Chickpeas: Your New Favorite Comfort Meal

The enticing aroma of spices wafted through my kitchen as I prepared to make my own version of Indian Butter Chickpeas. It’s one of those delightful dishes that not only satisfy cravings for comfort food but also strikes the perfect balance between rich flavors and vegetarian goodness. This Easy Indian Butter Chickpeas recipe can be your go-to meal, ready in just 30 minutes and all in one pot! Imagine a creamy, velvety sauce enveloping tender chickpeas, making it a truly nourishing and fulfilling meal. Plus, it’s a welcome relief for anyone looking to swap fast food for something homemade and wholesome. Grab your ingredients, and let’s dive into this vibrant world of Indian flavors together—your taste buds will thank you!

Why are Indian Butter Chickpeas so special?

Creamy Comfort: This dish is a warm hug on a plate, featuring a rich, velvety sauce that makes it utterly satisfying. Quick & Easy: Ready in just 30 minutes, it’s perfect for weeknight dinners. Versatile: Serve it with fluffy basmati rice, crusty garlic naan, or even a refreshing cucumber raita for a complete meal. Nutritious Delight: Packed with protein from chickpeas and bursting with flavor from aromatic spices, it’s a healthy alternative to fast food. For more quick meal inspiration, check out our Garlic Butter Shrimp or indulge in the sweetness of Honey Butter Brioche.

Indian Butter Chickpeas Ingredients

For the Sauce
Butter – Adds richness and flavor. Substitution: Use vegan butter for a dairy-free option.
Red Onion – Offers sweetness and depth. No substitutions necessary, though yellow onion can be used.
Garlic (2 cloves) – Enhances flavor complexity. Use garlic powder if fresh is not available (1/2 tsp).
Fresh Ginger (1 tbsp) – Adds warmth and spice. Can substitute with ground ginger (1 tsp).
Tomato Paste (1 tsp) – Provides richness and base flavor. No direct substitution; could omit for a lighter flavor.
Turmeric Powder (1 tsp) – Adds color and earthiness. No substitutions needed.
Ground Cumin (1 tsp) – Offers a warm, earthy tone. Could swap with ground coriander for a different flavor base.
Ground Coriander (0.5 tsp) – Complements the cumin with a citrusy note. Omit if unavailable; can increase cumin slightly.
Chili Powder (0.5 tsp) or Red Chili – Adds mild heat. Can adjust quantity to control spice level.
Garam Masala (2 tsp) – Brings a complex aromatic profile. Essential for authentic flavor; no substitutes.
Salt (0.5 tsp) – Enhances overall flavor. Use to taste based on dietary needs.
Crushed Tomatoes (400g) – Forms the sauce base with acidity and sweetness. No substitutes, but fresh or sundried tomatoes blended can work.
Heavy Cream (125ml) or Coconut Milk – Adds creaminess and balances spices. Substitute with coconut milk for a dairy-free option.

For Garnishing
Lemon Juice (¼ – ½) – Brightens flavors and adds acidity. Adjust to taste; lime can be used as a substitute.
Cilantro (chopped) – For garnish, adds freshness. Can substitute with parsley if cilantro is not preferred.

These Indian Butter Chickpeas ingredients combine to create a delightful dish that’s not only flavorful but also easy to whip up in your own kitchen!

Step‑by‑Step Instructions for Indian Butter Chickpeas

Step 1: Sauté the Onion
Begin by melting 2 tablespoons of butter in a large skillet over medium heat. Once the butter is bubbly, add one diced red onion and sauté for 5-6 minutes until it turns soft and translucent, stirring occasionally. This fragrant base will set the tone for your Indian Butter Chickpeas, enhancing their richness.

Step 2: Add Garlic and Ginger
Next, incorporate 2 minced garlic cloves and 1 tablespoon of grated fresh ginger into the skillet. Cook for an additional minute, stirring constantly until the mixture becomes aromatic and the garlic is lightly golden. This step infuses the dish with delightful flavors essential to the Indian Butter Chickpeas.

Step 3: Toast the Spices
Stir in 1 teaspoon each of tomato paste, turmeric powder, ground cumin, ground coriander, and chili powder, along with 2 teaspoons of garam masala and 0.5 teaspoons of salt. Allow the spices to cook for 1-2 minutes, stirring continuously; you’ll notice the spices’ vibrant colors and aroma enhance the cooking pan, deepening the flavor profile of your dish.

Step 4: Add Crushed Tomatoes
Now, pour in a 400g can of crushed tomatoes, stirring to combine everything evenly. If you prefer a smoother sauce for your Indian Butter Chickpeas, you can use an immersion blender to purée the mixture to your desired consistency. Let it simmer gently for about 2-3 minutes, allowing the flavors to meld beautifully.

Step 5: Incorporate the Chickpeas
Add a 540g can of drained and rinsed chickpeas to the sauce, stirring well. Bring the mixture to a gentle simmer and let it cook for 10 minutes, allowing the chickpeas to absorb the flavors and the sauce to thicken slightly. You’ll see the sauce coat the chickpeas, creating a luscious consistency that’s signature to this dish.

Step 6: Stir in Cream or Coconut Milk
Reduce the heat to low, then stir in 125ml of heavy cream or coconut milk, along with the juice of half a lemon. Gently warm through for about 2-3 minutes, ensuring everything is heated without boiling. This step creates the creamy texture that makes Indian Butter Chickpeas so comforting and delicious.

Step 7: Garnish and Serve
Finally, serve the Indian Butter Chickpeas hot, garnished with freshly chopped cilantro. Pair with fluffy basmati rice, garlic naan, or a refreshing cucumber raita for a complete meal. The vibrant colors and aromatic spices will invite everyone to enjoy this delightful and hearty dish!

How to Store and Freeze Indian Butter Chickpeas

Fridge: Store leftovers in an airtight container for up to 4 days to maintain freshness and flavor.

Freezer: Freeze in a sealed container or freezer bag for up to 3 months. Thaw overnight in the fridge before reheating.

Reheating: Gently reheat on the stovetop over low heat, adding a splash of water or extra cream to loosen the sauce if needed. Enjoy your Indian Butter Chickpeas warm!

Room Temperature: For safety, avoid leaving out at room temperature for more than 2 hours, especially if it’s warm outside.

Expert Tips for Indian Butter Chickpeas

  • Creaminess Achieved: Use full-fat coconut milk for a vegan alternative that maintains the dish’s creamy texture without compromising on taste.
  • Avoid Overcooking: Stir continuously while toasting spices to prevent burning, which can make your Indian Butter Chickpeas bitter.
  • Blend for Smoothness: For a restaurant-quality finish, blend the sauce until velvety before adding the chickpeas. This enhances the overall experience.
  • Custom Spice Levels: Adjust chili powder based on your spice tolerance; starting with less and adding more allows you to customize this dish perfectly.
  • Fresh Herb Boost: Always finish with fresh cilantro; it brightens flavors and enhances the presentation of your Indian Butter Chickpeas.

Indian Butter Chickpeas Variations & Substitutions

Feel free to explore these variations and substitutions to make this dish uniquely yours, as you savor the delightful flavors of Indian cuisine!

  • Spinach Addition: Boost nutrition by adding fresh spinach or kale during the last few minutes of cooking for vibrant color and extra vitamins.
  • Lentil Option: Swap out chickpeas for cooked lentils for a different texture while keeping it legume-packed and satisfying.
  • Potato Enhancement: Toss in boiled or diced potatoes to make the dish heartier and provide an exciting texture contrast alongside the creamy sauce.
  • Herb Swap: Experiment with fresh herbs like mint or parsley instead of cilantro to give a refreshing twist to your Indian Butter Chickpeas.
  • Coconut & Lime: Use coconut cream and a splash of lime juice for a tropical flair, bringing a delightful brightness to the dish.
  • Spice Swap: Try adding curry leaves or fenugreek for a deeper, aromatic flavor—the perfect way to further enhance your sauce.
  • Heat Adjustment: To control the spice level, increase or decrease the amount of chili powder or add a pinch of cayenne pepper for an extra kick!
  • Nutty Delight: Stir in some cashew or almond butter for added creaminess and a subtle nutty flavor that elevates your vegetarian dish.

Once you try these variations, you might find your new favorite way to enjoy this fantastic dish! For a delightful pairing, serve with some Buttermilk Pancakes Discover to balance the warmth.

What to Serve with Indian Butter Chickpeas

Elevate your Indian Butter Chickpeas meal with these delightful sides that balance flavors and textures beautifully.

  • Fluffy Basmati Rice: The light and aromatic rice absorbs the creamy sauce, creating a satisfying bite with every forkful.

  • Garlic Naan: This warm, pillowy bread is perfect for scooping up the rich chickpeas, adding a comforting layer of flavor to your meal.

  • Cucumber Raita: The cool, refreshing yogurt dip complements the spices in the chickpeas, taming any heat while adding a creamy texture.

  • Roasted Vegetables: A medley of seasonal veggies adds a lovely char that contrasts with the creamy sauce, enhancing your meal’s overall nutrition.

  • Lentil Salad: A protein-packed lentil salad brings a nutty flavor and additional texture, making for a wholesome and filling dinner.

  • Mango Chutney: The sweet and tangy chutney cuts through the richness of the chickpeas, offering a burst of flavor that keeps every bite exciting.

  • Masala Chai: This spiced tea is a delightful drink option that warms you up and complements the dish’s flavors beautifully.

  • Mango Lassi: A sweet, creamy yogurt-based drink, it pairs wonderfully with the spices in the chickpeas while adding a refreshing touch to your meal.

  • Coconut Pudding: For dessert, a light coconut pudding rounds off the meal perfectly, echoing the dish’s creamy elements while providing a sweet finish.

Make Ahead Options

These Indian Butter Chickpeas are ideal for meal prep, allowing you to enjoy a comforting dish any busy night! You can sauté the onions, garlic, and ginger, and prepare the spice mixture up to 24 hours in advance; just refrigerate it in an airtight container. Additionally, you can cook the entire sauce with chickpeas and let it cool, storing it for up to 3 days in the fridge. To maintain the creamy texture, stir in the cream or coconut milk just before serving. When you’re ready to enjoy your meal, simply reheat the sauce gently on the stove and serve it garnished with fresh cilantro for a delightful dish that saves you time without sacrificing flavor.

Indian Butter Chickpeas Recipe FAQs

How do I choose the best chickpeas for this recipe?
Absolutely! For the best flavor and texture, opt for canned chickpeas that are firm and not mushy. If using dried chickpeas, make sure they are soaked overnight and cooked until tender for about 1 to 1.5 hours. Avoid those with dark spots, as they can indicate spoilage.

What is the best way to store leftovers of Indian Butter Chickpeas?
For maximum freshness, store your Indian Butter Chickpeas in an airtight container in the fridge for up to 4 days. Be sure to let the dish cool down to room temperature before sealing it to avoid condensation that can make the sauce watery.

Can I freeze Indian Butter Chickpeas?
Yes! Indian Butter Chickpeas freeze beautifully. Pour your cooled dish into a sealed container or a freezer bag, and they’ll stay fresh for up to 3 months. When you’re ready to enjoy them again, simply thaw overnight in the fridge and reheat on the stovetop over low heat until warm.

What can I do if my sauce is too thick or too thin?
Very! If your sauce is too thick, add a bit of water or more cream until you reach your desired consistency while simmering. If it’s too thin, simmer it uncovered for a few more minutes to reduce and thicken the sauce. Stir occasionally to prevent sticking.

How do I adjust this recipe for food allergies or dietary restrictions?
I often make substitutions to cater to dietary needs! For a gluten-free option, ensure your spices are labeled gluten-free. If you’re dairy-free or vegan, use coconut milk instead of heavy cream, and vegan butter for added richness. Always double-check ingredient labels for allergens before cooking.

Can my pets eat Indian Butter Chickpeas?
While chickpeas are generally safe for dogs in moderation, be cautious with spices, onions, and garlic, as they can be harmful to pets. If sharing with furry friends, prepare a plain version without these ingredients to keep them safe.

Indian Butter Chickpeas

Creamy Indian Butter Chickpeas: Your New Favorite Comfort Meal

This delightful Indian Butter Chickpeas recipe combines rich flavors, comfort, and vegetarian goodness, perfect for a satisfying meal.
Prep Time 10 minutes
Cook Time 20 minutes
Total Time 30 minutes
Servings: 4 servings
Course: Dinner
Cuisine: Indian
Calories: 300

Ingredients
  

For the Sauce
  • 2 tablespoons Butter Substitution: Use vegan butter for a dairy-free option.
  • 1 medium Red Onion Optional: Yellow onion can be used.
  • 2 cloves Garlic Use garlic powder if fresh is not available (1/2 tsp).
  • 1 tablespoon Fresh Ginger Can substitute with ground ginger (1 tsp).
  • 1 teaspoon Tomato Paste Could omit for a lighter flavor.
  • 1 teaspoon Turmeric Powder No substitutions needed.
  • 1 teaspoon Ground Cumin Could swap with ground coriander for a different flavor base.
  • 0.5 teaspoon Ground Coriander Omit if unavailable; can increase cumin slightly.
  • 0.5 teaspoon Chili Powder Can adjust quantity to control spice level.
  • 2 teaspoons Garam Masala Essential for authentic flavor; no substitutes.
  • 0.5 teaspoon Salt Use to taste based on dietary needs.
  • 400 grams Crushed Tomatoes No substitutes, but fresh or sundried tomatoes blended can work.
  • 125 ml Heavy Cream Substitute with coconut milk for a dairy-free option.
For Garnishing
  • 0.25 to 0.5 Lemon Juice Adjust to taste; lime can be used as a substitute.
  • 1 bunch Cilantro Can substitute with parsley if cilantro is not preferred.

Equipment

  • large skillet
  • immersion blender

Method
 

Step-by-Step Instructions for Indian Butter Chickpeas
  1. Melt 2 tablespoons of butter in a large skillet over medium heat. Add one diced red onion and sauté until soft and translucent.
  2. Incorporate 2 minced garlic cloves and 1 tablespoon of grated fresh ginger. Cook for an additional minute until aromatic.
  3. Stir in 1 teaspoon each of tomato paste, turmeric powder, ground cumin, ground coriander, and chili powder, along with 2 teaspoons of garam masala and 0.5 teaspoons of salt. Cook for 1-2 minutes.
  4. Pour in a 400g can of crushed tomatoes, stirring to combine. Let it simmer gently for about 2-3 minutes.
  5. Add a 540g can of drained and rinsed chickpeas to the sauce. Simmer gently for 10 minutes.
  6. Reduce heat to low, then stir in 125ml of heavy cream or coconut milk with the juice of half a lemon. Warm through for 2-3 minutes.
  7. Serve hot, garnished with freshly chopped cilantro.

Nutrition

Serving: 1servingCalories: 300kcalCarbohydrates: 38gProtein: 10gFat: 12gSaturated Fat: 7gPolyunsaturated Fat: 1gMonounsaturated Fat: 4gCholesterol: 30mgSodium: 500mgPotassium: 600mgFiber: 8gSugar: 5gVitamin A: 1000IUVitamin C: 10mgCalcium: 50mgIron: 3mg

Notes

Store leftovers in an airtight container for up to 4 days. Freeze for up to 3 months. Reheat gently on the stovetop.

Tried this recipe?

Let us know how it was!

Crispy Thai Shrimp in a Blanket: A Must-Try Appetizer

As I dipped my fingers into a plate of crispy Thai Shrimp in a Blanket, I couldn’t help but marvel at the delightful crunch that met my ears—a symphony of textures that instantly transports me to the vibrant streets of Thailand. This beloved appetizer, known for its perfect blend of marinated shrimp wrapped in golden spring roll wrappers, is a crowd-pleaser that’s not only easy to prepare but also offers gluten-free options for diverse dietary needs. Whether you’re hosting a gathering or craving something special just for yourself, this recipe beautifully accommodates your culinary desires. And the fun twist? You can enjoy it fresh from the fryer or even make-ahead and store it for those spontaneous snack attacks. Are you ready to elevate your appetizer game? Let’s roll!

Why is this Thai Shrimp so special?

Crispy Texture: The combination of golden spring roll wrappers gives each bite a satisfying crunch, perfectly contrasting the juicy shrimp inside.

Crowd-Pleasing Delight: Whether at a party or a weekday dinner, these bites are sure to impress your guests.

Versatile Ingredients: Customize your shrimp infusion with fresh herbs or a spicy twist, fitting various dietary preferences easily!

Quick Preparation: Whip up a plate in no time; you’ll spend less time cooking and more time enjoying.

Make-Ahead Convenience: Assemble ahead and freeze for a delicious snack that’s ready to fry whenever cravings strike.

Cultural Charm: Bring the taste of Thailand home with a dish that celebrates hospitality and colorful cuisine! Pair this with a refreshing salad or soup like Som Tum for a complete experience.

Thai Shrimp in a Blanket Ingredients

For the Shrimp
Shrimp – Fresh, large shrimp provide a succulent filling; opt for tail-on for easier handling.
Minced Garlic – Adds aromatic flavor to the shrimp; fresh is preferred for maximum potency.
Oyster Sauce – Adds umami richness to the marinade; substitute with soy sauce for vegetarian options.
Soy Sauce – Contributes saltiness; use low-sodium if preferred.
Sugar – Balances flavors; can be reduced for less sweetness.
Ground White Pepper – Offers a peppery bite; substitute with black pepper if necessary.
Sesame Oil – Enhances nuttiness and depth; use toasted sesame oil for stronger flavor.

For the Wrappers
Spring Roll Wrappers – Create a crispy outer layer; cut wrappers into thirds for easy wrapping.
Egg (beaten) – Acts as a sealant for the wrappers; can omit for a vegan version.

For Frying
Oil for frying – Use a high smoke point oil (e.g., vegetable or canola); adjust frying temperature for optimal crispiness.

For Dipping
Sweet Chili Sauce – Traditional dipping sauce that complements the dish; alternatives include garlic-soy vinaigrette or lime-fish sauce.

With these ingredients, preparing the delicious Thai Shrimp in a Blanket will be a breeze! Whether you are gearing up for a special gathering or a simple family dinner, this recipe is bound to impress.

Step‑by‑Step Instructions for Thai Shrimp in a Blanket

Step 1: Marinate the Shrimp
In a mixing bowl, combine oyster sauce, soy sauce, sugar, ground white pepper, sesame oil, and minced garlic. Add the fresh large shrimp to the marinade and mix well until each piece is coated. Let the shrimp marinate for 20 minutes at room temperature, allowing the flavors to infuse and enhance the shrimp’s natural sweetness.

Step 2: Prepare the Wrappers
While the shrimp is marinating, take your spring roll wrappers and cut each one into thirds. This will create strips that are easier to work with when wrapping the marinated shrimp. Keep the wrappers covered with a damp cloth to prevent them from drying out as you work through the recipe for the Thai Shrimp in a Blanket.

Step 3: Wrap the Shrimp
Take a strip of the prepared spring roll wrapper and place a marinated shrimp at one end. Roll it tightly, making sure to enclose the shrimp completely, and seal the edge with a dab of the beaten egg. Repeat this process until all the shrimp are wrapped, ensuring they are snug for a delightful crisp when fried.

Step 4: Heat the Oil
In a deep frying pan, pour enough oil to submerge the wrapped shrimp about halfway and heat it over medium-high heat. The ideal frying temperature is around 350°F (175°C). To check the temperature, drop a small piece of wrapper into the oil; if it sizzles, the oil is ready for frying your delicious Thai Shrimp in a Blanket.

Step 5: Fry the Wrapped Shrimp
Carefully place a few wrapped shrimp into the hot oil without crowding the pan. Fry them for about 2-3 minutes on each side or until they turn golden brown and crispy. Use a slotted spoon to turn them for even cooking, ensuring a beautifully crunchy exterior and succulent shrimp interior.

Step 6: Drain and Serve
Once they’re perfectly golden and crispy, remove the wrapped shrimp from the oil using the slotted spoon and place them on a plate lined with paper towels to drain excess oil. Serve the Thai Shrimp in a Blanket hot with a side of sweet chili sauce for dipping, enhancing that delightful flavor with each delicious bite.

Thai Shrimp in a Blanket Variations

Feel free to get creative with your Thai Shrimp in a Blanket—there are so many delightful ways to customize this dish!

  • Herb-Infused: Add fresh Thai basil or cilantro for a vibrant twist; the aromatic herbs elevate each bite beautifully.
  • Creamy Fusion: Blend cream cheese or jalapeños into the shrimp filling for a creamy, spicy kick; it’s a surprising and delicious twist!
  • Baked Option: Consider baking or air-frying the rolls for a healthier alternative that still delivers a satisfying crunch when you bite in.
  • Coconut Surprise: Add shredded coconut inside the wrappers for a sweet, tropical note that complements the shrimp perfectly.
  • Citrusy Zest: Incorporate lemongrass into the marinade for an aromatic citrus flair that brightens the overall flavor profile.
  • Spicy Kick: For those who love heat, mix chili flakes into the filling; it will add that extra zing that spice lovers crave!
  • Vegetarian Delight: Replace shrimp with a crunchy mix of vegetables like zucchini, carrots, and mushrooms for a vibrant vegetarian version.
  • Sweet & Tangy Dipping: Try serving with a homemade garlic-soy vinaigrette or a lime-fish sauce instead of sweet chili for a tangy dip!

The possibilities are endless with this versatile recipe! If you’re looking for other shrimp inspirations, consider making Garlic Butter Shrimp or enjoying a comforting bowl of Tom Yum Goong. Experiment and find your perfect combination!

What to Serve with Crispy Thai Shrimp in a Blanket

Elevate your dining experience with delightful pairings that complement the crispy, flavor-packed bite of this classic appetizer.

  • Fresh Thai Salad: A vibrant mix of tangy lime, crunchy vegetables, and herbs like cilantro sum up the essence of Thai cuisine, enhancing the meal’s freshness.
  • Tom Yum Soup: This fragrant soup filled with bold flavors of lemongrass, lime, and spiced shrimp introduces warmth and zest, serving as a perfect contrast to the crispy rolls.
  • Jasmine Rice: Light and subtly fragrant, jasmine rice offers a soothing base for soaking up the sweet chili sauce, balancing flavors beautifully.
  • Dipping Sauces: Try a selection of sauces such as peanut sauce and sweet chili for variety; they elevate the experience with creamy richness and spice.
  • Coconut Rice: Rich coconut flavor and a touch of sweetness create wonderful harmony with the savory shrimp, adding a tropical touch to your meal.
  • Spicy Green Papaya Salad: The crunch and spice from this classic dish amplify the shrimp’s flavors while offering a refreshing palate cleanser with each bite.
  • Thai Iced Tea: A beautifully creamy and sweet beverage, it cools the palate amidst the spice, making it an essential companion for a true Thai feast.
  • Lime Sorbet: A refreshing and light dessert, lime sorbet cleanses the palate after the bold flavors of the shrimp and pairs wonderfully with the zesty theme.

Expert Tips for Thai Shrimp in a Blanket

Oil Temperature: Maintain the oil around 350°F (175°C) for frying; too hot will burn wrappers, while too cool can make them greasy.

Wrapper Care: Keep spring roll wrappers covered with a damp cloth while assembling to prevent them from drying out and becoming brittle.

Shrimp Quality: Choose fresh, large shrimp for the best results. Frozen shrimp can work, but fresh provides superior flavor and texture.

Pre-Assembly: Make shrimp rolls ahead of time and refrigerate for several hours or freeze for up to a month before frying; thaw slightly to reduce splatter.

Serving Suggestion: Pair with a light Thai salad or a dipping sauce like sweet chili for a complete culinary experience that will delight everyone!

How to Store and Freeze Thai Shrimp in a Blanket

Fridge: Store leftover Thai Shrimp in a Blanket in an airtight container for up to 3 days. Reheat in the oven for crispiness, avoiding the microwave.

Freezer: You can freeze assembled rolls for up to a month. Thaw in the fridge before frying for best results, minimizing splatter during cooking.

Reheating: For optimal texture, reheat fried shrimp in a preheated oven at 350°F (175°C) for about 10 minutes to regain crispness.

Make-Ahead: Consider preparing the shrimp rolls in advance; they can be refrigerated for a few hours before frying, making it a convenient option for entertaining.

Make Ahead Options

These Crispy Thai Shrimp in a Blanket are perfect for meal prep enthusiasts! You can easily prepare the filling and wrap the shrimp up to 24 hours in advance. Simply marinate the shrimp and assemble the rolls, then refrigerate them tightly wrapped in plastic wrap to keep them moist and fresh. For even longer storage, you can freeze the assembled rolls for up to a month—just remember to slightly thaw them in the fridge before frying to minimize splatter. When you’re ready to serve, heat the oil and fry them straight from the fridge or after thawing; they will be just as delicious with that perfect crunch and juicy shrimp interior!

Thai Shrimp in a Blanket Recipe FAQs

What type of shrimp should I use for this recipe?
Absolutely! For the best flavor and texture, choose fresh, large shrimp. Look for shrimp that are firm to the touch and have a slightly sweet scent. If you opt for frozen shrimp, make sure to thaw them properly in the refrigerator and pat them dry before marinating.

How do I store leftover Thai Shrimp in a Blanket?
You can store leftover Thai Shrimp in a Blanket in an airtight container in the fridge for up to 3 days. To reheat them without losing their crispy texture, place them in a preheated oven at 350°F (175°C) for about 10 minutes. Avoid using the microwave, as it can make them soggy.

Can I freeze the wrapped shrimp before frying?
Very! Assemble the wrapped shrimp and place them in a single layer on a baking sheet, then freeze them until solid. Transfer the frozen rolls to a zip-top bag and store for up to a month. When you’re ready to fry them, thaw the rolls in the fridge for a few hours to minimize splatter.

Why are my shrimp rolls greasy after frying?
If your shrimp rolls turn out greasy, it may be due to the oil temperature being too low. Make sure your oil is heated to around 350°F (175°C) before adding the rolls; you can test it by dropping a small piece of wrapper into the oil. If it sizzles, you’re good to go!

Can I make this recipe gluten-free?
Absolutely! Simply substitute regular soy sauce with a gluten-free version, and ensure your spring roll wrappers are gluten-free as well. This way, you can enjoy these delicious Thai Shrimp in a Blanket without any dietary concerns.

What should I serve with Thai Shrimp in a Blanket?
Pair your shrimp rolls with a refreshing Thai salad, like Som Tum, for a balanced meal. You can also serve them alongside sweet chili sauce for dipping, which enhances the flavor perfectly. Enjoy creating a delightful feast that’s sure to impress!

Thai Shrimp in a Blanket

Crispy Thai Shrimp in a Blanket

Experience the delightful crunch of Crispy Thai Shrimp in a Blanket, a must-try appetizer that combines marinated shrimp and golden spring roll wrappers.
Prep Time 20 minutes
Cook Time 10 minutes
Total Time 30 minutes
Servings: 4 pieces
Course: Appetizer
Cuisine: Thai
Calories: 180

Ingredients
  

For the Shrimp
  • 1 pound Fresh large shrimp Tail-on preferred
  • 3 cloves Minced garlic Fresh is preferred
  • 2 tablespoons Oyster sauce Substitute with soy sauce for vegetarian
  • 2 tablespoons Soy sauce Low-sodium if preferred
  • 1 teaspoon Sugar Can reduce for less sweetness
  • 1 teaspoon Ground white pepper Substitute with black pepper if necessary
  • 1 tablespoon Sesame oil Use toasted sesame oil for stronger flavor
For the Wrappers
  • 10 sheets Spring roll wrappers Cut into thirds
  • 1 large Egg Beaten, can omit for vegan
For Frying
  • 2 cups Oil for frying High smoke point oil recommended
For Dipping
  • 1 cup Sweet chili sauce Traditional dipping sauce

Equipment

  • Mixing Bowl
  • Deep frying pan
  • slotted spoon

Method
 

Marination and Wrapping
  1. In a mixing bowl, combine oyster sauce, soy sauce, sugar, ground white pepper, sesame oil, and minced garlic. Add the fresh large shrimp and mix well. Let marinate for 20 minutes.
  2. While the shrimp is marinating, cut spring roll wrappers into thirds and keep covered with a damp cloth.
  3. Take a strip of wrapper, place a marinated shrimp at one end, roll tightly, and seal with beaten egg. Repeat until all shrimp are wrapped.
Frying
  1. Heat oil in a deep frying pan to around 350°F (175°C).
  2. Carefully add wrapped shrimp to hot oil without crowding. Fry for 2-3 minutes each side until golden brown.
  3. Remove fried shrimp with a slotted spoon and drain on paper towels. Serve hot with sweet chili sauce.

Nutrition

Serving: 1pieceCalories: 180kcalCarbohydrates: 10gProtein: 12gFat: 9gSaturated Fat: 1.5gPolyunsaturated Fat: 2gMonounsaturated Fat: 5gCholesterol: 70mgSodium: 400mgPotassium: 200mgFiber: 1gSugar: 1gVitamin A: 500IUVitamin C: 3mgCalcium: 20mgIron: 0.5mg

Notes

Best served fresh and hot; can be made ahead and frozen for up to a month.

Tried this recipe?

Let us know how it was!

Creamy Indian Butter Chickpeas for Quick Comfort Food

As I stirred the pot, the aroma of warm spices and rich tomatoes filled my kitchen, transporting me straight to a bustling Indian market. This Creamy Vegetarian Indian Butter Chickpeas recipe is my take on a beloved classic—completely plant-based yet irresistibly comforting. With just one pan and 30 minutes, I can whip up a hearty meal that pleases my family and friends, perfect for those weeknights when time is tight. The tender chickpeas, enveloped in a spiced, buttery sauce, not only satisfy cravings but also deliver a nutritious punch packed with protein and fiber. Isn’t it amazing how a quick dish can bring everyone together? Let’s dive into this vibrant recipe that’s bound to become a new favorite on your dinner table!

Why are Indian Butter Chickpeas a must-try?

Quick and Easy: This recipe comes together in just 30 minutes, making it perfect for busy weeknights.

One-Pan Wonder: No need for multiple pots and pans; everything cooks beautifully in a single skillet.

Hearty and Nutritious: Packed with protein and fiber from chickpeas, this dish offers a satisfying meal without sacrificing on nutrition.

Rich Flavor: The combination of spices creates a deep, comforting flavor that’s sure to impress family and friends.

Versatile Options: Feel free to customize by adding leafy greens or garnishing with fresh herbs, just like with my Honey Butter Brioche for a perfect side!

Make this delightful recipe a staple in your home, and enjoy the comforting, flavorful experience that is sure to satisfy everyone at the table.

Indian Butter Chickpeas Ingredients

For the Sauce

  • Butter – Adds richness and flavor; use vegan butter for a dairy-free option.
  • Red Onion – Provides sweetness and depth; yellow onion can be used as a substitute.
  • Garlic (2 cloves, minced) – Enhances aroma and taste; fresh garlic is preferred for stronger flavor.
  • Fresh Ginger (1 tbsp, grated) – Adds a spicy kick; ground ginger can substitute but will change the flavor.
  • Tomato Paste (1 tsp) – Thickens sauce and intensifies tomato flavor; can omit in a pinch.
  • Turmeric Powder (1 tsp) – Provides earthy flavor and a vibrant color.
  • Ground Cumin (1 tsp) – Offers a warm, nutty taste essential for authentic flavor.
  • Ground Coriander (0.5 tsp) – Adds a citrusy note that balances other spices.
  • Chili Powder (0.5 tsp or 1 diced red chili) – For desired heat; adjust according to spice preference.
  • Garam Masala (2 tsp) – A spice blend for the traditional Indian flavor.
  • Salt (0.5 tsp) – Enhances all flavors in the dish.
  • Crushed Tomatoes (1 x 400g tin) – Forms the base of the sauce for a robust flavor.

For Creaminess

  • Heavy Cream (125ml) or Coconut Milk – Provides creaminess; coconut milk for a dairy-free version.

For Balancing Flavors

  • Lemon Juice (¼ – ½) – Adds acidity for a well-rounded taste.
  • Chopped Cilantro – For garnish and fresh aroma to finish the dish.

This delightful recipe for Indian Butter Chickpeas is sure to brighten your dinner table with its vibrant and comforting flavors!

Step‑by‑Step Instructions for Indian Butter Chickpeas

Step 1: Sauté the Aromatics
In a large skillet, melt 2 tablespoons of butter over medium heat. Once melted, add 1 diced red onion and sauté for 5-6 minutes until it becomes soft and translucent. The aromas will begin to fill your kitchen, providing a fragrant base for your Indian Butter Chickpeas.

Step 2: Enhance the Flavor
Add 2 minced garlic cloves and 1 tablespoon of grated fresh ginger to the skillet. Stir and cook for an additional minute until fragrant; be careful not to burn the garlic. This step will infuse your dish with an irresistible aroma, setting the stage for the rich sauce to come.

Step 3: Toast the Spices
Stir in 1 teaspoon of tomato paste along with the spices: 1 teaspoon turmeric powder, 1 teaspoon ground cumin, 0.5 teaspoon ground coriander, and 0.5 teaspoon chili powder. Cook for 1-2 minutes, stirring constantly to toast the spices and deepen their flavors. The mixture should have a vibrant color, promising a delicious Indian Butter Chickpeas dish.

Step 4: Add the Tomatoes
Pour in 1 tin (400g) of crushed tomatoes, stirring well to combine everything into a cohesive sauce. For a smoother texture, consider blending the sauce with an immersion blender at this stage. Let the mixture simmer for 2-3 minutes, allowing the flavors to meld and the sauce to thicken slightly.

Step 5: Incorporate the Chickpeas
Add 540g of drained chickpeas to the skillet and stir to coat them in the sauce. Reduce the heat to low, cover the pan, and let it simmer for 10 minutes. This will allow the chickpeas to absorb the rich flavors of the spiced sauce, creating a heartwarming dish.

Step 6: Finish with Creaminess
Stir in 125ml of heavy cream or coconut milk, along with the juice of half a lemon for acidity. Warm through for an additional 2-3 minutes, stirring until everything is combined and creamy. The sauce should be rich and inviting, instantly elevating your Indian Butter Chickpeas to a comforting comfort food.

Step 7: Garnish and Serve
Once heated through, remove from heat and garnish with freshly chopped cilantro. This final touch adds a burst of color and fresh aroma. Serve your Indian Butter Chickpeas over basmati rice or with garlic naan, and watch your loved ones savor every bite!

Indian Butter Chickpeas Variations & Substitutions

Feel free to let your creativity shine by customizing this recipe to suit your taste and dietary needs!

  • Vegan Swap: Replace butter with vegan butter for a delicious dairy-free twist. Enjoy the same rich flavor without compromising your dietary choice.

  • Extra Greens: Add a handful of fresh spinach or kale in the last few minutes of cooking for a nutrient boost. These greens will wilt beautifully, enhancing the dish’s color and health benefits.

  • Coconut Cream: For an even creamier sauce, consider using full-fat coconut cream instead of heavy cream. This adds a luscious texture and an extra hint of tropical flavor.

  • Flavorful Additions: Toss in roasted bell peppers or zucchini for a pop of color and additional layers of flavor. These veggies can enhance the heartiness of your meal, making it even more satisfying.

  • Spicy Kick: Love heat? Throw in some diced jalapeños or a pinch more chili powder to elevate the spice level. Just be cautious and adjust until it hits your perfect sweet spot!

  • Protein Boost: Add a can of drained and rinsed black beans or lentils for an extra protein kick and hearty texture. This variation not only increases the nutritional value but also makes the dish even more filling.

  • Potato Delight: Incorporate boiled and cubed potatoes to add a delightful twist. The potatoes absorb the flavors of the sauce beautifully, creating a comforting experience reminiscent of home cooking.

  • Artisan Touch: Top your Indian Butter Chickpeas with a sprinkle of toasted nuts or seeds, such as cashews or sunflower seeds, right before serving. This adds a delightful crunch that complements the creamy sauce perfectly.

Whether you’re whipping it up for a cozy family dinner or impressing guests, these tweaks can help you create a signature dish that everyone will love. For more comforting recipes, check out my easy Garlic Butter Shrimp or indulge in the sweetness of freshly baked Honey Butter Brioche. Enjoy each delightful bite!

How to Store and Freeze Indian Butter Chickpeas

Fridge: Store in an airtight container for up to 4 days; this helps retain the rich flavors and creamy texture of the Indian Butter Chickpeas.

Freezer: For longer storage, freeze in portions for up to 3 months. Use freezer-safe containers or bags, and ensure they are well-sealed to prevent freezer burn.

Reheating: Thaw in the fridge overnight, then reheat on the stovetop over low heat, stirring occasionally, until warmed through. You may want to add a splash of water or coconut milk to maintain creaminess.

Airtight Storage: Ensure the container is airtight to help preserve the flavors and texture of this delightful curry.

Expert Tips for Indian Butter Chickpeas

  • Spice Adjustment: Feel free to control the heat by adjusting the chili powder. A little can go a long way; start with less if you’re unsure!

  • Blend for Smoothness: For a creamier texture, consider blending the sauce before adding the chickpeas. This elevates the richness of your Indian Butter Chickpeas.

  • Customize Ingredients: Want extra nutrients? Toss in some spinach or kale during the last few minutes of cooking to enhance both flavor and nutrition.

  • Leftover Storage: Store any leftovers in an airtight container for up to 4 days. Freeze portions for up to 3 months, thawing in the fridge overnight before reheating.

  • Garnish with Freshness: Always finish with freshly chopped cilantro for an aromatic garnish that brightens your dish and adds a burst of color!

What to Serve with Creamy Vegetarian Indian Butter Chickpeas

Indulging in the rich, spiced flavors of this plant-based delight opens up endless possibilities for complementary dishes that make for a complete meal.

  • Basmati Rice: Fluffy and aromatic, basmati rice absorbs the curry’s sauce beautifully, enhancing the overall dining experience. Its delicate texture perfectly balances the richness of the butter chickpeas.

  • Garlic Naan: Warm, soft naan is perfect for scooping up every last bit of sauce. The garlic adds an extra layer of flavor that pairs beautifully with the creamy curry.

  • Cucumber Raita: This cool yogurt sauce provides a refreshing counterpoint to the warmth of the spices. It balances flavors and adds a delightful crunch, making each bite feel special.

  • Spiced Roasted Vegetables: A medley of roasted seasonal veggies adds color and a slightly sweet, earthy element to the meal. Toss them in spices for a harmonious match with the chickpeas.

  • Mango Chutney: A spoonful of fruity mango chutney adds a sweet contrast that brightens every mouthful of buttery sauce, enhancing the dish’s overall taste experience.

  • Lemon Quinoa Salad: Light and zesty, a quinoa salad with lemon juice and fresh herbs brings in a fresh, citrusy flavor that invigorates the palate. It’s a refreshing side that beautifully complements your cozy chickpeas.

  • Chai Tea: Round out your meal with a warm cup of spiced chai tea. The warmth and fragrant spices echo the flavors in your butter chickpeas, creating an inviting end to your dinner experience.

  • Chocolate Samosas: For dessert, indulge in crispy chocolate samosas filled with sweet chocolate or fruits. These sweet bites add a fun and delightful twist to your meal.

Make Ahead Options

These Creamy Vegetarian Indian Butter Chickpeas are perfect for meal prep enthusiasts! You can prepare the sauce up to 24 hours in advance, simply making sure to refrigerate it in an airtight container to maintain its vibrant flavors. Chop the onions, garlic, and ginger and store them together, and you can also measure out the spices for quick assembly. When you’re ready to serve, just heat the sauce in a skillet, add the chickpeas, and simmer for about 10 minutes. Finally, stir in the cream or coconut milk and lemon juice, warming through for that fresh and creamy finish. This way, you’ll have a comforting meal on the table with minimal effort during busy weeknights!

Indian Butter Chickpeas Recipe FAQs

What kind of chickpeas should I use for this recipe?
Absolutely! You can use canned chickpeas (540g) for convenience, as they are already cooked and ready to use. If you prefer dried chickpeas, make sure to soak them overnight and cook them thoroughly beforehand, as they require a longer cooking time to soften.

How should I store leftovers of Indian Butter Chickpeas?
For optimal freshness, store your Indian Butter Chickpeas in an airtight container in the fridge for up to 4 days. Be sure to let the dish cool to room temperature before sealing. This will help retain its rich flavor and creamy texture.

Can I freeze Indian Butter Chickpeas?
Yes! You can freeze your Indian Butter Chickpeas for up to 3 months. To do so, portion them into freezer-safe containers or bags, ensuring they are well-sealed to prevent freezer burn. When ready to enjoy, simply thaw in the fridge overnight and reheat gently on the stovetop.

What if the sauce is too thick after storage?
If your sauce thickens after storing, no worries! Add a splash of water or coconut milk while reheating over low heat; this will restore the creamy consistency. Stir frequently until heated through, and enjoy it as wonderfully as the first time!

Are there any allergens I should consider?
While this recipe is primarily vegetarian, please note that some ingredients like heavy cream or coconut milk could trigger dairy allergies. If you have any dietary concerns, feel free to substitute with almond milk or another non-dairy alternative for your Indian Butter Chickpeas.

Can pets eat this dish?
It’s best not to share Indian Butter Chickpeas with pets, especially due to the spices and potential allergens like garlic. Always ensure to stick to pet-safe food options for your furry friends!

Indian Butter Chickpeas

Creamy Indian Butter Chickpeas for Quick Comfort Food

Enjoy this quick and easy Indian Butter Chickpeas recipe, a comforting and nutritious dish packed with protein and rich flavors.
Prep Time 10 minutes
Cook Time 30 minutes
Total Time 40 minutes
Servings: 4 servings
Course: Dinner
Cuisine: Indian
Calories: 320

Ingredients
  

For the Sauce
  • 2 tablespoons Butter Use vegan butter for a dairy-free option.
  • 1 medium Red Onion Yellow onion can be used as a substitute.
  • 2 cloves Garlic Minced; fresh garlic is preferred for stronger flavor.
  • 1 tablespoon Fresh Ginger Grated; ground ginger can substitute but will change the flavor.
  • 1 teaspoon Tomato Paste Can omit in a pinch.
  • 1 teaspoon Turmeric Powder Provides earthy flavor and a vibrant color.
  • 1 teaspoon Ground Cumin Essential for authentic flavor.
  • 0.5 teaspoon Ground Coriander Adds citrusy note that balances other spices.
  • 0.5 teaspoon Chili Powder Adjust according to spice preference.
  • 2 teaspoons Garam Masala A spice blend for traditional Indian flavor.
  • 0.5 teaspoon Salt Enhances all flavors in the dish.
  • 1 tin (400g) Crushed Tomatoes Forms the base of the sauce.
For Creaminess
  • 125 ml Heavy Cream Coconut milk can be used for a dairy-free version.
For Balancing Flavors
  • 0.5 medium Lemon Juice Adds acidity for a well-rounded taste.
  • Chopped Cilantro For garnish and fresh aroma.

Equipment

  • Skillet

Method
 

Step-by-Step Instructions
  1. In a large skillet, melt 2 tablespoons of butter over medium heat. Add 1 diced red onion and sauté for 5-6 minutes until soft.
  2. Add 2 minced garlic cloves and 1 tablespoon of grated fresh ginger to the skillet. Stir and cook for an additional minute until fragrant.
  3. Stir in 1 teaspoon of tomato paste along with the spices: 1 teaspoon turmeric powder, 1 teaspoon ground cumin, 0.5 teaspoon ground coriander, and 0.5 teaspoon chili powder. Cook for 1-2 minutes, stirring constantly.
  4. Pour in 1 tin of crushed tomatoes, stirring well to combine. Let the mixture simmer for 2-3 minutes.
  5. Add 540g of drained chickpeas to the skillet and stir to coat them in the sauce. Cover and let it simmer for 10 minutes.
  6. Stir in 125ml of heavy cream or coconut milk, along with the juice of half a lemon for acidity. Warm through for an additional 2-3 minutes.
  7. Garnish with freshly chopped cilantro and serve over basmati rice or with garlic naan.

Nutrition

Serving: 1servingCalories: 320kcalCarbohydrates: 42gProtein: 12gFat: 15gSaturated Fat: 8gPolyunsaturated Fat: 1gMonounsaturated Fat: 6gCholesterol: 30mgSodium: 500mgPotassium: 600mgFiber: 10gSugar: 4gVitamin A: 1000IUVitamin C: 10mgCalcium: 80mgIron: 3mg

Notes

Feel free to customize by adding leafy greens or garnishing with fresh herbs. Store leftovers for up to 4 days or freeze for up to 3 months.

Tried this recipe?

Let us know how it was!